
Now that we are on the verge of big time heating season I can reflect on the new hearth pad I made for the wood/coal stove in the basement of the barn. In the past, due mostly to the fact that the stove was installed in the dead of winter with near-zero temps, the pad for the stove was simply loose firebricks laid on top of the plywood sub-floor. It had remained that way for four years until I revisited the situation over the summer.

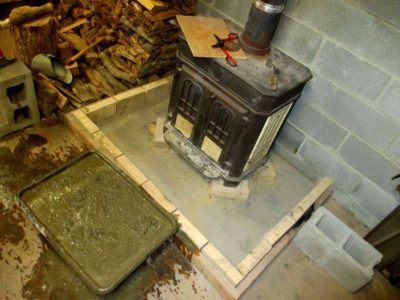
I removed all of the loose firebricks except for the four underneath the stove feet and a row around the perimeter and hand-poured a concrete pad (reinforced with hardware cloth) in its place. I don’d know if it will make any difference but it makes me happier to have it done.

It is pretty clear from the results that I am not a mason or concrete specialist. Regardless, it is ready to go and provides a permanent foundation for the 500-pound stove for as long as the barn is standing.
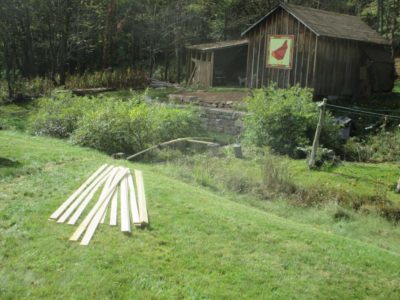
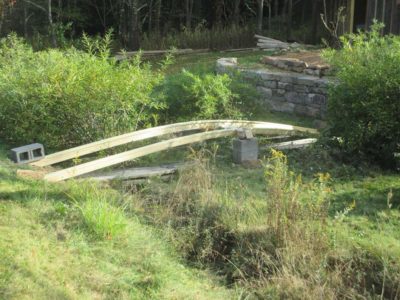
The root cellar on the homestead is just across the creek from the cabin, about 100-feet from the back door. Well, technically, it is across two creeks, one coming from a series of springs way up the hill and the other emanating from the spring that is about halfway between the root cellar and the cabin, and used to provide the drinking water for the cabin until the artesian spring was discovered 350 feet up the mountain in the 1980s. For the past dozen years or so the access to the root cellar was across two increasingly rickety plank bridges, and I had become increasingly concerned about the footing there as Mrs. Barn is usually the one retrieving vittles from the cellar.
The time had come for an updated structure to (re?)establish ease and safety for the trek. Since I’ve made a number of curved beam structures before, both bridges and arbors, this was the route I chose to take here. The total span of the space being covered was 25-feet, and one of the issues for the logistics was rendered irrelevant by the choice of an arched structure; the two end points were not level with each other.

With my long time pal Tom visiting for a few days, I decided that the time had come. I ordered some sweet 1x6x16′ pressure treated lumber, and it turned out to be nearly “Select” grade. We ripped each of the 1x6s in half, then used them to build the laminated arch in place.
With each end point determined by the site of the creek banks, I used concrete blocks in the center of the span to define the apex of the gentle curve and establish the form of the arch itself. Placing dead weights on each end of the laminae as we built them up, a near perfect arch was formed and replicated with each new layer. By off-setting the 1x3x16′ pieces when we glued and screwed them together, the arch was well accomplished.
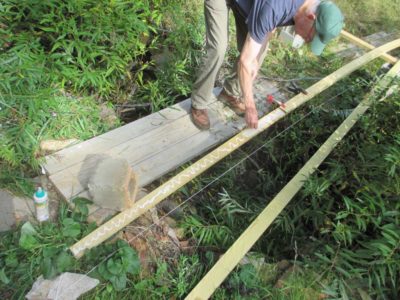
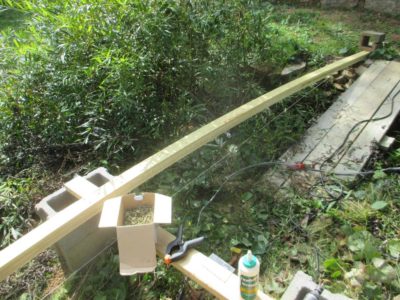

Each lamina was attached to the preceding one with decking screws @ 6-inch spacing, and excess Titebond III weatherproof glue.

The result was right on target.
The goal for the first day was to finish each beam to a bit more than half height, which we did.
After much consideration I decided to upgrade the heating in the barn studio. While my existing system of a premium wood/coal stove in the basement combined with a kerosene heater in the studio provided plenty of heat, two problems needed addressing.
For starters, the kerosene heater consumed about 1-1/4 gallons of kerosene for a full day’s heat, at a cost (last winter) of about $5/day. Not a killer, but not irrelevant.
Second, and more significant, was that I have never perfected the knack of keeping the wood/coal stove in the basement burning all night. Thus even though the shop space is super-insulated, every morning when I arrived in the shop, given the usual howling winds here its temperature would be close to the outside ambient temperature. This meant that a great many mornings the shop was in the single digits, and it took a very long time for the stove and heater to get the space and its mass of contents up to an acceptable temperature. My late afternoons were cozy and comfortable, toasty even, but the mornings were mighty brisk.
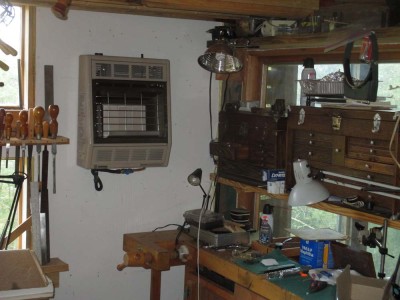
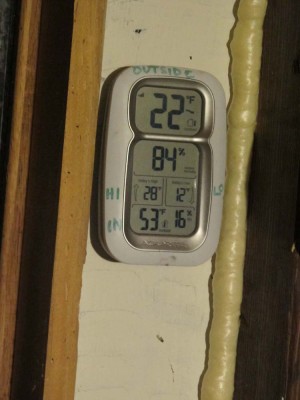
With that in mind I selected a heavy duty Empire three-panel radiant heater, fueled by propane. It was installed last week, and on its test run made the space uncomfortably hot in short order. The propane service fellow (actually a good friend of mine named Brad) thinks that given the volume of the space and the super insulated walls and ceiling, I should be able to make through the entire winter on a single 80-gallon fuel tank, or about $175 worth of fuel. This works out to about $1.25 a day. My strategy is to keep the propane heater set at about 40 degrees, just enough to keep the space warmer than freezing and much easier to heat up with the wood/coal stove in the morning.
I’ve also purchased a bunch of transparent shower liner curtains to close off one end of my shop, a space where I do not need immediate access most days. Reducing the volume of air being heated by 25% should have a beneficial impact on the micro climate.
Since the heating season in the mountains will begin in about a month, I should be able to report back on the efficacy of the new arrangement soon.
Stay tuned.
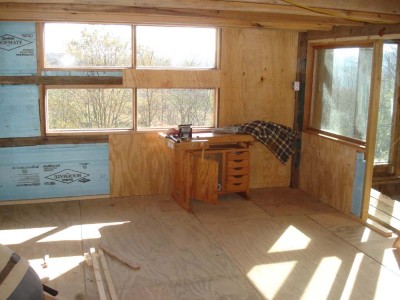
My studio space in the barn is a work in progress. It has been so since the first day I put a single, raggedy workbench in there several years ago even before all the walls were up, and the process will continue as long as I work there.
I find that the fluid nature of shop organization is one of the threads binding craftsmen together, and a source of celebration when we gather together. Fortunately for me, I do not have the urgent requirement for maximized cash flow velocity generation from my work space, since my primary source of income these days is in the crafting of words while sitting on my recliner.
And, since I have been limited in the scope of my activities recently I have been reflecting on, and to some degree changing, the spatial flow for the studio. One of the advantages of this long lead time of several years of working there is to evolve a better sense of what the space should be to best serve my needs. And now I am making those changes, albeit slowly as there is only so much you can do on one leg.
I’ve already written about the reconfiguration of one corner to more optimally serve as my bench for doing the “fussy” work I encounter frequently in the conservation and restoration of decorative artifacts, and increasingly the repair of vintage gun stocks.
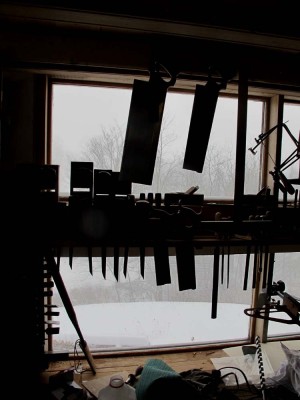
Other issues have nagged me, and are now in the process of being resolved. The first of these was my inadequate space in a single location for the residence of my hand planes. I liked the space I had chosen, directly over the planing beam, but I needed to consolidate all my inventory, which involved several steps.
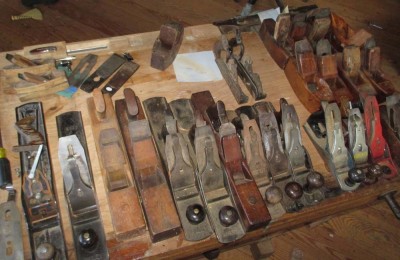
First, I started undertaking a serious evaluation of many of the planes marginal to my work, deciding what to keep and then tossing aside planes that took up space but were not part of my working regimen. Down they came and out they will go.
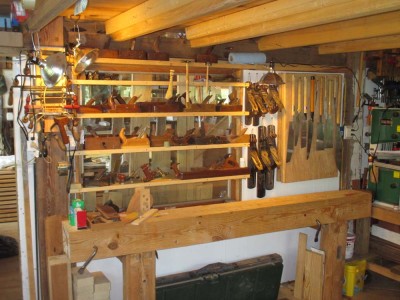
That cleared some space, but not enough. So, I added more shelving without adding more shelves. How? By simply doubling the depth of the shelves in situ. Why I did not do this from the git go remains a mystery. Then I removed the silly brackets holding my Stanley/Bailey planes and hung them on the wall.
Presto! The result is twice as many planes in the same visual space.
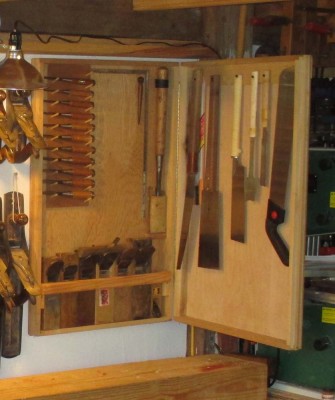
The next move was the consolidation and moving of my Japanese tools from a nearly inaccessible place on the east wall to a cabinet in the remaining niche over the planing beam. With saws on the outside and more saws, chisels, planes (and space for more on the inside) I am pleased with the result. (You needn’t scold me that I have the planes upside down in storage — I do not care)
Two final (?) issues to be resolved are the rat’s nest of a space halfway down the long north wall, which had become nothing more than a pile of stuff, some good, some less so, but all in the wrong place. This hodgepodge will be replaced in October when I build my Nicholson bench prototype for the rescheduled Refinisher’s Group bench-build (probably May 2016). This can serve as another work bench and my sharpening station.
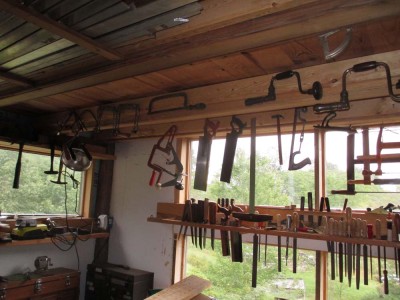
And I keep asking myself: with such a wealth of windows, why do I keep covering them up with stuff? Without a good answer other than, “Because you are an undisciplined slob,” I have begun to deliberately move many of the tools that were blocking the view to somewhere else, like alongside the overhead beams. That one will take a fair bit of trial and error to bring to fruition.
But I am determined to travel much less in the coming year or more, and pouring my time and creative energies into the barn and homestead. This will allow much in the way of improvements and I am anxious for them to unfold.
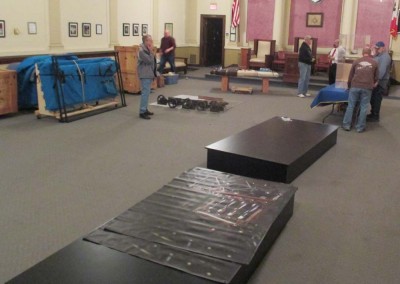
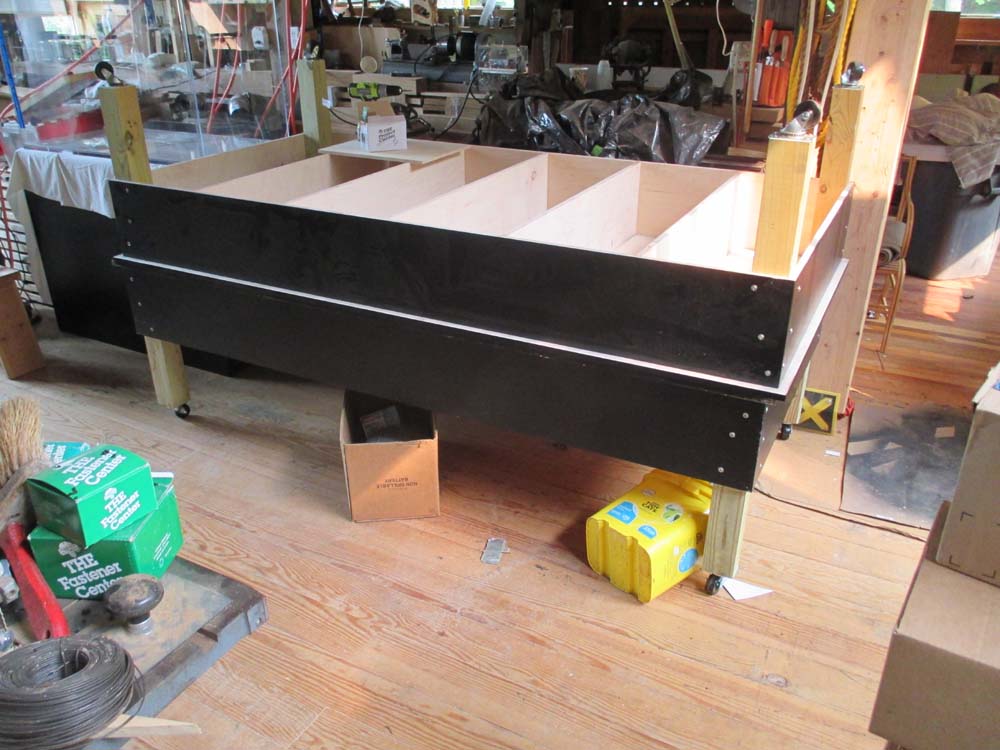
When closing down the HO Studley exhibit, one of the things I had to do was remove all of the exhibit paraphernalia from the exhibit hall, including the exhibit case for the tool cabinet, but also the platforms for the workbenches. This required me to rent a large cargo van to fit it all in for the drive back home.
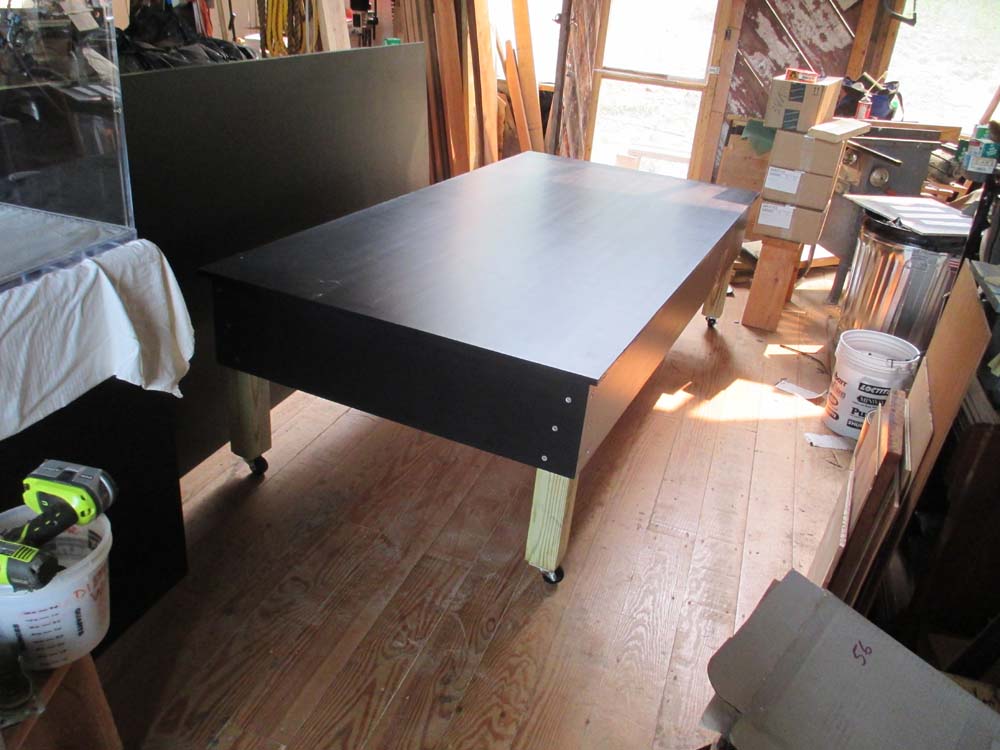
I haven’t figured out what to do with the exhibit case, but the platforms are already recycled into terrific assembly tables. Inasmuch as they were exceedingly stout well-buily 4×8′ platforms with 12″ skirts, all from cabinet-grade tulip poplar faced 3/4″ plywood, they were easily transformed into these new accouterments in the barn.

For each platform-now-table I took a single 8-foot 4×4 and cut in into four identical sections to serve as the legs. At each corner I screwed a leg into the two converging aprons, then affixed big casters to the bottom of each leg, flipped it over, and viola, a new and lovely work table!

I moved one into my main workshop to serve as a workstation for either conservation or assembly projects, and the other is currently against the wall in the classroom. But since they are both on wheels, it is 100% likely that they will simply be moved from place to place depending on the needs of the moment.
It sure made me glad I am no longer bound by the 220 s.f. footprint of my former shop in the basement of the Maryland house.
Yesterday was a gorgeous cool spring day, and I was comfortable enough with the progress in preparing for the Studley exhibit that I took 90 minutes to to make some repairs to the hydro power waterline and get it up and running after a fashion. We are not expecting any more hard freezes here, although there is the expectation for some snow flurries tonight and probably a couple more weeks of frost concerns for the garden, so the time was auspicious for the reactivation of the system that had been down since it froze solid in mid-November.
Once I get recovered from the exhibit I will tie it all back together (the top 300 feet of pipe is not yet attached and the intake now is simply laying in a trough at the bottom of the stream, with a head of about 100 feet) to maximize the power output, although I don’t really even need the power right now since I am not doing much in the way of electricity intensive work. But next month I will be building the prototypes for the workbench build in September, and that will require some wattage.
For now, I have the system running and the soft whine of the turbine is just barely audible above the vigorous flow of water running by.
Normally I can stand at my bench and gaze at the mountains, late afternoon especially as the barn falls into shadow and the mountain crest ablaze in sunlight. Not so today. I can barely make out the log barn only forty yards away.
We’ve got near white-out conditions, so my only practical means of transport is simple perambulation up to and back from the barn. Though the temp outside is brisk, it is cozy in the shop as the wood stove and kerosene heater combine to keep it nearly 60 degrees. I’ll glue up the last face board on the Studley benchtop in a bit, then work later today to compile my information on how much protection extortion I owe GovCo.
So far I’ve talked about two-and-a-half of the three legs of the stool I am sitting on in order to cope with a cold shop: 1) Isolation (reducing the drafts and minimizing the heated volume), 2) Insulation (via fixed thermal windows and a cocoon of R-43 XPS panels) and 3.1) Generation (of heat with a kerosene heater). Today I want to close out this blog arc with the 3.2) Generation of heat with a wood/coal stove section.

My cast iron heat stove is a Coalbrookdale Severn unit, a 500-pound British product that is no longer being manufactured. I mentioned this in an earlier blog about heating with coal. There is a lot of chat about this stove on-line, and there seems to be widely divergent opinions about it — its owners either love it or hate it, no one is ambivalent. My pal Tony scored this one for me during a renovation project he was doing, where the client wanted this stove removed and the preceding fireplace rehabilitated. Tony’s crew installed this in my barn basement last winter. I decided to put it there for several reasons.
First, I did not want to sacrifice floor space in my main shop to the wood stove, which if used perfectly safely and some amount of fuel storage would have consumed more than 10% of the available shop space. So, it was just a preferential space expression on my part. Second, having an open flame heat source in the middle of a woodworking shop was something my insurance company was hesitant about. On that point keeping it in the concrete block basement with a packed gravel floor made sense. Another reason is that the space in the basement is not to be an unused space, in fact it will be my machine shop. Nothing is colder than handling tons of freezing cold iron, so having the main heart source down there is a big plus. Finally, heating that space will keep the floor in my shop warmed, so I won’t be standing on a cold floor all the time.
Using the stove, especially for coal, is a bit tricky. The firebox is really small, so if I am burning wood I need to tromp down stairs every 90 minutes or so to put more wood in. I am still trying to get the hang of using coal. There must be a special technique for igniting anthracite, of which I have some inventory, but once it gets going it goes gangbusters.
Still, I was wrestling with the fact that the heat distribution from the stove was pretty much passive, and would take almost all day to get the studio warm enough. I didn’t want a complicated, dynamic distribution system that would need a lot of gadgeteering and monitoring/maintenance, but I definitely needed to find a better way to get the heat from the firebox into the studio a lot quicker.
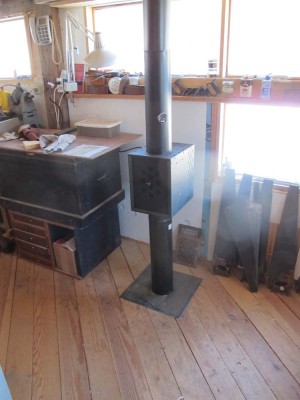
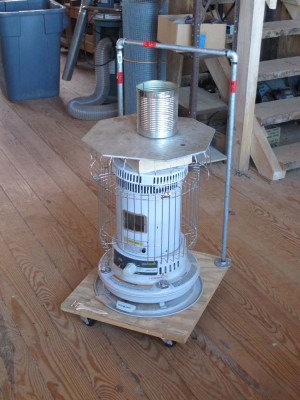
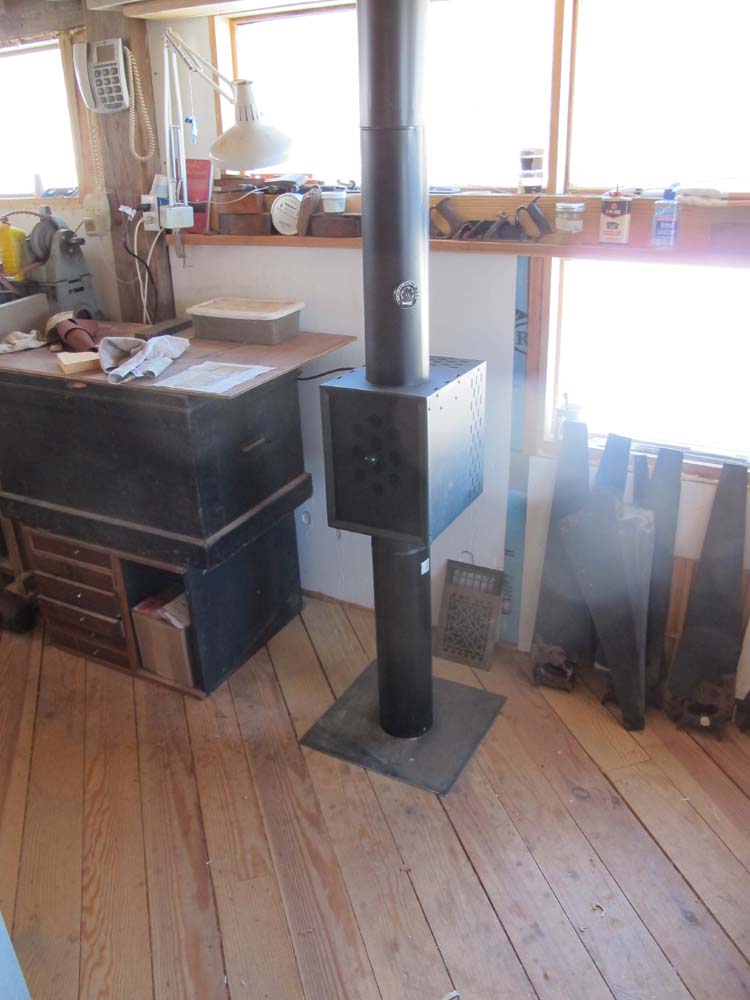
I recently acquired and installed an accessory to enhance the wood/coal stove dramatically, namely this heat recovery unit that fits in line with the stove pipe. It has been thus far a remarkable addition to the heating system for the shop. Once the stove gets heated up, the thermostatically controlled fan in the heat recovery unit kicks in and it starts gently blowing hot air into the shop space, and if I keep the fire in the stove going, it keeps the shop warm enough that I generally peel off my vest in short order.
So, my typical shop day heating cycle begins with me lighting the kerosene heater when I first get there, then trekking downstairs to start building up the heat in the cast iron stove, then back up to the studio to start working. Before I know it, the fan for the heat reclaimer comes on and I soon turn off the kerosene heater as the temperature climbs quickly to about 60 degrees, which suits me just fine. With a little fire maintenance throughout the day I am entirely comfortable working in the studio. Once I get the real hang of the coal fire, I can probably cut down on the fire maintenance to once in the morning and once at night.
Now that I’ve got the space envelope dealt with via isolation and insulation — i.e. keeping the outside out and the inside in, a concept I invented — let me turn to how I deal with the third point of the triangle, namely generating heat. As a facilities designer once told me, “If your envelope is tight enough you can heat the space with a light bulb.” Well, mine isn’t, and besides, in the Age of the Nanny State incandescent bulbs are apparently part of some crazy scam having to do with Gaia Apocalypse. You just can’t make this stuff up sometimes.
Anyhow, I had long been skeptical, at best, about kerosene heaters in a tightly enclosed space. After talking to my friend Dennis, whose hardware store I have patronized since the days when his dad was in charge, I decided to take a chance and give it a try. They do have the distinct advantage of being relatively inexpensive to purchase, especially if you buy them in late March like I did, and before the current anti-energy regime in Mordor on the Potomac they were cheap to run (this witless cabal promised to raise fuel prices to the moon, and they did their best to keep that promise!). But I was concerned about the stench of them in a closed shop, and their ultimate safety from fire and toxic fumes.
As I have learned in the past months these concerns, while not irrelevant, are not of the level I had thought.
Regarding the odor of the kerosene heaters, I learned that all kerosenes are not alike. Some are stinkier than others, and even if they are K-1, I can tell the difference between local kerosenes. I naturally purchase mine from the better supplier. Second, it is really important to keep a clean wick in the burner. If you notice the smell of burning kerosene when you first come into a heated space, you need to think seriously about swapping the old wick for a new one. I plan to make it a routine to swap out mine at the end of the winter every year. And third, I make sure not to hit the “Off” lever on my heater until after I take it out into the unheated (and better ventilated) part of the barn. This is because the wick is on a spring loaded rack, and it snaps off in an instant when you hit “Off.” This means that the hot wick frame will volatilize some of the kerosene on the wick and introduce a tiny bit of the kerosene vapor into the air. It’s not a hazard, but it does stink.
As for fire risks, they seem to be pretty small as almost all modern kerosene heaters have automatic cut-offs when the units are jostled hard or even if they were knocked over.

In use I employ a few enhancements for my heater which in my observation increases dramatically it utility and efficiency. These allow a single 18,000 BTU heater to keep a 3000 cubic foot space comfortably usable, but not quite to the level of cozy.
First, I removed the carrying handle from the unit and placed it instead on its own rolling cart, complete with a handle made from hardware store pipe. This allows me to move the heater without having to pick it up or handle it directly. Second, and perhaps the most important thing, I placed a couple of fire bricks directly on top of the combustion chamber. The bricks heat up and then radiate the heat into the space rather than working solely by convection. I feel that this increases dramatically the efficiency of the heater. Yes I know it does not “create” more BTUs, it just captures them and distributes them differently, and in my experience, better.
I add even more thermal mass with an octagonal shelf of 1/4″ aluminum diamond plate resting on the top grill. This not only increases the heated mass and thus the radiant heat distribution, but it beneficially disrupts the convection coming up through the combustion chamber and distributes it more widely by diverting the hot air around the shelf, pushing it out into the room. Besides, it’s nice to have a warm shelf for the glue pot to sit on, and sometimes my tea kettle for tea (or hot chocolate if Mrs. Barn isn’t watching).
So, how well does it work? I think pretty darned well. There are times when I am only in the shop for a while, or first thing in the day before the cast iron stove gets cranking, and the kerosene heater raises the temperature in the shop 15, 20, or even 25 degrees. That is not bad. I find that in the dead of winter I use about 1/10 of a gallon of fuel per hour with the kerosene heater, which for me works out to about $20/week. From where I sit, making a cold shop usable space for $20/week is a great deal.
My final concern was health, but once I thought about it I realized that the primary byproducts of kerosene combustion are soot and water vapor. I don’t mind the water vapor at all, and as long as I use premium kerosene and have a clean wick, it’s not a problem. Still, I keep a carbon monoxide monitor hanging on the wall a few feet away, generally a good idea whenever you are using open-combustion heat source in an interior space.
In short, I am exceedingly pleased with how my kerosene heaters perform (I actually have two, but only use one in the studio with the other out in the main barn space for whenever I need localized heat for something). I’m even thinking of getting a much smaller one to keep in the bathroom which isn’t heated, the use of the unheated bathroom bringing back memories of using the open air privy in the dead of winter when my dad was pastoring a tiny country church in Minnesota. Now THAT was cold!
Up next, supercharging my cast iron stove.
PS As I head up the hill to the barn, it is snowing sideways. Literally sideways. We are expecting several inches of snow and 50 mph winds today. It is good to have heat!
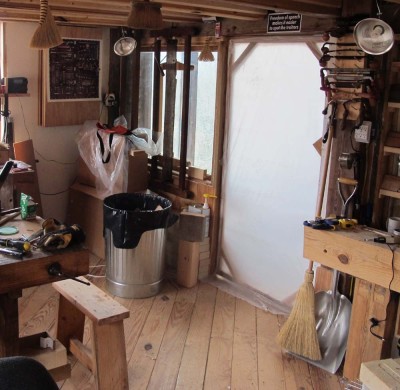
For the past couple of years as I have been struggling to move into and assemble the new workshop in the barn, I have been plagued by one corner, right inside the entrance to my studio. I am not by nature a neatnik, and the corner wound up being the repository for odds and ends that I didn’t know what to do with. It wasn’t situated well, nor was it large enough for a “real” workbench as the total space was about five feet square. About the only good feature of the corner is that it was a natural home for a large trash can.
Thanks in part to the inspiration of Jonas Jensen, whose blog is one of my favorites and often features immensely ingenious and impressive projects he makes from scrap materials in his spare time in the mechanical workroom of the ships on which he works in the North Sea, I realized there was no excuse for this state of affairs. Combining Jonas’ creativity with both a very limited improvised space and salvaged materials, along the impetus resulting from a recent visit to my friend Bob’s cozy gunsmithing shop, I was spurred on to action so that this very valuable real estate was reclaimed from being consigned to be nothing more than a junk-catching corner.
This new initiative, combined with a little salvaged Sjobergs workbench, resulted in a work space that is destined to become a favorite. I had originally deposited the tiny workbench in the barn’s classroom because even though it was wholly inadequate for full-scale furniture making, I had worked it over enough that it was now a pretty good little bench (after my rescuing it from the trash many years ago). Guess what? I measured it and it fit into the corner as if it had been made for it.
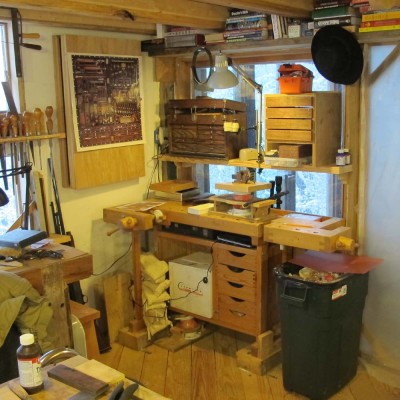
After finding new homes for the stuff in the corner, and acquiring a new rectangular trash can to fit in with the newly positioned workbench, I now have a delightful work station for doing my “fussy” work that is so frequently part of my projects, including carving, jewelry-type fabrication, filing, sawing and the like. My two bowling-ball-and-toilet-flange vises used for carving, engraving, and checkering are now there, along with my stereomicroscope, myriad dental tools, die maker’s files and rifflers, checkering tools and carving chisels. There was even space for a few books overhead, and a permanent (read: rememberable) location for the First Aid kit.


Recent Comments