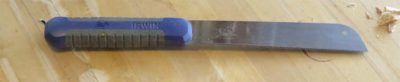
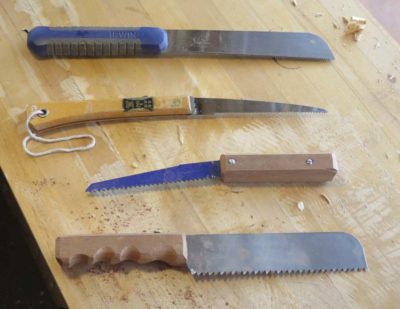
I recently posted about the wonderful little pull saw I bought at Lowes and how I use it constantly while working on the new cedar shingle siding. My only complaint about it is that it is just a smidge too big to fit neatly into any pocket of my old Skillers carpenter vest, a shortcoming I decided to address with other tools. So, I now have three more saws that do fit into one of the pockets, saws that are getting used with ongoing frequency.
The first of these is the little folding Japanese saw that I have had for ages. When fitting individual cedar shingles as one must, I find that there are many times when for several shingles in a row each and every shingle has to be custom cut and fitted, requiring lots of sawing. This is going to occur either on the ground or at the top of the ladder, and given the age and mileage on my knees I prefer it take place up on the ladder. When folded this little beauty fits perfectly in the breast pocket of the vest alongside at utility knife. Perfecto. It is so robust and inexpensive I will probably order another bunch of them so that I can keep one wherever I might need it.
Two other saws were shop made for beefier tasks like localized small scale demo work, which also needed to occur with some regularity as I was cutting away the old cedar siding paneling. Either of them allows me to work efficiently but under fairly delicate control as I was cutting away old materials from around electrical or coolant lines, places where I did not want to fire up the reciprocating saw.
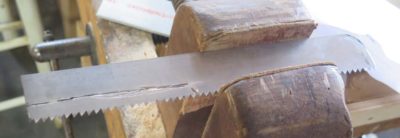
The first of these two saws use a leftover piece of bowsaw blade about 10 inches long. I rounded one end on the grinder and cut the other end of the blade with my rotary tool to remove the teeth and make a shaft for embedding into a handle.
I scuffed the surfaces of the blade handle then sandwiched it between two scraps of wood, using Gelfex epoxy to glue it all together.
I trimmed and filed the handle to fit my hand and it was off to the races, working perfectly for its intended function.
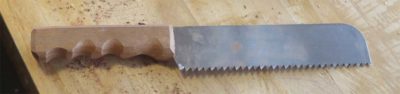
The second shop-made saw employed a blade from the reciprocal saw, the butt of which was inset into another two-piece scrap handle and embedded with epoxy as the handle halves were screwed together.
I now have an elegant sufficiency of little saws with large performance.
I am finding the gathering of accurate information about the current state of affairs in the ongoing proto martial law (at least here in Virginia where our knucklehead governor and his posse are making noises about portions of the lockdowns lasting for another couple of years). I found this brief video summary to be exceedingly helpful in comprehending the situation. You might, too.
Recently I have been working with planemaker and friend Steve Voigt to help him create a wax polish for his exquisite new historic-style wooden planes. Well, Steve has been doing all the work, I am just supplying the materials and a few formulations based on the results I’ve had in recent years. His desire was for a beautiful appearance and a non-slick surface so that his planes could be handled with the tiniest bit of tack against the bare hand.
Based on some correspondence and a recent Instagram post, he has apparently arrived at the finish line. He is strongly recommending I make this product for others with similar interests and asked if I had ever made this formulation before, because it was in his words, “Da Bomb.” You can tell he has been a college professor, what with all that hipster lingo. (He is actually a pretty hip guy, especially compared to me being just a lovable curmudgeon shouting at the clouds)
My reply was, “Yes I had, and yes it was.”
It just might be time for a new product in the Don’s Barn Store. I’ve actually been playing with quite a few ideas…
During (another) recent pre-martial-law episode of basement workshop archaeology at my daughter’s house I rediscovered a successful “proof of concept” prototype, a phrase I learned from my pal Ripplin’ John and have come to use with great regularity. I cannot even recall the particular project at this point, but only vaguely remember that I needed to do a lot of sanding in the winter, hence it would be inside. I needed a dust control scheme so efficient that Mrs. Barn would not even notice a speck of the dust upstairs, the basement steps ending/beginning immediately off the kitchen.
I had designed a downdraft table for dust control during upholstery stripping decades before and it worked wonderfully for the furniture conservation group I designed it for. In the intervening years downdraft sanding tables had become more common, but I did not have the space or need for one of these big units, 24″ x 36″ or thereabouts was all I needed. Pus, it had to be a benchtop unit given the restricted footprint of my basement workshop.
Being someone who rarely throws away anything that could theoretically become useful in the future I had almost everything I needed to build the unit. The only thing I needed to buy was a 24″ 48″ piece of pegboard from the home improvement center.
I had some nice scraps of 1/2″ tempered foam core sheet and made the box walls from them, sawing them on the table saw. I glued them together into the frame using hot melt glue. Double- or triple-wall carboard would have worked just as well. (One of the reasons I did not use wood walls was my desire for the unit to be ultra light weight; wood would have increased the weight several fold.)
I knew that my small unit, unlike the large downdraft tables, would need to have the air drawn from one end rather than from underneath so the internal air-flow volume had to be tapered, fattest at the end where the fitting was inserted to draw the air and very shallow at the other end. This tapered plenum provided a more equal air flow over (and through) the work surface of the unit, much like reduced/increased ducting controls the evenness of air pressure within air conditioning and heating systems. I found in practice the unit performed admirably in this regard.
The taper was achieved by gluing parallel strips of wood to the insides of the box fame, then stapling on a bottom of corrugated plastic sheet. Again, all it had to do was direct air and not support anything but itself.
For the working surface of the unit I simply cut and glued on a piece of pegboard, with only one cross rib in the center since the dimensions preluded any severe sagging given the pieces I was working on.
When I first set up my tiny basement workshop I purchased a larger-than-necessary cyclone collector, a machine that served me magnificently for all those years and remains the cornerstone of shop cleaning in the barn to this day. I cut a hole in the fat end of the plenum to insert the 3-inch hose fitting from the collector and the unit was done.
I am really glad I rediscovered this accessory and have kept it in my barn workshop since I do everything I can there to keep airborne dust to a minimum. I was recently using it to do some sanding and it still works great.
All it took those many years ago was a bunch of scrap materials and about an hour’s time to make. It was the perfect solution to the problem I had, and if you have an indoor space with the same constraints you might give it a try.


Recent Comments