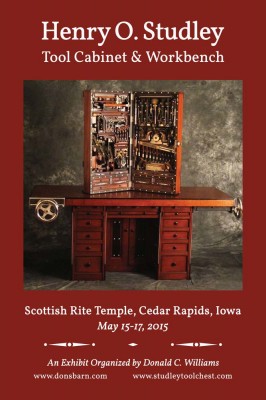
This morning Chris Schwarz emailed me the complete set of page proofs from VIRTUOSO: The Tool Cabinet and Workbench of Henry O. Studley for my review. I am nearly lightheaded with delight.
Forgive me while I crawl into my easy chair and spend the evening ogling the book with a red pen in hand.
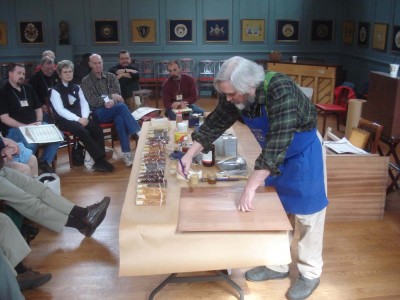
I am earnestly trying to wrap up some frayed threads in the blog posts, and this one and two more will complete the tutorial on simple parquetry, which I will combine, edit, and post as a downloadable document.
===================================================
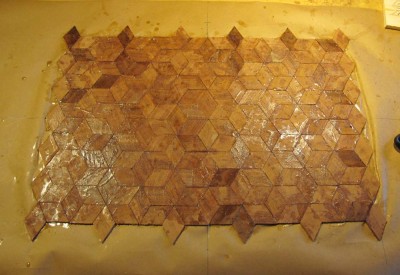
Once the parquetry composition has been assembled such that the area completed is larger than the field of the composition as it will be presented on the panel, the time has come to trim it to the exact size you want. But before that, you have to decide exactly how large you want the central field of the parquetry panel. I tend to work my way in from the edges of the panel as determined by the sizes and proportions of the furniture on which it will reside, then subtract a symmetrical border and a symmetrical banding.
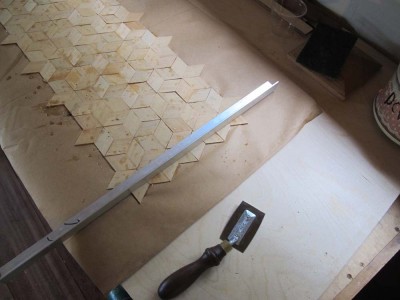
Once I have done that, I simply re-establish the center lines of the parquetry assemblage and precisely mark out its perimeter, and saw it with any of the veneer saws mentioned earlier. The desired end result is a rectangular and symmetrical composition. Once I have the field trimmed to the proper size, I re-mount the unit on a second, larger sheet of kraft paper using hot glue. It need be adhered only at the perimeter.
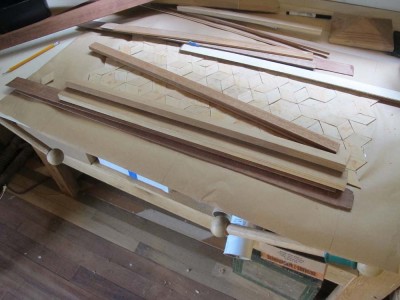
I tend to make my own banding, frequently making a simple stack of veneer faces with slightly thicker centers, assembled and glued between two cauls until they are set. Then I just rip of as many pieces of banding as the assembled block can yield.
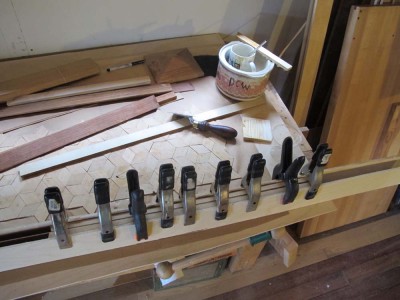

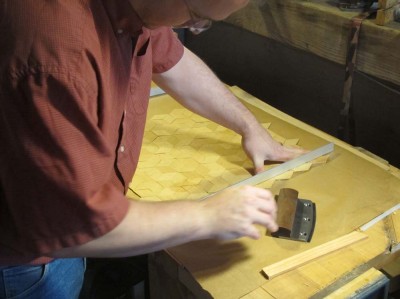
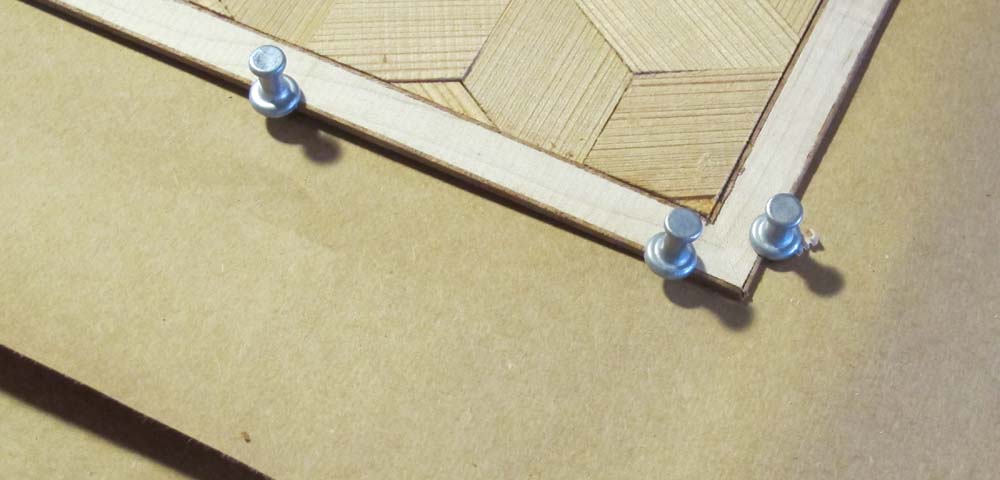
Once the banding is available, I cut them then trim the ends with a plane and miter shooting jig. Once the first piece is ready to apply, I place the entire composition on a large board with a corked surface. Then just like Roubo, I glue the banding down on top of this second piece of kraft paper, tight against the cut edge of the field, and “clamp” it in place with push pins, similar to those illustrated by Roubo. By the time I get all the way around the perimeter of the field, cutting then trimming each of the banding pieces, the piece is ready to set aside for a bit.
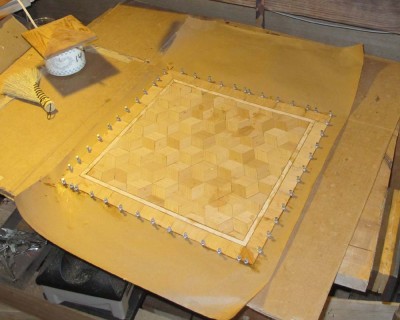
For the outer border, I tend to use a simple approach, often employing some of the original veneer stock in either the long-grain or cross grain orientation.
Once the banding is set I remove the pins then hammer veneer the borders in place, and the assembling of the parquetry panel is complete.
Up next – Gluing Down the Parquetry
As I mentioned recently I have been blessed with a rich buffet of challenging conservation projects. While not all of them are tortoiseshell, it does seem to be a recurring theme.
This project is a two-part carved tortoiseshell vessel (it has a inner, smooth cylinder to hold whatever it is supposed to hold) I believe to be a brush or writing implement holder, but I could be wrong on that. There are several sites on the outer carved shell that are missing some carving, and a number of other locales where the shell is fractured. It is a challenge to be sure.
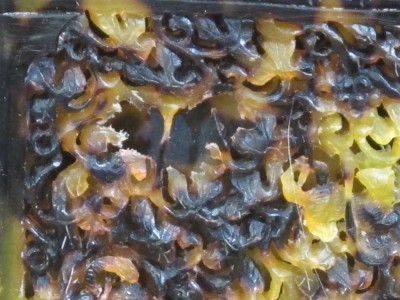
This place is missing the carving. It is roughly the size of the fingernail on my pinkie. Good thing I know how to do this stuff.
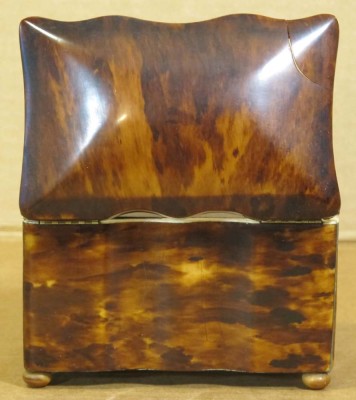
A second and perhaps even more challenging project is this molded tortoiseshell box with a split in the top. What makes this project so problematic is that the margins adjacent to the split are not aligned, so there is some fundamental material manipulation involved.
As the project moves forward I will be updating you on both what I am doing but why I am doing it. Amusing that a sheer nylon drapery is integral to both solutions.
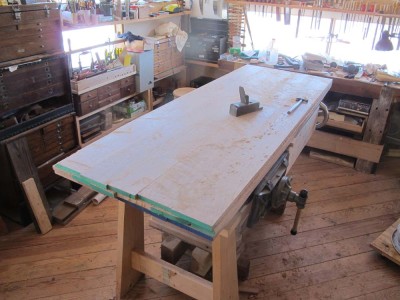
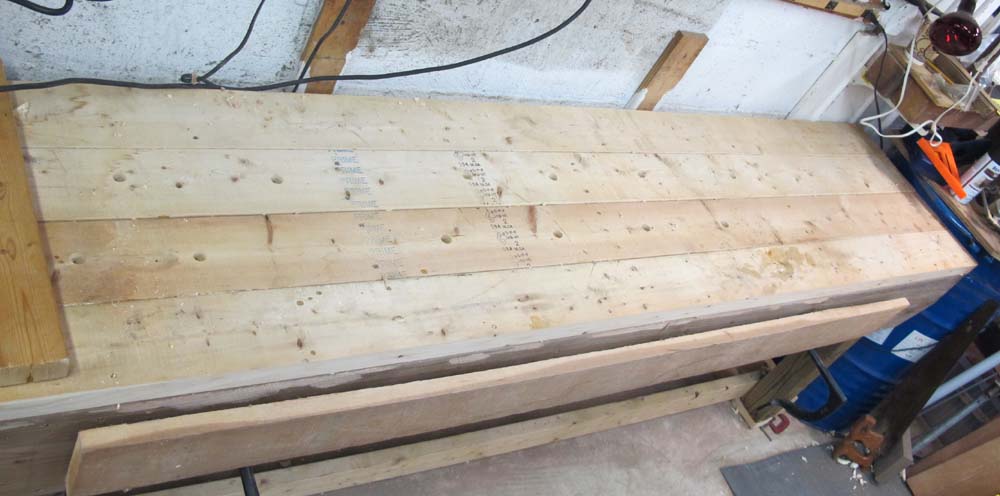
The slab for the Studley work bench top is all glued up and trimmed to size, and slid off my workbench onto a pair of horses for further ministrations, and just in time as I need my bench space to finish up a large group of sample boards for a luncheon presentation I am making soon for an architectural/decorative arts finishes assembly.
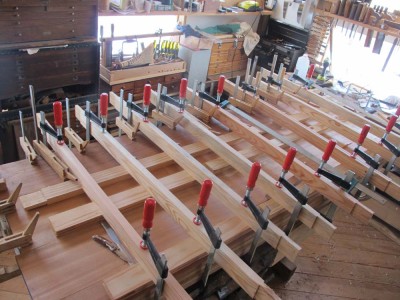
I have a lot of clamps, but not enough for me to affix the final top lamina of the bench in one step, so I first glued on the first half, then a day later the second half.
The slab is a beast, and I would estimate its weight at about 175 pounds. My version is about 1/8″ thicker than Studley’s, giving me a little bit of room for planing and finishing. The edges will be installed once the wheel-handled vises are attached for the exhibit, which will turn the top into a 500-pound behemoth.
From this point on I will be planing and finishing the top. Due to the time and budgetary constraints on my side, I selected something called African “mahogany” as my face laminae over the white oak core. As I mentioned earlier, it looks beautifully similar to the true mahogany that Studley used for his tool cabinet and work bench, but works like a composite that would be the result of making “wood” out of straw and donkey dung. It is the nastiest stuff I have ever worked, and I can state with a fair degree of confidence that this will be the first and last project to employ this “wood.”
Planing it is a challenge. I touched it with my “go to” low angle smoother and got horrific tear out. That took me back on my heels. Hmmm. So, I switched to my favorite toothing plane, and got tear out with the toothing plane as well! I mean, I have never had tear out with that toother. I backed off the blade a bit and had some success, and today I will touch up the toothing blade and proceed, but it will be slow even though the surface needs very little work.
The next challenge is to resharpen my smoother to use after the toother, or conversely just tooth it overall and go straight to the scraper for the final surface.
Sty tuned.
Normally I can stand at my bench and gaze at the mountains, late afternoon especially as the barn falls into shadow and the mountain crest ablaze in sunlight. Not so today. I can barely make out the log barn only forty yards away.
We’ve got near white-out conditions, so my only practical means of transport is simple perambulation up to and back from the barn. Though the temp outside is brisk, it is cozy in the shop as the wood stove and kerosene heater combine to keep it nearly 60 degrees. I’ll glue up the last face board on the Studley benchtop in a bit, then work later today to compile my information on how much protection extortion I owe GovCo.
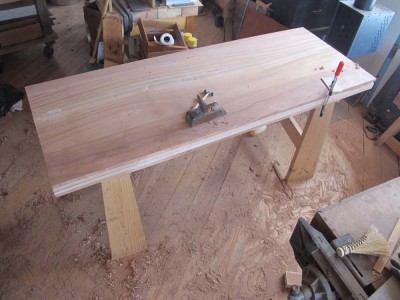
With three of the four lamina glued up for the replica Studley workbench top, I got the assemblage flipped over and moved onto my bench for planing the oak core surface for the final lamina, the top (African) mahogany boards. I must say that even now this hunk weighs a ton. I can barely flip it over by myself.
I like to use a toothing plane to work surfaces like this, and using my favorite toother I went after the surface this morning. My care in the assembly to this point paid off as it took me only about an hour to get it ready for the final glue-up.
Once the final lamina gets glued on, I will trim the unit to size, fit the vises to it, then work on the edges.
Stay tuned.
Cosmologists assert that the four phenomena holding the Universe together are 1) strong inter atomic forces, 2) weak inter atomic forces, 3) gravity, and 4) magnetism. Which shows how little they know, as somehow they overlooked 5) duct tape, and 6) shellac.
What has this got to do with The Barn?
Well, nothing actually, but it does lead me to another fundamental phenomenon of the Universe, namely inertia: a body at rest tends to stay at rest, and a body in motion tends to stay in motion. For the purposes of this post Chris Schwarz and Joe McGlynn fall into the latter camp, I in the former. These two guys seem to be the very definition of peripatetic. I am, shall we say, more contemplative. Yeah, that’s the word, contemplative. (“Lazy” was so much less mellifluous).
One of the things I really like about my studio in the barn is a dedicated sharpening station, and thanks to the inspiration of plane makers Konrad Sauer, Raney Nelson, and Ron Brese, and inventive scrounging genius Mike Siemsen I have long recognized the utility and hence have desired an elegant lapping plate for that work station. Recently I was at the building recycling center and saw a stack of granite splash boards, probably from a kitchen where the users finally came to their senses and had the granite ripped out in favor of some nice butcher block wood slab counters.
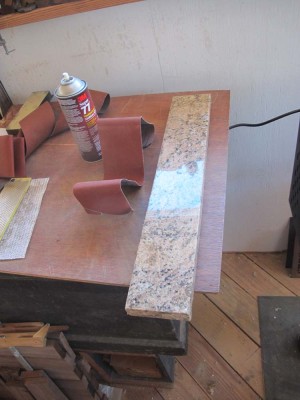
Anyway, I selected two pieces that fit my needs, and they were a whole fifty-cents apiece. They are 4-inches wide and 24-inches long, which makes them a perfect fit for 4×24 sanding belts for a portable belt sander. yes, I do own one; I have found no better way to sharpen lawnmower blades.
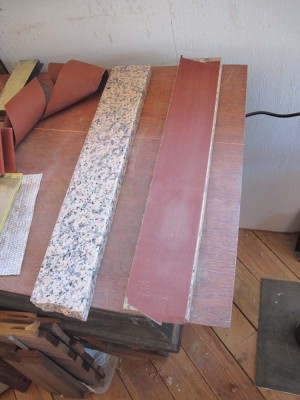
Using the polished granite surface as my base, and spray adhesive as the binder, I first tore the sanding belt once crosswise, then applied it to the granite. Voilay! An instant lapping plate. Given my two pieces of back splash, I can mount four different grits of sanding belt simultaneously, so regardless of the delicacy of the task I am ready to roll. Or lap, as the case may be.
March 14 I will be presenting “Historical Finishes” to the Tidewater Chapter of the SAPFM. The meeting will take place at Somerton Ridge Hardwoods (http://somertonridgehardwoods.com) in Suffolk, VA.
Hope to see you there.
Lately I have received several emails asking about the status of the tickets for the upcoming HO Studley Tool Cabinet Exhibit. To boil them down, each of the inquiries asked, “Hey man, where’s my ticket? I bought it eight weeks ago (or ten or fifteen) and have not received it yet. What gives?”
I was bewildered, as I recalled that the web site selling the tickets indicated that the process was for the tickets to be distributed to the attendees at the exhibit itself, which in fact is the case. But I was wrong in thinking that information was on the web site; it must have been in our earlier blog announcements. I am sorry for the confusion. We are not sending you a ticket when you purchase one, but rather you go into our list as someone who purchased it and will be given the physical ticket at the exhibit.
Simply come at your appointed time, get your ticket, and go in to the exhibit hall and spend the requisite hour ogling this masterpiece.
We will add a passage to the web site reiterating that, but be assured that if you bought a ticket and received confirmation of purchasing the ticket, we know about it.
For anyone who does not know, the exhibit of the tool cabinet, its contents AND Henry Studley’s workbench, will be coincident with Handworks 2014, and only 20 minutes away from HW’s Amana, Iowa location, in the beautiful Scottish Rite Temple in downtown Cedar Rapids, Iowa (the next town away) from May 15-17, 2015.
Tickets are still available here.
Like many in the woodworking universe, I am a benchaholic. We revel in the design, construction and use of exquisitely elegant workbenches: Roubo, Nicholson, torsion boxes, Moravian, Scandanavian, etc. Sometimes I fear that our fascination with these remarkable tools can be off-putting to those who are just starting out in furniture making, or at least do not yet have such-and-such a bench. I have spoken with folks who tell me something like, “Well, I would like to begin serious woodworking but I’ll have to wait until I get the time I need to build a (fill in the blank) bench.”
I’m probably guilty of promulgating this mythology to some degree, as I have waxed ecstatic about this or that response to workbench design, building, or using. If I have done so and you have found it a hurdle to your work, I apologize sincerely.
Two recent developments for me have been a brisk wake-up call. First was watching Mike Siemsen’s brilliant video “The Naked Woodworker,” which is now part of the ensemble of references I steer all new woodworkers towards (along with “The Anarchist’s Tool Chest” and James Krenov’s “A Cabinetmaker’s Notebook”) and the companion Siemsen youtube video on using the bench he builds in the video. Folks, they are solid gold. Mike is such a down-to-earth guy that his persona often inadvertently obscures his own giftedness at the workbench.
Second has been the recent revival of my own conservation projects, some of which are taking place in my old studio in my daughter’s house basement (which has been nothing short of total dishevelment for the past year). Of course, when I transferred the contents of my workshop from there to the barn, I left myself with only the barest of bones regarding tools and supplies necessary for maintaining a house, not for building or restoring furniture. Among the voids in the space was the hole left by the workbench that is no longer there. Increasingly I found myself frustrated by not having any real workbench to use.
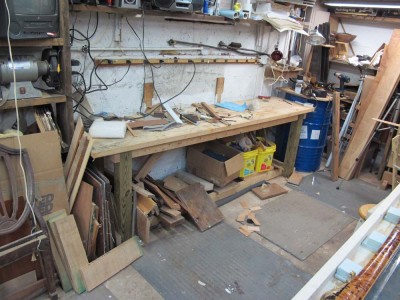
With Mike’s inspiration fueling me, I took a new look at my workspace and the assets there. No, I did not have a workbench, but I did have this crude work-table along the wall. Built after supper one night several years ago, its only real function to this point was to hold stuff. I had a Zyliss vise on it, and it served my needs for the tasks of house-work.

Today these needs and Mike’s inspirations prompted me to retrofit this table, making it into a spare but fully-functional Nicholson bench. The best part of the whole venture was that it took only about 80 minutes of work to accomplish the transformation, using a couple of boards from my stash in the lean-to shed. Cleaning the bench off took nearly as long as the new construction.
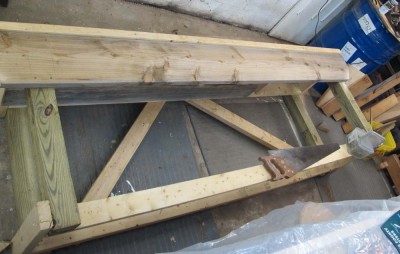
I first laid down the old table on it back and screwed a 10-inch wide apron on the front. Ideally I would have used a 12-inch wide apron, but there wasn’t a 2×12 out in the shed. So, with my battery drill and decking screws a new apron was in place. The step of planing the top overhang to be even with the apron surface took the most time of the whole project, and was really an unneccessary step had I been building this from the start. But I wasn’t, so I had to plane off 1/4″ of excess overhang. I suppose I could have sawn it, but I just set up the fore plane to cut pretty aggressively and knocked it out.
I added a 2×8 backing board behind the apron to allow for use of holdfasts, which are the key to the use of a Nicholson-style bench. I drilled a dozen holes for holdfasts on the front then flipped the bench onto its top.

While upside-down I took some 2×10 scraps and screwed them to the underside of the 2x top, for the same purpose as the skirt backing board – it allowed the utilization of holdfasts. Also while it was upside down I screwed new 2×4 skids under the legs to raise the bench height a little. I prefer my workbench height to be taller than a lot of folks, to be even with the top of my wrist while my arm is hanging down, it’s just the way I work most comfortably.

After turning the unit back into its upright stance, I drilled holes in the top for holdfasts.

Then I got to work. I still need to install a crochet on the apron and a planing stop through the top, but for now I need to get back to my projects.
Even if you count the time I spent construction the original table, at this point I have a simple and highly functional woodworking workbench for less than three hours (!) and a few pieces of wood from the shed. Now I’m trying to figure out how to make the presence of this bench a “selling point” if this house ever goes on the market.


Recent Comments