I just got back from a grueling trip to southernmost Texas and back. Given my disinclination to subject myself to the romantic advances of blue-gloved airport goons I drove the 4,000+ miles from the Mid-Atlantic to McAllen TX and back.

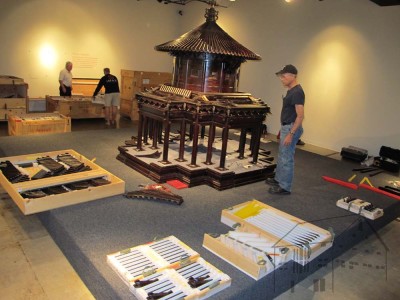
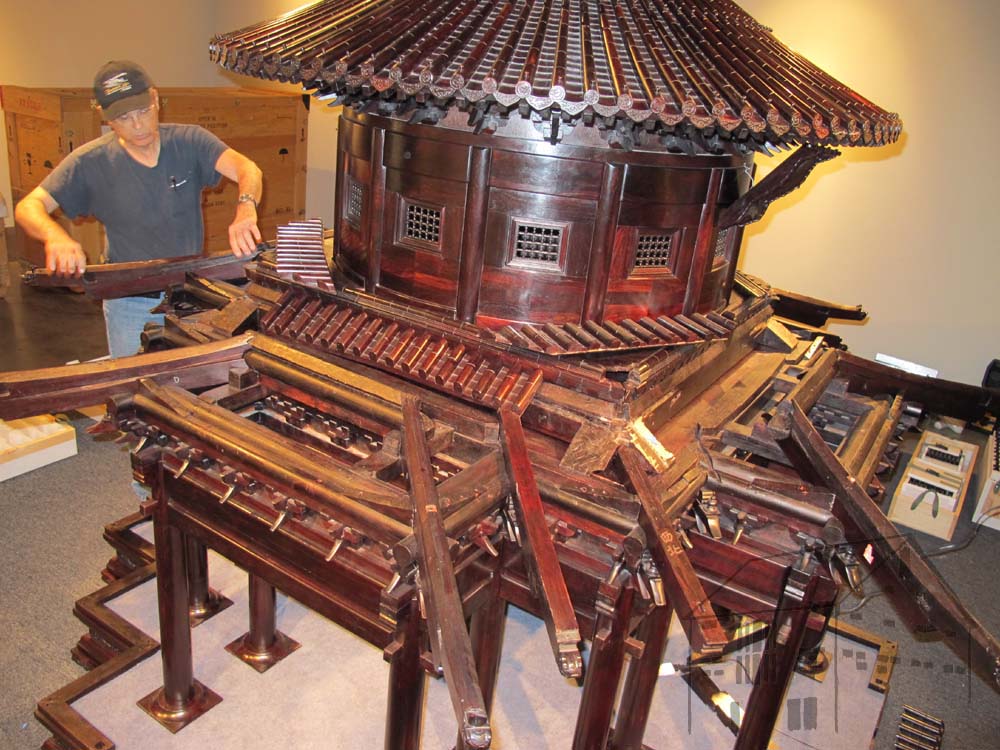
The purpose of the trip was to revisit the International Museum of Arts and Sciences and dismantle and pack a Smithsonian exhibit that has been under my care for several years, a 1/5 scale model of the 10,000 Springs Pavilion in Beijing’s Forbidden City. You can see more information about the original structure here, and the recent exhibit here . (make sure to watch the videos of us moving the giant framework and roof)
As had been the case in each of the exhibit’s previous venues, several volunteers came along at their own expense to make it happen. Long-time friends Rick, Bill, and John joined me again and we worked together like a well-oiled machine, getting the job done in about 60 man-hours.
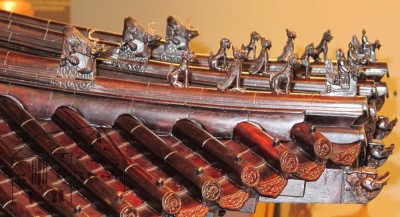
The Pavilion model is an amazing contemporary artifact fabricated from thousands of carved and joined pieces of Red Sandalwood that have been assembled into about 800 pieces.

The artistry is breathtaking, and the ~2,500 pound mass of the item is really impressive. I have been asked to continue stewardship of this exhibit even though I retired from the Smithsonian last December, in great part due to the fact that I am about the only person aside from the original makers who knows how it all goes together. Plus, I genuinely enjoy working with my colleagues from the Office of Smithsonian Affiliations. This particular 3-D puzzle came with no instructions other than the Chinese figures carved into or written on it. Over the years my team and I have deciphered it well enough to make it happen (with the spectacular help of a maitre-de from a Queens NY Chinese restaurant who translated some of the scrawled pictograms) so the list of folks who could even do the job is pretty small.
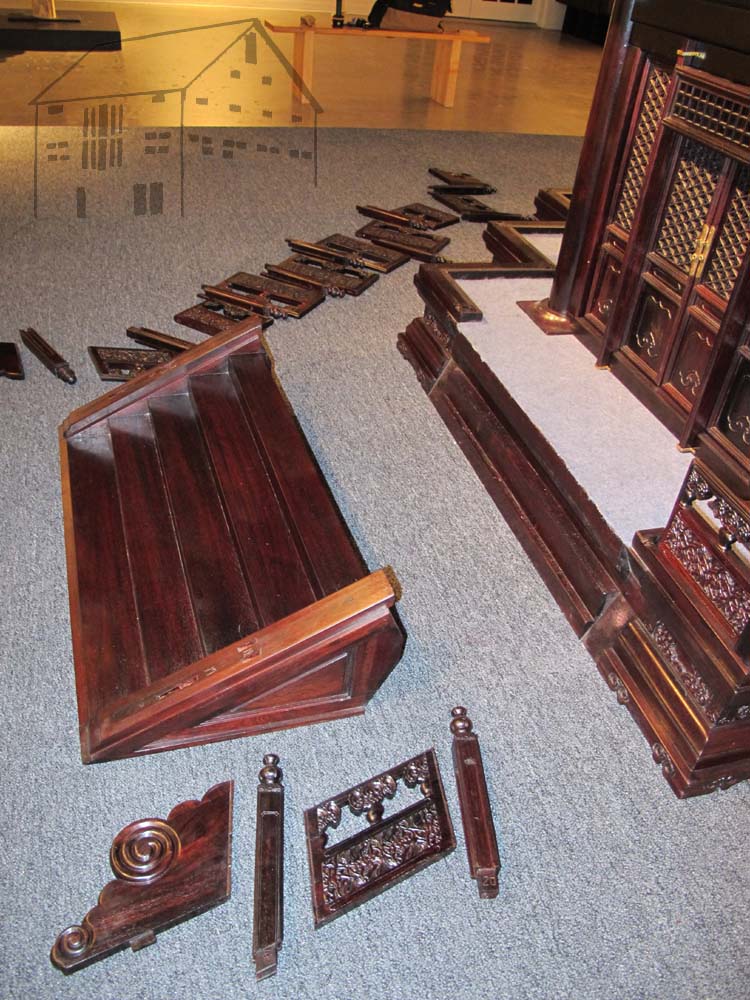
First comes the really easy part, removing the railings and stairs.

Then comes the doors and window grilles, all carved from solid Red Sandalwood.

The lower roof sections are tricky as they weigh a lot and are tenuously interlocked. If one fell on your foot you would have at least several broken bones for sure.
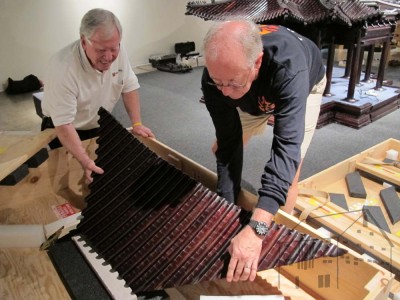
Taking them out safely, and placing them in the fitted cases requires teamwork and steady choreography.


One of the highlights is the ceremonial removal of the elaborately carved two-part finial on top. This piece was John’s turn.
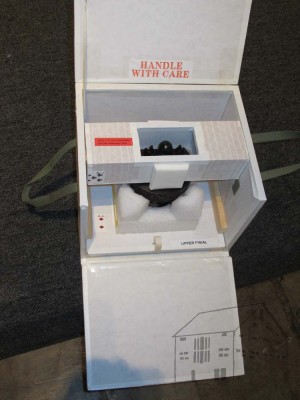
Each piece goes into its own fitted compartment.

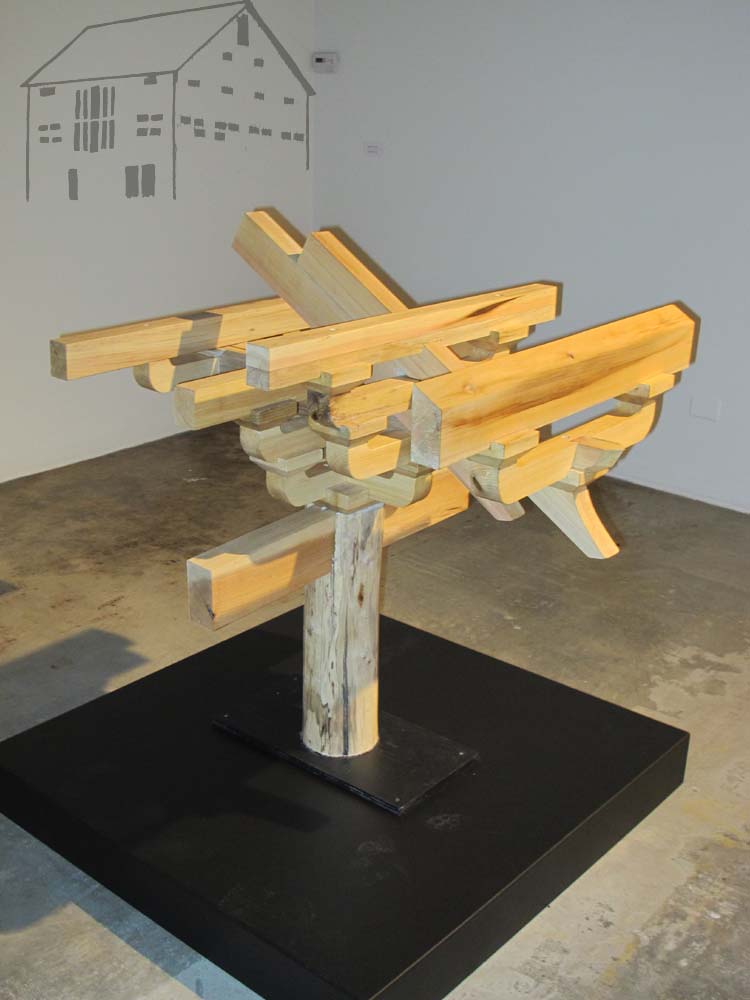
My own contribution to the exhibit was this 5-foot-tall, 1/2 scale model of the construction of the post/beam/roof assembly. It has been very well received, as the scale of the pavilion is so small the visitors have difficulty figuring out how it all goes together.
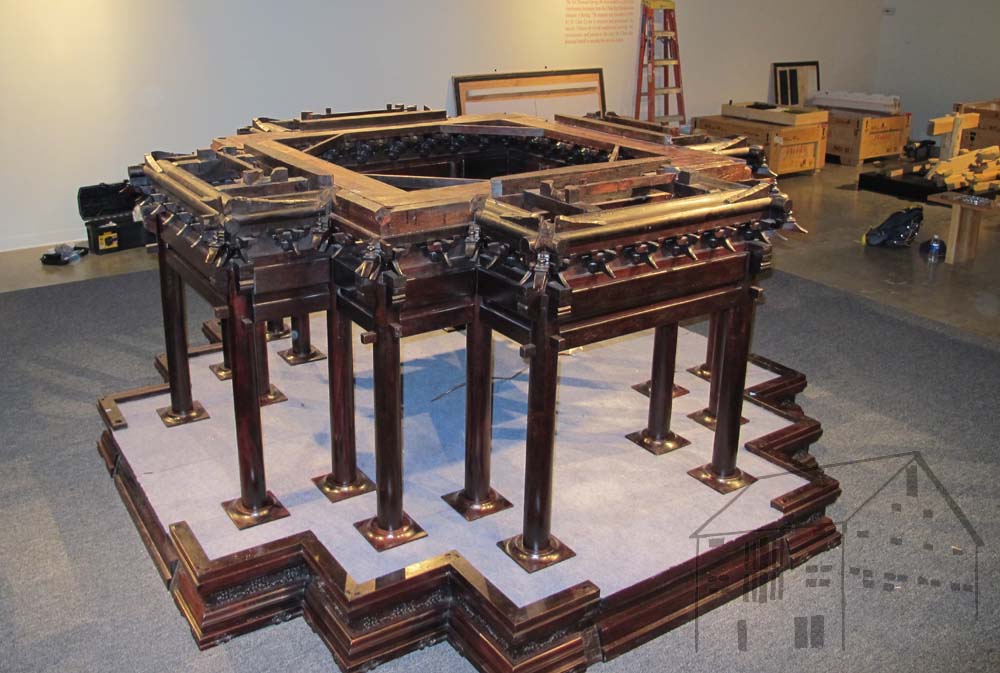
As the pavilion comes apart one piece at a time, the eventual skeleton of the magnificent artifact becomes almost forlorn.

A highlight of the IMAS that I finally had time to enjoy was the adjacent gallery, where a spectacular exhibit of Tiffany stained glass resides. I sat for several minutes in the silent darkness, imbibing the masterpieces there. If you are in the neighborhood of south Texas, make plans to go and enjoy them yourself.
The Pavilion exhibit is not currently scheduled for another venue, but if one comes up I will be sure to let you know.
There is more stuff about the pavilion exhibitions here
http://www.blog-affiliations.org/?p=2548
http://www.si.edu/mci/pavilion/pavilion.html
While in Georgia last month I overheard a conversation suggesting the benefits of having small wax blocks with logos to give as premiums to students or as gifts to friends, or to even provide as commercial products. I decided to do that for myself, and will describe the process here.
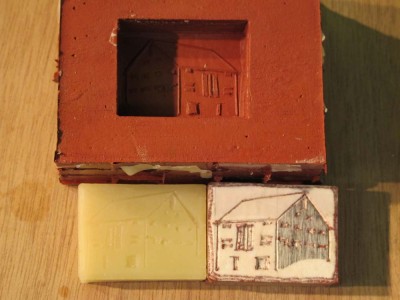
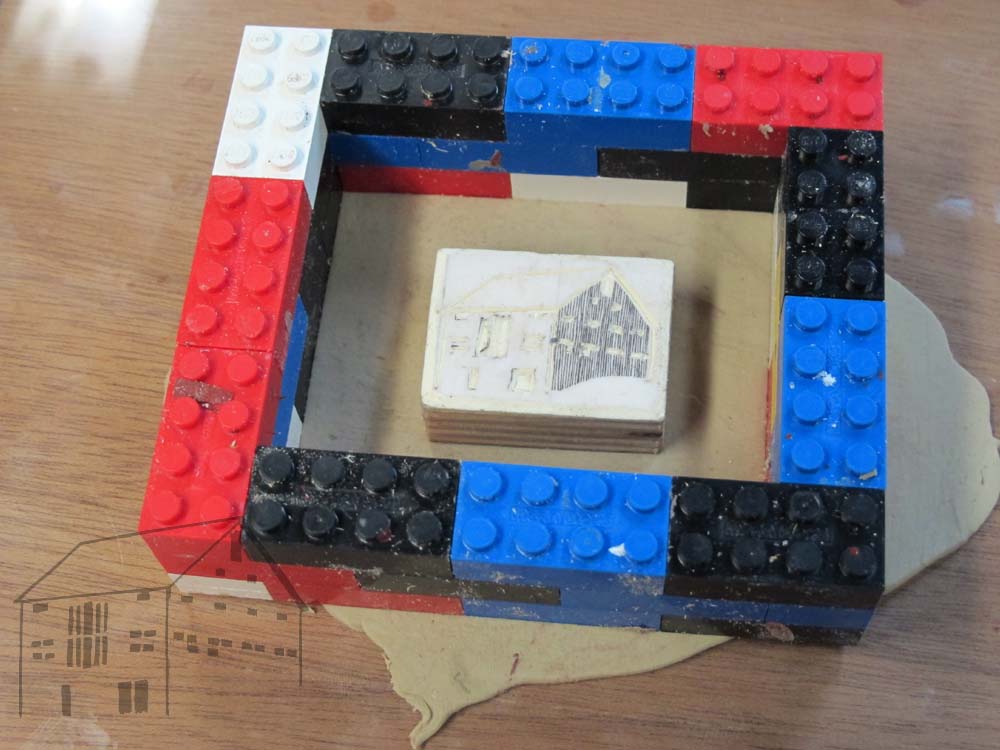
My objective was to produce a small wax block with The Barn logo incised in the surface.
My first step was to print out a version of the logo that was the right size for my needs. I glued this to a piece of 1/8” mat board. Once the glue was dry for this I cut it to the exact size I needed, which I then glued to a piece of ½” Baltic birch plywood.
Using a scalpel knife I incised the logo through the printout and down into the mat board. Once this was finished I immersed the entire block into molten beeswax, mostly as a means of smoothing out any raggedness of the incised lines. I wiped off all the excess wax.

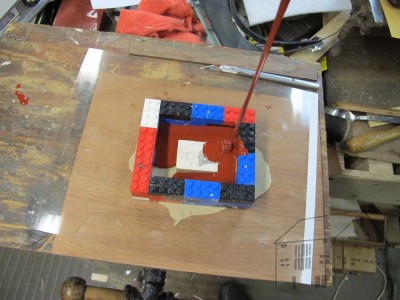
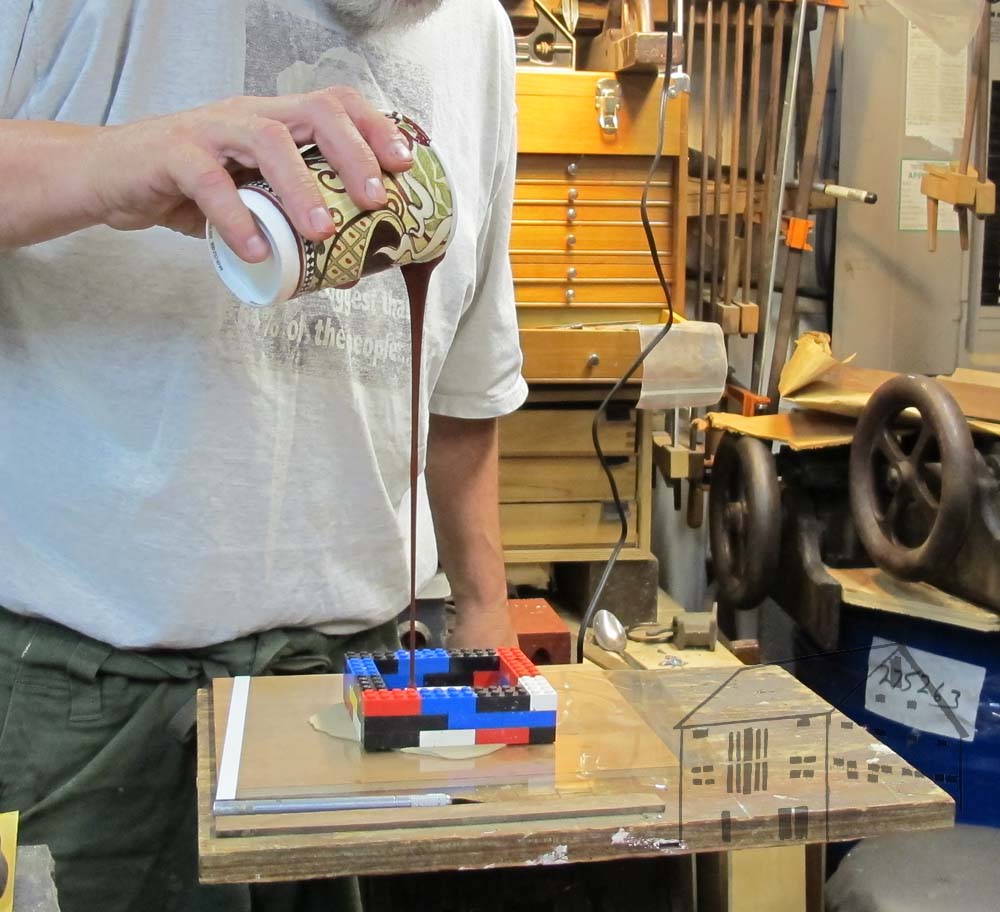
I prepared a bed of plasticine sculpture clay and pressed the block down on it, detailed side up. Then I construct a Lego-type flask around the block with at least 3/8” margins on all five sides.
NOTE: do NOT use plastilina or any sulfurous sculpting clay. It is a fine product but the sulfur-containing chemistry is not good for what comes next.
Fill a paper cup with the appropriate amount of silicone RTV (Room Temperature Vulcanizing [crosslinking]) molding rubber with its catalyst, and stir them thoroughly. These are mixed by weight and vary from product to product; be precise. There are many different grades of silicone RTV, and they will be the subject of another blog on casting molten pewter. For this project I simply used some I had sitting on the shelf. Admittedly, I do a fair bit of this for my artifact conservation projects so my shelf may be outfitted differently than yours.

After mixing the silicone RTV and catalyst I raised the cup and poured a thin stream of the liquid rubber into the flask, starting with the corner away from the pattern block and allowing the rubber to flow over the pattern like lava from a volcano. This technique reduces to almost zero the problems of bubbles in the surface of the finished mold. Let the mold cure and disassemble the entire construct, gently removing the block from the silicone rubber mold. It does not need any separating agent.
Melt some wax and pour it into the rubber mold. Allow it to cool and then gently pop the wax block out. You are done.
Using this method you can create a single piece mold for casting a wide selection of materials ranging from epoxy, plaster, wax, hot-melt glue…
One of the myriad headaches of relocating slowly from a home of 29 years is that the contents of the former home do not accrue to the future home evenly. As a result I often find myself in one place or the other reaching for a tool or supply for a necessary task, only to realize that the thing I need is 216.7 miles away. Such was the case last night when I needed to cast some epoxy replacement pieces for a project upcoming next week.
Normally when I am casting epoxy pieces replicating wood I dust the rubber mold with pigment, then add more pigment to the epoxy as I am mixing it then pour the pigmented epoxy into the pigment mold. You guessed it, all my powdered pigments have already been moved to The Barn. Grrr.
Calling around this morning I found that the nearest powdered pigments were an hour away. What to do, what to do?
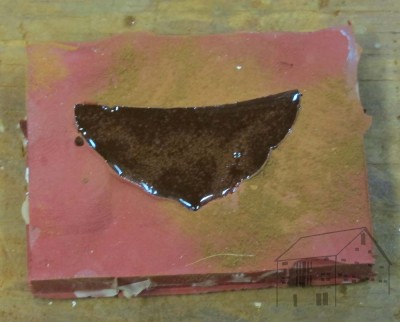
Well, consider that pigments are simply highly specific dirt. The pigment I needed was burnt umber. Where could I find some reddish brown dirt? Hmmm.

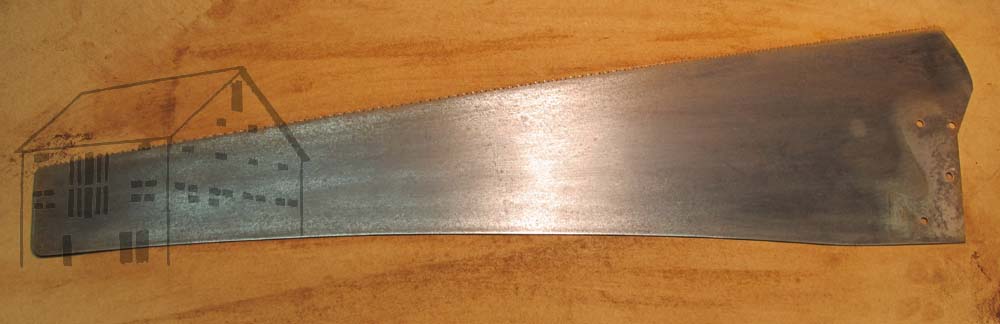
As I was pondering this question while puttering in the shop, I looked at some newly acquired vintage hand saws from the flea market, one of which was pretty uniformly encrusted with rust. Coincidentally, rust falls somewhere between burnt umber and red ochre. Perfect!
In a few minutes with a piece of sandpaper I had all the beautiful pigment I needed. Perfect color, perfect texture, uniformity. Free and already in hand.
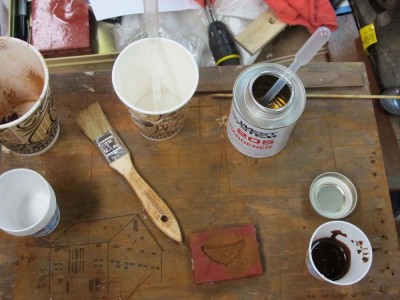
So, I took some of the powdered iron oxide (rust), sprinkled it into both the mold and the epoxy, and did the deed. It turned out exactly the way I needed it to be.

Plus I got to move down the path to restoring some old saws.

Materials science is our friend. Learn it. Love it. Live it.
I just finished a few days of production of glazed doors for the library bookcases. It gives me all the more respect for those artisans to make acres of kitchen and bathroom cabinetry. I am not really set up for large scale joinery production, but great progress was made nevertheless.
 In following Occam’s Razor, the philosophical construct that suggests simplicity as the best answer to a convoluted question, I decided to make exceedingly simple glazed doors using the pile of southern yellow pine I had left over from the barn flooring along with a dozen or so sheets of plexiglass from a house project that never materialized (it actually evolved into a much better one). Of course I overlooked the inverse of Occam’s Razor, namely that the simpler the structure, the greater the need for skillful design and execution.
 My plan was to build open faced mortise and tenon corners (bridle joints) using my table saw to cut all the joints. In principle the idea was fine, but in practice, let’s just say that a $25 saw from Craigslist is probably not the one you want for such a process (especially when the fence is such a piece of garbage it almost isn’t even worth the effort to throw it out the door). But, it was what I had on hand. My Unisaw was back in Maryland, along with my home-built but perfectly useable tenoning jig.
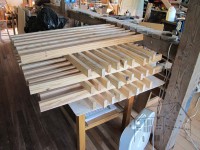
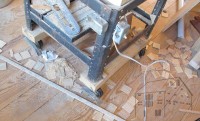 The first thing I needed to do was make a simple tenoning jig, which I did. Then, I cut all the open mortise shoulders on the rails, which were purposefully 1/2″ wider than the stiles. This went smoothly. I was left with several score of identical wooden tiles, which I gathered to save for the myriad times I need a small shim or spacer.
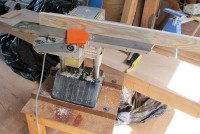
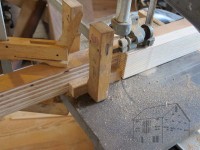 Cutting the open tenons was not so easy as the tenon length, corresponding to the wider rail, was deeper than the saw blade could cut when fully exposed by almost a half an inch. Grrr.
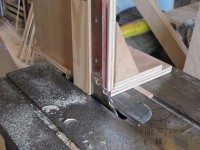
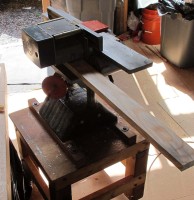
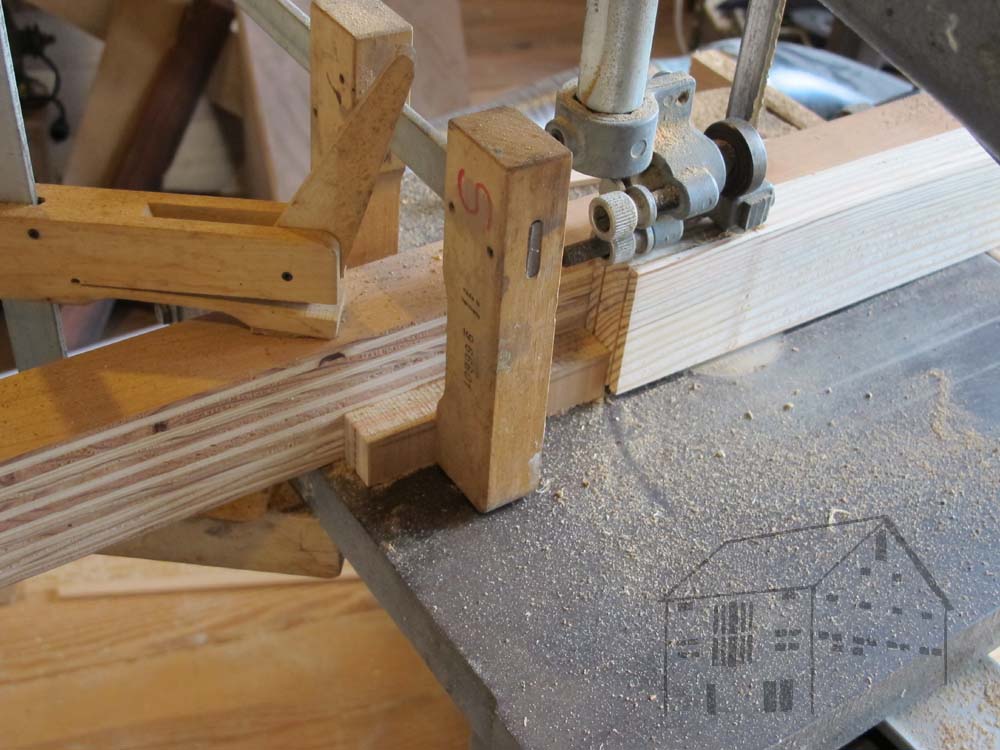
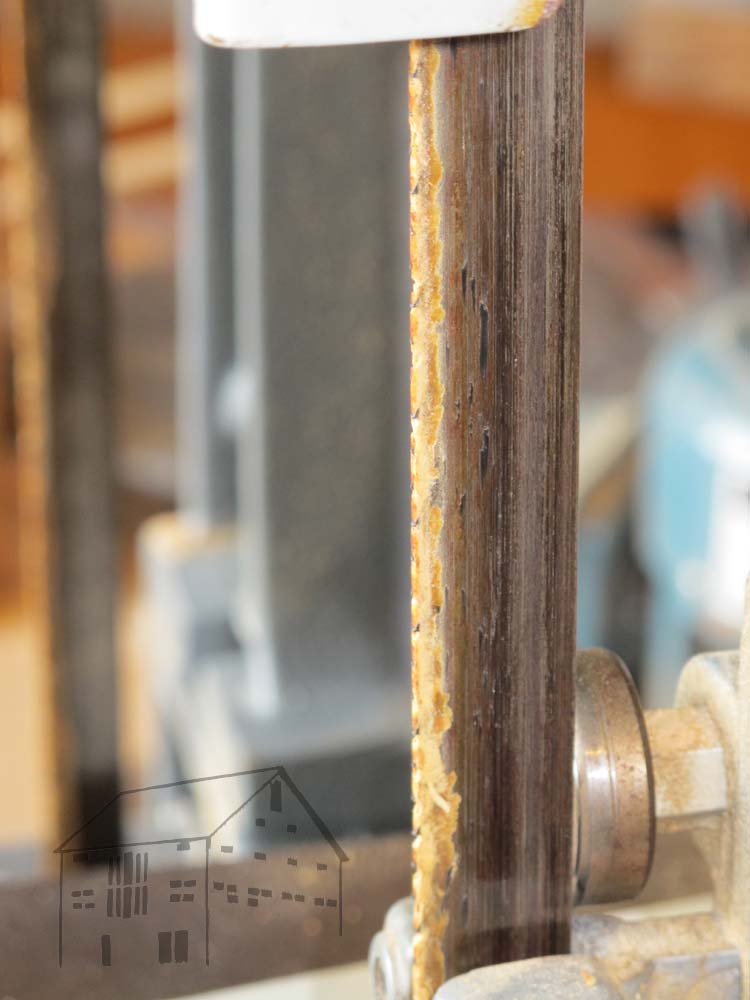
 Quickly I set up the band saw to make the necessary shoulder cuts and it went fairly smoothly. Near the end things began to bog down a bit, and you can see why here. Even though well dried (almost three years for 5/4 stock) the rosin in the southern yellow pine was so gooey it clogged the 3/4″ 4 tpi blade. The only reason it worked as long as it did was the friction kept the rosin soft, so the saw blade could still do its work. Once I stopped the pitch cooled and hardened into a rock. I will either need to clean the blade completely or throw it away. Fortunately it is not my only blade.
 Since the glazing was 1/8″ plexi, and I like fully housed glazing, I ripped an off-center groove on the inside edges of all the door elements into which I would insert the glazing. In retrospect I should have been more careful to line up the groove with the outer edge of the tenon. It would have made the fitting of the corners a lot cleaner, but then so would a well-performing table saw.
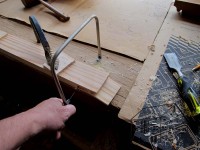
 I moved to the work bench, my first Roubo model, and trimmed the shoulders of the tenons and cut the blanks from the open mortises with a coping saw. It literally took only ten or fifteen seconds per mortise. Most of the corners fit together without further attention, a few needed a handful of strokes with the rabbet plane for them to slip together.
I then glued the frames together with the plexi sheet inserted, and when dry they were ready for trimming and installation.
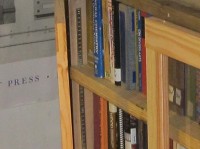
 As a sop to motivational psychology, I temporarily installed two pairs of the doors and filled the cases with books. This fatuous gesture was very encouraging. When I return probably at the end of the month I will assemble the remaining doors, and finish the detailing of all the doors before I install them and load the units with boatloads of books.
One of the truly invigorating aspects of the recent gathering of FORPXI (Fellowship of Roubo Plate XI) was the unambiguous pursuit of excellence by all the participants. That example of diligence and facility was a compelling wordless exhortation to me, and will remain a powerful force in my memory.
Perhaps no vignette of the week was more engaging than the experience of visiting Ron Brese’s home and shop, about a half hour away. On Monday evening we went there for a pizza gathering hosted by Ron and Jameel Abraham, who comes as close the fitting the adjective “menuisier” as anyone I know.
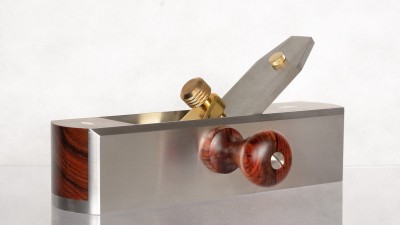
One of Ron Brese’s planes. Image used by permission.
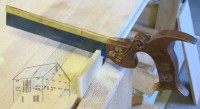
After eating, the dinner party withdrew to Ron’s modest workshop, modest except that it possesses state-of-the-art facilities for the manufacture of sublime hand planes. We ogled and pawed the accoutrements there, of course asking permission first. At one point Ron brought out his collection of contemporary backsaws, basically similar models of dovetail saws from all the hand-tool makers we encounter at Lie-Nielson, Badaxe, Gramercy, Wenzloff, Eccentric, etc. Ron let us examine and give each a test drive. There was not a dud in the bunch, I would be delighted to use each or any of them.

A back saw by Andrew Lunn of Eccentric Toolworks. His saw is of such a quality as to be different in kind from my own efforts thus far. Image used by permission.
Now, I have observed many kinds of craftsmen. (I distinguish these “doers” from the “observers” or aficionados who would rather experience artistry vicariously. As someone who appreciates merely contemplating elegant systems, including constructs of words and ideas, believe me I am not being demeaning here) First are those who simply want to make stuff, regardless of the technology required. For these “Git ‘Er Done-ers” nothing is more important than having some task completed. Even if they are not using the right tool for the job. Second are those whom I call the “Toolistas” whose greatest pleasure is in the making of the devices that are in turn used to make stuff. I observe these folks in the show-and-tell segment of woodworking gatherings wherein they wax ecstatic about the latest elegant jig they built, or the newest machine they acquired, or similar.
At its best this latter impulse is manifest in the making of exquisite tools themselves. Fortunately for us the “Toolista” community has enriched us in the access we have to perhaps some of the finest tools ever made. As I told Charles Brock when he interviewed me in Barnesville, we are living in the golden age of woodworking and toolmaking.
I’ve made a lot of tools, (in my work as a conservator there were countless instances where a tool I needed simply did not exist except in my mind, so I made it to accomplish the task required — I straddle the “Git ‘Er Done vs. Toolista” divide fairly evenly) including several dovetail saws. Examining closely the saws in Ron’s collection was a humbling experience. Before then while I recognized the limits of my saw-making vision and abilities, in the moment of seeing and using the examples from these Hall of Fame makers I had a whole new perspective on my own puerile efforts. In correspondence with one of those saw makers afterwards, I wrote:
 “While I have an interest in making tools, I have yet to go much beyond the most crude skills. Seeing and using your saw reminded me of that, so damn you for condemning my own work in absentia, and thank you for setting the standard for all of us to aim for. Well done!”
The inspiration of elegant tools such of these is a powerful motivating force for me as it provides focus and a destination towards which I will move. In the coming days and weeks I will be using them to guide my transformation of a saw I have owned for thirty years but never been happy with. There is nothing “wrong” with this tool except that I do not like it, and I will be remaking it to my own preferences. I see this project as another step in the journey from where I am to where I want to be.
Stay tuned.
In reflecting back on my very productive recent days, laboring diligently to prepare The Barn to house our several tons of books, I have the nagging suspicion that I was the target of some subliminal mockery. I got some of the two dozen glazed doors cut and a few installed (and the stock for all of them ready to assemble). Still, just beyond earshot I thought I sensed, feeling more than hearing, a gentle guttural Gallic guffaw, cruelly chiding me with, “Roubo, Roubo, Roubo.”
Yes, only steps away from where I toiled from dawn to dusk were the ~600 pounds worth of components for The Bench, sitting patiently waiting for my attentive affections. The top is already bound to a triple block and tackle, as it is the only way I can maneuver it at all. Based on my rudimentary understanding of mechanics and some back-of-the-envelope calculations, the top itself weighs about 450 pounds (my fully-clothed weight of about 230 is just barely enough to levitate the unit, hence the top weighs a smidge less than twice that weight).
Unfortunately given my upcoming schedule it is unlikely that I will be able to focus my efforts on completing The Bench before early October. It is immensely gratifying and frustrating to receive the periodic emails from my fellow FORPXI congregants regaling the group with the tales of completing their shrine, er, workbench, from the recent gathering in Barnesville, Georgia.
My day will come. My only steps thus far are to prepare the space where it will reside. Directly in front of two banks of north-facing windows, it will be the centerpiece of my work for the next three or four decades.
With the exception of my Victorinox Spirit multi-tool, I’ve always had the impression, and mostly the experience, that devices designed for a multitude of functions end up not performing any of them well. To that end I generally avoid “combination machines” for woodworking, even though I have long owned a Mini-Max over-under jointer/planer. Truth be told it was way too big for my current workspace in the basement and has mostly served as a lumber rack for the past 15 years, but I look forward to rehabilitating it in the machine room in the first floor basement of the barn. The Mini-Max’s mortising attachment has never been attached to the best of my knowledge, and I will rectify that shortcoming shortly.
One combination tool that did make some sense to me is the jointer/planer offered by Hitachi, Makita, and others in which the cutterheads for both functions reside side-by-side on the same drive shaft. For much the same reason as the Mini-Max – I simply never had the space for one of the 8” x 12” units – I never looked into them closely. Then came the day some years ago when I went to a garage sale promising “Tools, tools, tools!”

As I approached the garage I saw this petite little version of this machine, a model I have never seen and frankly was unaware existed, and at $100 it was almost my moral duty to purchase it. The capacity is for jointing and planing 4” wide stock and it can plane about 3 ½” thick, which limits the usefulness to very small projects. Or so I thought. It sat around mostly gathering dust out in my shed until I moved it out the The Barn a couple years ago, where it gathered more dust.
Flash forward to the present, when I need to crank out a couple dozen doors for The Barn Biblioteca. I had just returned from the Roubo bench fest in Georgia the night before, and I had this stack of rough-prepped stock to get over the finish line. The mondo oak slab for the bench top is smack dab in the center of the Great Hall of The Barn (I have to work on it in the only place where I had an overhead hoist), making maneuvering with my Ryobi or Dewalt planers problematic. I guess I could have planed everything by hand, but the clock for relocating is ticking really fast. Hmmm, what about the little Makita combination machine? It was dramatically smaller and more nimble, at least when it comes to moving it and the workpieces. I pulled it out and gave it a test run. It passed with flying colors.
After a quick look-see and cleaning and lubricating I fired it up. No flying shrapnel, always a good sign. A quick edge jointing: perfecto. A quick face jointing – since this was door frame stock nothing was wider that about three inches – and it was still performing just fine. Setting the planer height and immediately planing the other face of the stock and I knew I had a winner. Literally I could prep three sides of each piece in under a minute. I spent more time moving the stock than working the stock.
In considerably less than two hours I was able to edge and face joint and thickness plane each stick followed by a finish ripping on the table saw.
It is such a delight when you encounter any tool, hand powered or pigtailed, that performs its function perfectly. This tiny machine is a perfect tool for the task of preparing small, long stock. I expect to give it a real workout in the coming months and years.
If you ever find one, you might think about picking it up.
Back in the day the London Shellac Research Bureau produced a lot of literature, sometimes in concert with shellac researchers in or from India. Such is the case here with their Technical Paper No. 16 from 1938, “Fractionation of Lac” by R. Bhattacharya and G.D. Leach. I presume them to be researchers or scholars but do not know exactly.
It is worth noting, as the authors do, that as a biological material shellac is not homogenous, and they describe methods of separating out various fractions of the lac, and some very useful implications about the performance of coatings formulated with the differing fractions.
Enjoy.
Ever since donsbarn.com went live I have been receiving notes about the display of the page on mobile devices. The issue was that the menu on the left did was not reduced on these devices, in effect obscuring the page itself.
To solve this problem Jason added a button at the bottom of the menu which will allow those viewers to reduce the menu and allow for viewing of the page content. It is a bit clunky as a solution, and in the future we are hoping to add a dynamic feature to allow for automatic reconfiguration amenable to mobile devices.
Stay tuned.
Don
My quest to house fully the family book collection has led to the decision to construct a large library in The Barn, filling the entire third floor south balcony. Since The Barn is not yet, ahem, completely critter-proof, this calls for enclosed bookcases. Lots of them.
Last winter I constructed several fairly simple cases that will suffice completely for the task, and this summer I have begun making the glazed doors for them.
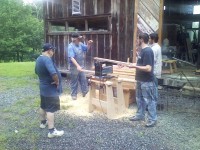
During a recent family reunion the menfolk kinfolk pitched in to spend part of a day rough cutting and initial preparations for the stock for twenty doors. I had a fair bit of 5/4 x 6” southern yellow pine left over from laying the flooring two years ago so that is what we used.
After carrying the 16’ boards up the hill from the storage barn we used a trim carpenter’s chop saw to cut the boards into the four-foot sections I needed. These were then fed through my ancient Ryobi AP-10 planer to get two clean sides, then ripped roughly in half, awaiting further refinement before being ready for actually making the doors.
The little Ryobi planer hummed along perfectly for a couple hours, somewhat astounding given its age and mileage.
An especially pleasing aspect of the adventure was that my hybrid power system – The Barn is completely off-grid with hydro-solar electricity generation, backed up with generators as necessary – performed equally well. For about two hours we had both the planer and the table saw running simultaneously and the system was unfazed.
Nevertheless I have some upgrades in the works, including quadrupling my battery storage by adding a new bank of the largest 12-volt deep-cycle batteries on the market (each weighs just under 200 pounds. In addition I have purchased five more of the Samsung photovoltaic cells to augment the three already at work. Two of the new panels will be dedicated to stand-alone 12v system in The Barn to run the fan in the composting toilet or for those times when I just don’t need much power, to charge the batteries of my drill, etc., or when I am maintaining or just don’t want to turn the larger system on.
I’ve got more plans on the hydro side, such as replacing some of the plumbing at the bottom end of the penstock (the pipe that carries the water from the dam down to the turbine) and the addition of a second turbine, a cross-flow turbine to augment the current Pelton wheel turbine, which I will fabricate myself.
Stay tuned.


Recent Comments