This has been The Summer of Gragg, and I am on the home stretch for the two chairs I am building. One of the big hitches to the project is that I was committed to getting it all on video, and sometimes getting my calendar to mesh with the videographer’s calendar was a big challenge. Fortunately (?) I made sure to have the two chairs at different points of the process, making sure the have one of them at the concluding point of the previous video session and the other somewhat ahead. So, when our calendars did coincide we could make hay.
Recently the first one made it to the finish line construction-wise. I was pleased. I can now concentrate on trimming and sculpting each of the individual elements to make the chair much more sinuous. This process must be done once the chair is fully assembled so the lines, edges, and proportions can be tuned as a whole.
I’m envision a completion date of early to mid- October.
I’m guessing that we will have 20+ hours of good video when all is said and done, and for simple logistics it will have to be diced into roughly hour-long segments to get it upload-able.
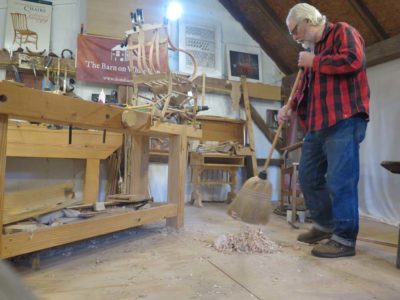
One cliché throughout the skilled trades is that workmen should clean up entirely at the end of the day and get their tools prepared for the next morning so that with the new day they can “hit the ground running.” I am not that way. I do not “hit the ground running” at the start of almost any day that does not have an extreme emotional import, I have to ease into the day. Simply put I am not a morning person, Mrs. Barn knows not to discuss anything important with me first thing in the day. I’ve been told my animus towards that time of day is due to my antipathy towards coffee. That might be true. The taste of coffee is repugnant to me, not as severe as cilantro or curry but in the same lineage.
I find that my best approach to a day of work in the shop starts with, well, my approach to the barn, which is about 150 yards from the cabin, mostly at about a 15-20% incline. I promise you that gets the juices flowing. Once in the shop my preference is to spend a little time cleaning, sweeping, putting away, and sometimes even spending a little time sharpening. This routine is what gets me in tune with the unfolding day’s undertakings, and after a few minutes of puttering like this I am ready to attack the day with vigor.
And yes, I do clean, organize, and sharpen throughout the day as is necessary.
This is a grand time on the homestead as the bounties from Mrs. Barn’s passions for gardening and good eating become manifest. She gathers the fruits of her labors daily, and processes them almost every day. Canning, drying, pickling and eating good stuff are in the air all the time now and, thanks to her skillful efforts, into the winter. On top of that is the yogurt and cheese she makes every week from the two gallons of whole milk we get from a local farmer.
Pickled cucumbers, pickled squash,
dilled beans, green beans, dried apples and strawberries (she picked over 100 pounds of strawberries this year!; I’m guessing she cans/dries about 150 quarts of food every summer and autumn),
tomatoes, and salsa are the results that will treat us all winter long. The tomatoes are just arriving so fresh BLTs will be on the lunch menu for the next dozen lunches.
On top of all this the apples are beginning to turn so I can look out my studio window and see them hang in the trees. Maybe it’s time to build an orchard ladder or two.
With the wooden core and outer bronze shell fabricated it was time to combine all the elements together to see if the concept was viable. Given the taper of the beveled side of the new plane shape and the resulting narrowing of the plane mouth I needed to cut one ear off the “T”-shaped iron to fit the smaller opening. With my Dremel tool and a cut-off abrasive disc it took all of thirty seconds to do that. Another minute on the diamond plate smoothed it all up and even the sharpening did not take long.
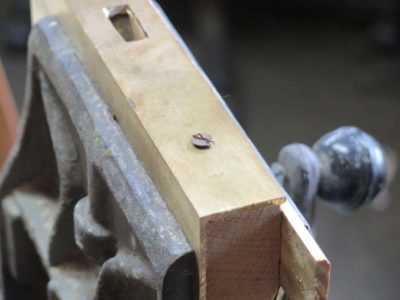
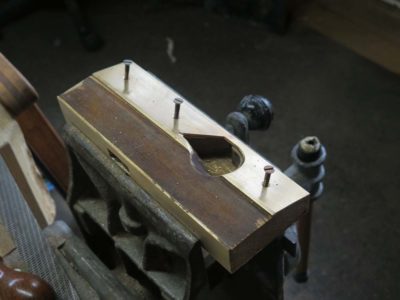
I decided to screw the bronze shell to the wooden body in such a manner that I was sorta working without a net in that if it did not work out correctly I was in for a lot of headache work. Much like Chris Schwarz uses on the corners of some of his campaign furniture, I drilled and countersunk the screw holes such that the vast majority of the bronze slotted flat head wood screws projected proud of the surface by an amount greater than the slot depth, then file the area smooth. I got my bronze screws from my favorite screw source, Blacksmith Bolt and Rivet Supply out in or near the Peoples’ Republic of Oregonistan.
Since the screw’s clamping force was so great the bronze shell deflected and I had to do a fair bit of abrasive flattening to make everything look good. The first ones left me very optimistic. A subsequent error resulted in less satisfactory results.
As I moved on to the other screws I mistakenly switched from using my brace and bit to cut the countersink to my battery drill and its countersink bit. Big mistake, as the angle of the new countersink was incorrect, an error I did not realize until it was too late. Clearly the bevel for the second countersink bit was shallower than the first bit in my brace, so the screws did not seat perfectly and there was a tiny line around the fastener when they were leveled off.
Drat.
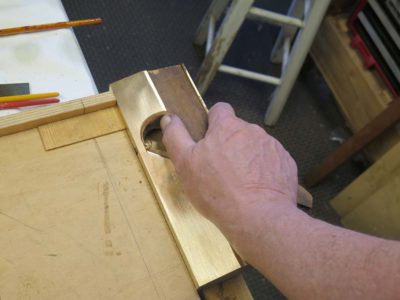
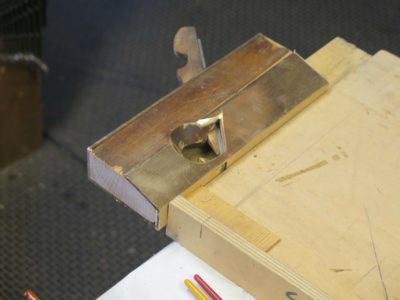
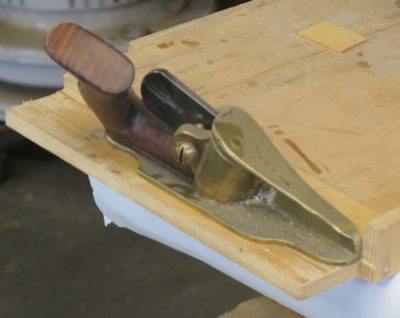
That said, once I cleaned it all up as best I could the tool both performed magnificently but also fit my hand like it was designed for it. For that reason I did not make and install a handle like was on Patrick’s plane. I always have the ability to do that ex poste.
Some last minute clean-up and I declared it finished. Since the purpose of the tool is to shave the edges of veneers (I use hand-sawn veneers pretty much exclusively for parquetry) I gave it an extensive test drive and I have to say that it is more than glorious, more than sublime. It is gloriously sublime! Or is it sublimely glorious?
I’d guess that I have somewhere around 8-10 hours invested in it, and I think it was well worth the effort.
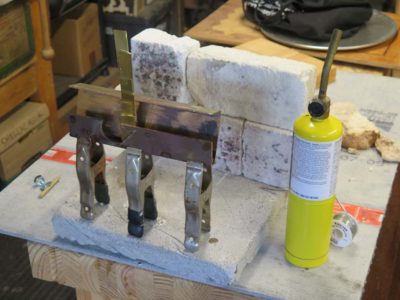
Once I had the beveled bronze cheek fitted and cut for the side opening it was time to silver solder the two major pieces together. Silver soldering pieces together at an angle can be tricky because if you get it wrong the pieces just stay together in the wrong conformation and you have to torch them REALLY hot to get them apart (usually warping at least one of the two pieces) or saw them apart.
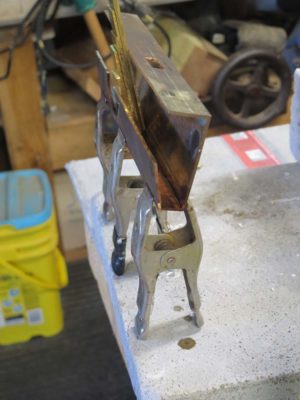
I clamped the pieces together in place at the narrow dimension of the bevel but needed to shim the widest point to get the angle correct. After prepping the surface and slathering on the paste flux I lit ‘er up with the MAPP torch. It took a couple minutes to get the entire mass up to temperature but then the solder flowed like water into the crevices where it was supposed to go. I introduced the solder along the inside corner of the joint and let it heat-wick to the outside, the liquid solder being drawn to the torch. There was surprisingly little excess solder to be cleaned off afterwards.
I let the mass cool down slowly in the ambient temperatures and returned a hour later to a hard assemblage in the exact correct configuration.
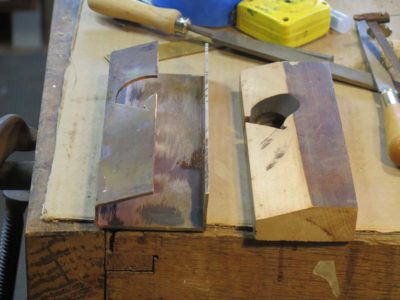
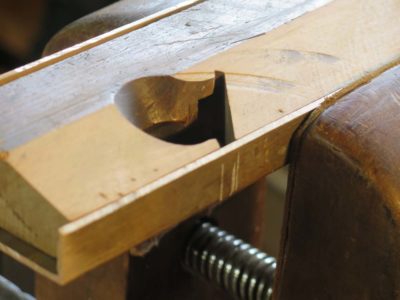
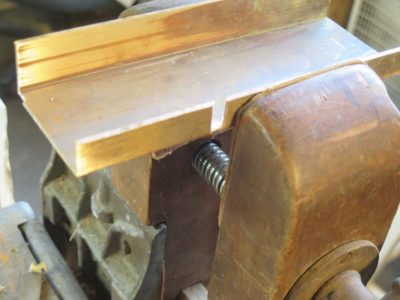
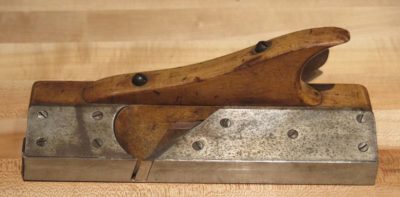
The first thing I did for the new plane was to take the old plane body and cut its height down a smidge to fit into the rectangular space inside the bronze downspout. Then I set the saw blade at an arbitrary angle that seemed pleasing to me, leaving the mouth of the body about 5/8″ wide. With the blade left at this angle and the fence moved farther away equal to the wall thickness of the downspout I cut the same bevel in the bronze. Then I cut the top of the bronze shell to accommodate the thickness of the plane body.
Setting the beveled body inside the bronze half-shell I layed out the openings for the iron. At the mouth of the iron I rough cut the opening slot with a hacksaw and filed it clean.
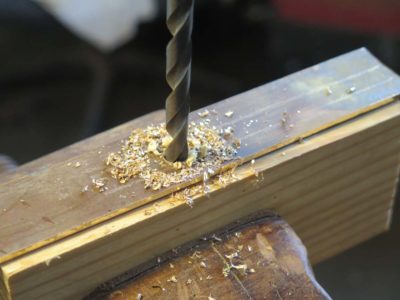
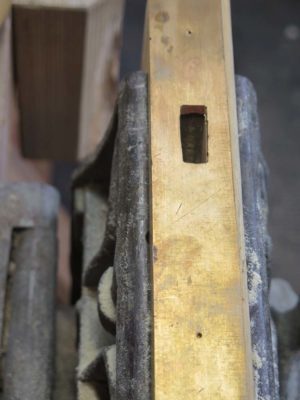
For the upper opening of the iron, to accommodate the tang and the wedge, I put the bronze shell with a backing block in my vise and drilled that out and finished that rectangle off with a square file and mill file.
Recently my friend Rich came to visit and record some video documentation of the barn’s power system which he was instrumental in designing and installing.
After last year’s WW18thC soiree at Williamsburg I blogged about being fascinated with a parquetry shooting plane Patrick Edwards had in his arsenal, and I vowed then and there to make one for myself.
Then last summer I scored this little beauty at Martin Donnelly’s annual house cleaning auction in July, and I thought it might assuage my desire to make one myself. Yeah, right. It is exquisite but only cranked up the flame.
Last week in between some glue-ups for the Gragg chairs on the fourth floor I ran down to the studio to get going on that. I wondered if Patrick’s plane was a reconfigured rabbet plane and decided that this was the path for me in my pursuit. So at a tool flea market I bought three derelict 1-inch rabbet planes with irons for $5 each. I would feel no remorse for trying and failing with landfill candidates like them.
Many years ago I had acquired some sections of bronze downspout from my local metals recycler, not for any particular reason other than it was neat and it was cheap. I figured that it was the perfect raw material for some project, some time. Well the project and time had come.
Stay tuned as I take you on the journey of turning a pile of junk into a sublime tool.
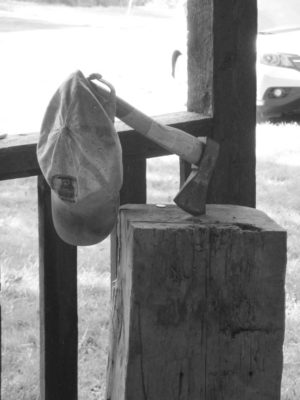
This is my view out the front door twice a day while I am putting on my shoes to head up the barn. I hang my cap on the handle of the splitting hatchet used for kindling all winter long.
In its own way it pretty much sums up life on the homestead.
While I appreciate the spatial efficiency and construction elegance of large tool chests, I know myself well enough to realize they are not suited for my temperament nor work habits. As the renowned classical philosopher Harry Callahan remarked, “A man has to know his limitations.”
I prefer my tools to generally be in open storage at torso height whenever practicable (not always possible but still the goal), such as my habit of festooning the shop with machinists’ tool chests and hinged cabinets chest-high around the perimeter of the space, and my always handy rack of drawknives.
For the past few years I utilized a vintage tool chest for storing my molding and joinery planes next to my FORP Roubo bench. Unfortunately for me the reality of my untidy habits comes to the fore and the chest is almost always under a crap-load of stuff, some of it valuable and some of it less so. Thus I spent more time devising “work arounds” to avoid accessing those tools than using them. I decided that the tool chest had to go. Exactly where it would go has yet to be determined but had to go it did.
At the same time with some shop rearranging I had a surplus but crude shelving unit that fit the spot perfectly. Coincidentally it held all of the planes that were formerly stored in the black hole of the big black tool chest.
Problem solved.
In the weeks since I made the switch I have used the now-easily-accessible planes more than in the years they were languishing in said Black Hole.


Recent Comments