As I gently ease myself back into the routine of life on the homestead, especially a life of work in the barn studio (I find that each day adds another few minutes to my naturally recovering stamina), my first few projects are ones that do not require any special level of precision or strength.
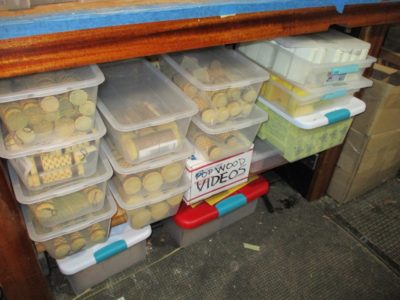
Those first few outings to the barn were spent at mundane tasks like tidying up the workshop and organizing my product inventory. I hope this makes it easier to be prompt in my fulfillment, even though I will still probably only mail things out once or twice a week.
What was most important about these tasks is that I could accomplish them while sitting down.

A second undertaking revolved around the fact that my entryway “steps” to the barn had been, for the past fifteen years, two hunks of southern yellow pine 8x8s left over from the original frame raising in November 2007. Could it really be almost fifteen years? In recent time the timbers had become aged and their corners rounded, making them unsteady underfoot.

Using some pressure treated lumber from the inventory I fashioned a new platform, one much steadier when I step up and into the barn. Nothing fancy, just pure crude utility. I will probably appreciate that even more when this coming week I attempt to hoof it up the hill rather than taking my little truck given that my legs are only now gaining adequate strength and muscle mass. I’ll take it slow, probably 4-5 minutes to ambulate the almost 200 yards, and hope my legs don’t turn to jelly before I get there. It’s quite amazing how much muscle tone I lost with nearly a month of inactivity.
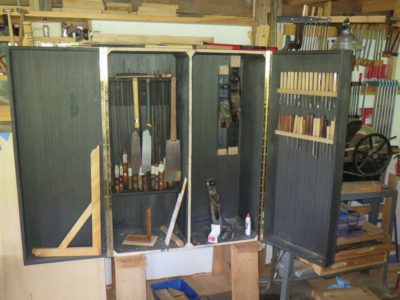
As I have stated previously, the interior of the tool cabinet will be “composed” more than it will be “designed.” The process of layout and fabrication will certainly be a deliberate one, and the amount of progress will depend greatly on the other activities in my life, projects in the studio and events outside the studio.
I have made my first choices and taken the steps to make them happen.

First, I moved my saw rack en toto into the rear of the proper right compartment.


Second, I began to design the fittings to affix my hand planes to the rear of the proper left compartment.
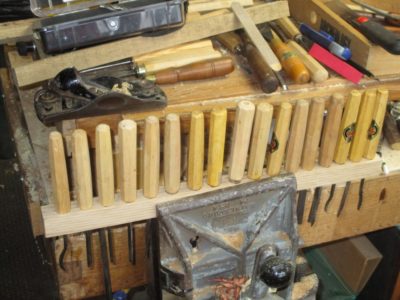
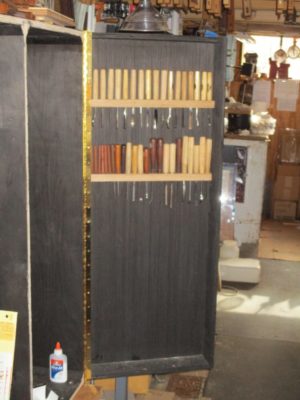
Third, I began the process of mounting my carving chisels on the proper left door panel.
It’s clear there will be a lot of proceeding and retreating as I work out the composition, but it will all be a lot of fun. There will be irregular updates as they are called for.
Stay tuned.

With the box and doors constructed the slow task of arranging the interior of the tool cabinet interior will unfold over the next several months. I have at best a vague master plan other than to “compose” the interior space slowly and deliberately, with no doubt a detour or eight along the way.
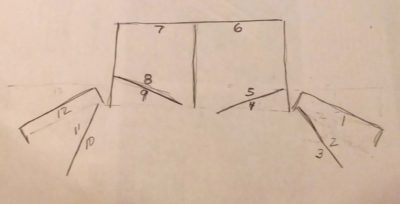
My overall scheme reflects the capacity. The drawing above demonstrates the plan of the tool cabinet with its four interior hinged panels, yielding 12 panels on which to mount tools. In addition, there will be eight drawers at the bottom of the case interior, four on each side.
At the moment my organizational strategy is as follows:
Panel 1 – carving chisels
Panel 2 – spokeshaves and other carving/shaping tools
Panel 3 – bench chisels and joinery mallets
Panel 4 – layout/measuring tools
Panel 5 – smaller planes
Panel 6 – larger planes
Panel 7 – larger saws
Panel 8 – smaller saws
Panel 9 – layout/measuring tools
Panel 10 – files and rasps
Panel 11 & 12 – don’t know yet
Check back in a year and we’ll see how close I stick with this plan.
In total, Panels 1, 2, 3, 6, 7, 10, 11 &12 combine to provide 48 square feet of hanging tool storage, and Panels 4, 5, 8 & 9 add up to another 18 square feet. We’ll see how much I can stuff in there.
In case you were wondering, and even if you were not, many of the tool fittings will be screwed from the outside of the case. Hence, I think the decorative parquetry is still a ways down the road even though I have already begun designing that as well.
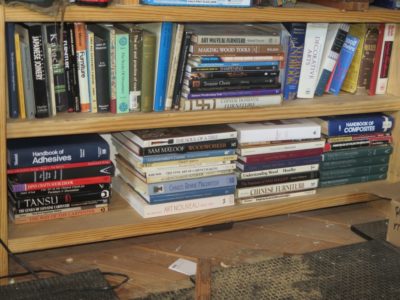
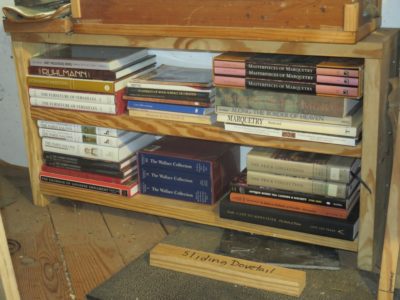
One of the notable absences from the studio ever since I started working there pretty much full time almost ten years ago was the physical distance from my books. Almost all of them were located up on the library balcony on the other side of the barn. Not far, but not close enough for the psychic comfort of 1) being part of the decor of the studio, and 2) being close enough that I could just grab one to browse or look something up whenever I was waiting for the glue to dry or something similar.
Yes, my gunsmithing books were already down in the studio on a shelf over that workbench, but even I do not browse gunsmithing books. They are ther for instructional/informational purposes.
In the studio, I need books for inspiration and peace of mind. It’s one of my many quirks. So, I relocated a goodly number into my immediate work space, and once I get finished with the tool cabinet and empty the plane shelves, will probably fill them with books too.
I feel better already.

A couple months ago for my birthday Mrs. Barn gave me this remarkable tool to keep handy. I’ve had many headlamps over the years as my fading eyesight is always seeking more lumens, but this one is the first that I’ve tried that is actually comfortable, high performance, and long lasting. The combination of the LED illuminator plus the 2 AA batteries being located at the rear of the unit giving it a perfect balance, I can wear it all day long with comfort. I cannot tell the lifespan of the two ordinary batteries as I have not yet had them go dark after almost 60 hours of use.
She says she bought it at the local feed-and-seed coop, so I am guessing it may be available at Ace Hardware stores.


I’m not sure I posted the final picture of the second door finished and hung. Like the first door I am still noodlin’ the latching hardware and have not yet come to a resolution.

I gotta say, these simple insulated doors have made a tremendous difference to controlling the microclimate inside the studio, especially since I fitted them with high performance gasketing.
In January, which can be a lot more brisk than you might expect in Virginny given our altitude (~3100 feet) and breeziness (we are in a wind power “red zone”), I experienced a dearth of heat output from my coal/wood stove for a week that required me to keep the kerosene rocket stove going most of the time to keep the temperature comfortable in the studio (50-ish). I gave the problem a fair bit of thought and diagnosis, and my settling on the wrong answer was reminiscent of a conversation I had eons ago with a statistician whose job was to help academic researchers design their projects to yield the most authoritative results.
The statistician recounted numerous incidents wherein an “expert researcher” would show up in the office with a box full of lab notebooks and say something like, “Here is all my data. My conclusions are X, Y, and Z, so make the data fit those conclusions.” Virtually every institution of structured inquiry has statistical specialists like the one I knew, and I expect they have all been presented with scenarios like the one I just described. Given the current prevalence of junk science being the coin of the public policy realm, we are all subject to faulty questions being asked, slipshod “research” being conducted to fulfill the question, and dubious “results” being crammed down our throats as being “settled science.”
As Michael Crichton once remarked, “There is no such thing as settled science. If it is ‘settled’ it is not science. If it is science, it is not settled.” A recent dark-humor internet meme explained the status quo; “97% of all scientists arrive at conclusions their funders desire.” This has become ever more evident in our recent past. Follow the toxic stew of money, power, and prestige, and you can predict where nearly every “science” story thread will eventually end up. Put another way, it is likely I/we would be better off believing the exact opposite of everything reported publicly, in keeping with the tenets of the Gell-Mann Amnesia Hypothesis (look it up).
What does this have to do with my stove?
Everything and nothing, as I had arrived at the wrong answer when diagnosing the performance of the heating system. I was confusing the natures of coincidence, correlation, and cause. In short, I was short-circuiting the loop of synthetic thinking, whereby the inaccurate/incomplete merging of the noumenon (that which can be conceived) and the phenomenon (that which can be observed) was leading me to a faulty conclusion. I should have known better, for three decades all of my teaching has been built on a foundation of synthetic thinking.
My first stop on the faulty thinking express was to observe that the original gaskets on the stove doors, now over a half-century of service (the phenomenon), were falling apart and definitely needed to be replaced. In doing so I surmised that the efficiency of the stove (the noumenon) would be dramatically enhanced by getting the stove door gaskets back up to spec.
I found a source for the odd sized gaskets and replaced all the aged ones. In the aftermath of that I could see that the doors fit more snugly and the fire box was very tight. The next day after allowing the gasket cement to harden, when I fired up the stove the firebox built up much quicker heat but the studio temp was no better. Besides, there was a lot of smoke in the interior space and not as much as there should be coming out the top of the chimney. Smoke tendrils were coming out of every teeny crevice in the exhaust pipe.
Hmm, sez I, somehow there must be a bird or mouse nest somewhere in the stovepipe preventing good air flow up the pipe, disrupting the proper function of the system. This line of thinking was my second stop on the crazy train of faulty problem solving. I reluctantly disassembled the stove pipe to the point where it exited the building envelope.
Nothing. All I had accomplished was to get really dirty.
The next day the weather was a little warmer but I still needed some heat and thus fired up the stove again. Not only was the interior smoke worse, there was water dripping from somewhere up above down the stove pipe all the way to the stove on the first floor. Whatever I had done to this point was the wrong thing. Not only was the problem not solved but it seemed to be getting worse. It’s almost as if I was a gubmint science policy advisor.
Clearly there was need for a third excursion on the Coincidence, Correlation & Cause Express.
I disassembled the section of the stove pipe penetrating the barn wall and the upward crook/rain cap outside the building. The end of the pipe, outside the building, was fully impacted with a dam of sooty frozen sludge. You see, I had failed to correlate the series of blizzard-y snow storms we’d had a month before, which combined with our absence for a fair bit of the intervening time allowed snow to blow underneath the rain cap and into the top of the stack and compile there. At some point in the timeline the snow so filled the up-crook of the smokestack that it allowed only the bare smallest amount of smoke to escape around the perimeter of the snow plug, and even that was facilitated only by the heated exhaust warming the metal pipe just enough to allow a little gaseous exhaust to escape. And, the harder I tried to get the system up to proper performance the more I was causing the soot/snow plug to melt into a serious dam of sludge in the elbow of the up-crook, blocking all exhaust flow close to 100%. Once I got all that cleaned out (I cannot recall a messier job) and reconfigured the stove pipe to prevent a reprise in the future, the stove was cranking enough heat into the studio that I was peeling layers as I worked.
I had misread the components of the coincidence, correlation, and cause equation, and thus unknowingly dispensed with any hope of accurate problem solving via synthetic thinking.
It was a great reminder to me to be skeptical about almost everything I observe and think, read or hear, and, I hope, it was a good lesson learned.
One of my initial design/aesthetic choices for the standing tool cabinet was to make the prominent detailing to be black, along with the entire interior. In the former case it was to set off the comparative blandness of the oak veneer, about which there will be exhaustive posting in coming weeks, and in the latter it would serve to set off the tools themselves. As to the ebonized stringing in between the parquetry I am not yet fully convinced — I may instead go with rosewood which will serve the primary purpose equally well, although it will not tie-in with the interior well without further design– but ebonized interior is already a fait accompli.

The ebonized stringing for the proof-of-concept parquetry exercise representing the outer skin began with a piece or two from the pile of 1/4″ tulip poplar I had on hand, itself a raw material for yet another proof-of-concept for some fauxrushi I am prototyping. Using water soluble shellac as my coloring medium, a/k/a India Ink, is a method I use frequently.

The big box store pieces of tulip poplar fit a flower pot tray perfectly, so I used the tray as the immersion bath for the board. After soaking it all night the surface was really black.

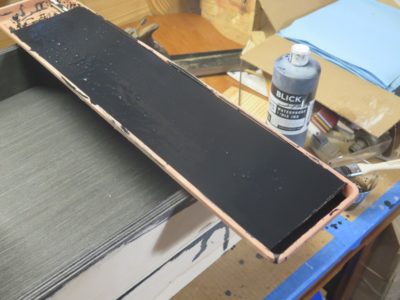
Even then when ripping the bards on the bandsaw it was apparent that the interiors were not well dyed, so I repeated the tray and India ink step again with the strips. The result was a pile of 1/4″ wide ebonized stringing strips. That might sound a tad wide to you but remember, the front presentation of the cabinet as 4-feet-by-3-feet.
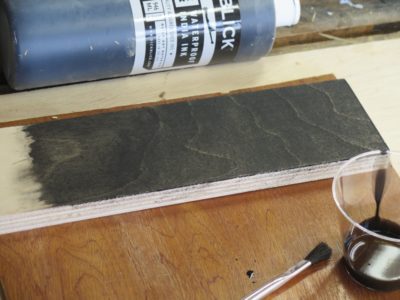

As to the interior, I noted that the soaking of the plywood with India ink yielded a very desirable surface, black-ish but still retaining the character of wood, a result not really possible with something like gel stain or il paint.

With the door frame laying on the flat floor I slathered T3 on all the gluing surfaces and placed the first door skin on it, making sure to align the edges properly.
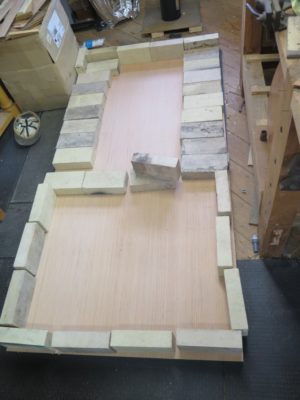
My primary clamping mechanism for the glue-up was placing fire bricks along the glue lines. Each fire brick weighs about ten pounds, so I reckon there was just under 400 pounds of dead weight holding everything in place over night.

Once the glue dried for the first skin on the door frame I was able to lift the entire thing up onto sawhorse to work it further. With a Japanese mortising saw and an Irwin detail saw I cut out the opening for the window.


Then came time for some of my stash of foil-faced polyisocyanurate insulation for the void chambers.

Some more T3, bricks, and all the spring clamps I had available and the assembling was complete. All that remained was to remove the second skin over the door opening, trim the edges, and trim and insert the insulated glass panel.
With the first door finished and installed it was time to move on to the second door, which, like the first, would be constructed around an existing panel of insulated glass. This time it was a leftover panel from the 90 I first bought at a building materials recycling center in order to fabricate the windows in the barn with my pals Craig, Dave, and Long Tom. The panel was considerably smaller than the one for the first door so the construction and “design” were markedly different.
On the first door the panel of glass was large enough that it was essentially little more than a frame and glass. Not so with this one, it needed some actual internal framework to hold the panel and thus some spaces to put the requisite rigid insulation infill. As with the first door the skin was nice 3/16″ plywood.

The construction itself was straightforward with the inner frame being made from clear 2x construction lumber, ripped and planed. As for the joinery I used my mortiser to punch square holes where they needed to be and the bandsaw for cutting the tenons. This pic is from the previous door but you get the idea.
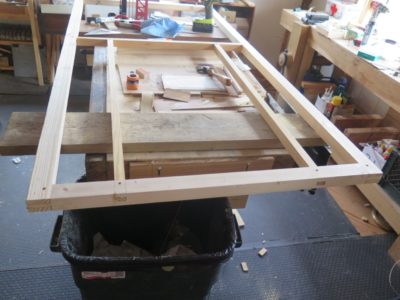

Once the mortises and tenons were finished I assembled them with T3, gluing and screwing each joint together.

And with that the frame was done, ready and waiting for the application of the first door skin. For that step I had to clear a space big enough to work on the entire thing flat and supported. Given the size of the door, that meant I had to clear some space and do it on the floor.

Recent Comments