I’ve got a 12-inch radial arm saw down on the first floor of the barn, but it has not seen one second of activity since it was moved here thirteen years ago. I’m just not doing anything that makes it necessary. However, on the second (main) floor I’ve got a 10″ chop saw that gets used regularly to make long boards shorter for whatever reason. For some tasks I use the cross-feed sled on the table saw but far more frequently I’m just chopping something up.
One of the great features of the chop saw is that it is quick and easy. One of the lousy features is that it made a huge mess even when I hooked up the “dust collector” outlet to the shop vac. Even when everything was hooked up properly sawdust went all over the place and it required a local cleanup with every use.
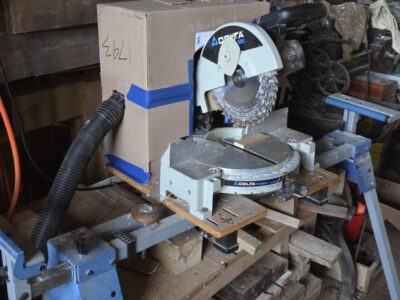
I finally got tired of this nuisance and made and installed the lowest possible tech solution, which reduces the sawdust cloud by about 99%. I looked through my mountain of boxes piled up on the third floor and found one that fit my needs. Equipped with a utility knife and a roll of masking tape I fabricated a box shroud to fit over the back side of the saw, complete with a port for the shop vac hose. At this point the only thing missing is a fitting to glue to the portal for plugging in the hose, but even with just a rough hole cut in the side of the box the collection is magnificent.
I do not know the setup of the Blacksmith Bolt and Rivet fellow (he’s been getting virtually all of my wood screw business for quite some time) but this video of a “small” Japanese screw making operation tickled my fancy.
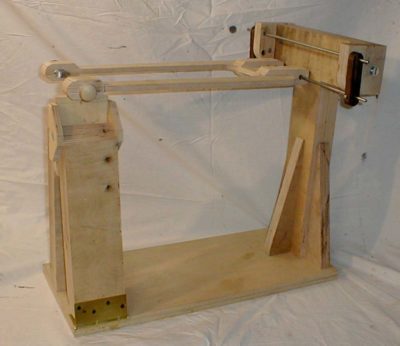
One of the many projects I’ve been juggling this past week was making a new outside cowl for the headstock of the old-as-dirt-but-wonderful Walker-Turner lathe my pal MikeM passed along to me many years ago. Exactly how and why I was fiddling with it will be told in a series of posts very soon, but for this moment suffice to say that as I was bolting on a new cowl cover this afternoon I had that sinking moment when you feel a bolt wring off.
Impolite words and guttural moans filled the air.
I’m not sure if the bolt broke because I was feeding it in crooked or it bottomed out, but one thing is sure – it’s busted. 1/64″ below the shoulder.
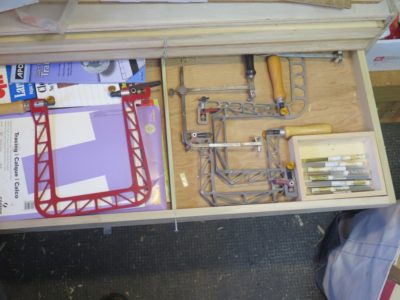
I drilled out the center of the bolt in the hopes of removing it with the reverse thread bolt extractor. I then spent the next hours in a (thus far) futile search for the set of extractors. Wherever it is it is hiding skillfully.
But, I did find some other things I forgotten about, so there is that.
I am booked solid for the coming week so it will be ten days before I can return to this particular migraine headache. If the extraction fails, I will have to drill out the hole and tap it to the next larger bolt size. Hardly anything more than a First World problem, but it did cast a cloud over Shangri-la today.
As I approach the end of the year I am reflecting/projecting on the projects ahead of me. In addition to diving deeper into writing I’ve got a large number of things on my plate, including the mini-Gragg for Li’l T’s March birthday (coincidentally the month for the arrival of grandson #3, all of them March boys), outfitting my 18thC tool chest collection for on-site interpreting and re-enacting, doing some casting and patternwork, some possible private tutorials at the barn, several new workbench builds, blah, blah, blah.
High on my list will be resuming work on my ultimate tool cabinet, the one that will take me along until my ashes are scattered on the mountain. Since the presentation surface of the cabinet will be parquetry in the fashion of the Roentgens, and made from scraps left over from the French Oak Roubo Project, I still have a lot of veneer to saw to complete that. I’ve written about that some, but it has been so long I will probably start the account all over again.
To enhance my veneer sawing I am thinking seriously about another upgrade to my bandsaw using the roller guide set from Carter.
Have any of you tried this product? If so, please let me know. It is not cheap, around $200, but if it works as well as they say I will plunk down the money without hesitation. Given the fact that I originally bought the saw for $100 at a yard sale, I can afford to tart it up a bit.
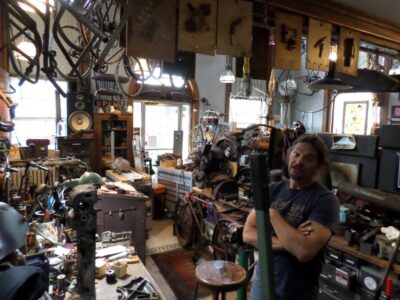
During our recent visit to Youngerbarndottir and Li’l T I arranged to travel a few dozen miles to visit my long-time friend “Jersey Jon” of American Pickers fame. Jon is one of the smartest and most creative people I have ever met, not only exceedingly talented but extraordinarily skilled at a whole host of activities. I am honored to be in his circle of friends and colleagues.
His reputation as perhaps the world’s leading expert on the history and restoration of pre-WWI motorbikes is well deserved. We spent a few hours rummaging around his old bank building as he described a never-ending menu of upcoming projects.
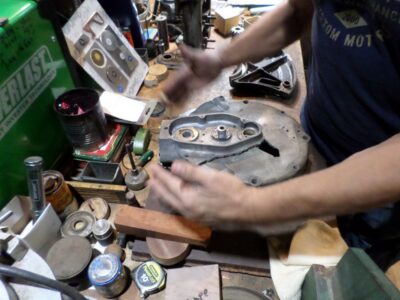
One mind-blowing project was his need to rebuild this crankcase of a very early motorbike engine that had blown itself to smithereens. As we noodled the process and outcome of the project, I was pleased to realize that the smelting furnace I gave him two years ago was likely to be integral to the solution to the problem of getting this ultra-vintage motor bike back on the road.
It could have been a much longer visit but he was on the countdown to leaving the next morning for a fortnight of Pickers filming.
If I were somehow told to restrict myself to just one standing/stationary power machine in the shop I would almost certainly refuse to play that False Dilemma scenario. Instead, I would opt for two bench top units, a drill press (probably using my Jet mortiser as it is just an extra-stout drill press with some specialized features) and a bandsaw. Of the latter I would further refine the choice to not one but two, my little Delta 9″ which I find integral to milling veneer, and my Rikon 12″ which is adequate for just about everything else (as long as I keep it tuned and outfitted with a variety of sharp blades). I’ve checked, and even combined they do not nearly occupy the volume of one venerable Delta 14″ bandsaw or similar, probably the standard by which — aside from the near-mandatory table saw clogging the center of the work space — almost any woodworking shop in the US is measured. Plus, to confound the meta-Prisoner’s Dilemma variation even further, the little Delta 9″ is light enough to move easily for use or storage under a bench or table. So, I won’t play that game.
What does this to do with the title?
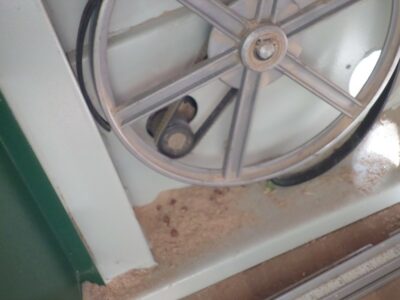
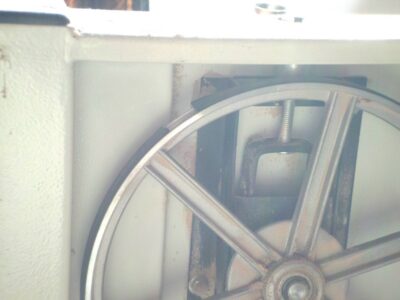
Well, I recently installed a new blade on the Rikon and as I was adjusting it I noticed a little bitty thump-thump-thump as I turned the wheels by hand, centering the blade on the tire crowns and got the guide blocks where they needed to be. I closed it up thinking I would touch the weld joint sides and rear with a stone when at full speed to smooth out the little thumping sound. It almost always does. Not entirely correct. It ALWAYS has resolved the problem before on any of my bandsaws.
But this time, under power the thump-thump thump almost instantly became THUMP-THUMP-THUMP followed by a WHAM! and the sound of the blade becoming a weird piece of modern sculpture.
Short and sweet — the original tire on the wheel had finished coming apart and in so doing tore up the blade in the lower wheel box. There was no real damage to the saw, fortunately.
I ordered and installed two pairs of new tires (second pair is backup for if/when the phenomenon reprises). The lower tire needed nothing to get it off, it was already in pieces. The upper tire actually broke as soon as I started removing it, revealing a pre-existing split that was well along the path to destruction of its own.
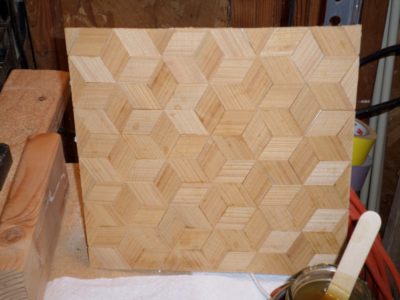
During my recent Introduction to Historic Woodfinishing workshop I used a parquetry panel to demonstrate the substrate preparation processes and found it so useful that I said to myself, “Self, you should do this demo at Handworks.” In the blink of an eye, I committed myself to cranking out six more parquetry panels in a very short time. I will do four (hopefully identical) demos of French wax finishing, at 11AM and 3PM both days. My plan is to take a panel from rough parquetry to gleaming in about 20-30 minutes using analogs to the tools, techniques, and materials available to a Parisian atelier.
With an audience looking over my shoulder.
Wish me luck.
In the meantime I had to actually fabricate six parquetry panels; four for the demo sessions, one more to remain “raw” and a sixth to be completed in advance to use as a showpiece. The only ways I could conceive to finish such an undertaking were 1) cutting parquetry lozenges by hand for several days running, or 2) use my bandsaw or table saw to gang-cut stacks of lozenges. After initial trials I decided to follow path #2 with my little Delta benchtop bandsaw.
I’ve used my bandsaw for ripping parquetry and banding stock strips before, but could I tune the machine to actually create the diamond lozenges themselves? Let’s FAFO (Fool Around and Find Out). *Spoiler Alert!* – the result was so successful that it will likely be my standard procedure from now on. My days of hand cutting individual diamond lozenges may be over.
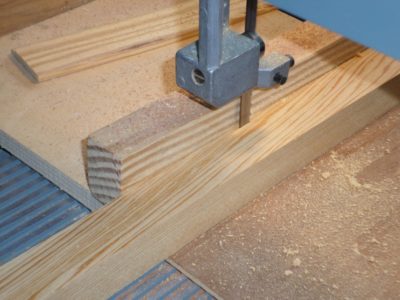
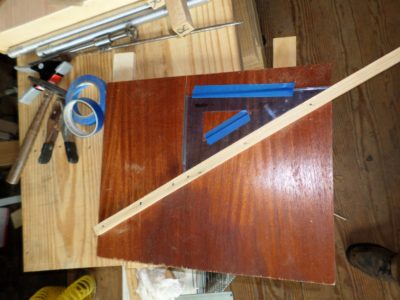
I first fabricated a crosscut sled for the bandsaw from some scraps of maple runners and mahogany plywood. I ran this through the saw approximately halfway, then inserted my thin 6″ machinists’ rule into the kerf to serve as the reference line.
Taping a 30-60-90 triangle in place against the reference line, to make sure nothing moved, I tacked a fence to the sled at 60-degrees to the kerf. I often use tacks rather than glue in cases like this because I can induce micro adjustments with a hammer when necessary.
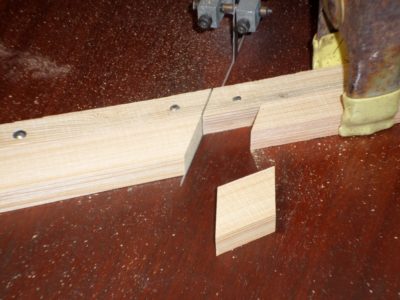
Using the newly installed fence I cut a 60-degree stop block to use whenever I want to cut 60-120-60-120 lozenges. For any particular composition of parquetry I cut a slice of the veneer strip then rotate it and place it against the blade to establish the placement of the stop block against the fence. One good/bad feature of the little bandsaw is that the blades are very thin with almost zero tooth set. Not good when making rough cuts in irregular stock, excellent when making precision cuts in identically prepared stock strips.
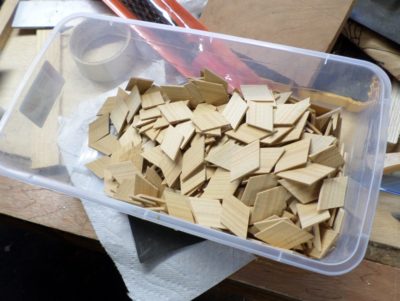
With the machine set up and the test cuts made to assure the angles and dimensions were spot-on I was able to saw five or six diamonds at a time and filled my shoebox-size bin in about 20 minutes.
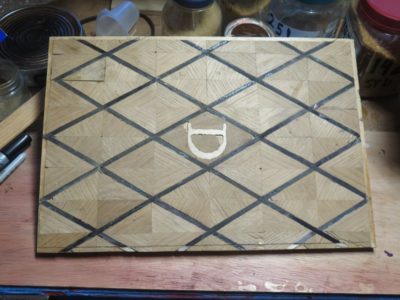
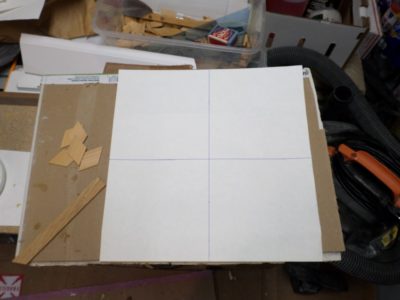
With the stock elements in-hand I laid out cross-lines on paper and got to work.
I find the cross-lines to be exceedingly helpful keeping myself on track as I glue down the diamond lozenges to the paper. Any irregularity, no matter how miniscule, compounds and amplifies. Hence the guidelines to keep me on track. With precise diamonds and the cross-lines I could compose a complete foot-square panel in a little over a half hour.
Trimming off the projecting elements with a veneer saw and Japanese knife the next morning I now had six compositions ready to glue down, in this case to 1/2″ Baltich birch plywood.
The irregularity of handsawn veneer (or bandsawn for us modernes), regardless of how carefully executed, is why the ancient ebenistes saw the toothing plane as the first woodfinishing tool to be employed.
On to mounting the parquetry panels face down on the plywood. All the gluing for this project was done with 251 gws hot hide glue.
Final trimming in situ was followed by banding and perimeter strips. I work two sides at a time, trim the ends of those two sides at 45-degree angles, then cut and trimmed the remaining pair of sides. It took me a lot longer to do the banding and perimeter strips than to compose the original parquetry.
And with that I am now the proud possessor of six parquetry panels for showing-and-telling. If you are at Handworks stop by and take a look. I’ll be in the center aisle of the Festhalle.
With the especially strenuous activities program on the homestead these days — tons of yard work, fixing my hydro line, etc., with very little time in the shop at the moment — my evenings have been pretty sluggish. I often don’t even have the energy to read anything serious or write, and instead we sit on the couch and work our way through “Leave It To Beaver” or “The Dick van Dyke Show” a couple episodes at a time. Yes, in most respects (not all, but most) I would be happy for the tenor and character of our culture to reflect the 1950s USA. That culture has long passed, being replaced by something that seems to resemble Mao’s Cultural Revolution inflicted on the innocent population of China, and now being revived in spirit among the American “intellectuals” and academics. In other words, people generally devoid of any useful beneficent accomplishments. (I do not consider bloviation and pontificating to be useful, unless they agree with me of course!)
In addition to LITB or DVDS I can often be found spending time immersed in woodworking videos, like those of a Japanese commercial custom carpenter who uses both machines and hand tools in his excellent work. Some of his machinery boggles the mind.
There is no grass growing under this fellow’s feet.
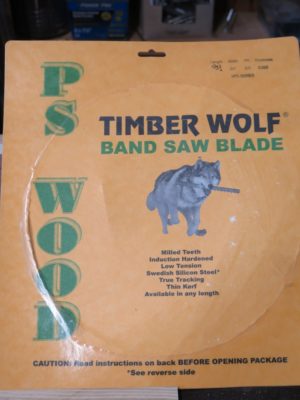
During a recent round of machine maintenance and associated exercises I reflected on my current 14″ bandsaw set-up, particularly relating to the blade that was on the machine. Now, there was nothing wrong the current blade as it was in fine shape but I was willing to go afield in this regard. I had been thinking long and hard about buying and in$$$talling a carbide-tooth bade especially after watching a Stumpy Nubs video on his transition to carbide bandsaw blades. The great Winston Churchill quote, “The American people can be depended on to do the right thing after all the alternatives have been exhausted,” comes to mind; I do not mind spending dollars, even high dollars, on a performance-enhancing option but only after I have been absolutely persuaded it is the only reasonable option. Or sometimes exploring a different, less expensive option that might come close.
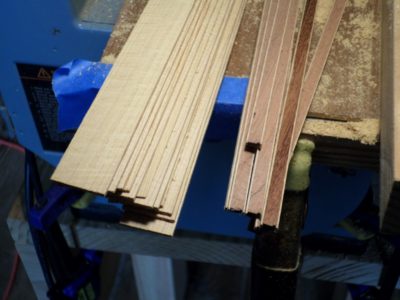
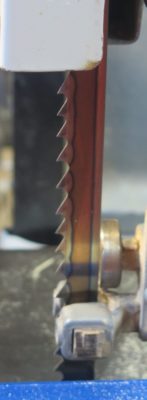
In the end I decided to try a different route than the carbide-tipped blade$ and opted instead for one of these variable pitch blades (unevenly spaced teeth) and I was frankly astonished at the performance.
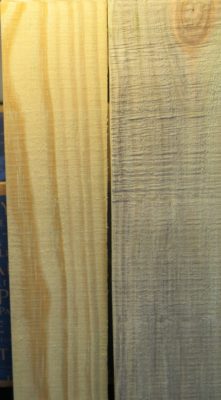
As you can see in the photo, the re-saw on the right was with a 1/2″ x 4 tpi blade in excellent shapeand the result on the left was one of these new variable pitch blades with the spacing being 2 to 3 tpi. As different as day and night with virtually no chatter
In addition, the sawing itself was nearly effortless, and an unexpected benefit was the great reduction is noise. The blade is not silent, it is cutting wood after all, but dramatically quieter than the previous blade. All the result of disrupting the harmonics resulting from equal spacing between the teeth.
Since I have smaller bandsaws for finer work I will probably leave this one set up for joinery and small re-sawing. I am finding myself using the band saw for more routine work especially since outfitting it with the excellent Kreg fence.
For many years I was/am a friend of Knew Concepts founder Lee Marshall and his collaborator and successor, Brian Meek. When we met at their first Woodworking in America conference they were just beginning to explore branching out from their world of jewelry-making tools into our world of coping and marquetry saws. I think those first interactions occurred around 2010 or thereabouts and I recall vividly an evening of dining and sketching on napkins as I proposed they undertake the design and manufacture of a vertical marquetry chevalet. Sure, this concept was revolutionary and heretical and might raise the hackles of horizontal-chevalet-traditionalists but that did not concern me nor apparently did it do anything but enhance Lee’s curiosity.
I had already made my first foray into the chevalet machine form with my c.2002 benchtop horizontal unit, but to be truthful I already had too much muscle memory dedicated to vertical sawing to ever feel fully comfortable with it. I always kept returning to my tried-and-true bird’s mouth and jeweler’s saw.
So my intersection with Knew Concepts crew was underway. Our ongoing collaborations led me to hold virtually all of Knew Concepts products in my workshop, trying out what they already were making along with many protypes in development.
I was very excited when they brought their first complete proof-of-concept prototype to WIA 2016 and gave it a good long test drive. There was much left to noodle out in the details but the overall concept was in place. Before those details were resolved Lee’s health declined to the point where he died, and Brian succeeded him at the helm of Knew Concepts. The transfer of the company was long and complicated, but eventually the new regime was in place.
Some time in 2019/2020(?) I dropped an email to Brian asking about the progress of the machine. He called me to say that one of the terms of the company transition was that at least one unit of the machine be manufactured and that unit would be sold to me. A few months later it arrived and I set it up just enough to give it a look-see. It is a spectacular machine and as of last month is now permanently ensconced at the end of the third daughter, ready to make marquetry at a moment’s notice.
While I was at it, I made a major improvement to my Knew Concepts Mark I jeweler’s bench saw by adding an oversized working platform, making it all the more amenable to marquetry than it was before, not surprising since it was designed for jewelry-scale work.
This post might be a long-winded way to say that I have loved marquetry since I first encountered it almost fifty years ago and now have the time and tools to make it an integral part of projects. I suspect my main emphasis will be parquetry, not curvilinear marquetry, but I am now outfitted for either or both. My tool cabinet will be my first big foray into monumental scale work as the outside will be vaguely inspired by the works of Abraham and David Roentgen.
I’m thinking this might be the conclusion of this Winter Projects series and it is time to return to our irregularly scheduled programming.


Recent Comments