A week of travel, during which I was mostly without connectivity, and the final push to get through the first round of edits and annotations for “To Make As Perfectly As Possible: Roubo on Furniture Making” (T minus about 15 days and counting…) has taken a toll on these missives at Musings at The Barn on White Run.
Still, I wanted to wrap up the project on the gargantuan picture frame featured last time.
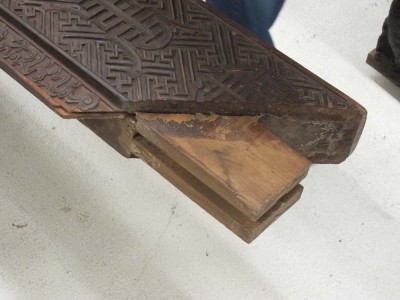

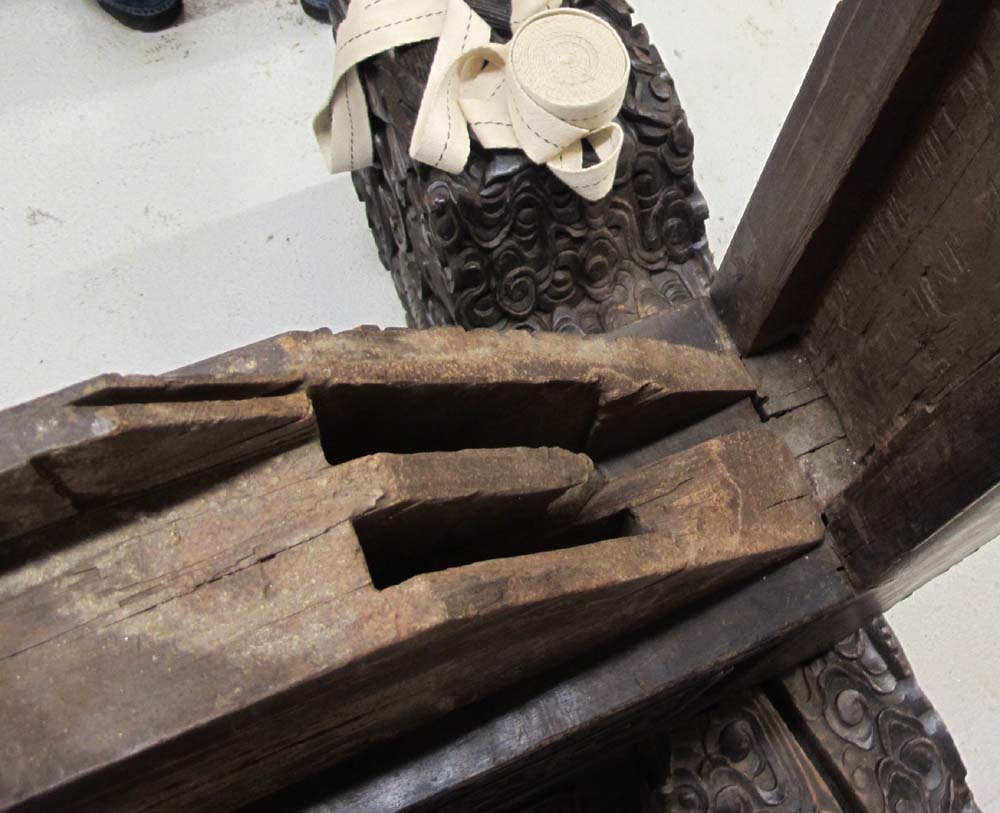
One of the critical things about a frame that large is that is must conform to the painting inside, and even the smallest deviation will result in calamity when projected out over ten or twelve feet. The sub-assembly that houses the painting was assembled with mitered double mortise and tenon joinery at each corner, and the joints were not tight. Originally they were glued together with hot hide glue, but for this project the desire was to prepare the ensemble for traveling exhibit, mandating as a result that the entire unit be disassemble-able. Glue was out, so the joints had to be assembled and left friction-fit. This allows for just enough wracking that the fit of the painting could not be assured.
Another solution was called f0r.
When first presented the problem I chewed on it for a great while, then proposed and devised an “after market” locking cleat assembly for each of the four corners, to be applied on the verso of the corners once the painting was installed and the configuration of the frame was established.

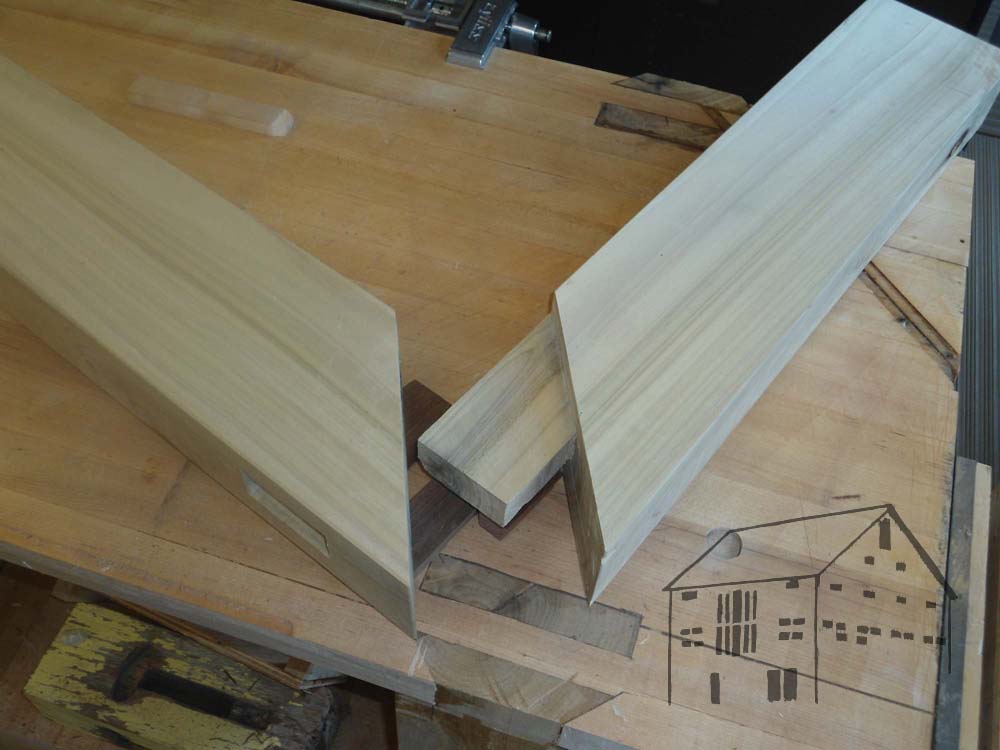
Using some 4×6 tulip poplar stock I had laying around I fabricated an analogous corner at about 2/3 scale,
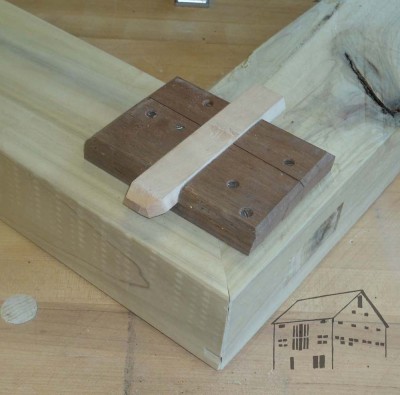
then designed, fabricated, and installed a quadruple dovetailed cleat-and-lock system to be affixed to the corner. It worked perfectly, and when presented to the curator and project conservator from the museum who owns the artifact, approval was enthusiastic and immediate. Earlier this month I fabricated the four corner units, mostly on my table saw at home. Each piece is tapered and beveled at 5 degrees.
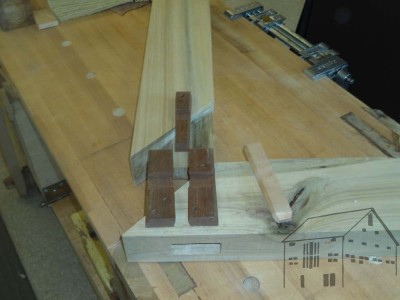
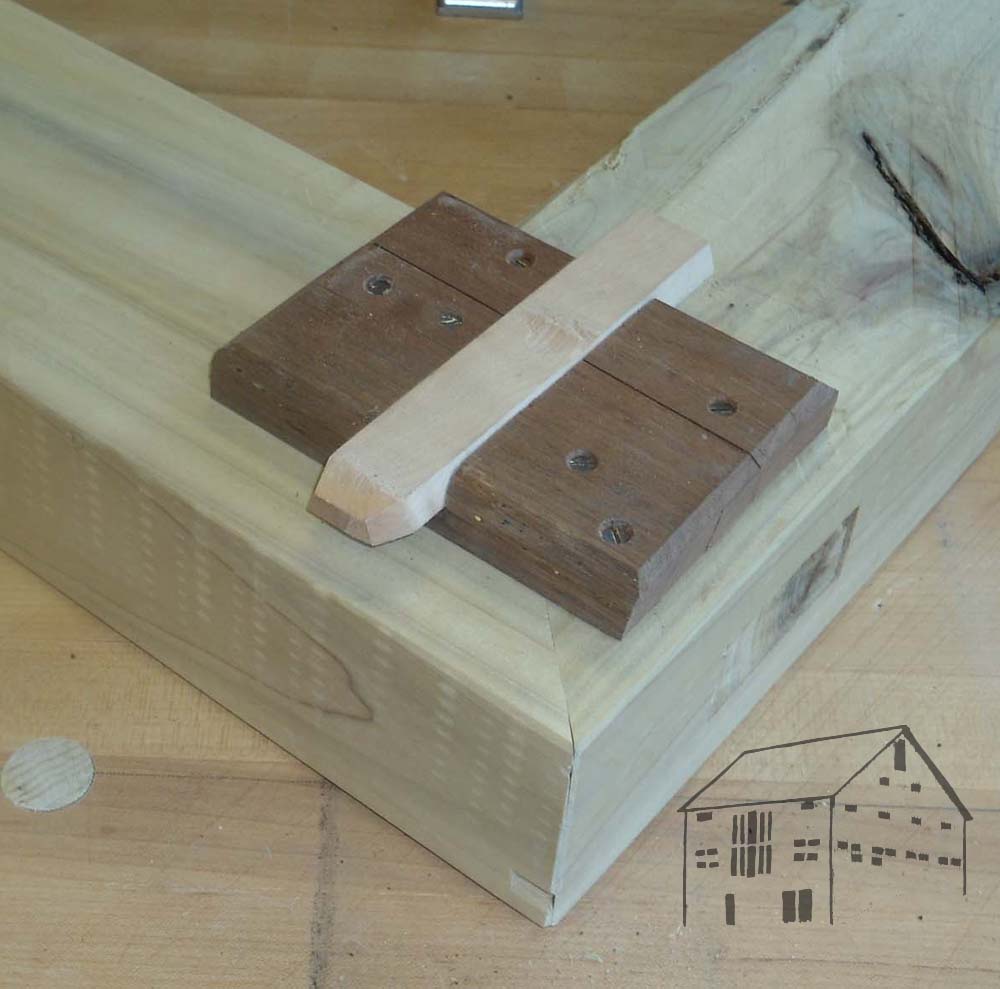
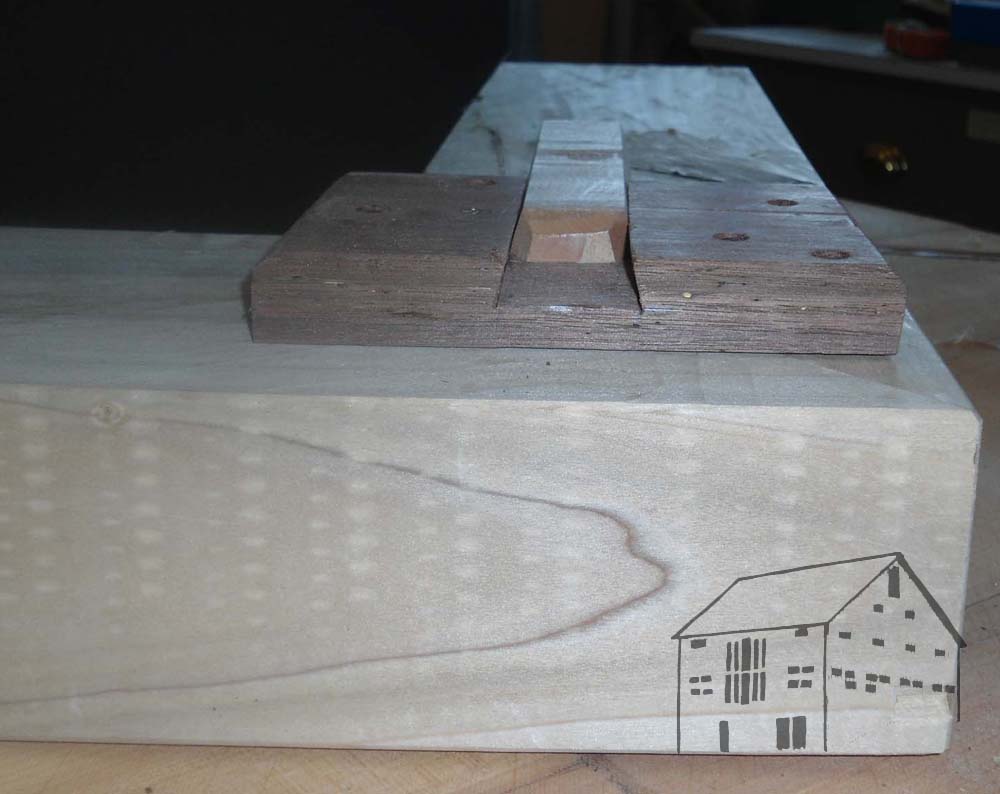
A double-taper set of cleats is first attached to the assembled corner,

positioned so that when the mortises are seated, the cleat is perfectly aligned.
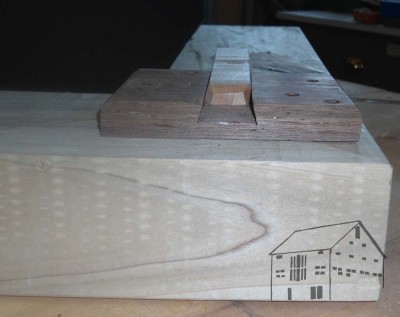
Then a double tapered locking pin is driven in to a double tapered sliding dovetail, rendering the entire assembly immobile.
The status of the project is that we will be installing the painting some time in the new year, and once the painting is fitted perfectly in the currently sorta-loose frame I will attached the new cleats, and the assembling process will be finished.
.
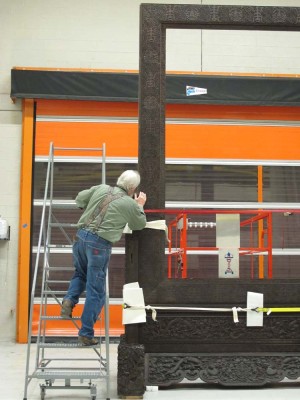
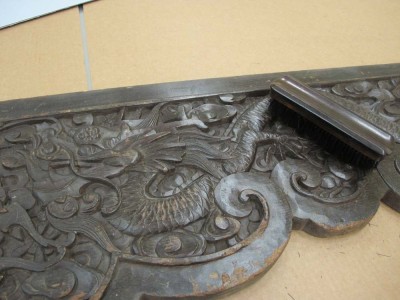
In the closing months of 2012, as I was approaching departure from the Smithsonian’s Museum Conservation Institute after almost three decades, my major project was the conservation of an ornately carved monumental picture frame. By monumental I am not talking about merely big, I am referring to an assemblage weighing just under 3/4 ton and standing eighteen feet high! In form the frame is akin conceptually to a Federal-style shaving mirror that you might find on top of a dresser.
Over the past two weeks I have gone back in to my former work place to finish off the project, which had been sitting idle for the past eleven months.
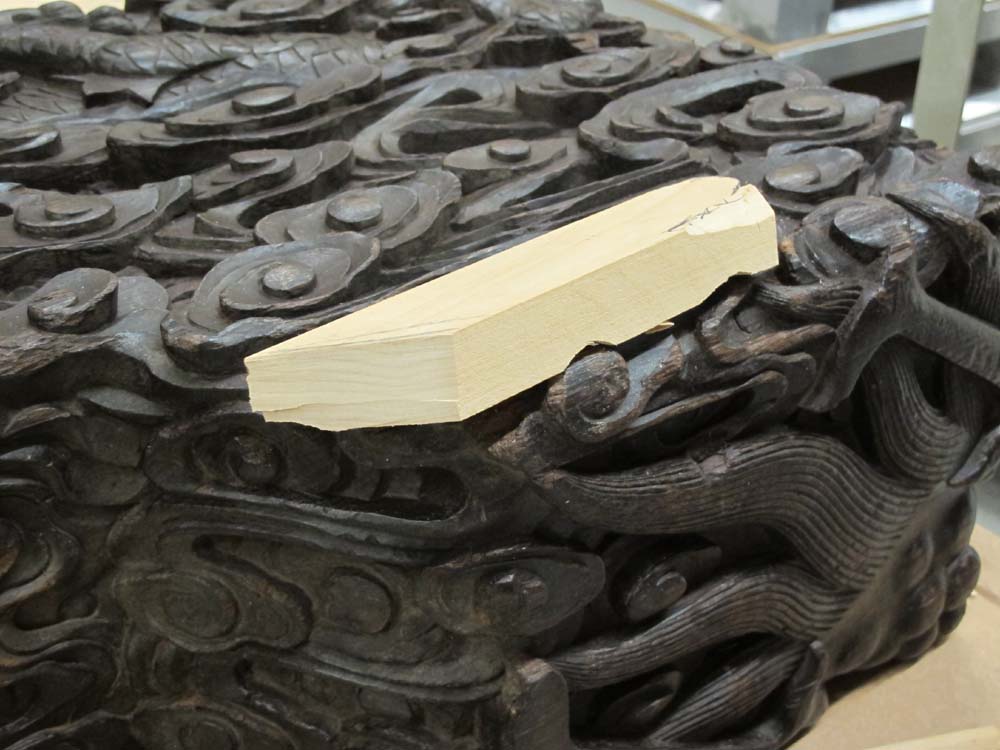
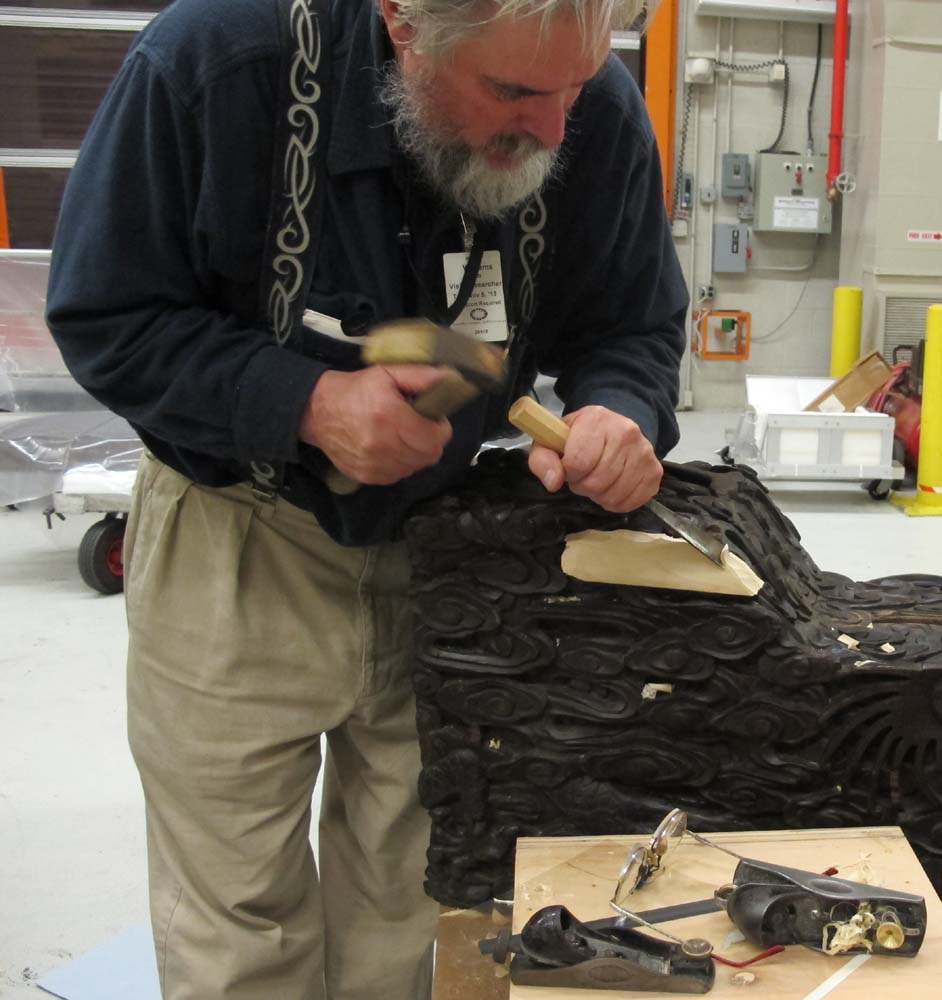
The main focus for my days of work has been the carving of missing elements and the completion of the presentation surface.

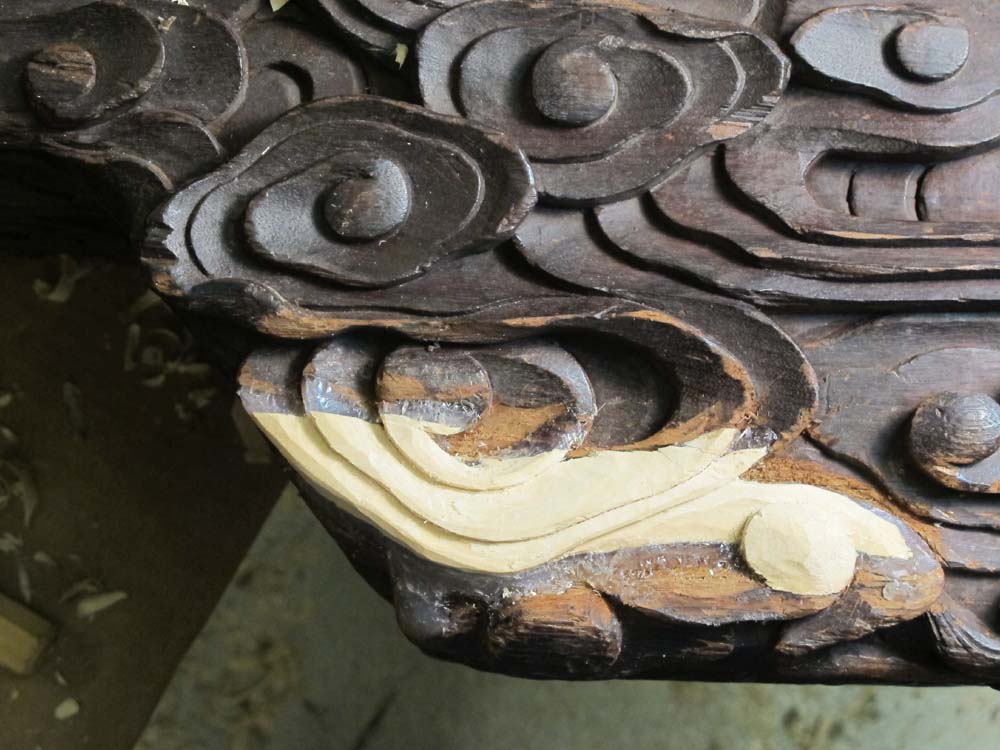
One corner of one of the bases was pretty much gone, so I had to graft in a chunk of cotton wood and EVA filling adhesive (a general process I published in this paper) and get out the carving chisels. While we did not conduct scientific wood analysis on the frame, the character of the wood suggests it was fabricated from paulownia or something very similar, so my options for grafting in new material to carve resided in the cottonwood-paulownia-tulip poplar nexus.


Since the loss was enough that I was uncertain of the design element, I had to make it up as best I could.
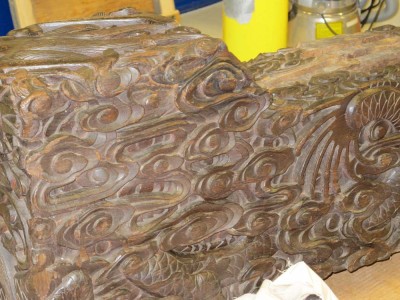
The final result was not displeasing.

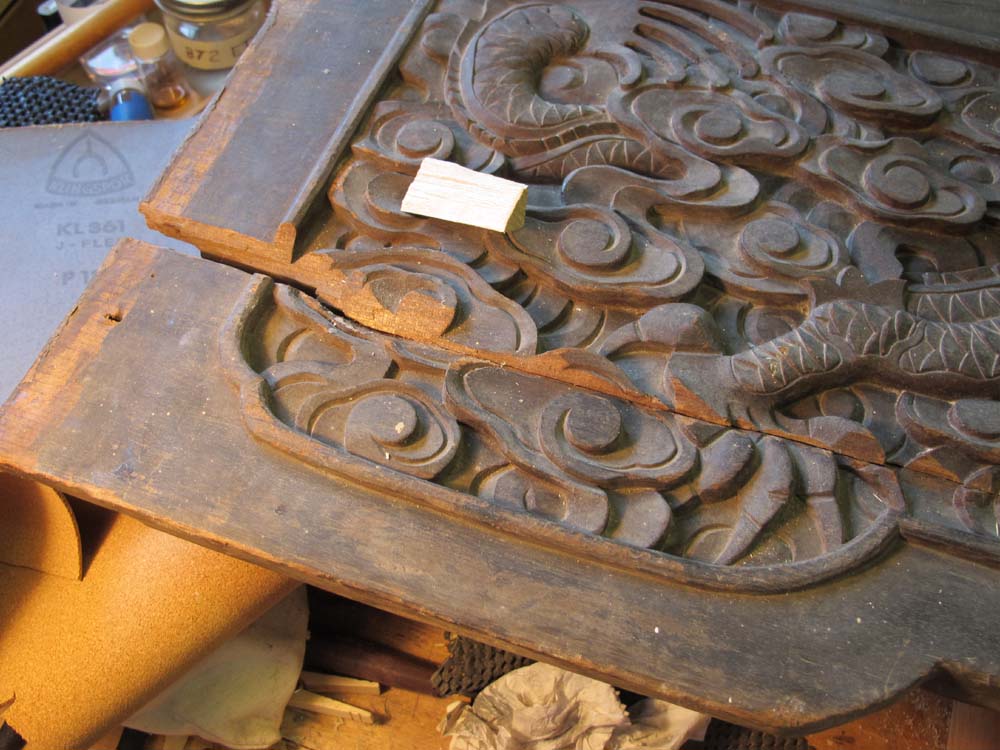
Other areas, mostly opened splits, needed to be filled and carved as well. Some of this had started a year ago, but was not yet done.
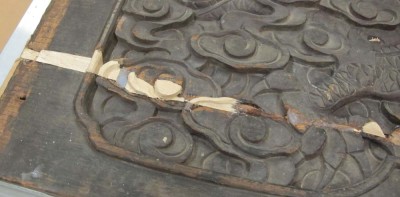
Again, I used cottonwood as the primary wood fill material with gap-filling, flexible but carveable EVA as my adhesive.
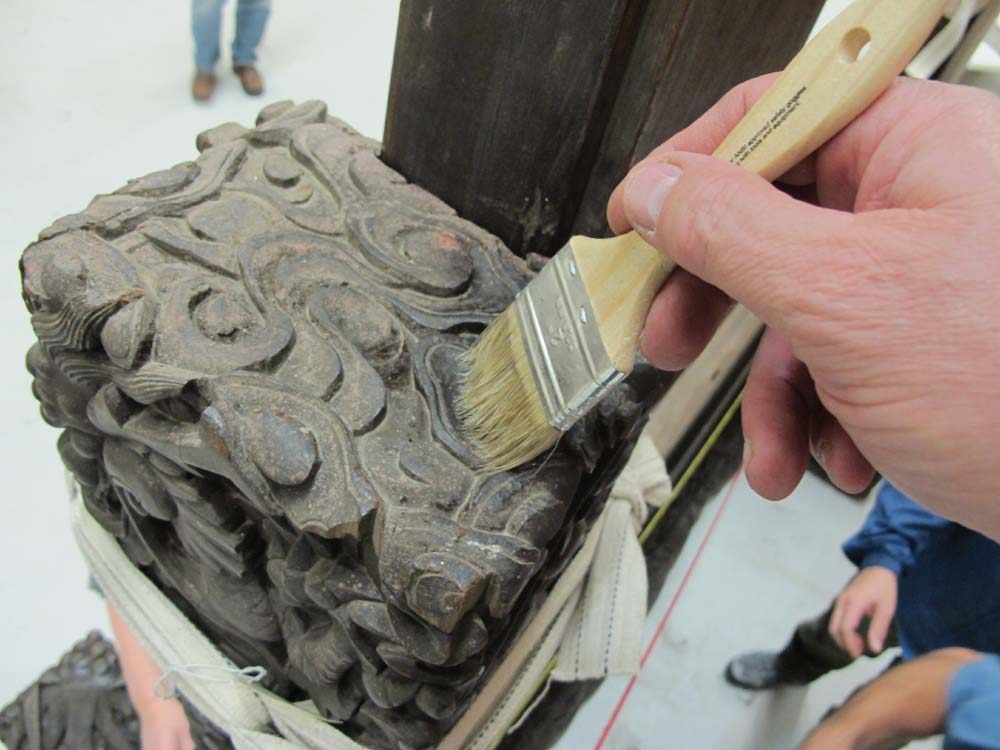
Once all the carving was complete I lightly toned the new wood with gouache then sealed the entire area with Mel’s Wax followed by pigmented paste wax to provide a unified appearance.
When the frame components arrived in the furniture conservation studio more than a year ago the first task was to assess the pieces and begin to clean every square millimeter of surface. Since the surface was sensitive to most cleaning methods we wound up rolling Groomstick — an archival, specially formulated non-sticking putty used for cleaning sensitive artifacts — over the entire ornately carved surface, a process that took over a dozen volunteer interns more than three months.

Once cleaned, since the surface was sensitive to most of the typical coating systems we might use in treatment, I determined a protocol that worked magnificently: a light application of Mel’s Wax (a high-performance, easy-to-use archival furniture maintenance coating invented by my colleague in the studio — production of this product has begun and it will be available from me very shortly) to provide a stable, high-performance, easy-to-remove foundation sealant.
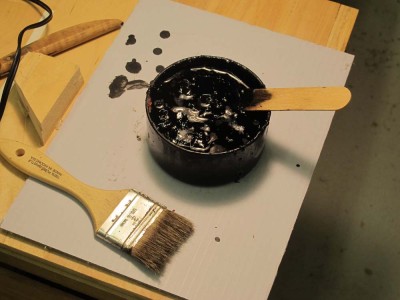
This was followed by a “dry brush” application of pigmented paste wax, essentially a formulation I derived based on shoe polish technology.
This area has been partially completed, with the right side having been buffed with a shoe polishing brush after the pigmented paste wax was completely dry. I made no attempt to disguise every single scrape and loss on the surface, it was an old and well-worn artifact, and its nature is readily evident.
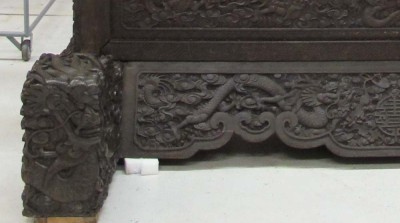
So yeah, “shoe polish” saved the day in creating a homogenous presentation of the frame, into which the gigantic painting will be installed fairly soon.
Next time I will describe the quadruple dovetail locking corner cleats I designed anf fabricated to lock the double mortised mitered corners in place, so that the frame configuration matched precisely that of the painting.
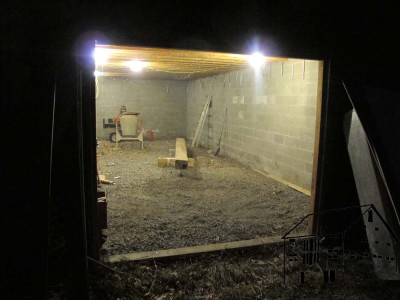
After laying down the new ¾” plywood flooring over floating 2×4 sleepers the next step in preparing the machine room for the actual arrival of the machines was to finish the doorway to allow entry into the space. For the past seven years I just had plywood fastened over the garage-door opening there, removing the sheathing only under very unusual circumstances, which had not occurred often. I had always intended to build some nice, simple doors and now was the time.
The finished doors are absurdly simple units of plywood and 2x4s, roughly 48” wide by 81” high. I started by cutting the plywood to the right size, then all the 2×4 framing pieces, and assembling the whole with decking screws. Each door of the pair includes two 20” x 40” thermal window panels, left over from building the dozens of windows in The Barn. I originally purchased almost a hundred of these glass units from a salvage yard in Toledo, who had purchased the contents of a defunct window factory who-knows-when.
I made the openings for the windows by simply cutting the voids mostly with my circular saw following the frames, then finishing off the cuts with a hand saw. I laid down a bead of transparent silicone calk and dropped the glass panels in place, followed by molding strips to lock the panels in place. No framing, no joinery, just quick and dirty.
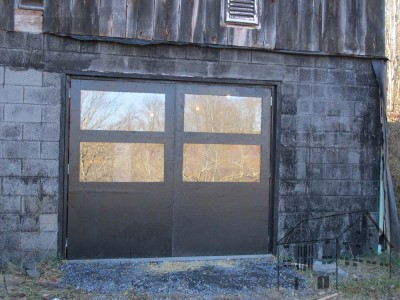
I did not get the doors all trimmed and weatherstripped this trip, but at least they are up and functional. There are no door knobs as the doors will only be opened from the inside when the barrel bolt latches at the top and bottom are released.
They are inelegant, but I am content with them. Some day I may make some exquisite doors of mortised frame-and-panel, but for now the screw gun assemblage does the trick.

I am especially pleased with how well they blend in to the barn overall, but could not help but notice that the concrete block wall around the doors need painting, pronto.
The one area of The Barn to receive the least attention thus far has been the ground floor, a shortcoming I have begun to address. In anticipation of the upcoming move of my machinery next month I needed to get room for them prepared, which I began with the recent clean-up of the space.
For the past couple of days I have been making great progress in getting the machine room ready not only for the machines but also the installation of a wood stove to heat the machine room and my main workshop which is immediately overhead.
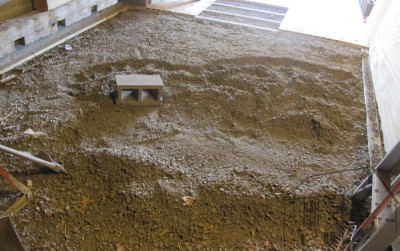
Fully cleaned, or as fully cleaned as I could get it, the space looked like this at the beginning Wednesday night.

The best thing about being at The Barn is that it is not close to anywhere. The worst thing about The Barn is that it is not close to anywhere. When building materials are required for a project, if they are not delivered it means a three-hour round trip to the lumberyard. On Thursday afternoon I made the trek, returning with about 1400 pounds of supplies in my little half ton S10. If GM had not been vampirized into a confiscated soviet enterprise I would be the perfect spokesmodel for their little trucks, as I have used them hard with nary a whimper on their part. Remind me to tell you sometime about heading over the mountain, some of the winding-est roads anywhere, with two 400-pound smelting furnaces, a raft of machines, and weighty supplies in the back, my pal Mike riding shotgun. In the dark. In the rain. And me with poor night vision. I cannot state with certainty that when we arrived he leaned over to kiss the ground, but it would not surprise me.
The space for the machine room still had its packed gravel floor from the original construction seven years ago, wholely inadequate for machines (yes I know the dictionary spells wholely differently, but in my opinion dictionaries are wrong about this). In addition, the gravel floor was not really level. So, my plan was to flatten the gravel and lay floating 2×4 PTSYP “sleepers” on it, then screw ¾” CDX sheathing on top as the final floor.
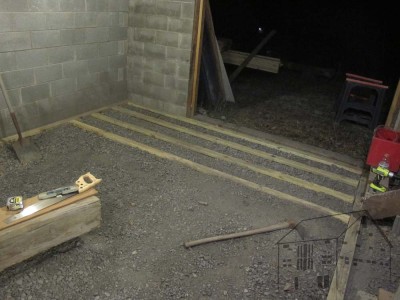
The first several feet were fine, and the gravel level was just about right. The hardship came after these first few sleepers were laid.
Unfortunately the remaining gravel had been put down with a slight crown, about 3 inches worth. That would not have been a terrible problem, but I had to inset the sleepers with their tops to be about two inches below the current gravel level.
Let the digging begin.
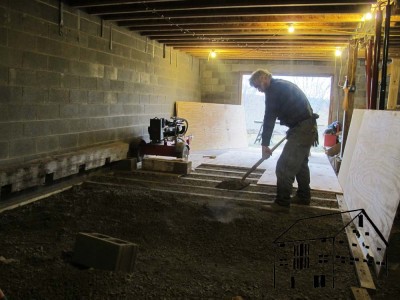
For the majority of the project, I wound up loosening all (and removing most) of the gravel where it was, using a shipwright’s adze as my implement of destruction. The gravel was a local product known as “limestone dust” which packs tight, becoming almost cementitious over time and traffic. This consumed about 75% of my time and 90% of my energies, as the gravel had to be bludgeoned into a state of looseness, the shoveled and raked smooth at the right level.
Had you been there to keep me company yesterday and today — and where were you, by the way? — this is what you would have seen a thousand times.
My working routine for this was to sit on a concrete block and work in arcs swinging the adze to break up the gravel, working in ever widening arcs and moving the block stool as needed. Once a large enough area was so prepared I would remove about half of the gravel, one shovel full at a time.
By the end of the day I was practically immobile with exhaustion, and last night I was in bed by about 8.30, too tired and sore to even open the folder with Roubo 2 manuscripts being edited.

Just before a late supper tonight I finished with the main area of flooring I will get done this trip, but even this 300 square feet (with another 100 s.f. to get next trip) exceeds my current tiny basement workshop by 50% so things are looking good. But then, I have to make room for a wood stove and all the machines I have out in the barn at the other house…
Tomorrow I make the new garage doors for the machine room.
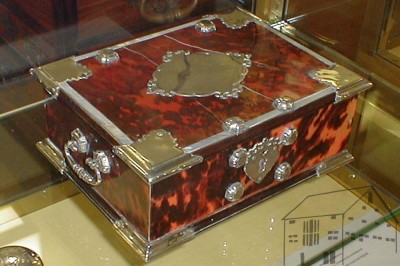
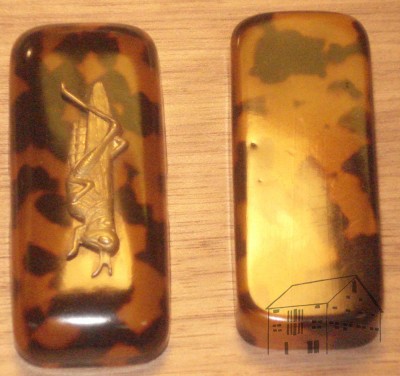
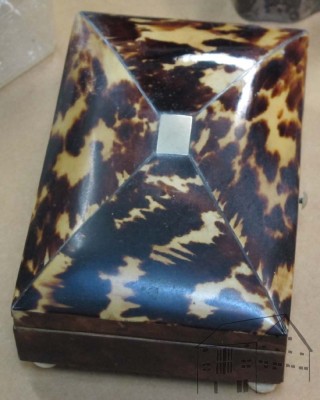
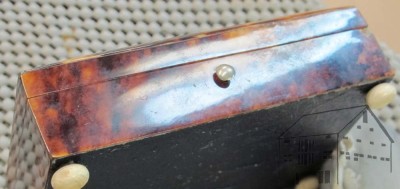
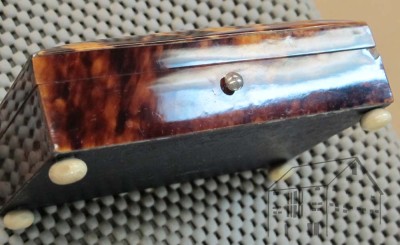
I have long held that tortoiseshell is one of the most fascinating non-shellac materials available to decorative artists. This South African silver and tortoiseshell writing box from the 1700s I saw in a Dutch museum some years ago is nothing short of captivating. Over the past decades I have developed an appreciation for not only the material but its use as veneer in historic furniture and decorative objects like pill boxes and tea caddies.
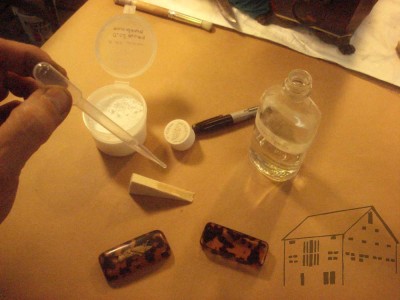
My interest is such that I even invented an imitation tortoiseshell that I use in my ongoing restoration of numerous artifacts. Here is a small gallery of some of my “tordonshell” examples. Attendees for my upcoming course “Introduction to Boullework” will get a chance to make some tordonshell for themselves (tentatively August 2014 — stay tuned).
Over the past few years I have been treating a collection of exquisite tortoiseshell objects belonging to a long-term client, mostly cleaning and polishing them along with the occasional in-depth repair of substantial deterioration. Recently while working on some beautiful little boxes I had time to consider the way in which many “restorers” and certainly dealers abuse tortoiseshell objects in their care.
The occasion of my contemplation was the hand-polishing of several small boxes, and the recollection of a conversation I had once with a dealer at an antique show. The artifacts for sale in his booth were nearly devoid of the surface character that should grace most tortoiseshell. In conversation he revealed with glee that he used power buffers to bring his pieces up to a kitschy glaring shine (my description, not his) turning gloriously fabricated items into something more akin to extruded or molded plastic from Target.
I would have gladly instructed this dealer on how I polish tortoiseshell (the right way), but after seeing what I have seen in numerous antiques shows, it would have no doubt been a wasted effort. But you gentle reader might be more fertile territory.
Here’s how I do it.
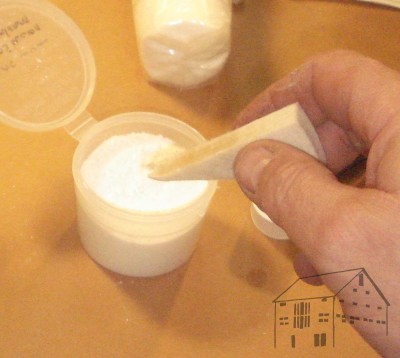
First, I gently clean the surface with lint free cotton cosmetics pads dampened with a few drops of naphtha to remove any greasy accretions from furniture polish concoctions. If the surface is especially grimy, I might mix up a water-in-oil emulsion, but that is a rare requirement. I avoid using other water based cleaners most of the time as the proteins comprising tortoiseshell are water sensitive. Probably not sensitive enough to be damaged by a quick and careful swabbing, but I avoid this virtually all of the time.
Next I move on to the actual polishing, which in this case requires the gentle application of powdered abrasives, the kinds used for preparing metallography specimens for analytical microscopy. I have long used 1 micron agglomerated micro-alumina abrasive from Beuhler, but there are no doubt other sources. I find that a thimble full would almost last for a life time. Not really, but I am still on the original stash of powdered polishes I have been using for decades (I have several grades for different kinds of polishing processes).
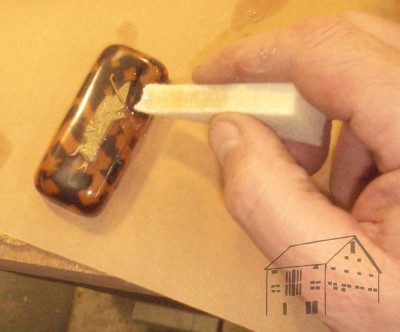
In some instances I place a little mineral spirits in the watch glass holding the powder and dip a piece of worn cotton flannel or felt block into the slurry to charge the pad, and gently but vigorously rub the tortoiseshell surface. Other times I drip some of the solvent onto the felt block and dip the moistened block into a container of the abrasive. Just as often once the pad or block is charged I simply use the pad or block dry.
In most cases the results are evident in a couple minutes of careful work on a very small area, and a small object takes an hour to carefully hand polish, more or less. It is important to avoid rubbing hard enough to heat the surface or erase the character of the tortoiseshell. This is where the power-polishers take a wrong turn. By buffing on a power wheel, they heat the shell and often deform it (the chemistry and properties of tortoiseshell are very similar to your fingernails, and are thus very sensitive to heat and moisture) and damage the shell, and polish away all the magnificent character of the material leaving it like gaudy synthetic plastic.
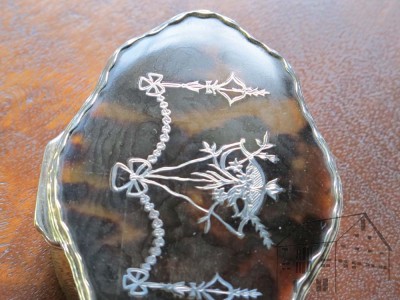
The ideal for cleaning and polishing tortoiseshell is to both recover the appropriate glossy aesthetic but retain the “water mark” moiré pattern inherent in the material.
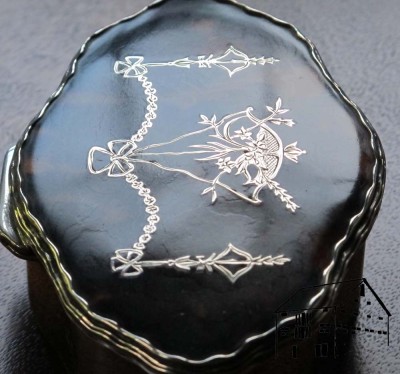
Since tortoiseshell scutes, or plates, are formed in laminar depositions on the carapace of the sea turtle, when the material is processed in creating art, the layers of the deposition are cut through leaving a “Tide-line” pattern. When the shell has been very well preserved this pattern is nearly invisible to the untrained eye, but on appropriately aged shell it is well evident.
Thjis image demonstrates perfectly to progress of moving from a heavily oxidized and cloudy surface (bottom) to the glistening, beautifully nuanced texture of the finished surface (top).
The transformation of a properly polished object is dramatic.
My final step is the application of an archival maintenance surface, in this case a light coat of Mel’s Wax, a ultra-high performance easy-to-use maintenance coating invented in our labs during my previous employment (going into production and coming soon from the store at donsbarn.com) did the trick.
My process allows for the pleasing aesthetic result while preserving the appealing texture of the shell surface.
For more information about tortoiseshell artistry and technology check out my new book, to Make As Perfectly As Possible: Roubo On Marquetry, where Roubo expounds on the subject of Boullework and I add my own two cents. Also on my plate for the future is to write The Technology and Preservation of Ivory and Tortoiseshell, probably some time around 2015 or 2016.
Somehow this blog post got lost in the shuffle, so it is a few weeks after the fact.
====================================================
On the day of convening the week-long gathering of several dozen members of the Professional Refinishers Group in August 2011, the months-long drought took its toll. The creek above the dam dried up for the first time in memory. Ironically the local hydrology left me clueless at the bottom of the mountain; because I have several springs between the hydro turbine and the dam, the water flow coming down the creek seemed unchanged.
I had been anticipating this problem as the water flow, and hence the power output, and been steadily declining through the year of 2011. To mitigate this problem I ordered three solar panels from my friend Rich at NoOutage.com. The day before the Group convening I took delivery of a bank of solar panels, and the attendant electronic hardware to control them and integrate them into my system. Unfortunately I did not have time to install them before the throng descended. That was exceedingly unfortunate.
There was barely enough electricity for the event to proceed, fortunately we did not use much power as it was mostly low-tech demonstrations and lots of tale-swapping and tip-sharing. For those times when power was needed – a PowerPoint presentation, and some formulation requiring heated materials, for example, I just fired up a little generator. The event unfolded all right, but it was embarrassing, to say the least.
During that week some of the participants volunteered to stay afterwards and help me install the new solar panels and hardware, and I remain eternally thankful to SteveB, JeromeB, and BillR for pitching in to help.

The new hardware consisted of three 235-watt solar panels, their roof mounting hardware, and the charge controller (the small black box on the right side of the power house) that would allow them to feed into the existing system. SteveB and JeromeB jumped up onto the roof for that portion of the project and proved themselves to be skillful practitioners of the problem solving arts. BillR is an electrical engineer, so he and I worked on the hooking up of the new panels to the old system. Once again, BillR’s knowledge and problem solving skills saved the day, and by the morning of the second day he had everything humming along.

The output of the solar panels was nothing short of astounding. At noon on a sunny August day they were each producing almost 290 watts of power! Bewildered I called Rich, who told me that the ratings for solar panels had to be estimated for the output at the halfway-point of the panel’s effective life. In other words, since these are thirty-year panels, the manufacturer expects them to produce 235 watts under direct full sun in fifteen years after their installation.
In the following picture, the solar component of the system is providing 79.2 volts of power at 7.7 amps, for a total input to the batteries of 609 watts.

Notwithstanding our location in the mountains, where the weather can change frequently (I have witnessed five rainstorm and bright sunshine cycles in a single day), these panels have been a boon to me. They pound out power during daylight, even when it is overcast. Not 290, or even 235 watts, but a couple of kilowatt hours each day even when it is raining. On a sunny day like today, they probably produce five or six kilowatt hours.

In addition, the natural cycle of the weather has provided us with a wet and cool summer, so the water is flowing more freely this September than any of the previous 13. Still, I felt the need to upgrade our system further, and am embarking on that journey now.
Up next – The Second Major System Upgrade
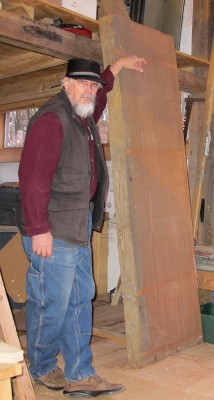
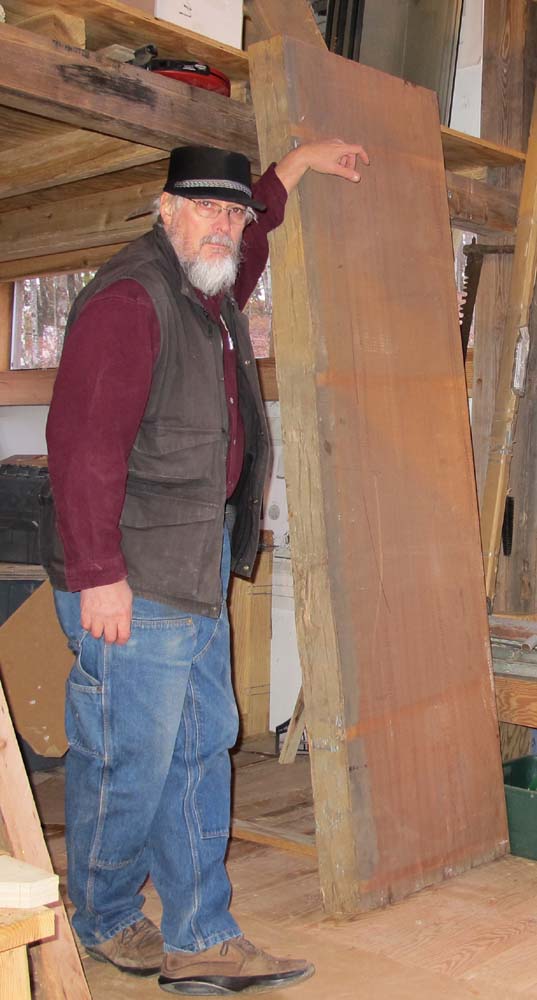
Several months ago when Chris Schwarz blogged about the closing of Midwest Woodworking , a local institution for more than a century, I immediately contacted him about the possibility of obtaining a slab of mahogany so that I could build the Studley-style workbench that I am pretty much morally obliged to make, especially given my acquisition over the summer of a workbench with a pair of wheel-vises (more about that in the coming days).

Much to my delight he was able to obtain such a slab o’ wood, albeit in a 14+-foot length that we have split with each one getting a 7+-foot long by 4″ x almost 24″ wide hunk of lumber. Of course, since the time of placing my order those many months ago I have learned through careful examination that Studley did not build his bench from a slab, but rather through stacked laminations with exquisite Cuban mahogany faces.
Since I am metaphysically obliged to follow his footsteps, I now have a massive hunk of wood without a defined destination.
So, I have this massive slab, and some vintage 6″x6″ black walnut, I’ve been thinking about another Roubo bench, using sipo (the mahogany analog) for the top,and black walnut for the legs and stretchers, with an ebonized crozet and planing stop, and a couple of Peter Ross holdfasts. It would be the only one like it in the neighborhood…
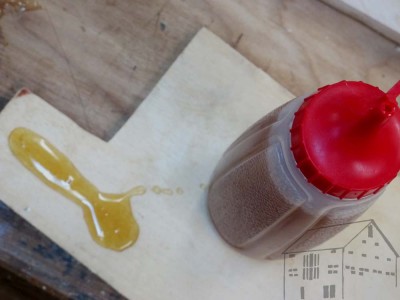
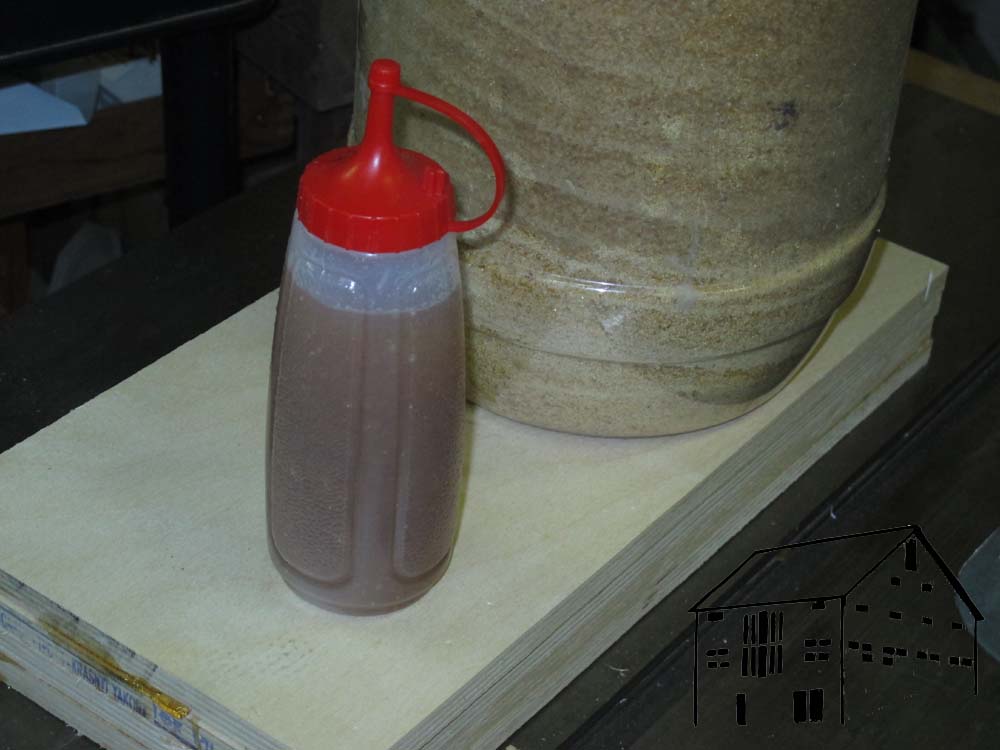
Hot animal hide glue is my standard adhesive in the shop mostly because it is what I used most often in my furniture restoration projects over the past forty years. I find that I use it even much of the time when I am making jigs or other non-conservation projects around the shop.
I used to find it a nuisance at these times, mostly because I didn’t want to be bothered with another brush, or wait until the pot heated up, or whatever excuse I came up with. I have come up with a routine that allows me to effortlessly employ hot hide glue for almost anything. The secrets are a ketchup bottle, a microwave set on “Defrost,” and a potpourri crock finally being used for something useful instead of spewing stink into the air.
I generally use 192 gram strength glue around the shop, and here is how I prepare and use it.
Taking my hardware-store ketchup dispenser I fill it up about 2/3 with cold water. (Cold water makes the glue granules hydrate more quickly.)

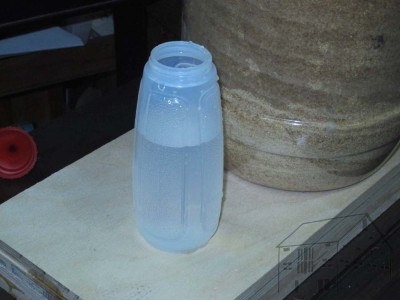
Then I add dry glue granules until the dispenser is full to the top with water, and let it sit for a while. Depending on the water temperature and my needs, this can take anywhere from an hour to overnight.
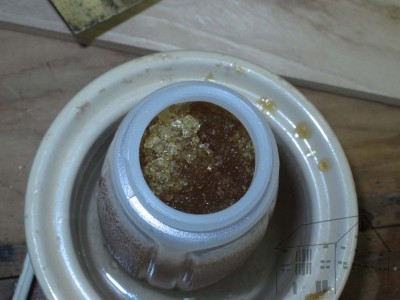
Once it is swelled it looks like this, and I either pop it in the microwave for 2-3 minutes at the Defrost setting if I am in a hurry, or into the potpourri crock if I am not. While in use I simply keep it sitting in the little crock.
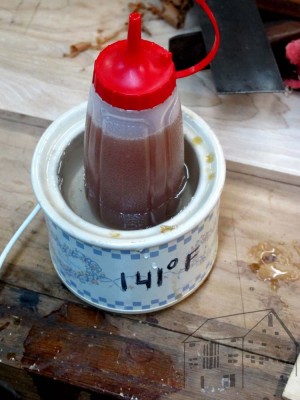
The beauty of the ketchup dispenser is it makes using hot hide glue as easy as using white glue or cold liquid glue. Sometimes if I am concerned about the glue gelling too fast I will toss in a pinch or two of canning salt to suppress the gelling, but most of the time for routine shop stuff I just use it the way it is. Otherwise the mass of the molten glue in the dispenser allows me to keep using it for several minutes even after removing it from the heat source, unless the shop is really cold.
One of the things I especially like about this gluing method is it makes creating parquetry panels so much easier since I can just dab the back of the lozenge with a bit of glue before setting it down on the kraft paper backing. No fuss, but especially no muss.
There is certainly no reason I can think of to prevent you from using an empty white glue bottle for the same purpose, but be careful to keep the nozzle clean or the whole thing comes to a screeching halt.
I’ll write about that more some time soon.

At the conclusion of our recent foray/return to photograph and study the tool cabinet and workbench of Henry O. Studley for the upcoming book VIRTUOSO, I insisted we commemorate the moment with this photo since it was likely the last such trip we take all together. Narayan set up his camera and captured this image, literally moments before we departed for the final time. For any “make up” images I need for the manuscript, it will probably be just two of us for a quick trip.
It was my fifth visit to the ensemble, Narayan’s fourth, and Chris’ third. They have been wonderful times of camaraderie and collaboration, a fair bit of off-the-wall humor and wide ranging discussions, all resulting in thousands of spectacular images and innumerable observations that will be interwoven with copious research to create a compelling book about this iconic collection and the historical figure who created it. Now comes the hard and fairly solitary part of the project — actually getting a manuscript on to Chris’ desk in the next thirteen months.
We have some truly grand ideas regarding the project that will be announced when and if they come to fruition.
Stay tuned.
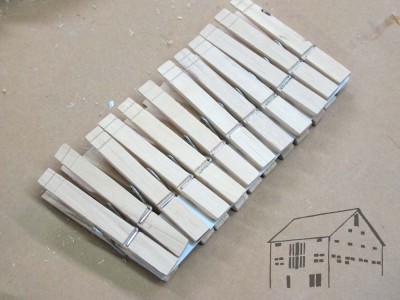
Since a lot of my work involves restoring and conserving historic wooden artifacts, I am often faced with odd clamping situations. One tool I find invaluable in these pursuits is the humble clothespin. Inexpensive, fairly light clamping force, and almost infinite reconfiguring possibilities, I keep scores of these on hand in the shop.
When I open a new pack of clothespins, and I recommend getting the large higher quality ones from the hardware store rather than cheesy ones from WalMart or similar, the first thing I do is to cut bevels on the ends, removing the useless and interfering tips. A quick set-up on the band saw accomplishes this in just a couple minutes. These trimmed clothes pins are now part of the clamping stock.
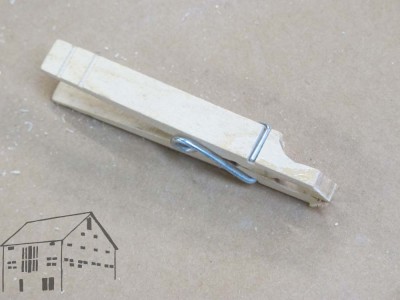
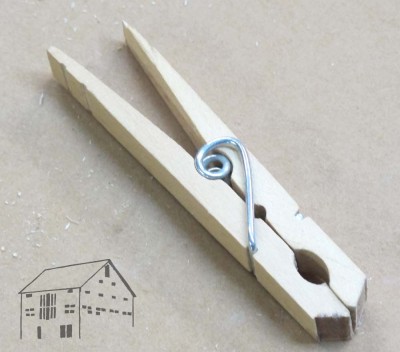
When the task requires it, I shape the remaining clothespin tips to whatever form I need. At about 10-cents apiece I do not fuss about their consumption or destruction.
One enterprise I have been following is this fellow’s project to manufacture high-performance clothes pins. I can’t wait to see them when they become reality. I’m ordering two sets.


Recent Comments