For the last several months I’ve been prevented from getting into a rhythm in the shop due to a host of wonderful family happenings, sometimes even going for weeks without darkening its doors. When I do get into the shop I spend a lot of time cleaning, organizing, and tuning up the shop itself. That really does not require really getting in the flow, I can just spend a few minutes here or there moving nd throwing away. In fact I’m trying to impose a better order and functionality of several shop spaces.
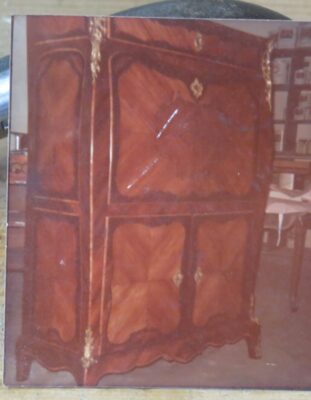
One of the unintended pleasures of the undertaking has been the rediscovery of items I did not even remember I had, at least until I put my hands and eyes on them. Such is the case with this 3″ x 3″ print, taken with a tiny Kodak Instamatic pocket camera fifty years ago. This piece was one of the “kits” delivered to the Schindler’s shop in the back of a Mercedes station wagon. Taking pictures of my projects was simply not part of my operating system back then, but this tulipwood and rosewood marquetry secretaire bore a royal inventory stamped, probably from about 1700. Along with the other “kits” I worked on around this time, including a pair of bureaus by Riesener, a switch was turned for me that has directed part of my life to this very day.
And I did not even remember this image until I found it while going through a box of ancient stuff. Heck, I haven’t even thrown away all my papers from college. My college career lasted from 1972 to 1985, so…
The day began with smoothing the parquetry compositions, first with toothing planes, both manufactured and home-made, then followed by blocks of pumice.
The next step was to lay out a simple banding knotwork design for one corner as an exercise.
Excavating for the inlay came next, followed by cutting and fitting the elements of the design.
In the end everyone went home with examples of the techniques to apply to their upcoming projects.
If this technique interests you I hope you will join me for next year’s class on October 1-3, 2026.
Opening up the panels glued up the night before is always a thrill for the students to see their work coming to fruition.
The next step is to trim the fields to make them good rectangles for the banding followed later by the borders. A variety of veneer saws were at work, ranging from pricey French saws to inexpensive Japanese ones. They all work.
The perimeter banding was applied and adhered with 192 gws glue, and the banding held in place with aluminum push pins that are surprisingly similar to those used by craftsmen 250 years ago.
Throughout the day and overnight, if a panel was not being worked it was placed in front of a box fan to drive off as much moisture as possible, to harden the glue under the parquetry. That strategy was somewhat successful.
Last month, for the first time in many years, I was able to offer an Introduction to Parquetry class at Joshua Farnsworth’s Wood and Shop near Charlottesville VA. We plan for me to offer the workshop again next year.
I had two exercises in mind for the students, all based on sawn veneer edge strips from boards.
The strips were then cut into identical 60-120-60-120 parallelogram “diamonds” or lozenges with a simple jig and a dovetail saw.
NB/ mea culpa – over the years I have attended and spoke at countless woodworking clubs and guilds, and invariably there is a show-n-tell session, and invariably they feature prominently some elaborate jig a member made to do this or that function. (Yes I know I used “invariably” twice in one sentence. That is a purposeful literary flourish.) In the old days I would just roll my eyes and tell myself, “That’s not woodworking.” Then we started the Roubo Transalation Project. Turns out the world of the ebeniste’ was all about jigs and patterns. To quote LBJ, “I reserve the right to be smarter than I used to be.”
Once the pile of lozenges got big enough, they laid out X and Y axes on a piece of paper to guide them then started assembling the composition by gluing down the lozenges to the paper with 135 gws hide glue.
Once the composition was large enough to cover the “field” of the substrate panel, in this case 1/2″ Baltic Birch plywood, the working face of the parquetry (ultimately the verso) was slathered with 192 gws hide glue, followed immediately by the face of the substrate panel.
Then the wo glued surfaces were brought together and clamped using another 1/2″ panel as the caul and a double layer of corrugated cardboard as a gasket.
I learned recently that the first Roubo volume, To Make As Perfectly As Possible — Roubo On Marquetry has sold out! Plans are underway to revise the book format into a semi-deluxe edition as was done with great success for the Roubo On Furniture volume. I am currently reviewing a couple text passages that I thought might need some wordsmithing (to quote LBJ, “I reserve the right to be smarter than I used to be”), but otherwise the redesign and printing are in Lost Art Press’ hands.
After what seems like a century we are back in Shangri-la, having logged thousands of miles in traveling for the past two months. We were home twice to swap out luggage but otherwise we were elsewhere.
It began with our arrival in DC for the very birthing day of Grandson #3. Three weeks later we went to Alabama for the third birthday of Grandson #1 and first birthday of Grandson#2. Then back to DC for GS#3’s baptism, a grand week we got to spend with our co-in-laws. My co-father-in-law and I are twin sons of different mothers.
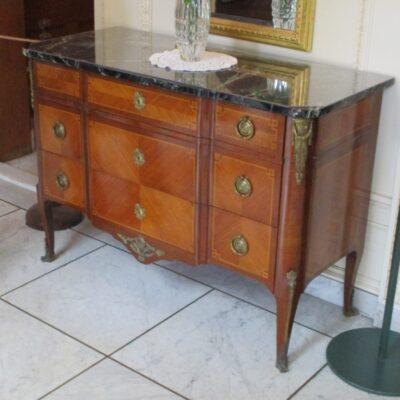
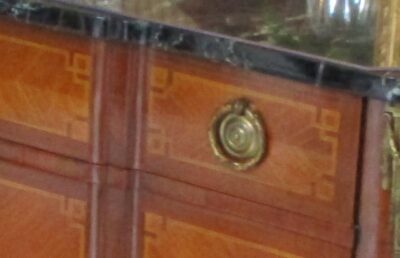
While in Rochester our hostswe squeezed in a visit to the Eastman House museum. This was a charming veneered French-style chest, although almost certainly late 19th or early 20th century (I did not take it apart to confirm that thought). I was especially taken by the “knotted banding” pattern.
After another brief stop to swap out more laundry we wrapped up our journeys with a trip to Rochester NY where I made six presentations to the Rochester Woodworkers Guild — Principles of Furniture Conservation, Case Studies in Furniture Conservation, How Furniture Conservation Affects My Current Furniture Making, demonstrations of various conservation techniques, a review and demonstration of parquetry techniques, and finally a conservation/restoration clinic based on the pieces the attendees brought with them for that purpose.
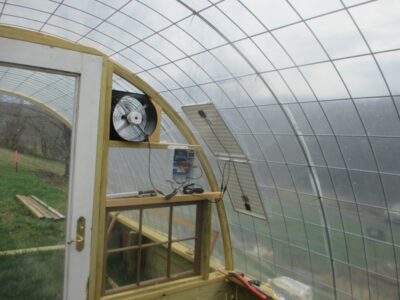
Now back home with summer trying to ramp up we are back at it big time. Mrs. Barn is feverishly working on her gardens and I am hard at work on the greenhouse, finishing the installation of a greenhouse fan, draping the structure with a shade cloth our newest son-in-law gave to us when it turned out to be too large for their patio space, and sealing up the perimeter to protect from the voles that are the bane of Mrs. Barn’s gardening life.
The shade cloth was something we had been wondering about as the inside temps were in the 80s when the outside temp was in the 20s. Now that the sun and outside temps are much higher the issue came front and center. I do not like high temperatures anyway, but when I was working inside the greenhouse in 110-degrees I broke out the shade cloth and affixed it in place. Combined with the fan that lowered the inside temps to a manageable 85 degrees.
Even though the 1/4″ hardware cloth covers the entire floor out to the walls, I made a second hardware cloth “flashing” to be ground-stapled on top of the continuous layer then crown-stapled to the walls. The tricky part is forming it to the posts, which usually required another piece or two to be cut and fitted. If voles get past this a number of Rat Zappers will be awaiting them.
As for vole-proofing the space, that began at the very beginning of the construction phase several months ago. I covered the entire inside space with 1/4″ hardware cloth, and now was the time to tie it all together with new pieces at the bottoms of the walls and posts. One more day of that and it will be time to move on the laying out the inside configuration.
I hope we get to stay home more from now on, but that may be a vain hope. In two months the family of GS#1 and GS#2 will be moving to live within five miles of GS#3. I’m guessing that Grandma and Grandpa will be burning up the roads between here and there.
I am anxious to get back into the shop to work at both the bench and in my writing chair, but that might have to wait a little longer.
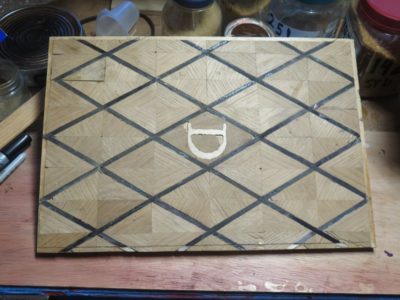
My proof-of-concept panel with the parquetry pattern at full scale. Rendering this was an extremely instructive and useful exercise that changed my approach to every step of the process.
In prepping for the tool cabinet parquetry mock-up — that is as exact as I can make it rather than my previous proof-of-concept — plus the actual parquetry on the cabinet, I was going to need dozens if not hundreds of the diamond units. A task that large is similar to eating an ox. You do it one bite at a time.
Here’s that first bite.
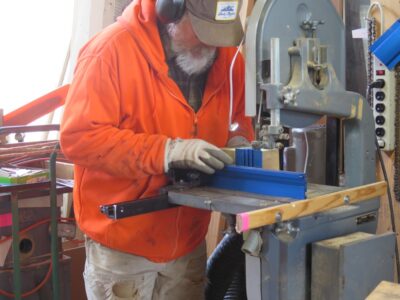
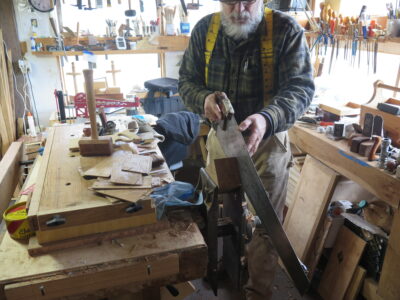
My starting point was cutting hundreds of 30-60-90 triangles both with the grain and across the grain. My veneers were all white oak cut from leftover scraps from the French Oak Roubo Project, and man was it dense. I tried cutting the triangles using jigs and handsaws (that is how I teach introductory parquetry workshops like the upcoming one at Wood and Shop near Charlottesville VA), but soon came to the realization that this ox needed a little prodding.
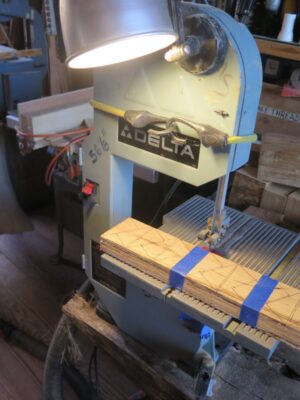
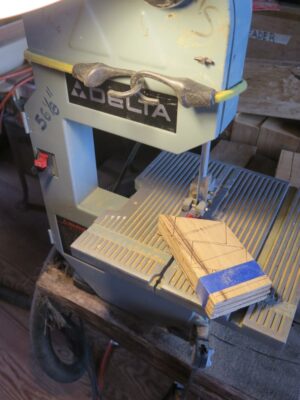
Given my recent success using my Delta benchtop bandsaw with a fine blade, combined with a new strategy for working the parquetry, I decided to do all the sawing on that little machine.
Soon enough I had two plastic shoebox-sized tubs each filled with hundreds of the slightly oversized triangles I needed for what would come next.
Changed horse #1.
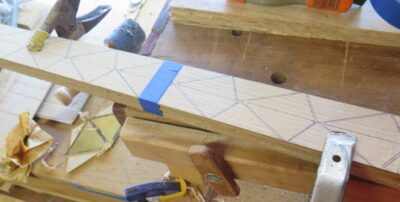
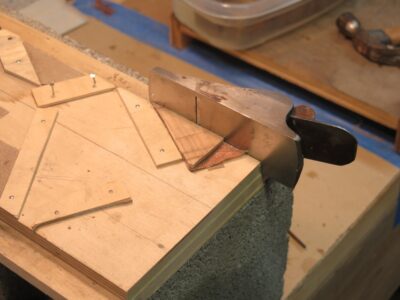
Even though I wasn’t sawing the triangles by hand I was determined to edge plane each one using precise shooting jigs fabricated especially for that purpose. A few dozen of those, especially the ones that are primarily cross-grain, and that determination flagged. I needed a different system if I was to get the ox eaten. That “new system” will be the focus of my next post on the project.
Changed horse #2.
In addition, once I first established the size of the parquetry pattern I created a brass template to make each diamond the perfect size and fit. I was so intent I used trigonometry calculations and a vernier caliper to get the dimensions and angles really precise. (If you ever wondered when you would use what you learned in 11th grade Trig class, now you know.) The frustration of this fussiness soon depleted my enthusiasm for this approach. The alternative I devised will be demonstrated in a post a way down the road.
Changed horse #3.
Stay tuned for “what would come next.”
PS Posting might continue to be sorta sketchy for another little while as grandson #3’s arrival is imminent, and grandsons #1 and #2 have birthdays right on the heels of #3’s introduction to his share of the national debt.
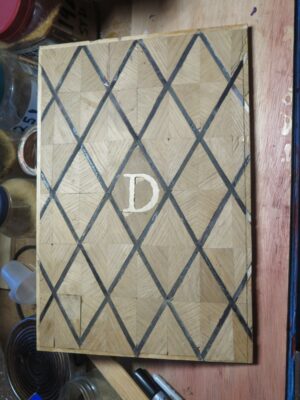
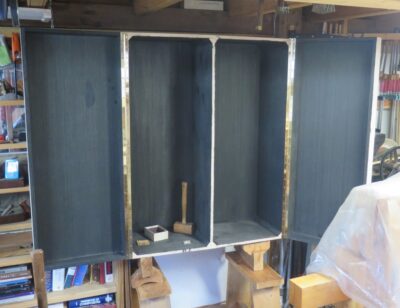
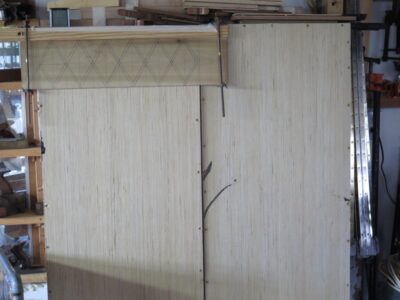
After a very long while of not working on it I have resurrected the (very showy) decorative parquetry aspect of my mondo tool cabinet. I cannot recall exactly where I left it blog-wise and thus presume you don’t recall either. So, let me go back to the start and endeavor to keep the thread going better than before. Although with blizzards, greenhouses, and soon-to-be-three grandsons you never know. My goal is to post every week or so, walking you through my process step-by-step.
The short and sweet re-introduction is that I’m going to use a fancy parquetry composition, one inspired by the works of the Roentgens. Certainly not as fancy as theirs, and definitely not as well executed (they were perhaps the finest furniture-surface-decorators of their time, or maybe of all time [their pictorial marquetry is without parallel in my opinion]).
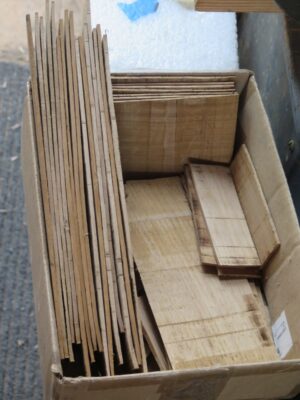
All of my base veneers were sawn from leftover chunks of white oak from the French Oak Roubo Project, so though the material is not literally contemporary with the Roentgens it does not miss it by much.
Depending on the piece and my mood (or weariness) I used both hand and machine sawing for the task.
The parquetry pattern is a cluster of four 30-60-90 triangles assembled into both swirl and sunburst patterns into diamond shapes, to be used alternately in the final composition. An early sketch and proof of concept confirmed my vision for the cabinet.
Once the veneers were cut into their ~1/8″ sheets I began sawing out the hundreds and hundreds of smaller triangles. These did not have to be particularly precise, and it was more efficient to deal with them ex poste and in the assembly process. So my little Delta bandsaw was the perfect tool to saw a stack of the veneers into the requisite triangles. Hundreds and hundreds of triangles.
At first I thought I would plane the edges of the triangles and created several jigs for that purpose. It turned out to be way more trouble than that was worth, trying to hold on to little pieces of really dense white oak, planing the skew edges. Did I mention that there were hundreds and hundreds of them to do?
I wound up taking a whole different approach, which will be the topic of the next post in this series.
As I approach the end of the year I am reflecting/projecting on the projects ahead of me. In addition to diving deeper into writing I’ve got a large number of things on my plate, including the mini-Gragg for Li’l T’s March birthday (coincidentally the month for the arrival of grandson #3, all of them March boys), outfitting my 18thC tool chest collection for on-site interpreting and re-enacting, doing some casting and patternwork, some possible private tutorials at the barn, several new workbench builds, blah, blah, blah.
High on my list will be resuming work on my ultimate tool cabinet, the one that will take me along until my ashes are scattered on the mountain. Since the presentation surface of the cabinet will be parquetry in the fashion of the Roentgens, and made from scraps left over from the French Oak Roubo Project, I still have a lot of veneer to saw to complete that. I’ve written about that some, but it has been so long I will probably start the account all over again.
To enhance my veneer sawing I am thinking seriously about another upgrade to my bandsaw using the roller guide set from Carter.
Have any of you tried this product? If so, please let me know. It is not cheap, around $200, but if it works as well as they say I will plunk down the money without hesitation. Given the fact that I originally bought the saw for $100 at a yard sale, I can afford to tart it up a bit.
While undertaking some recent reorganization of my basement workshop in Elderbarndottir’s former house (she got married in November and moved to her husband’s house) I came across this nostalgic and beat-up picture from early 1977, hiding behind one of the shelving units. This French secretaire was my first really high-profile/high-value furniture restoration project at Schindler & Son of the Palm Beaches, where I started working in late 1974. Unfortunately I did not take any detailed pictures of projects at this point of my career – had this happened once I was a museum conservator the project would have been documented with hundreds of photographic images to go along with the written reports. I probably took a picture or two of the interior, it was spectacular. Bat that was almost 50years ago and cannot recall that detail.
Somewhere I have a picture of a Riesener cabinet from the same client, but that picture has not turned up yet.
Prior to this I did a lot of run-of-the-mill restoration for “ordinary” antiques along with a boatload of custom finishing and refinishing; before Schindler’s I was a “scratch and dent man” at a couple of furniture stores.
This project arrived in pieces in the back of Ambassador So-and-so’s Mercedes station wagon. The secretaire bore the inventory stamp of the Chateau de Saint Cloud. It should come as no surprise that the culture from which the word bureaucrat is derived should be punctilious about household inventories, but there you have it.
Over a period of a couple weeks, I reassembled it and made repairs to the rosewood and tulipwood veneers, then finally a couple of days of shellac pad polishing. “Pop” Schindler came almost every day to watch and guide me, it was on this project that he introduced me to hot hide glue.
This was a seed for my fascination with exquisite European furniture, especially of the French variety (along with our company’s work at the Wrightsman estate in Palm Beach and their furniture collection), and was truly the acorn from which my fascination with Roubo sprouted. It was also the prompting for me to embark down the career path of conservation; I entered that stream in 1981 at Winterthur Museum while I was a student in college.


Recent Comments