One of the great delights of attending the recent LNT event in Covington KY was to witness the overlapping of the generations of contemporary woodworking and woodworking tool makers. This atmosphere will be replicated to a logarithmic degree at the upcoming Handwork 2017 where there will be several dozen exhibitors in Amana rather than the half dozen in Covington. The ultimate irony is of course that the generations of modern craftsmanship, and the populations within them, have almost no relationship to the calendar.
There were of course the godfathers of the modern woodworking and toolmaking universe: Lie-Nielsen Toolworks (in truth Thomas Lie-Nielsen could be be considered one of the progenitors of this new world of high-quality tools at an approachable price), Chris Schwarz, Pop Wood, Matt Bickford. The middle generation was represented by Raney Nelson and Scott Meek, whose creative energies in the direction of tool making are probably now in their second decade.


But what drew my attention was the presence of The New Generation in the persons of Mateo Panzico (top) and Steve Voigt, two brilliant toolmakers whose emergence in the marketplace over the past caouple of years has been noteworthy.
Both makers were at last year’s LNT Covington event (in fact my only picture of Mateo was from last year) and I was this close (thumb and forefinger a fraction apart) to coming home with some of their product but miraculously I resisted the temptation. The same could not be said for this year.

The two men are working in wildly different styles; Mateo is developing a creative vocabulary in infill planes, and his stylistic beginnings were a bit steampunk-ish but evolving into somewhat smoother, not-quite-organic forms.

Steve is tacking close to the winds of tradition with his double-iron beechwood body English designs. Notwithstanding my inventory of toothing planes, I am considering commissioning him to try his hand at the form.
Both makers are producing exquisite tools that are at the very highest levels of performance.
This year I came home with two smoothing planes, one from each fellow. In truth part of the reason I made the decision was my desire to get their tools before these makers become so well known and in such demand that I could no longer afford their tools. As a free-market absolutist myself, I will not object to their growing success in the least, in fact I will celebrate it, but I was simply making a rational decision to buy before they ascended to a point where I could no longer consider obtaining them.
The best part? Mateo and Steve are but the tip of the iceberg. There are literally dozens of new and nascent toolmakers seeking to fulfill your desires and demands in the marketplace.
Thanks to Lie-Nielsen Toolworks and Handworks 2017 for nurturing this new generation.
At almost the last minute I decided to attend the Lie-Nielsen event in Covington, in great part due to it being a sorta “release party” for With All the Precision Possible: Roubo on Furniture, (or simply “R2” for those of us living inside that particular bubble) which was arriving that very morning. Also in the equation was the fun I always have at these gatherings.
The exhibitors at the event confirmed my premise that we are living in a Golden Age of tool making and woodworking.

Beginning in the front corner window of the brew pub was Raney Nelson, plane maker extraordinaire and principal in Crucible Tools along with Chris Schwarz and John Hoffman.

Raney did have some of his planes in hand, but most interesting to me were these new plane-adjusting hammers he’s been noodling lately (I came home with one).
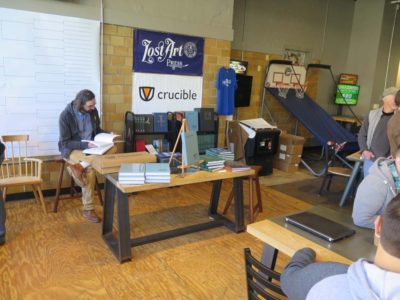
Next to Raney was the space for Lost Art Press. Since the second Roubo volume had arrived that very day, there was quite a bit of traffic. It was the first time any of us had seen the book in the flesh, and Chris (and I) spent a fair bit of time browsing through it. We are not displeased.

I used Chris’ staked table, I think this was the one with the soap finish, as my station for signing all three of my LAP books and promoting and demonstrating polissoirs and beeswax finishes.

I had a lot of traffic from friends old (Studley book collaborator Narayan Nayar on the left) and new dropping by for a signature and some chat about old ways of finishing.
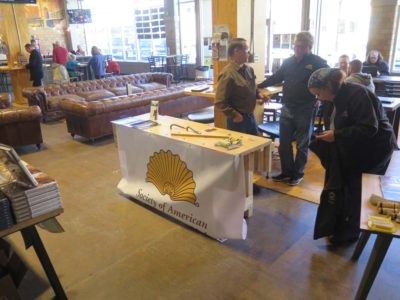
Directly opposite me was the work station for the Ohio River Valley chapter of the SAPFM as their workbench was humming with activity all weekend, extolling membership in SAPFM, an organization that is near and dear to my heart.
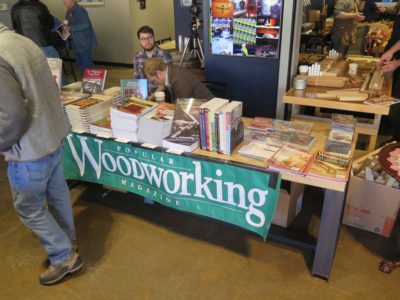
Rounding the corner was the large offering from Popular Woodworking with lots of books and videos, and opportunity to interact with Editor Megan Fitzpatrick and other PW/F&W staff, including video producer Jake Motz (in the beard and glasses) with whom I worked on two videos last year.
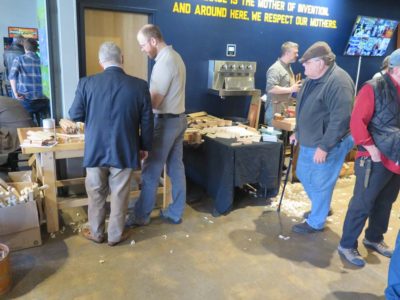
Turning into the bullpen at the center rear of the brew pub was Matt Bickford with a great selection of his molding planes and dozens of lumber blanks into which contours could be made. Immediately adjoining Matt was Scott Meek, whose magnificent planes are both high performance tools and sculptural artworks. Unfortunately I failed to get a decent picture of Mateo Panzica of Lazarus Tools who took his station between Scott and Steve.
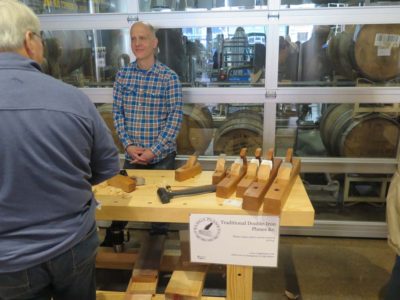
Along the back wall was my almost neighbor Steve Voight (he is a music professor in nearby Harrisonburg VA), whose traditional style beech bodied planes are a fairly new, and most welcomed, entry into this world.

Finally we come to the sainted patron for this and many more events of this type, Lie-Nielsen Tools. Daneb Puchalski and the LNT crew are remarkable in their teamwork — imagine if you had to both coordinate the entire event and set up AND take down your display every day — and their welcoming of fellow craftsmen and toolmakers is a model of evangelism at its best.

Now that the last bluster of winter is in the rearview mirror, it was a pleasingly and comparatively mild winter, and spring is in the headlights (we hope) it’s time to reflect on the utility of my cast iron bi-fuel stove for the barn. Finally, after three winters of trial-and-error I think I have it down to the point where it is the reliable workhorse heat source I had always hoped for.

To recap, the unit is a smallish British wood-and-coal stove probably of the 1970s vintage. Though smaller than the cast iron fireplace insert for the cabin, it is considerably heavier (the barn stove weighs in at about 525 pounds) due to the need for a firebox that can handle both wood and coal. I went on line to retrieve both the owner’s manual and to view youtube videos on the operations of such stoves. That was not the least bit helpful. In fact, I believe the owner’s manual was written by people who eventually became computer software instruction manual writers; neither had any usefulness for the end user, being written only by and for someone who already possessed full mastery of the “information” contained therein. Of course, it is possible that there is a contextual implication and perhaps those inculcated with the cultural norms of Britain are predisposed to operate such a device.
The stove is not located in the studio, it is in the basement directly underneath it. Thus it requires a long, steady heat in order to get the warmth up to my work space. Following the instructions on youtube served only to frustrate me, and I had to re-invent using this stove myself. Once that was done the use of this heater became a pleasure.

Here is the routine I have devised after scores of attempts, and is one I find to provide steady and constant warmth to my work space. A typical cycle for heating with the stove is 48 hours, by which I mean I can keep it running steadily but must clean out the ashes and clinkers every other morning. It usually requires 1-1/2 buckets’ worth of cleanout.

With the firebox emptied, the building of an effective heating fire can begin.

I begin this process by laying down about a roughly 2″ layer of nut coal as the bed for the fire and the foundation for the roaring heat to come.

On top of the bed of coal I place a single firestarter. If you are sharp-eyed with a good memory, you will recognize the firestarter as a piece of paper towel I used for the final filtering of our beeswax upstairs. I use one new filter for each platter of molten wax, so I’ve got a good (if not excess) inventory of this aid.
Next comes the whole reclusive woodsman skill set in constructing the kindling/firewood conflagration.

Each layer of fuel gets more massive.

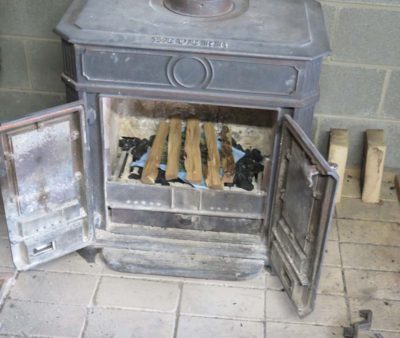
Finally the firebox is completely full of dried maple, locust, and oak awaiting a flame.

Then, the flame.

Once the flame is going, I close the left door completely and close the right door to about 1″ opening to maximize the air flow.

10-15 minutes later I check back on the fire to make sure it is doing what I want it to be doing.

If going well, and a this point of my experience it always is, I place the iron fences at the front of the firebox to allow “banking” of the coal throughout the day.

Within a half hour the stove pipe is plenty hot, and upstairs it radiates heat into the shop.
From this point on I add fuel to the fire every hour or so until early afternoon. At the 1-hour point I add about three pieces of firewood along with three scoops of coal, at the 2-hour mark two pieces and four scoops, at 3 hours one piece and five or six scoops, and just after lunch another half dozen scoops of coal with no new firewood. I close the doors both firmly and make sure the flues are wide open (the gates are right behind the ceramic panels in the doors) and can usually hear whistling sound of the combustion air being drawn through.
As I wrap up the day at 6PM I pack the firebox as full as I can with coal, close the doors and tighten the latch, and close the gates halfway. Next morning when I arrive in the shop at about 8.30, the pace is still toasty warm and the fire is glowing red. I do a partial clean-out of the firebox by agitating the movable grates and emptying the ash drawer underneath, and spend the second day just shoveling in coal every few hours.
On even the coldest day of the winter — temps in the teens and nearly gale force winds — the workshop space was a cozy 64 degrees all day long (cozy because I am dressed for winter, after all). On such a day I will use 1-1/2 50-pound bags of nut coal, on a milder day 3/4-1 bag will suffice.
While I am not anxiously awaiting the next winter, I now know I can keep my own workspace cozy and amenable, and I still get to look out at the mountains any time I want.
Over the next six weeks I will be blogging about Handworks 2017 a lot, or at least my preparations for it to be sure. I think we are at T-minus 52 Days before departure.
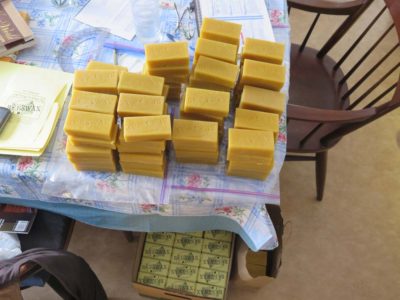
Over the winter Mrs. Barn prepared two full cases of packaged beeswax in anticipation of the event. If all goes well I will not bring any back home. One thing down, a bazillion to go.
I intend to demonstrate wax and shellac finishing during the event, so come by and say “Hi.” I’ll be in one of the center aisle booths at the Festhall.
The task for the second day of training at the Library of Congress rare book conservation lab was for each of the specialists to emerge at the end of the day with a perfectly prepared matched set of oak bookboards in order to create their own model of the art form. Considering that this was an assembly of gifted folks with near-zero woodworking experience, that is no small feat.
Re-sawing in the vise, crosscutting, and trimming on the bench hooks was what consumed the entire day.


I let them try any number of re-sawing methods, ranging from my vintage 4tpi carpenter’s rip saw, my own bow saw or their bow saw, a range of Japanese saws they had in-house, my French style frame saws, etc. I have to say that by nearly unanimous confirmation the Japanese saws came out the favorites.
Following the re-sawing, and the flattening of one face of each of the two bookboards, I asked them to mark the desired 1/4″ thickness with a gauge and shoot a rabbet around the perimeter for the final thicknessing by hand plane.

Off they were to the races. After the boards were to the proper thickness they were sawn to width and length on the bench hook with back saws or Japanese saws, and all four edges shot also on the bench hook, mostly with either block planes of small bench planes (most of the book boards were in the 5″ x 7″ range). The final step was slightly beveling the edges.
As I packed up at the end of the second day I think everyone was well on the way to having their own pair of boards ready for making their model book.
It was an unmitigated delight to introduce them to the tools and processes of making their own bookboards and I look forward to getting reports of them applying their new skills to projects in the future. The virus of hand toolism was planted, and some of them even went to the recent PATINA tool sale two weekends later.
Now I just gotta see to fixing their orkbench problem.
Some time last year I was contacted by the ancient book caretakers of the Library of Congress (LC) to inquire about some in-house training they needed in woodworking. Yes, that’s right, ancient book caretakers needed to know about woodworking. Actually I knew that because many, many years ago I had helped a colleague in the same department with a project having to do with very large format book (about the size of a Roubo original edition) that was having problems with its bookboards, or cover boards, which were made of oak. You see, the the world of old books, especially those from about 1500 and older, wooden book covers are simply part of the equation. While the specialists at LC were expert in the care of the paper contents, and their bindings, they were a bit hazy on the details and practices of fashioning the wooden boards.
Having participated in a number of collaborations with LC over my career, they asked if I could come and teach them. Of course the answer was “Yes” and we began the Dance of the Conflicting Calendars. Combined with the political brinkmanship that is endemic to Mordor on the Potomac it took many months for the training to occur last month. One of the items looming overhead was the sub rosa blustering about “shutting the government down” to accomplish some partisan goal or another. (My own attitude on that matter as a skeptical non-partisan Strict Constructionist Declarationist I wished the government would shut down, or at least retreat to its Constitutionally mandated activities, which by my count means elimination of ~90% of FedCo.)


The goal of the two-day session was to impart the knowledge and implant the muscle memory so that each member of the ancient book posse could fabricate a technically faithful book model as a practice exercise in preparation for the next time one of the ancient wooden board books needed re-binding.
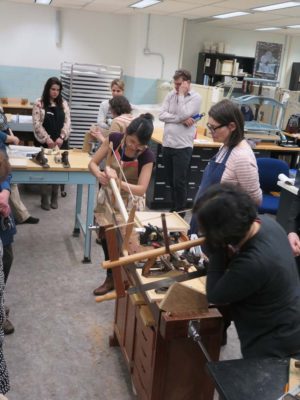
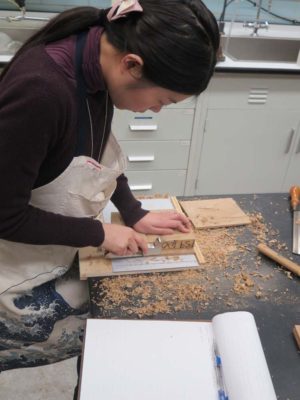
So, on a bitter cold and blustery February morning I pulled up to the doors of the elegant LC Jefferson building, my CRV filled to the brim with tools and materials for them to use under my tutelage. In a caravan of carts all of these were wheeled down to the book conservation space underneath the Madison Building across the street, and I set up shop.
Only one of the crew had experience in woodworking (the fellow using the bow saw in the picture below) so I needed to start at Point Zero to review the nature of wood, tools, and the processes used in planing, sawing, etc. I brought plenty of 5/4 white oak to work with, and we got down to bidnez.

The first assignment was for everyone to use the bench bench hooks I made for them to saw a single piece to the size they needed for their book model’s boards.
Then came the flattening of one face of that board to provide a reference surface for the resawing. Given the human scale involved (this crowd was for the most part more petite than a typical woodworking gathering) they were particularly pleased with #4 planes, which are too small for my routine use.

With the flat reference face completed, next came the resawing. I’d made a Fidgen-style kerfing plane to leave with them, and they took to it like me and bacon. The final product was to be a 1/4″ thick book board, so I made the kerfing plane to create a 3/8″ thickness.


One of the more serious challenges for the exercise is that as a book conservation unit they were not well equipped for woodworking in the bench category. Their only bench was an ancient and wobbly Sjoberg hobby bench.

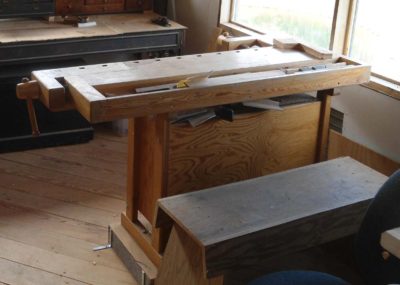

I have one exactly like it that I got out of the trash many years ago. Frankly if I had to use one like this every day it would end in the trash too. I completely remade mine, mounted it on some 4″ slippers to get it to a decent working height, and screwed the entire thing to the floor, resulting in a very nice and oft-used work station. Mine is currently ensconced in the corner, perhaps not coincidentally closest to the propane furnace, and is dedicated to the finer work of decorative objects conservation, gunsmithing, etc.

I will do my best to address their lack of a decent workbench, hoping to make and donate a mini-Roubo in the coming months. But for now, all we had was a wobbly little bench and some mobile work tables.

Then the resawing began with a variety of saws, and thus endeth Day One.
My next step in the Great Kerfing Plane Saga was to go where I think kerfing plane evangelist Tom Fidgen started – kerfing planes with a fixed fence to produce a set width to the cut. My most typical use of resawing by hand is making hand-sawn veneers, so I decided to make my first kerfing plane part of that equation. Since I am not yet as skilled at veneer sawing as the craftsmen in the 18th century Parisian ateliers, who routinely harvested twelve sheets of veneer per inch of stock, I struck a more realistic task of cutting eight per inch. Thus, my need was for a dedicated kerfing plane set to 1/8″.

Falling back on my old habits and routine, I made the body of my plane from 13mm baltic birch plywood. I had first made a pattern for the tool, one I could use repeatedly. I derived the pattern template from a backsaw, which I traced onto 3mm plywood and cut out. The template now hangs overhead off a joist in the shop, awaiting for new kerfsaw-making urges to strike.
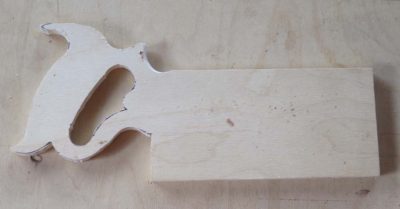
I traced the new kerf saw pattern on the thicker plywood, and drilled out holes where they would make the sawing the most amenable. I accomplished this with my coping saw in a couple minutes. Once I was done with the sawing I worked on the profiles of the handle with rasps and files so that it was comfortable in my hand.

I made a 3mm rectangle to be glued to the heavier plywood to provide for the cutting spacing.

The assembling continued apace with another scrap of bowsaw blade and a piece of scrap brass barstock to serve the retaining element to hold it all together.


The completed tool is a delightful amalgam of lightness with robustness for vigorous use, combined with comfort and precision for repeated cutting of veneer.

The test drive was perfect!

I followed up on this kerfing plane with one for some teaching I had upcoming, where the ultimate objective was to derive prepared oak boards of 1/4″ thickness from 5/4 stock. In this case I made the fixed cutting distance 3/8″ since this was the closest scrap I had handy, and in recognition that the folks I would be teaching had no woodworking experience and a bit extra waste would be advantageous. I will soon recount that tale, confirming the tool removed a huge potential hurdle to them completing their assignment and future task.
Thanks again Tom Fidgen for leading me down this path of simplicity for the sake of precision and efficiency.
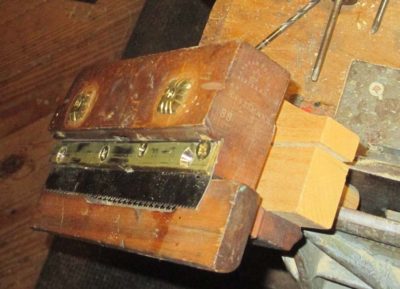
With the initial endeavor into making a Tom Fidgen-ish kerfing plan resulting in a functional tool, I needed one last step to make it worth keeping on the shelf. Since the body of the plow plan was so short, the tool had a tendency to try to flip forward as I was using it aggressively. So, I fashioned a handle for it based on tracing one of my favorite hand saw handles.
Like a lot of things I make in my shop, especially when prototyping, the handle was from a scrap piece of wood from the scrap box, cut with a coping saw and in this case simply glued to the body of the plane with yellow glue since I did not want to whip up a new jar of hot hide glue just for this.

I got the orientation of the handle a little high, angle-wise, but it lengthened the profile of the plane so that I could really get to it. With a new blade in its proper orientation (not pictured) it works like a charm and sits in a handy place right over the planing beam.
It was a great introduction to the tool and I thank Tom Fidgen for introducing it to me. The plow plane starting point was a good one for me, but the final result was a bit clunky in my hand even thought it preformed exceedingly well.
But I wasn’t done yet.
With the encouragement of Tom Fidgen’s presentations at WIA and elsewhere I decided to make an attempt at a kerfing plane. His enthusiasm and evangelism for this tool has once again revitalized an older form from days of yore and integrates it into our toolboxes now. Huzzahs, Tom!
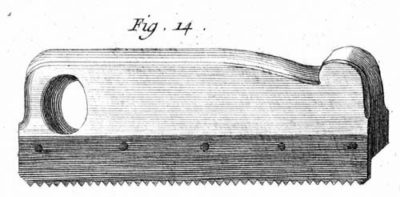
This tool from Roubo pretty much validates the utility of the tool. Being a smart guy like Roubo, Tom re-devised a tool without the knowledge of the master’s work from 2-1/2 centuries ago. Fidgen & Roubo — creative geniuses separated by 250 years.
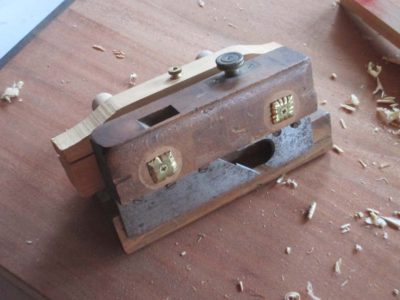
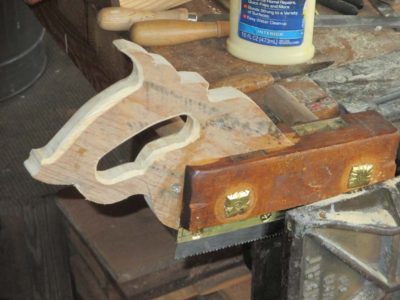
Since the iron and especially the skate of the plow plane serves an analogous function as the blade of a kerfing plane, cannibalizing a decrepit one from my junk drawer seemed to be the right place to start. I’d already added new arms and fittings for the fence at some point the misty past.

I removed the skate and found a near perfect bed to affix a rip saw blade section.

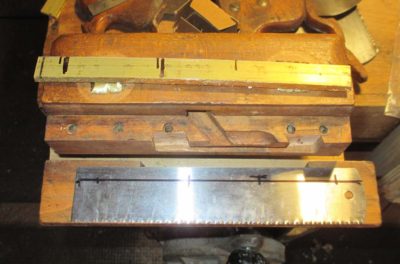
Using a piece from a bow saw blade I bought at Highland Hardware and cut with metal snips and a scrap of brass stock from the scrap drawer I charged forward. (Actually I mighta charged a little too fast; I fited and drilled the blade and retaining bar with the blade running in the wrong direction. Sigh. Still it worked surprisingly well, but in the end I made a new blade and bar.)
The assembly was pretty straightforward, although drilling through the saw blade was a bit of an adventure.
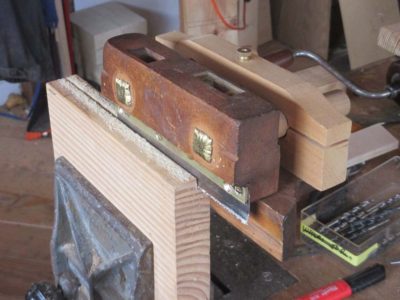
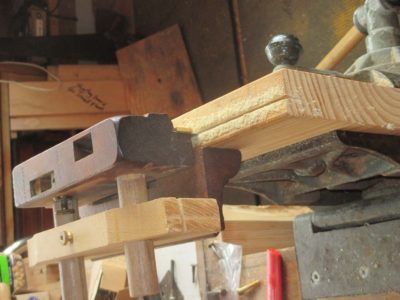
It was time to give this cobbled-together tool a test drive. Magnifique!
But I was not done yet.

Jim Moon has informed me that he is bringing his remarkable replica of the H.O. Studley Tool cabinet to Handworks in Amana IA. The ensemble will probably be exhibited in the Amana Furniture Shop near the booths of SAPFM, Mary May, and Mike Siemsen. It’s a great location, allowing for much greater access by the attendees and greater safety and security for the collection.

As if you didn’t need any more reasons to attend the best tool event on earth.

Recent Comments