I’ve got a 12-inch radial arm saw down on the first floor of the barn, but it has not seen one second of activity since it was moved here thirteen years ago. I’m just not doing anything that makes it necessary. However, on the second (main) floor I’ve got a 10″ chop saw that gets used regularly to make long boards shorter for whatever reason. For some tasks I use the cross-feed sled on the table saw but far more frequently I’m just chopping something up.
One of the great features of the chop saw is that it is quick and easy. One of the lousy features is that it made a huge mess even when I hooked up the “dust collector” outlet to the shop vac. Even when everything was hooked up properly sawdust went all over the place and it required a local cleanup with every use.
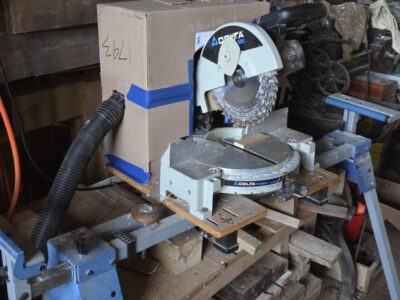
I finally got tired of this nuisance and made and installed the lowest possible tech solution, which reduces the sawdust cloud by about 99%. I looked through my mountain of boxes piled up on the third floor and found one that fit my needs. Equipped with a utility knife and a roll of masking tape I fabricated a box shroud to fit over the back side of the saw, complete with a port for the shop vac hose. At this point the only thing missing is a fitting to glue to the portal for plugging in the hose, but even with just a rough hole cut in the side of the box the collection is magnificent.
The Abraham boys and their posse are at it again and Handworks 2026 is barreling down the pike. It will be Friday and Saturday of Labor Day weekend, in the lovely village of Amana, Iowa. I’ll be there again close to dead center of the Festhalle, hawking my wares such as they are. Polissoirs, beeswax and shellac wax, videos, and original c. 1765 Roubo prints, etc.
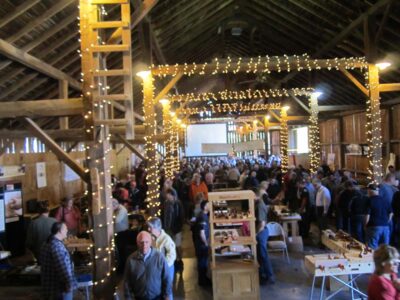
The Festhalle from Handworks 2013
It’s the most amazing tool festival of hand woodworking you will even encounter with visitors and makers from around the globe if the tradition holds.
I’m already ramping up my truckload of stuff to take with me, at the moment creating a pile on and under a workbench I will be taking and making wax processing part of almost every day from now on.
This just might be my last long road trip other than family priorities. We just don’t have the oomph for drives like that anymore.
One of Mrs. Barn’s favorite things is the annual visit from “Eddie the Spoon Guy” at the craft market during our local celebration of all things pertaining to maple syrup. She stocks up on a multitude of wooden spoons, spatulas and similar items to use and to give as gifts throughout the year. This year Eddie had some teensy spoons that she thought would be perfect as gifts for each of the grandsons.
Once she had them home she asked, “Wouldn’t it be nice to have their names carved into the handles?” What could I say, other than, “Of course.”

Sorry, just can’t seem to get this image to load horizontally.
Givin the diminutive size of the workpieces my first task was to find a good work holding system, something that would hold these itty bitty pieces solidly yet allow me to have access to the surfaces to be worked. Fortunately, I have a jeweler’s bench top rotating vise with movable jaws, allowing a close fit for the round a tapered handles. To maximize the grip and eliminate the risk of damage I used abrasive pads to cushion the jaws. That solution worked perfectly, padding the wood yet gabbing the spoons hard and steady.
Then the question was, “What do I use for the incising?” Using a chip carving knife was not within my ken as the pieces were like carving names on a round pencil. In other words, beyond my confident skill set. I thought about using one of my engraving burins or a tiny chasing tool, but practice with them was not encouraging. Looking through my box of carving tools I came across a 1mm veiner from a project I cannot even remember now. That was just the ticket.

The end result was great. I won’t show that as I strive to protect my loved ones from the netbots.
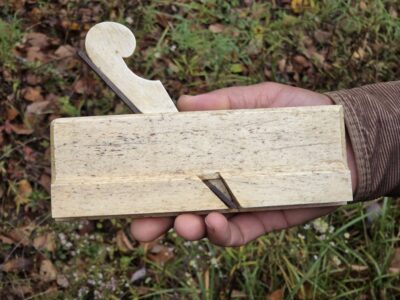
Reflecting on the bountiful tools I saw last weekend at the PATINA tool shindig I was reminded of a tool my friend Justin showed me when he visited a few months ago. Fashioned entirely out of a whale bone, it is spectacular.
I had a great time at the PATINA toolapalooza on Saturday, connecting with many friends and acquaintances, and communing with hundreds of thousands of tools. Every year I can spend up to a dozen minutes shopping for clothes and such, but I could spend dozens of hours browsing and shopping here.

There are two parts of the event, and I always start at the tailgating outside in the parking lot. That’s often where the real deals are found.

My big score for the day was a full NOS sleeve of vintage 220-grit 3M Tri-M-ite sandpaper. My experience is that this is getting harder to find, but one fellow had several tables of sandpaper-ish inventory, most of which I did not need. But the Tri-M-ite was priced nicely so I bought the whole pack.
I was only tempted a little by a smaller patternmaker’s vise that was missing a lot of parts. It was only $60 but I let someone else go home with it.

But if vises were what you wanted, there were plenty.


Inside was packed with both people and tools. Bins and shelves of tools.


The only other things I bought for myself were a file handle for $3, a Lufkin 10-foot tape measure for $2, and an extension carpenter’s rule for $8. I did buy a number of good tools for the grandsons, small back saws, eggbeater drills, and chisels for a future date, etc.
Very much looking forward to next year.
I’m involved in a couple more tool events this year; stay tuned.
One bite at a time, of course.

A couple weeks ago we ventured back into Mordor to do some yard work and house work in preparation for the return of Youngerbarndottir’s family to the region, as they might need to encamp at that house for an indeterminate time.

Unbeknownst to us there had been a microburst storm a few nights earlier and we were greeted with the sight of a large chunk of maple tree laying in the yard and on the deck. While I had brought my chainsaws, this was an unexpected, uh, pleasure.
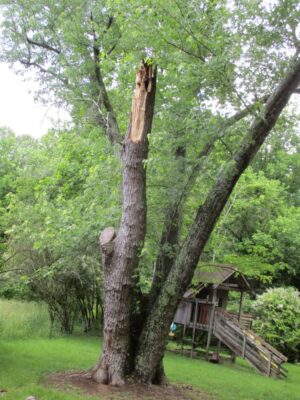
To give you a sense of the scale, the trunk snapped off about twenty feet up the tree, and the base of the snapped off section is just under 24 inches in diameter.
I have made no bones about my fandom for the Craftsman 20V product line, owning several drills, saws, string trimmers, and chainsaws. Are they the “best” performing cordless tools? No. Are they the least expensive cordless tools? No. But I do judge them to be the best value of the type. (PS- as much as I would welcome Lowes/Ace/Craftsman to support and underwrite my tool acquisition disorder, these are all tools I bought myself.)
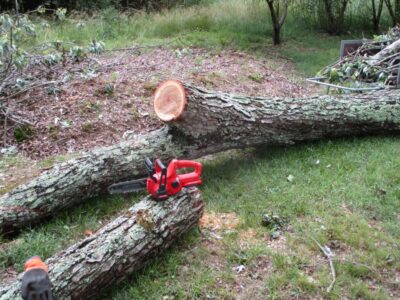
The 20V chainsaws are invaluable for routine yard work and even more demanding work. Just before leaving Shangri-la the little chainsaw made short work of a 12-inch locust post. With that in hand I worked many hours in cleaning up the tons of maple, one bite at a time. 75% of the cleanup was accomplished with the little 20V chainsaw, including sawing up to a foot of trunk. Admittedly it took a couple of fresh batteries, but I had them on hand, so it was no big deal. For the more routine cutting the trunk into roughly four-foot boles I used my gas-powered Stihl.

Although the silver maple is somewhat of a junk tree, I decided to salvage the best of the trunk stock for some future use. I was particularly interested in two crotches which will be turned into some sort of bowls on the lathe. But first, that will require fabricating an outboard turning plate on the ancient lathe my pal MikeM gave me eons ago. That will be its own series of posts later in the summer, I hope.
For the moment the boles are laying in the yard awaiting relocation to the old goat house where they will remain protected from weather and dry out slowly until I can cut them into whatever I need them to be.
If I am known for anything in the realm of shop work it is that I am an enthusiastic advocate for two arcane tools; the polissoir at the finishing bench, and the toothing plane at the woodwork bench. I find myself grabbing one of my dozen toothing planes almost every time I am preparing a board for whatever comes next, as toothing planes are magnificent for the task of making a board flat/planar (but not smooth).
I have long asserted that we are living in a Golden Age of hand tool makers, and one of them is my friend Steve Voigt. Sometime last year I asked Steve to make me a custom toothing plane. As a result of our correspondence about the plane, I sent him three of my favorites to use as guides for his work.
A few days ago I received two packages from him, one with my three and the other with his new one. I’m like a kid on Christmas morning, anxiously awaiting the time soon when I can really take it for a test drive.
Stay tuned.

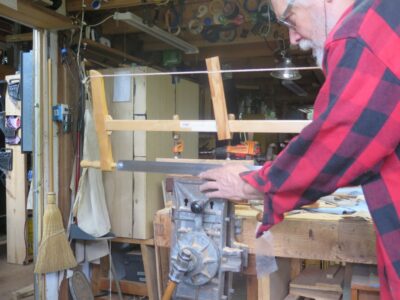
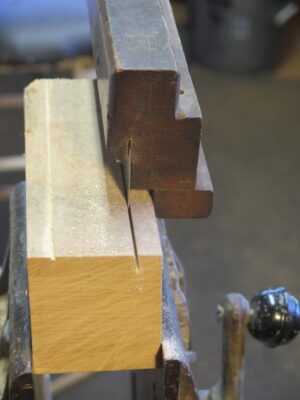
Recently my friend JD came for a visit, bearing a crosscut slab from a cherry tree that fell across his driveway. He wanted to turn it into a small tea table to hold his cup of morning coffee out on the porch.
I thought I might be able to smooth and flatten it only using planes, but the amount to remove (~3/4″ of very hard end grain) was simply too much. So, I spent a couple hours sawing to get the two faces coplanar.


After that I did most of the work with my trusty #5 set up as a foreplane, followed by a companion #5 set up as a smoother.

Some vigorous work with my user-made scraper, picked up somewhere along my path, and I was done.
So a few hours of good fellowship and labor it was ready to go home with him for attaching the legs and finishing. At first he was dismayed at the “washed out” nondescript appearance, but I assured him the rich cherry color would soon return. Since it will be out on the porch for his morning coffee he will finish it with some thinned polyurethane for the greatest penetration and protection. I’m awaiting the finished pictures myself.
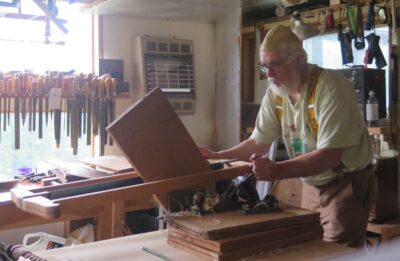
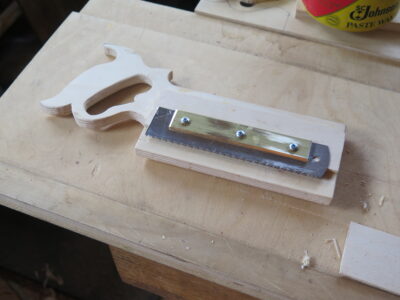
On occasion I think up things to do with derelict tool parts that I pick up along the way. Such is the tale here.
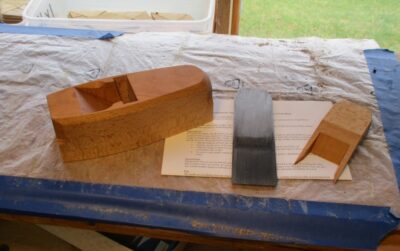
Since I enjoy hand-resawing — sometimes necessity really is the mother of invention, and I do not possess a bandsaw for the task — I’ve invested a bit of time in assembling the requisite accouterments for the task. Included in this mélange would be several kerfing planes with fixed fences to reflect the more typical thicknesses I am trying to cut. These are made out of Baltic Birch plywood and work just fine.
When I began assembling my 18th Century tool kit for demonstrating I wanted to include resawing in the mix since folks are genuinely amazed to see that work being done. My kerfing planes would suffice for functionality but not for aesthetics or interpretation, so I dug around in my boxes of spare parts to see what could be done. I found an abandoned body of a plough plane and the light bulb went off. I was especially attracted to the moving fence on the sole. I can never remember what this part is called. Is it the fillister, or is that something else? Whatever it is I thought it would be a nice feature for a kerfing plane to include in my kit.
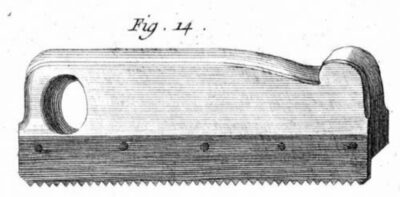
Roubo Plate 14 Figure 14
I do not think this notion is historically outlandish as there is a plane/saw included in Roubo that really seems to bear a peculiar resemblance to the kerfing plane in current use. Although Roubo refers to this as a tenon shoulder saw, I could definitely see it working as a kerfing saw with virtually no modification.
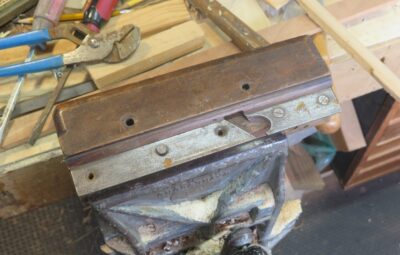
My first step in transforming this derelict into a delight was to remove the skate guide from the plane body. This was not an easy task as several of the screws had cemented themselves into place with corrosion. I got a couple out by customizing a screwdriver but had to drill out three of the heads and then file the shafts flat to their surroundings.
I was using a piece of a bow saw blade for this tool and had to cut a groove up into the plane body into which the top of the blade was inserted to the plane body where the skate was, to bring the saw teeth into proper relationship with the movable fence.
Once that was accomplished, I punched and drilled new holes for the screws attaching the blade to the body. Viola’, a lovely new tool from the carcass of an old one.
The native fence set-up gives me just a shade over 1/2″ so I might re-tinker with that at some point in the future to expand the capacity to an inch or so.
Perhaps it’s an age thing, perhaps it’s a “working alone” thing, but I have had a lot of time reminiscing lately while up in the barn.
50+ years ago when as a teen and newly arrived into a real-live cabinet shop I was introduced to the deep-seated passions of European craftsmen. Prior to that I was a “scratch and dent” man at a couple of furniture stores, which, though a legitimate service, is not the same as working alongside men with years of apprentice training and decades of life on the job.
This shop was operated by a New Yawker of Greek heritage and produced amazing interiors with frame-and-panel rooms, carved detailing, and exquisite finishing. (I was an underling in the finishing room; they did not consider my week(?) at a Mohawk workshop to be really valid for what they did and trained me in their way of doing things enough that I could next catch on to the Schindler’s shop where I spent the following few years) Since the talent pool in south Florida was not up to his standards the owner hired guys from Long Island to come and work there, they were amazing craftsmen/artists.
Hans was a German-trained cabinetmaker in charge of that side of things. Joe was an Italian who was my boss in the finishing room. Both men were incredibly generous in teaching me what they knew at a level I was able to learn, and sometimes that created conflict between them when Hans said one thing and Joe said another. I mean, real conflict to the point where the big boss had to step in and send them back to their corners.


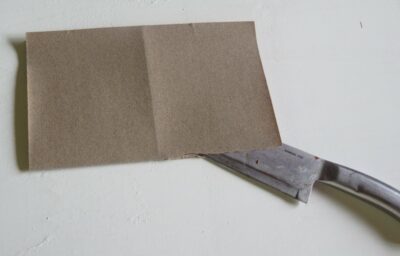


Perhaps the most intense quarrel I recall was about how to fold sandpaper. Really. Hans was insistent on the “quartering” method of preparing and using sandpaper. In this technique the sandpaper was twice folded in half along the perpendicular center lines, then cut to the cross-fold along one line then folded into a stacked quarter. According to him, this was the only way a REAL craftsman used sandpaper.

Joe bristled at both this method and the insinuation that he was not a REAL craftsman (they were both just shy of magicians in their work). According to Joe the only true method for preparing and using sandpaper was to cut the sheet in half along the short axis, then fold the paper twice to yield three identical sections when folded over. To be honest a version of this method is the one I have used more often in the subsequent five decades.

But the experience of watching two late-middle-aged men almost coming to blows over how to cut, fold, and use sandpaper was indelibly burned into my memory and provided a lot of insight into the human condition. If we want to, we can gin up conflict over the most inconsequential things while letting the existential stuff slide by with barely a notice.
Design? Pshaw. Construction details? Shrug. Finishing schedule? Whatever.
But sandpaper? Put ’em up, buddy.

Recent Comments