I’ve got a 12-inch radial arm saw down on the first floor of the barn, but it has not seen one second of activity since it was moved here thirteen years ago. I’m just not doing anything that makes it necessary. However, on the second (main) floor I’ve got a 10″ chop saw that gets used regularly to make long boards shorter for whatever reason. For some tasks I use the cross-feed sled on the table saw but far more frequently I’m just chopping something up.
One of the great features of the chop saw is that it is quick and easy. One of the lousy features is that it made a huge mess even when I hooked up the “dust collector” outlet to the shop vac. Even when everything was hooked up properly sawdust went all over the place and it required a local cleanup with every use.
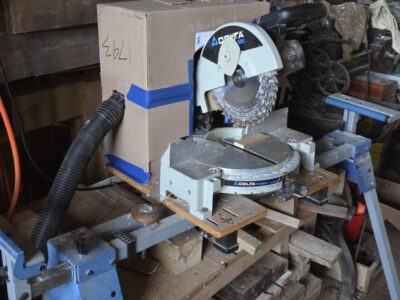
I finally got tired of this nuisance and made and installed the lowest possible tech solution, which reduces the sawdust cloud by about 99%. I looked through my mountain of boxes piled up on the third floor and found one that fit my needs. Equipped with a utility knife and a roll of masking tape I fabricated a box shroud to fit over the back side of the saw, complete with a port for the shop vac hose. At this point the only thing missing is a fitting to glue to the portal for plugging in the hose, but even with just a rough hole cut in the side of the box the collection is magnificent.
One of the great things about possessing and occupying the barn is that I have 7,000 square feet of space. And occupy it I do. Lots of storage, lots of work space(s). As a matter of fact, I have more than a dozen work stations allowing me to set up multiple projects, moving from one to the other as needed. Or more truthfully, moving from a cluttered one to a less cluttered one.
Thus the down side to occupying the barn. It needs more regular cleaning than I am inclined to do.
I have two dear friends, MikeM and MartinO, whose shops are so neat and orderly at all times they are what critics of shop videos would say, “It looks like no one ever works there, they are too clean.” I can attest that Mike and Martin are indeed so orderly their shops do look that way. Whether it is by necessity or temperament, the shops reflect the orderliness of the men themselves. Everything is in its place, put away immediately after use. Everything is kept clean, all the time, beginning with the moment a task is completed.
I will resist the churlish temptation to brand this as some sort of psychosis (smile). Alas, I do not possess the traits these two neatniks have as my operating system.
For the past few months I have been paying the price for my own poor housekeeping habits, working my way back into regular shop time by cleaning the place, one work station at a time. The end in in sight but I know well enough the trial of messiness will return soon enough.
Here’s a partial montage of my work stations. I apologize in advance for the photography; trying to get good images when the space is ambient light and blinding snow reflection is blasting through the windows.
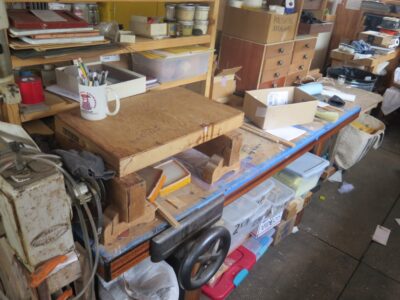
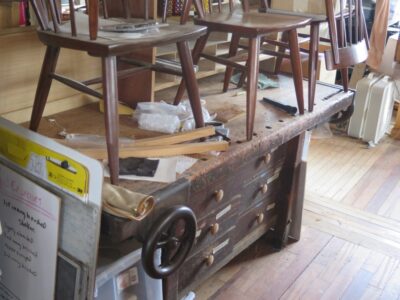
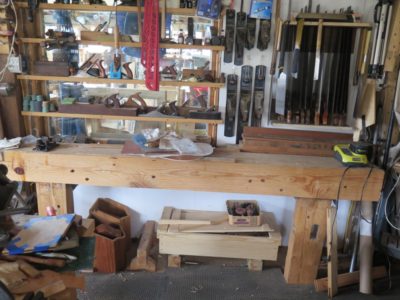
On the east wall, directly underneath a double row of windows is my FORP monster workbench, 8-1/2 feeet long and probably close to 500 pounds. This bench gets used almost every day, currently is is the working platform for assembling my parquetry units for the big tool cabinet I’m making. Underneath the bench is a cabinet full of marquetry/parquetry tools and supplies, and my stash of adhesives. They are located here to be near the wall propane furnace.
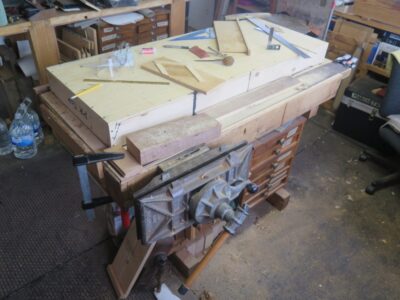
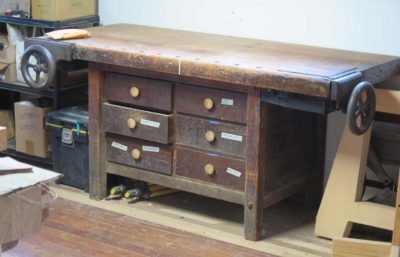
Turn around from Roubo and you’ll find my third child. If I was a Viking I would have this one buried with my in the mound. This bench, with one of my Emmerts on board, is my most used piece in the whole shop. I’m currently using it tp layout the doors of the parquetry tool cabinet.
One step behind and parallel to this bench is an early Roubo, not really successful but good enough to use as my metalworking and tool repair bench. It has an Emmert machinists vise on it, and many jigs underneath.

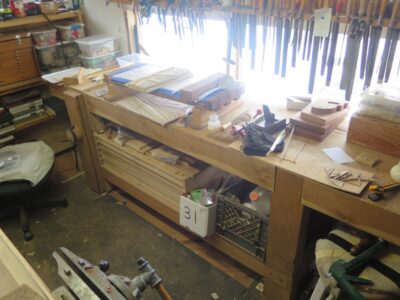
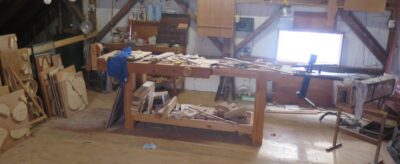
Midway along the north wall is another Roubo bench, now my primary finishing station. Underneath are cabinets full of brushes, pigments, and tube paints, etc.
Turn around from my finishing bench and you will find the Studleyesque bench I built for the exhibit now almost a decade ago. It is perfectly usable as a general bench, but I mostly use it for my sellable inventory underneath, and packaging orders to ship out.
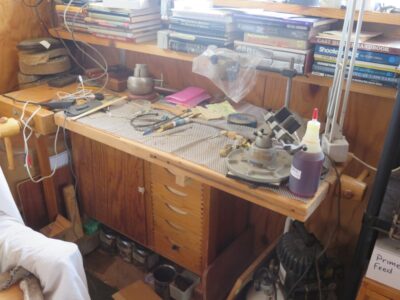
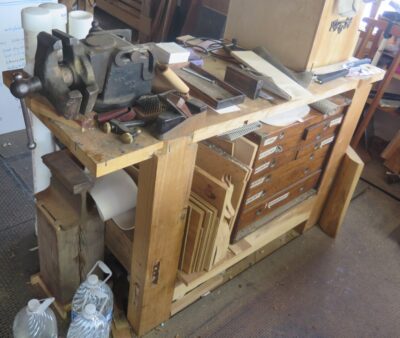
Down in the northwest corner of my shop is my “fine work” bench, a salvaged and renovated Sjoberg I use for all manner of small scale work. Gunsmithing, engraving, checkering, silicone mold making, chasing, etc.
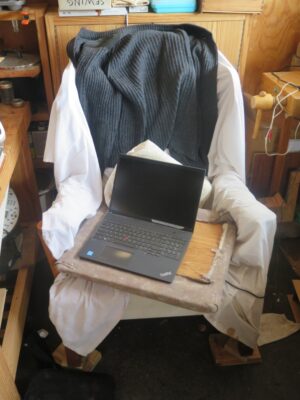
Literally adjacent to the Sjoberg bench is my writing station. You might not think writing is work, but I promise you it is. The chair frame was made by my Roubo translation collaborator Philippe Lafargue. I use a turned over seat deck from a long gone project as my lap desk.

In the corner opposite my engraving station is my waxworks, encompassing all manner of wax processing. It’s on top of a large map case unit full of veneers, mother of pearl pieces, and other exotic material. Keeping the waxwork tidy is an unwinnable proposition, I just try to keep it usable with minimal fuss.
And this is just some of the stuff inside my 15′ x 35′ heated shop.

Stepping outside the heated shop is the “great room” in the center of the floor. In the center of that is this Nichiols that I use whenever I am traveling to demonstrate traditional hand tool work. It gets used here too, currently for making a Japanese planing beam and the base frame for the parqutery tool cabinet.

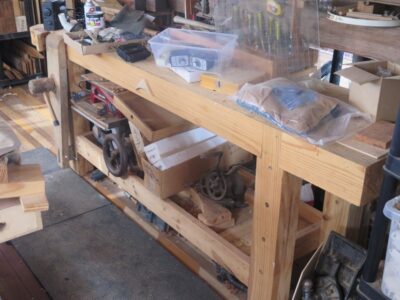
The north side of the great room is just tool and supply storage, but along the south edge is the space for my lathe, chop saw, and a vintage machinist lathe I bought at Donnely’s and then it was restored by my long time friend Jersey Jon.
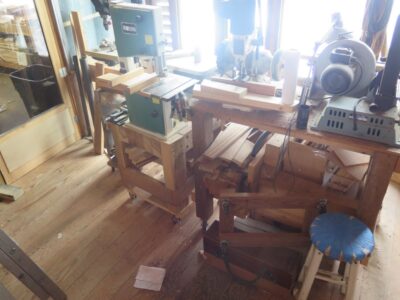
At the east end of the room, in front of the wall o’windows, are two rolling benches with a variety of power machines, and next to them is my drill press.

On the opposite side of the floor from my shop is a space I originally designated as a classroom. It contains several work stations for students, but now serves as an intermediate space for things in process of being “put away.”
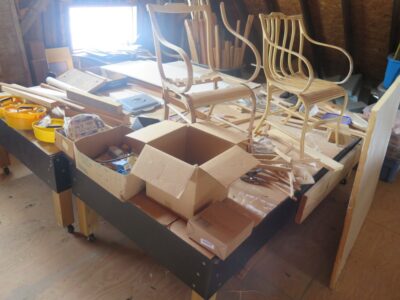
Then on the fourth floor is my Gragg chair workshop.
At one end of the 40 x 24 space is my Roubo workbench, steam box and many bending and assembly jigs.
I also have a couple of large assembly tables that can be situated as the need arises.
So there is a truncated account of all the work stations I need to clean.
…to discover this carpentry tip.
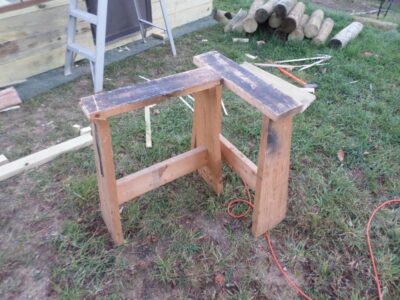

While working on the greenhouse I brought down my favorite sawhorses but found the ground to be too uneven to use them. Perhaps I should have chosen my Butterfly Sawhorse instead. In a moment of inspiration I realized I could create a stable workstation by simply screwing the two horses together at a right angle to create a rough triangle configuration.
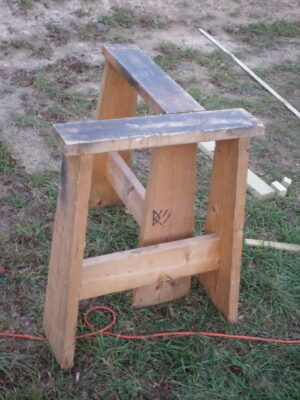
Zzzztttt. Problem solved.
Here’s a sharpening tip I have used for the past several years.
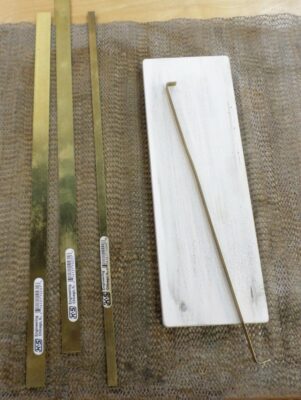
In order to get the back-bevel secondary angle consistent and effortless, many folks use the “ruler method” and rest the back side of the blade on a metal ruler to get the back bevel/micro secondary bevel. Since some of my machinists’ rules have different thickness, in addition to the preference for not using an actual rule since they can move during the process, I pulled out a thin brass strip from my supply box and cut and bent it to fit the stone in question.

By overbending the tips a smidge the metal strip is basically spring-loaded into place, thus the micro-bevel jig stays put during the final few strokes of sharpening.

The brass strips are available at almost any hardware or hobby store, usually for a dollar or two. Obviously you could use any thin strip of sheet metal as well, flashing would work just fine.
There’s been a lot of “rearrangeritis-ing” going on in the barn as I try to organize and winnow the contents so that I can establish an honest-to-goodness estimate of the footprint I need to use, in great part to project into the distant future when we build our final, geezerized home some time in the 2030s.
Back in the day when I used to write a lot for PopWood one of my articles was about building and using something I called a Butterfly Sawhorse, that could be folded flat to hang on the wall or unfolded to operate as a very convenient work or holding station (I’ll post the article as soon as Webmeister Tim and I can figure out how to unlock the AWS archive where it is stored). In the maelstrom of rearangeritis I find myself using this tool almost every day.
One of the things I’ve always wondered about the Butterfly is, how much can it carry? To be technically dispositive about it I would load it up with weights until it collapsed, documenting the process exactly. But that does not strike me as particularly useful exercise is the results would be 1) a precise knowledge of the load bearing capacity of the Butterfly, and 2) a squashed flat Butterfly.
I did get a good sense of the Butterfly’s strength recently when I loaded it up with an estimated 700 pounds of really, really green walnut. It accomplished with task with nary a quiver.
Sometimes a willingness to venture “outside the box” yields great rewards. This is one of those times.
Like probably most of you I have a number of modern saws with impulse hardened tri-faceted teeth. The upside is that these teeth can be very long lasting. The downside is that they are brittle and prone to snap off whenever encountering an exceedingly hard material, such as a nail. I have several saw blades with a gap-toothed grin. Fortunately, the blades are almost always replaceable. Unfortunately, until recently, my experience had been that they were impossible to sharpen due to the impulse hardening that made the files skate off of them without affecting any improvement. I found this frustration to be true for any of the facet-tooth saws I have, whether actual Japanese saws or the Stanley western style saws that employ Japanese-style teeth.
While working at my daughter’s house a while ago with my old-ish Z-brand saw I hit a nail good and hard. Much to my surprise only one tooth snapped off, but a couple dozen were mushroomed (I’m not good enough with that camera to get a nice pic). I had never before seen this damage. Before, the teeth just snapped off.
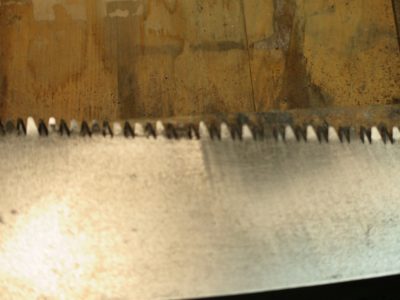

I certainly had new replacement blades in the drawer, but since the teeth were intact (except for the one) I decided to bring it back to the barn and give it a try to sharpen them. Using abrasives, first sandpaper then one of my small whetstones, I flattened the back side of every damaged tooth. Since most of the saw’s use was for rough carpentry and yard work I went ahead and cleaned it up pretty well.
However, when it came to re-shaping the damaged facets even my diamond needle files mostly skated over the hardened tips. But there in my small container of whetstones for my carving tools was a diamond shaped aluminum oxide “India” stone. The cross section was exactly like that of the file normally used to sharpen Japanese-stye saw teeth. I also had a needle-taper stone of the same material. They both came in handy.
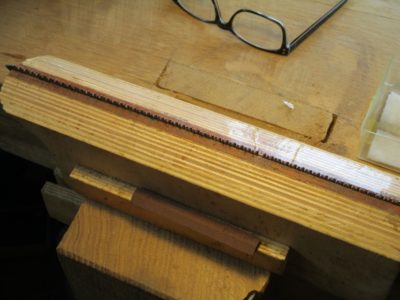

Setting up the sharpening station just like every other saw I’d sharpened in the past umpteen years, “filing” with the “India” whetstones worked like a charm.
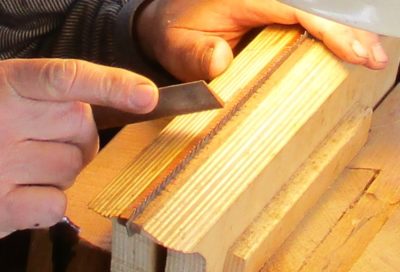
In less than a half hour I had the task done. Prior to the sharpening the saw would still cut after a fashion, 51 strokes to get through a 2×4, but after the sharpening it made it though the same lumber in exactly 1/3 of the strokes, leaving a very nice kerf surface.
It is a good day when you can go to bed after learning something you did not know when you woke up that morning.

A couple months ago for my birthday Mrs. Barn gave me this remarkable tool to keep handy. I’ve had many headlamps over the years as my fading eyesight is always seeking more lumens, but this one is the first that I’ve tried that is actually comfortable, high performance, and long lasting. The combination of the LED illuminator plus the 2 AA batteries being located at the rear of the unit giving it a perfect balance, I can wear it all day long with comfort. I cannot tell the lifespan of the two ordinary batteries as I have not yet had them go dark after almost 60 hours of use.
She says she bought it at the local feed-and-seed coop, so I am guessing it may be available at Ace Hardware stores.

While working at the kids’ house I was relegated to a little spot in the unheated, concrete-floor garage. By the end of the first day my feet hurt all the way to my neck. No doubt about it, I am really spoiled by the floors in the barn. My shop there has wooden flooring over wooden joists, with 3/4″ rubber horse stall mats over them and I can stand there all day with no problem.

I was looking around for some mitigation to the floor situation and fortunately found two huge cardboard boxes, probably from new kitchen appliances. I spread them on the floor such that there were four layers of corrugated cardboard between my feet and the concrete and set about to working as normal. The difference/improvement was dramatic.
Though not quite as forgiving as my barn floor and not as durable either, this solution will definitely suffice for keeping me upright and out of pain for the duration. And if I wear out this new floor padding? No problem, there are more big boxes to use once these go into the trash.
Once my list of “Little projects” got whittled down I had some allow time and had fortunately grabbed a pile of stuff to sharpen, mostly damaged or never-used (by me) tools so I was standing up for long stretches working on my stones. The foot-comfort factor was high, thanks to nothing more sophisticated than sheets of cardboard underfoot.
Back by popular demand – sandblasting! I am delighted to profile my complete sandblasting system.
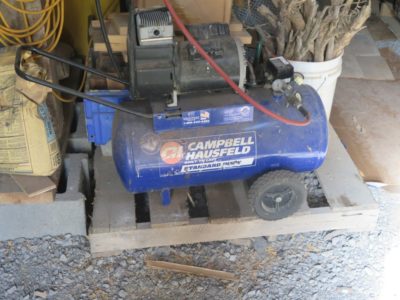
The starting point is my “nothing special” $75 Craiglist compressor in the basement of the barn, residing there because it is a diaphragm compressor head rather than a piston head and thus pretty noisy. The compressor unit is a 2 HP motor/head attached to a 10 gallon tank. The compressor is attached to the air-abrasive gun via a typical reguator/air hose system and quick-release pneumatic fittings. I generally operate my blasting gun at around 40 psi which gives me good control and adequate aggressiveness and is well within the capacity of the compressor.
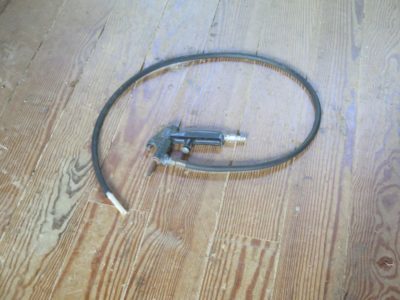
The blasting gun attached to the hose is a siphon-feed unit, ancient (probably Craftsman) but indistinguishable from some thing you could buy tomorrow at Harbor Freight.
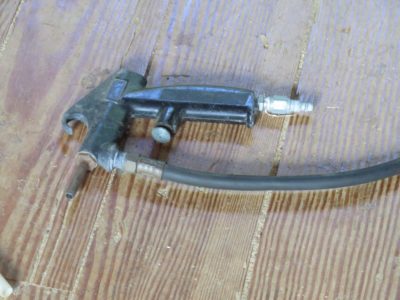
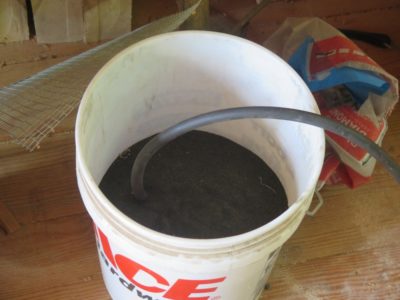
The system operates like this: The air running through the gun nozzle creates a partial vacuum in another feed-line fitting/tube which draws the abrasive medium through the siphon tube. In that effect it is identical to a paint spray gun, but instead of pulling up liquid paint and atomizing it through an atomizing nozzle it is sucking up the abrasive and focusing it through the gun output aperture. As a general practice I simply jam the end of the siphon tube into the bottom of the abrasive reservoir, almost always just a bag of the abrasive or a five gallon bucket if I am feeling fancy. I refill the bag/bucket with “overspray” abrasive gathered from the trash can. I’ve thought about getting a fixed metal “hopper” reservoir but the bag/bucket work just fine for me.
One final word: make sure to wear eye, hand, and face protection. Really. I generally use a face shield, light leather or rubber gloves, and a dust mask or respirator. You do not want to get even a smidge of this in your eyes or lungs.
===============================================
BTW I got my stitches out yesterday and much to the doc’s surprise I have had zero discomfort since Saturday, when I became pain free and cane free. As he commented, “This level of recovery is unusual for someone at your stage of life.” Apparently for geezoids like me the cartilage pain is compounded by an even more severe arthritis pain, which I do have some but not yet to the serious pain level. If arthritis is the foundational pain problem, repairing the cartilage will not diminish the pain to my current level of “0.” Still a little stiffness but that will disappear with motion and PT. I’ve been told to take it easy for a month, which I will probably sorta do. Off to mow the lawn.
The events of the past several months, including Mrs. Barn and me losing our remaining parents and my becoming closer to 70 than 60, are leading me on a path of deliberate winnowing of my shop and barn contents. Given that my sister is still going through my mom’s stuff — and she lived her last years in a one room “mother in law” apartment with my brother and sister-in-law — and the literal tons of belongings in my father-in-law’s four bedroom, two car garage house with a large back yard where he lived for 59 years, I am determined to reduce my material possession burden to my heirs as much as possible. Since my mom died at 103 I may have some time to get it all resolved, which is a good thing when there are 7,000 square feet and 70+ acres in the discussion.
Other contributors to this long-term process are the realizations that barn-based workshops will not have the prominence that I once thought would be true, and given my current set-up on the fourth floor I really do not need a second floor classroom outfitted with a perimeter of workbenches (I do however still use that space mostly for development of the ripple molding cutter). Also I recognize that at some point in time life in the mountains would just become too hard physically, and I would see the barn in my rearview mirror. Not any time soon, but it is inevitable in 10, or 15, or 20 years. One small step we are taking to delay that day as long as possible is to try to find someone who can execute most of the mowing and bush-hogging tasks around the homestead, but when you live in the least populous county east of the Mississippi River it can be a challenge to find someone to work for you.
One of my upcoming tasks will be winnowing the workbench inventory. Do I really need eight workbenches in my own workspace? Of course not. So, I will begin reducing that particular footprint almost immediately and there are definite “Workbench Wednesday” implications.

The first of these will be to replace my first workbench built for the space, the timber planing beam, with a low bench of the Jonathan Fischer/Roman/Estonian variety. Since completing my French Oak Roubo Project bench I have had no need for the planing beam so it will be resawn and joined to become the slab for that bench. It will occupy roughly the same space but serve a more immediate need as my knees and hips are becoming more troublesome and working while sitting is ever more congenial.

This change will also allow me to construct a standing tool chest to hold a copious inventory of hand tools, to be placed at the end of the low bench where my saw rack and metal hand planes hang on the wall. Since seeing Walter Wittmann’s cabinet a few years ago I have seen this as a solution to my tool storage problem and now is the time to act on it. The Japanese tool box will reside where Walter’s large lower drawers are located.
Of the plans for the workshop changes these are two of the three at the top of the list. The third is to restore my piano-maker’s workbench in order to make it a proper gift for my son-in-law, and move it out of my workspace. I m still cogitating on the ultimate home for the Studley-ish bench I built for the exhibit.
On top of everything else I have stock for at least another half dozen workbenches still unbuilt, but that may be moved on to other folks with the time, energy, and need that I do not have. Among these are the gigantic mahogany slab and vintage walnut 6×6 that would result in an eye-popping Roubo bench, a 14/4 curly maple slab already glued up, a stack of oak 10x15s, some 12-foot long 7×15 Douglas Fir timbers…
Stay tuned.

Recent Comments