Mrs. Barn calls it ADD, I call it Hyper-curiosity. Whatever it is, it means that sometimes I have a tough time turning my brain off, which in turn has an ancillary side effect of insomnia. And, an inability to concentrate fully when I’m watching a movie or such (tonight it’s an Eastwood bullet-fest — obviously Mrs. Barn is out of town) and I usually have a note pad nearby to capture my fragmented musings. A few of these and I have an idea, a few ideas and I have concept, and a concept usually turns into a project of some sort.
Here are some landmarks on the conceptual map that is taking shape for one possible future project for The Barn based on observations, whimsy, and experience. Consider the following:
I’ve had the amazing opportunity over a great career spanning almost five decades that enabled aggressive learning and allowed/required creative, interdisciplinary problem solving
I retired five years ago with plenty of fuel left in the tank. Since then I’ve published three books (with at least five more manuscripts in the pipeline, maybe even as many as a dozen if I get back to writing fiction), filmed three videos, and created a unique exhibit.
Now freed from the immediacy of most deadlines (I’m still writing a ton, but the deadlines of the Roubo and Studley books were imminent and the Studley exhibit deadline was inflexible) and recovered from two serious injuries, I can now let my mind wander and creative juices flow unfettered
4. I have a big barn in a beautiful setting and have been encouraged to organize workshops to pass on what I learned over the years. Those who have attended the workshops give me great feedback about the experience and the setting.
5. But, most folks are unwilling to come to The Barn for workshops, for what ever reason; distance, remoteness, time, topic. Last summer two of the four workshops I had scheduled were cancelled due to lack of interest, this year it was three of five scheduled workshops cancelled. I will probably never cease offering them, maybe just a couple every summer, but it’s pretty clear workshops at The Barn are likely not a big part of the equation going forward..
6. I still enjoy greatly transmitting to willing learners the stuff taking up space between my ears and energizing my hands.
7. I go places to teach occasionally, but my aversion to travel makes this an unlikely major component of my future plans. Plus, I generally expect hosts/classes to compensate me similarly to conservation clients, and that is a deal breaker a lot of the time. Think of it as the intersection between Opportunity Costs and Comparative Advantage.
8. I am comfortable speaking to audiences, whether the audience is people or cameras. I hope my previous videos confirm that self-assessment.
9. A talented (and eager) young videographer has returned home to the hills after honing his craft at college and in commercial work. Given that about 39,614 guys are out there making woodworking videos, some with negative production value or informational organization, I’m thinking there may be some fertile territory for our collaboration given his expertise and my idiosyncratic interests.
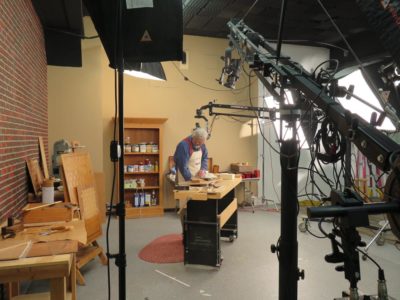
10. The cavernous fourth floor of The Barn ( 18′ x 38′ with 17′ cathedral ceiling) served mostly as an attic for the past few years.
With those things simmering in the pot, I have decided to turn the fourth floor into a video studio. Mostly that involved cleaning out the stuff being stored there, doing a bit of painting, and finishing the wiring. If nothing comes of this, at least I got the attic cleaned, painted, and wired.
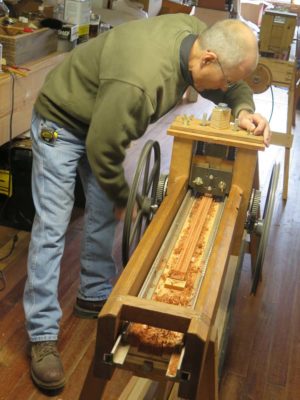
While I was fussing with the Roubo bench, John was in the adjacent space being utterly productive in tuning up the Winterthur ripple molding machine. His success was such that he was able to concentrate on running samples with a variety of the cutters that my long time friend Cor van Horne made when he built the machine.
Magnifique!
Our plan is for John and me to feature and demonstrate this machine at the upcoming Working Wood in the 18th Century conference at Colonial Williamsburg in early 2018.
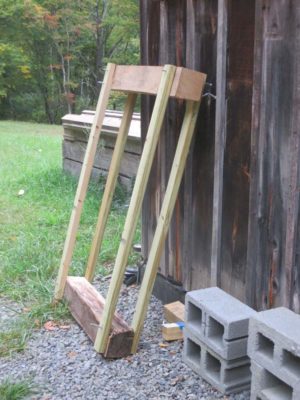
As we left our intrepid adventure, all four legs of the FORP workbench were bound in place, unable to move fore or aft. The effort to seat them with a hydraulic bottle jack and the weight of the building was inadequate but that episode opened an avenue for contemplation. Namely, how about constructing a frame to capture both the feet of the legs and the hydraulic jack against the slab top?
Brilliant! sez I, and I set about making one such device from oak 6x6s and framing 2x4s. I placed the lower 6×6 cross piece underneath the feet at one end of the bench and captured the bottle jack with the other 6×6 above the slab. Good concept, poor execution. The corners were pinned with 1/4″ lag bolts, which almost immediately bent to such a degree that the unit was not functional.
For the next iteration I ripped a pile of surplus 3/4″ CDX plywood into 5″ wide strips, the fashioned them into a more robust frame what was three pieces for the stiles and seven pieces for the beams, all glued and screwed with four 1/2″ carriage bolts holding each corner together.
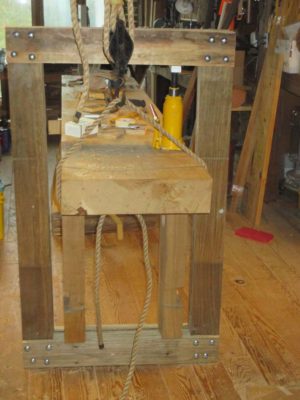
I held my breath as I maneuvered the bench and the frame to their respective locations, placed the bottle jack directly over one of the legs with a metal bar at the top to transfer the force to the frame and started pumping the lever arm. The results were almost immediate and immensely gratifying as I worked my way around the bench from leg to leg. With each new stroke of the handle the legs would be driven into the mortises about 3/16.” In about 30 minutes I had all four legs seated and a huge note of thanks for the person who invented the portable hydraulic jack.
At “peak compression” I noted that even the seven-layer beam deflected almost a half inch due to the force.
Finally the bench was on its feet, with zero wobble and clearly no need for glue in the joints. I installed the stretchers and the shelf, and having already completed the game of Tetris required to move it where it was going and the six steps of moving other things to make it happen, including four other workbenches to new locations, with two 8-foot workbenches being hoisted to the fourth floor, and the 450 lb. FORP bench slid easily to its new home.
I will wedge the through-tenons next week and true the top next spring after it goes through the winter in its new, heated home. I have not yet decided what to do about spacing the holdfast holes, or installing the planing stop and leg vise.
Stay tuned. At least I now own a killer hydraulic press frame.
Getting back into the shop after harvesting juncus I was anticipating installing the legs on the French Oak Roubo Project workbench after having it wait on me for more than fours years. The joinery was all done, the repairs completed, and all looked well. The first few whacks on the bottom of the legs (the bench was upside down) produced pleasing results, and we flipped the bench over the finish driving them home from the top.
A few good moments of movement, then, nothing. No mount of persuasion would budge the legs any more than about halfway in. Even with my 12 lb. sledge nothing was moving. On any of the four legs. So I tried driving them back out to fiddle with the joint shoulders. Nothing happened. No matter how hard I beat on it. A cold clammy sweat began prickling me all over.
Then a stroke of genius came down. How about if I used a hydraulic bottle jack and placed it under the bridge between the two balconies with a 6×6 post filling the excess space? I practically dislocated something patting myself on the back for that one.
The first attempts revealed the propensity for the jack force to lift up the bridge beams. No big deal, I just cut 4×4 spacers to fit between the top of the bridge beams and the barn frame, essentially bring the entire weight of the barn into the equation.
I began to have some results as I levered the 12-ton jack and could hear and see the legs creeping into their mortises. Then I started hearing creaks from places far away, and rapidly backed off when I realized that the process was literally inflicting enough force to potentially tear the barn apart.
In Roubo’s description of the finishing processes and materials included in L’art du Menuisier (and thus our To Make As Perfectly As Possible translation) he used the word “juncus” when referring to the fibrous plant from which the polissoirs were made. At the time we had competing dictionary definitions and identifiers, “rush,” “grass,” and “straw” all showed up in one dictionary or another, and in the end I decided to simply use the word “grass” if I recall correctly.
Yannick Chastang, like my Roubo Project collaborator Philippe Lafargue, was trained in the full multi-year program at Ecole Boulle in Paris, chided me that Roubo chose the word “juncus” on purpose and I should have as well, at least in concert with the word “rush.” Fair enough, but in retrospect since the word Juncus refers to a genus with over 300 species of grassy rushes I cannot beat myself up too much for that editorial decision.
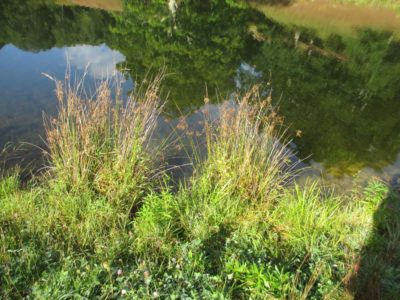
I was talking about this to Mrs. Barn one day, she being a botanist/mycologist by training, and she said something like, “Well, you are in luck since we have Juncus effusus growing around the pond.” She took me outside and sure enough, we have a number of fairly immature clumps at the shore of our pond. When Daniel the stonemason was here building the hand-knapped dry-stack wall a few months ago he mentioned that he had loads of juncus growing around his pound and I was welcome to harvest as much as I wanted.
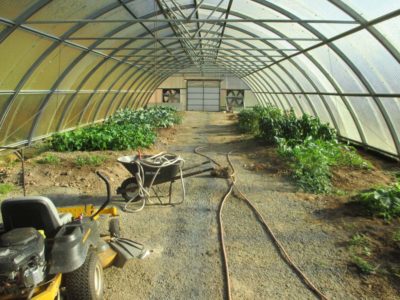
As a break from our activities during ManWeek John and I took the morning an went to Daniel’s place to harvest soft rush, or juncus. We first spent a minute ogling his greenhouse. Mrs. Barn will be most impressed with it when we visit again.
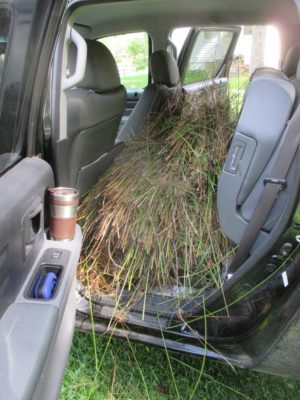
Then we headed to the pond and there was indeed a multitude of soft rushes ringing one end of it. In less than an hour of harvesting we had the back seat of the Envoy completely filled.
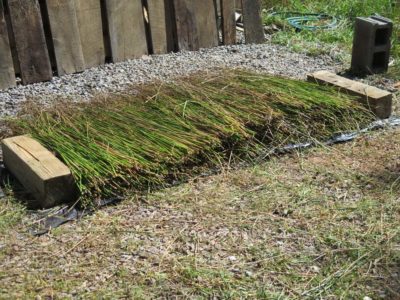
Back at the barn we sorted and arranged the rushes to dry in the sun before moving them inside a few days later.
Yannick avers that polissoirs made from these fibers have a very different feel and performance than the ones I get made from sorghum broom straw. After this material gets fully dry and I make some Juncus polissoirs I will be able to make my own determination on that.
While I was occupied with the Roubo bench slab in the center hall of the barn John was a dozen feet away in the classroom tinkering with the Winterthur ripple molding cutter. When we gathered earlier as a group we identified a number of modifications that might serve to transform it into a reliable, precision machine. I ordered all the materials and supplies we thought we needed for this undertaking so everything was ready to go for John to dive in to making these modifications a reality.
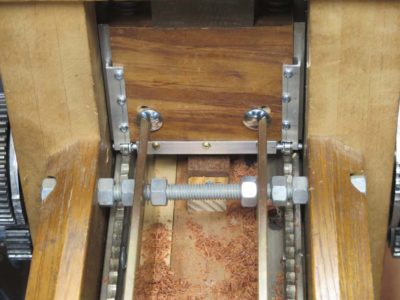
As a moment of review, the ripple molding machine is simply a contoured scraper being drawn across a length of wood, with either the scraper or the workpiece being undulated by some sort of linear pattern. In short, a ripple molding is the result of controlled chatter.
In the case of this machine it is the cutter that remains fixed relative to the length of the frame, but which undulates up-and-down via a horizontal “follower” rod affixed to the cutterhead frame, pressing down on the pattern running the length of the machine frame. We found in our earlier efforts that either the pattern or the follower ere being degraded and even destroyed by the very process of creating the moldings.
I do not know how this problem was dealt with historically, but for our applications we decided to replace the extant follower rod with a new rod and tiny roller bearings to instead ride along the pattern, transferring the up-and-down impulse without friction to the cutterhead. John spent extensive time retrofitting the cutterhead to accommodate this modification without damaging or changing irrevocably the machine as it was presented to me.
After installing the new follower system John reported to me with a grand smile that it as a perfect solution to the problem, and would guide our design considerations as we move forward with new machines in both our futures.
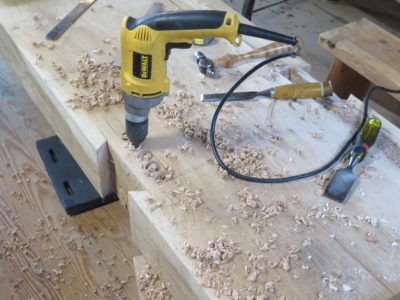
When I last left the oak Roubo bench 4+ years ago it was still quite ways from being done (one of the great benefits of building a bench a laDavid Baron is that it can get done in a week). The leg tenons were all cut, but only two of the dovetailed mortises and none of the rectangular mortises, so clearly a lot of drilling and chopping was in store. There was nothing exceptional about the task or process other than it required flipping the top a couple of times to get the job done. The last two dovetailed open mortises took about an hour to knock out.
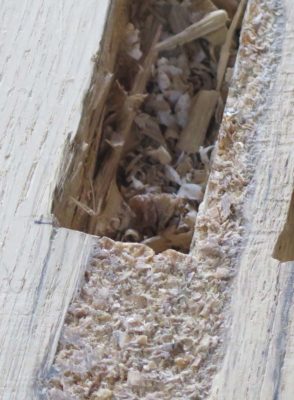
Drilling and chopping the closed mortises went smoothly. For three of the four. And the fourth? Grrrrr! For some inexplicable reason I switched from a Forstner-style bit to a long auger bit for my drill, and it went astray. Not just astray but bound tighter than a drum and would not move forward or backward (a theme that was not yet fully played out). After a lot of fussing and fuming I was eventually forced to drive it through the other face using my sledge hammer. Sheer brute force. I was reminded of my late friend Mel Wachowiak’s quip, “With enough force you can pull he tail off a living cow.” Or drive a 7/8 auger bit through an inch of solid oak.
This blew out a chunk of the face adjacent to the mortise, leaving me less cheery than you might expect, my anger being tempered only by the fact that all this damage took place on the underside of the slab. An hour later I had knitted together all the splintered wood and glued it back in place to leave overnight. In the end it was a patience-expanding experience.
The good news is that the repaired place (epoxy and shavings filled) held up perfectly when chopping the mortise in that area. The repair felt just like the adjacent wood and held a nice crisp corner with no chipping or fracture.
So now the mortises were all done and seemed to provide a nice snug fit, and I was looking forward to driving the legs home in the morning.
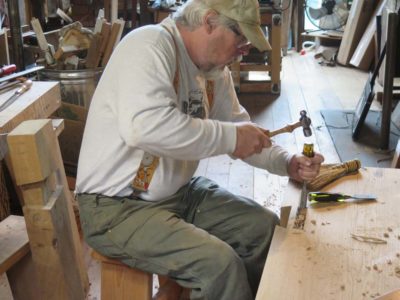
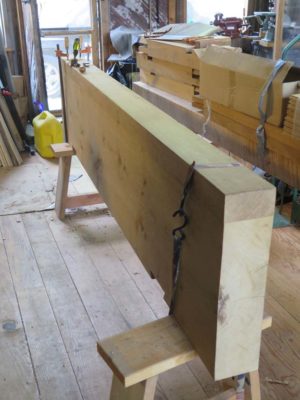
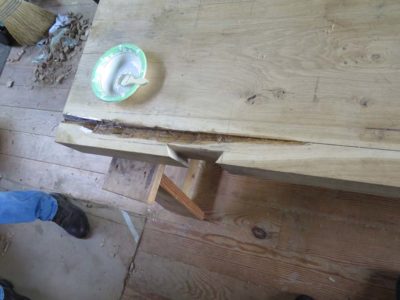
With a little logistical cogitation John and I, both 60-somethings and neither of us mesomorphs, managed to maneuver the 300+ pound top of the French Oak Roubo Project workbench out into the light. Immediately I was struck by both the magnificence of the 240(?) year old white oak slab, and the waney void adjacent to a glue line on the underside of it. I suppose at one time I was just going to leave it as-is, an admittedly foggy memory going back four years, but given that one of the leg mortises needed to go right through the flawed region I decided instead to fill it. I could have grafted in another piece of oak but instead fell back on a tried-and-true method of repair that I have employed several times in the past as it was especially well suited for a repair of this size.
I first sized (primed) the margins of the effected area with standard West System epoxy, thinned about 25% with acetone to get deep penetration. One of the reasons for any potential epoxy failures, whether in adhesion, consolidation or filling, is that the epoxy does not penetrate adequately to knit the entire construct together nicely. What then often happens also is that the density differences between the high density inelastic epoxy and the less dense, much more elastic wood, may result in a fracture at their margin when they are intimately bound together in a cyclic stressful environment. The diluted epoxy addresses the first of these problems, the filling of epoxy with large wood flakes addresses the second.
In this case I ran a scrap of oak through the power planer to yield the typically large shavings you would expect from the machine. I took handfuls of these shavings and packed them down into the void that had been previously primed with the thinned epoxy.
I then drizzled un-thinned epoxy on top of the wood flakes, then sprinkled on more shavings and packed them again through some wax paper. I let the entire fill to harden overnight.
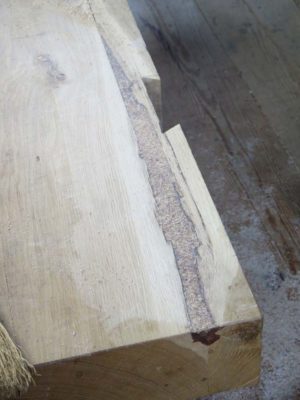
An additional feature of fills like this is that when the volume is large enough, the exothermic reaction of the epoxy hardening causes the adhesive to actually boil in place, aerating the fluid as it hardens, reducing further the density of the hardened fill. This is a very good thing.
The resulting repair is much closer in density to the wood, thus reducing the risk of a system fracture at their interface, and yields a repair that can be easily smoothed with a rasp or Surform tool.
The success of the repair can be clearly seen in the edges of the mortises I drilled and pounded through the slab and the repair (next blog post). It held together wonderfully and had working properties nearly identical to the adjacent oak.
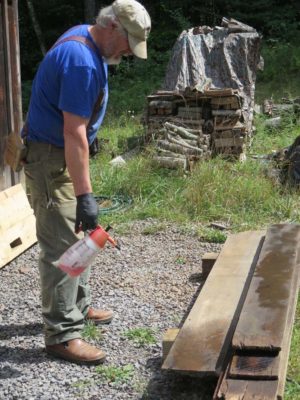
With our ambitious agenda awaiting us for the Man Week at the barn, our first task was to begin the Tetris game that always seems to be on tap for any type of reorganizing the shop. The ripple molding machine was easily accessible for John but I had to move a ton of stuff to get to the FORP I workbench parts that were behind the parts for all the other workbenches that are not yet finished, and a large pile of old oak salvaged from the shack deconstruction that we were working on when I crossed paths with the cranky wheelbarrow that put me out of commission for the better part of a year.
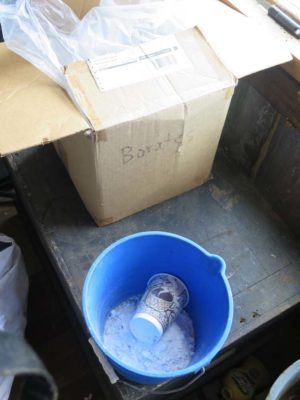
The first thing I noticed from the pile of salvaged oak was the presence of frass in between each piece of the stack. It might have been old frass from a no-longer-active infestation or it might not. It was not an extreme amount but I was not going to take a chance as I was going to be making furniture for the cabin from it.
I mixed up my typical batch of insecticide with a gallon of marine anti-freeze and two 8 oz. cups of dry borate-complex powder (Disodium Octaborate Tetrahydrate), then mixed with a paint stirrer in my cordless drill.
I used a cheap garden sprayer to saturate the boards and stacked them under plastic to let it all soak in thoroughly. After 36 hours I set them against the barn to dry, and two days later moved them inside and will put them to use when that project moves to the top of the pile.


Recent Comments