In a way it reminds me of the books associated with virtually every material science/history division, wherein the argument is invariably made that the author’s favorite material is THE basis for all of civilization. In the world of wood one totem is A Forest Journey: The Story of Wood and Civilization. As I reflect on it and similar works of technological development, I note that it takes a special talent to render the fascinating and vibrant realm of history into something sterile and unconsumable. But somehow our educational system manages that difficult task. And the more I delve into the world of Roubo the more fascinated with the past I become.
I am currently working my way through Pursuit of Power: Technology, Armed Force, and Society since A.D. 1000 by William H. McNeill. His books are a slow read, not because they are difficult but rather because they are so dense and require frequent pauses to digest. Much like reading the Minor Prophets of The Bible, the human themes presented are more current than tomorrow’s headlines.
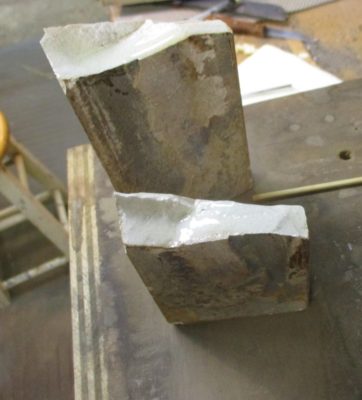
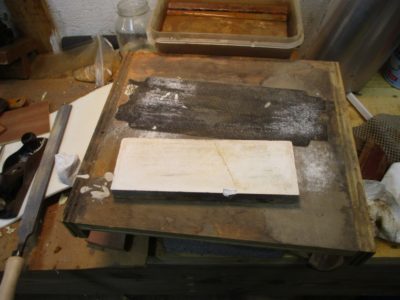
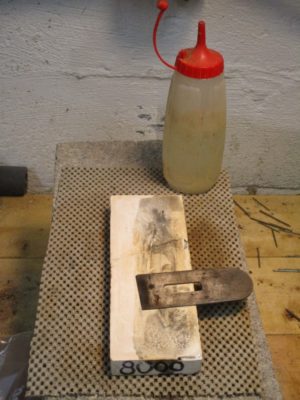
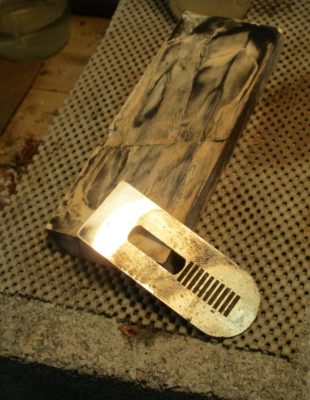
Among my inventory of sharpening implements is an old 8000-grit ceramic water stone that I bought perhaps 35 years ago. I recently dropped it on a concrete floor with the resulting carnage you might have predicted — it snapped in two. Rather than toss it out I tried to salvage it and put it back to work.
Based on the character of ceramic sharpening stones, namely that by nature they are comparatively porous, the foundation existed for adhering the two pieces back together. In fact, since ceramic stones tend to be fairly soft and friable (fracturable) when adhering pieces of these ceramics together you have to pay attention to the adhesive-adherend margin, making sure that the density and hardness of the adhesive is congenial to the density of the adherend. While I cannot modify the character of the cured adhesive film, I can use other methods to modify its performance.
In this case I followed my longstanding practice of using dilute adhesive to size the gluing margin (the surface of the adherend), thus rendering something more hardened-sponge-like than a block of hard plastic in direct contact with the soft ceramic. The latter construct is much more likely to fail in somewhat short order as the harder, denser, and more cohesive adhesive breaks off some of the softer ceramic block, resulting in the failure. In this case I used an epoxy I had on hand.
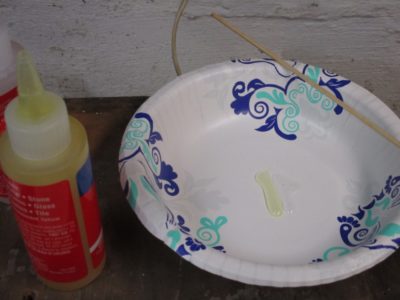
I mixed the two parts thoroughly, then diluted it immediately with with acetone to yield a watery solution. This was applied directly to the broken stone surface, and soaked in to yield a fairly parched-looking surface. This results in an adhesive/adherent region perhaps ten or twenty of fifty times wider than that accomplished by full-strength epoxy alone. After a few minutes I added another application of the dilute epoxy, then set it aside until the epoxy was almost tack-free.
The it was ready for a bead of the full strength epoxy, which I applied to the lower half of the joint to make sure none of the full-strength epoxy would squeeze out the top glue line to excess.
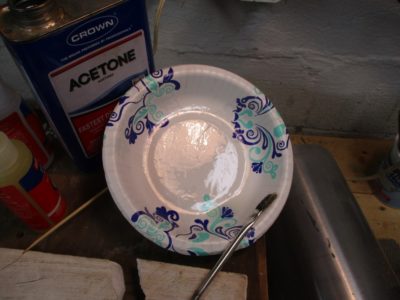
Once the gluing surfaces were coated with the epoxy I placed the two halves together and applied very gentle clamping pressure, mostly to hold the two halves in correct alignment rather than drawing them together. Their fit was wonderfully tight from the git-go. There was a tiny bit of epoxy squeeze out on the top line, and I wiped that off immediately with a paper towel sodden with acetone.
I let the assembly sit until the epoxy was fully hardened, then re-trued the surface, first with a sheetrock screen and then with sandpaper over a flat surface. Since it is an ultra-fine polishing stone it does not need much water; to make sure the epoxy is not challenged I simply wet it on the surface instead of soaking the stone in the water bath.
In use there is a little click as the steel is passed over the fracture line, but the stone still works just fine.
While browsing around the interwebz over the weekend I noticed that Rex Krueger featured Roubo’s winding-winding-sticks-on-stilts from our Roubo on Furniture volume. He is to be commended for bringing the message of hand-tool woodworking to a new audience.
For unto us a child is born, unto us a son is given: and the government shall be upon his shoulder: and his name shall be called Wonderful, Counsellor, The mighty God, The everlasting Father, The Prince of Peace.
The angel went to her and said, “Greetings, you who are highly favored! The Lord is with you.”Mary was greatly troubled at his words and wondered what kind of greeting this might be.But the angel said to her, “Do not be afraid, Mary; you have found favor with God.You will conceive and give birth to a son, and you are to call him Jesus.He will be great and will be called the Son of the Most High. The Lord God will give him the throne of his father David,and he will reign over Jacob’s descendants forever; his kingdom will never end.”
And they said, “Isn’t this the carpenter’s son? Isn’t his mother’s name Mary?”
And I heard a great voice out of heaven saying, Behold, the tabernacle of God is with men, and he will dwell with them, and they shall be his people, and God himself shall be with them, and be their God. And God shall wipe away all tears from their eyes; and there shall be no more death, neither sorrow, nor crying, neither shall there be any more pain: for the former things are passed away.
I pray for you to have a blessed Christmas with loved ones and that you are celebrating the Incarnation, through whom we can be reconciled with The Creator.
We had planned to spend a little time on the road this morning, but imagine our surprise when we woke to 6-7 inches of “occasional flurries” on top of the several inches from a few days ago. My snow blower had a flat tire with no way to get it to an air compressor to it or vice versa, so we spent several hours shoveling snow.
Over the next two weeks Webmeister Tim will be updating virtually every aspect of the site platform and blog functions. If all goes well you should experience no difference other than faster loading and a Comments function that actually works. I will strive to post with some regularity in the mean time but there may be some interruptions to my access for posting.
If you are trying to order something from the Store and it isn’t working, be patient and try again later. I’ve got my final pre-Christmas mailing of a few orders tomorrow (they will surely not arrive before Christmas), and then there will be no more shipping until January 5 at the earliest.
Hope it isn’t too disruptive, and besides you should be concentrating on enjoying the blessing of time with loved ones.
One of my fond memories from my formative years as a woodworker was the period of three years hen I was a patternmaker in a foundry, which is where I learned what “precision woodworking” was all about. To be truthful it is a standard applicable to very little of my work ever since, but it was elucidative nonetheless. Most of our work was pretty heavy machine-oriented, but we did have a selection of hand tools for shaping the forms. Because, another lesson from the patternmaking days was that we were, in essence, fabricating sculpture, most of it being sculpture based on blueprints, but sculpture just the same. But for most of our work we relied on stack lamination and shaping components with large disk sanders, working to the center of a knife strike line.
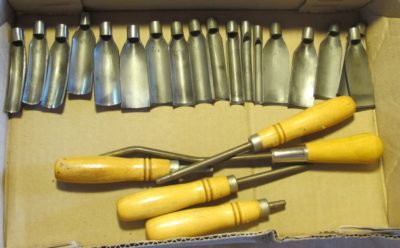
Every so often we had to really sculpt pieces by hand, hence the inclusion in our tool kits of tiny spokeshaves that I find so integral to Gragg chair work. Another peculiar tool set for sculpting foundry patterns was the interchangeable thin-walled gouge set made by Buck. For many years after leaving the patternmaking shop I searched for a set of these gouges, and then all of a sudden I found myself with three complete sets. I still use these tools in the shop with regularity although I am down to two sets. When my dear-friend-I-have-never-met Rob Hanson related the tale of losing his house and shop during the California fires two summers ago, I began sending him “care” packages full of tools to get him re-started, concluding recently with a barely used Record 52-1/2 vise. Somewhere along that trek I decided I did not really need three sets of these gouges and sent one to him. I have not yet figured out how to integrate these tools into Gragg, but I will.
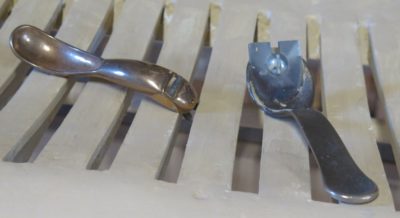
The small spokeshaves are fine for convex surfaces and larger concave shapes, but for concave surfaces with smaller radii we relied on a set of tools we called draw-spoons. For shaping the rear seat rail and wallowing out the seating deck of the Gragg chair tools like scorps, travishers, and inshaves do not work for me but the drawspoon fits the bill perfectly. There were a range of drawspoons in the patternmaking shop, but there was only one set and I never had the opportunity to make another. The larger of my tools came from Garret Wade back in the day, now I think they are available from Woodcraft as a spoon plane. I have a smaller set that came from AMT back in the Stone Age, I do not know if they are available anywhere any more. Lee Valley makes a drawspoon but it is too large for the purposes I need.
I have found that I simply could not make Gragg chairs in any meaningful way without the drawspoon, and if you want to make them you will need at least one as well.
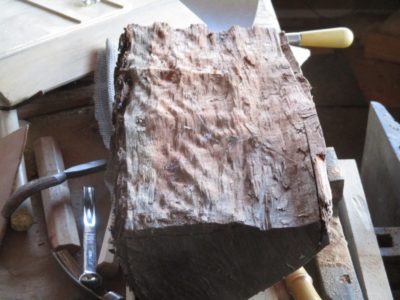
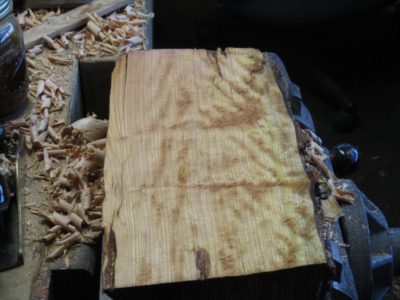
A while back a local friend brought me a pile of wood from his firewood pile. Not until he cut and split it did he realize that it was a load of quilted cherry. Quick as a bunny he brought it over, and I have been waiting for the best time to saw it up into usable boards. Unfortunately that time has not yet come, but my eyes glance over to the pile every time I go down to the first floor of the barn to feed the stove.
Even when viewing it along the cleavage line from splitting it is clear there is something pretty special inside. A few minutes with a scrub plane and fore plane, followed by a dousing of shellac, confirms the initial optimism. Given the firewood-size of the pieces, this one was about eight inches wide, I’m thinking of some particularly figured panels or small-ish boxes.
Spectacular, and I am betting that if you have a firewood pile there is plenty of woodworking and woodturning treasure in there too.
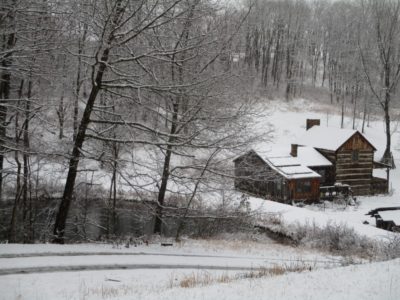
On Monday we had our first measurable snowfall, we’d had a few covering skiffs but this was about 3 inches of magnificent huge wet flakes, imparting spectacular beauty to the branches and landscape. Today should be a pip, with nine inches expected.
Thus far even the temps have been reasonably mild, with some days requiring only a little time of my kerosene heater to take the chill out of the shop. It looks to remain that way for until Christmas, and I will not mothball the hydropower until then.
[Update — At mi-day there were another 4-5 inches of snow, although it seems to be vacillating between fluffy flakes coming down hard and sleet. Might by my first chance to use the mondo snow blower we bought 18 months ago.]
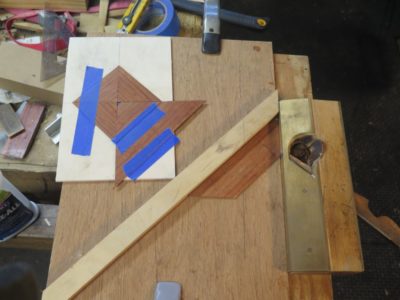
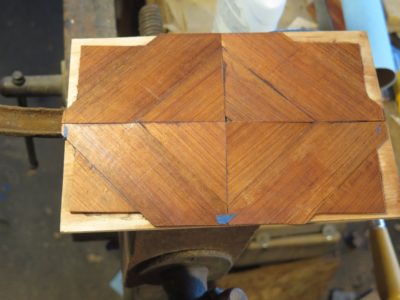
Much of the goings-on in the shop are Christmas-gift related and therefore must wait a while before recounting them on this page. But one recent veneering exercise revealed the foibles implicit in being distracted by other activities, and what happens when you (by that I mean me) lose your concentration.
I was creating a fairly simple pattern from some rosewood veneer and everything went well and I managed to assemble the pattern with one little scrap I had to use.
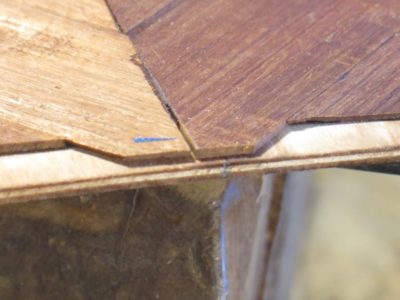
When I glued down the veneer to the substrate I simply forgot to anchor the composition into the correct place on the panel, and lined it up free then placed the caul and clamps. Of course the whole thing shifted under the weigh pressure and I saw the next day that everything was out of whack.
I tried to lift the veneer by soaking it with acetone, but it was too set for that to work. All I accomplished was tearing everything up. It was off and that was that. Now it’s off to the trash can.
Now my only question is, was this simple rookie mistake or a geezer mistake?.


Recent Comments