Making Screws
I do not know the setup of the Blacksmith Bolt and Rivet fellow (he’s been getting virtually all of my wood screw business for quite some time) but this video of a “small” Japanese screw making operation tickled my fancy.
I do not know the setup of the Blacksmith Bolt and Rivet fellow (he’s been getting virtually all of my wood screw business for quite some time) but this video of a “small” Japanese screw making operation tickled my fancy.


Recently my friend B invited me to accompany him to a day in Waynesboro at the Virginia Institue of Blacksmithing for their “open shop” session during which he was going to fabricate a replacement part for his wood stove. It was a most impressive facility and I am browsing the class schedule to attend some myself.


There were more than a half dozen former and current students ranging from young teen, working with his mom on a project, to geezers like me. They were all working on projects doing broaching, hand forging, power hammering, riveting, plasma cutting, welding and a lot more.

One of the many projects I’ve been juggling this past week was making a new outside cowl for the headstock of the old-as-dirt-but-wonderful Walker-Turner lathe my pal MikeM passed along to me many years ago. Exactly how and why I was fiddling with it will be told in a series of posts very soon, but for this moment suffice to say that as I was bolting on a new cowl cover this afternoon I had that sinking moment when you feel a bolt wring off.
Impolite words and guttural moans filled the air.
I’m not sure if the bolt broke because I was feeding it in crooked or it bottomed out, but one thing is sure – it’s busted. 1/64″ below the shoulder.

I drilled out the center of the bolt in the hopes of removing it with the reverse thread bolt extractor. I then spent the next hours in a (thus far) futile search for the set of extractors. Wherever it is it is hiding skillfully.
But, I did find some other things I forgotten about, so there is that.
I am booked solid for the coming week so it will be ten days before I can return to this particular migraine headache. If the extraction fails, I will have to drill out the hole and tap it to the next larger bolt size. Hardly anything more than a First World problem, but it did cast a cloud over Shangri-la today.
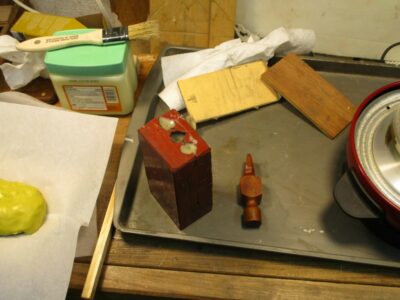
One of the things I knew I would be doing at the recent 18th Century Trades Fair was using an open flame, to 1) heat up a waxing iron to use for applying a molten wax finish, and 2) cooking hot animal hide glue.
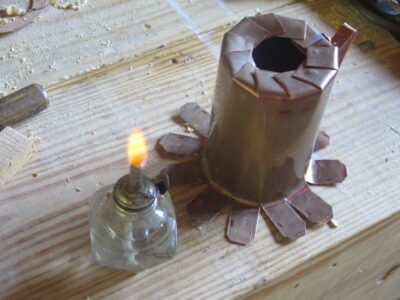
I have a couple old alcohol burners but neither would hold up to the least little bit of wind in the open. So, in order to make these processes part of my presentation I needed a wind screen inside of which the burners could reside while in use.
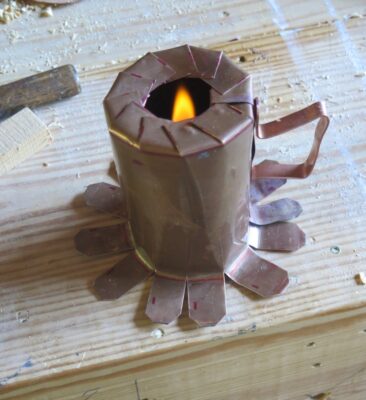
Browsing my handy supply of scrap metal I found the perfect piece of heavy copper flashing and set to cutting with my hand shears once I made the measurements of the burners.
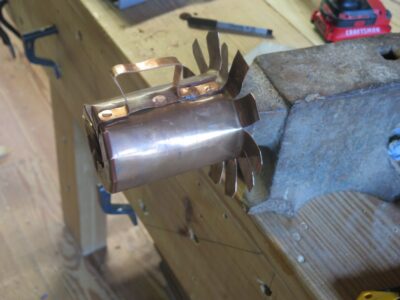
Since I could not put my hands on my tinsmith’s stake I grabbed a 2-1/2″ maple rod to use as my form for bending the copper sheet and drilling rivet holes and then pounded the copper rivets on my anvil. The design is quirky and inelegant but works like a charm. Only after use in battle will I know if I need to punch a few breathing holes to keep the flame lit.

One thing is for sure, a small alcohol lamp (or even candle) can provide a lot of calories and if they can be concentrated can heat up something pretty efficiently. I had this re-purposed tinsmith iron hot enough for melting and spreading block beeswax in just a few minutes. Ditto my small double boiler glue pot.
I cut a piece from my metal stock inventory to make a handle, which does get mighty hot after an extended use. I’ll have to wrap it with some cordage or such to insulate it for handling.

The next morning I demolded the first half of the silicon rubber for MattC’s hammer head. I cleaned all the surfaces of any residual clay from the embedding. I spread a parting agent (petroleum jelly) over all of the silicon mold surfaces and reassembled the first half mold including the original wooden master pattern and the attendant elements. [Sorry for the blurry pic — note to self, do not drop your camera on the concrete floor, it don’t work so good after that)

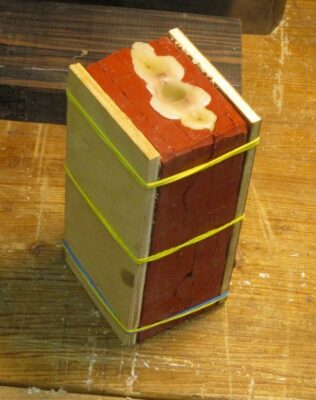
Reconstructing an identical plastic brick dam, I repeated the mixing and Matt poured the liquid silicon molding material and we let it sit again overnight to harden.
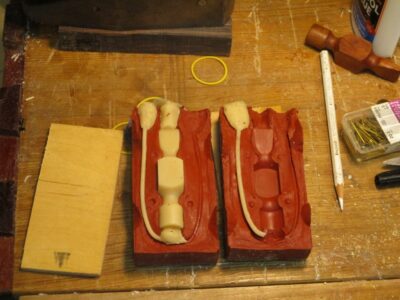
Once the entire rubber mold was separated and cleaned it was ready to go for making wax models for lost wax casting. I did cast one wax pattern and saw that I needed to expand the sprues a little with a scalpel. Had I used a larger piece of wire or tubing there would not have been a problem.
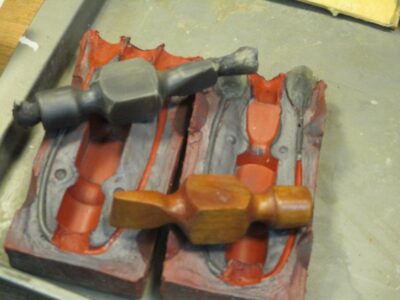
Just for the heck of it I walked him through the process for casting pewter directly into the mold, which requires depositing powdered graphite on all the cast surfaces to reduce the surface tension of the molten metal. I mimicked the process with wax and he got a kick out of the metallic-looking wax pattern.
At this point I turned the mold over to Matt to proceed with the enterprise from his end. My work was done.
Except for the second hammer head. Stay tuned.
I (a/k/a “Maker 1”) recently spent some time in the barn with my friend MattC, a tool enthusiast, collector, purveyor, and maker (a/k/a “Maker 2”). Matt wanted to learn about making rubber molds from which wax patterns could be made for lost wax casting, so I demonstrated techniques for doing just that. As a test exercise we used the wood pattern for a hammer he is hoping to produce.
Here’s a very brief report on that process.

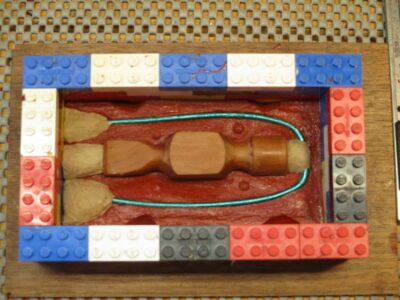
First, I embedded the wooden master pattern in sulfur-free modeling clay, to an approximate halfway parting line (sorry for the blurry photo). The “sulfur-free” descriptor is a critical one because silicon molding rubbers will not set in a sulfur-contaminated space. Getting the contact margins with the master pattern is critical to getting a nice, clean two-part mold.
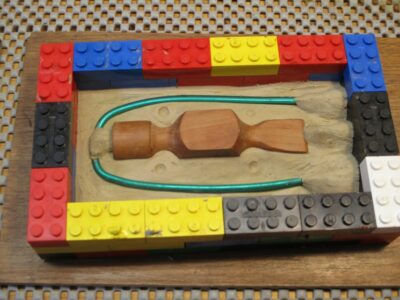
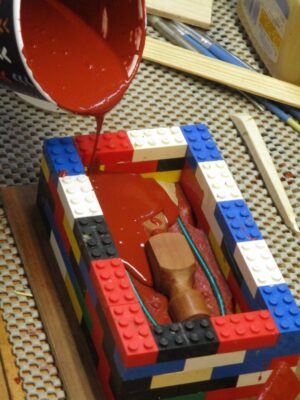
Once the embedding was complete I built a rectangular dam around the assemblage using my old favorite plastic toy bricks. At this point I added a heavy wire sprue to the mold, along with the necessary gates to get the molten wax into the rubber mold. In this case I constructed three funnel gates at the top of the mold and one through gate at the bottom, connecting the sprue and the master pattern. All of these will be hollow voids in the end.

With everything ready to go I mixed up the silicone rubber molding material, using a disposable cup and my digital scale. The rubber I chose for this project was Polytek 71-60, a fairly hard rubber that can accommodate low temp metal casting directly into the rubber mold. I’ve used this product for decades and find it amenable to my work. It is, of course, now discontinued. I do believe that the Smooth-On company makes an analogous product although I have not yet tried it.

Ideally the container of mixed rubber would be placed in a vacuum chamber to draw out any air bubbles, but since I do not have one set up at the moment I just let it sit for a few minutes and popped all the bubbles rising to the surface, essentially reducing the overall vapor pressures within the liquid solution.

Additional methods of dealing with any remnant air bubbles include my holding the cup fairly high over the embedded master pattern and pouring a very thin stream of the liquid into the void. The long, thin stream breaks up most of the remaining bubbles. Furthermore, I always start pouring away from the pattern itself and allow the liquid rubber to flow over the surfaces on its own, which also reduces any bubble issues.

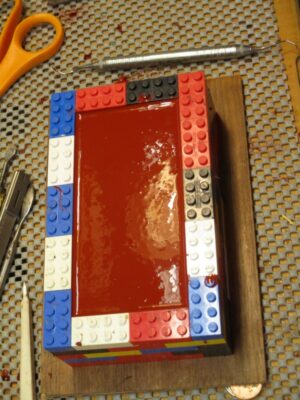
Finally, when the plastic toy brick flask is full, I spend a few minutes popping any bubbles that emerge on the surface, once again reducing the vapor pressure within the liquid and eliminating any risk of bubbles being permanent against the surface of the patter (the ultimate problem).
Depending on the temperature and freshness of the silicon rubber solution (there are definite shelf-life issues with these products), I return to de-mold the first half of the final mold in four to six hours. Usually, I just wait overnight.
Next time – the second half of the mold.
My longtime pal Ripplin’John sent me photos of his latest project en route to an MFA (at our age John, what were you thinkin’?). Seriously, I am immensely proud that we are friends, my circle of close friends is actually quite small, and of his artistic and technical accomplishments while exploring the realm of artistically integrating wood and metal. Some time ago I gave him a copy of the Matthew Boulton book and is now going to town.

This “lunch box” employs classic boullework techniques, right down to the engraving. In his own words,
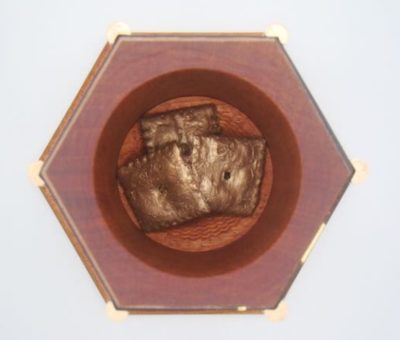
Well done, sir. You can tell him so in person at Handworks where he will be helping me in my booth.
I’ve been hanging with my pal MikeM for a couple decades, and at least one of his consuming passions is rubbing off on me — hammers. Many times a Christmas package would arrive from Mike, and on more than one occasion it was a hammer or mallet he had restored or made. One of them, a polished vintage ball peen hammer head with a sublime curly maple handle, is in my personal tool pantheon and gets used every day I am in the barn (pic above). Every day.
Well, as they say, “Bad company trumps good character,” and Mike’s “bad” influence on me over the years in the realm of hammers has taken hold. (Just kidding folks, Mike’s friendship is a life treasure.) I now find making hammers one of the many delightful undertakings in the studio. I’m probably not approaching Mike Territory, but in response to a comment by a recent visitor in the studio, “No, I do not have a ‘hammer problem.’ I have a lot of hammers. Big difference.”

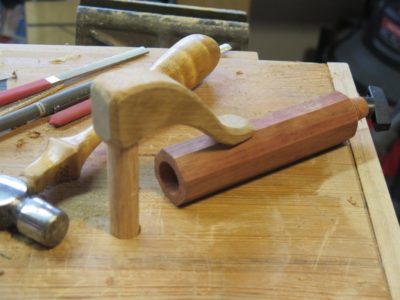
Many years ago I picked up several steel pieces at a flea market. These cylinders, which I naturally thought would make great mallets, were of unknown origin and a peculiar morphology. The flat ends were easily drilled and tapped. My original thought was this would be great for affixing faces to the striking surfaces.
The problem emerged when I tried to drill a hole on the cylinder surface for a handle. It was hard. I mean really, really hard. Too hard for any drilling device I had, up to and including carbide and cobalt drill bits. The rounded surface was so hard I could not even make a dimple with a machine punch and in fact the tip of the punch broke off when I tried. I have never encountered something this hard, and scratch my head about the manner of hardening this surface. It was probably case hardened on a precision rolling mill, but what was its purpose? I have no idea, but for several years its purpose was mainly to hold down the sill of one of the studio windows. Occasionally it would be used as a dolly or backing anvil, but nothing more.
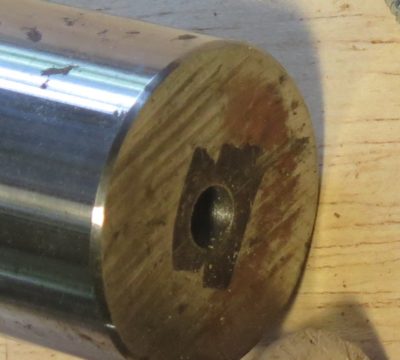
Recently, while in the tool-making “zone,” I decided to give up on the idea of creating a typical mallet configuration from the cylinder and exploit its differing hardness to create a joinery/carving mallet. This began with drilling a hole in the flat face.

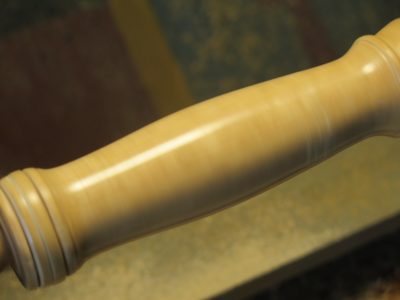
To match this I turned a white oak handle from some of my scraps, and drilled that as well. The finish on the handle was Blend 31 wax melted into the surface while turning on the lathe, then burnished with a piece of coarse linen. I like both the look and the feel of the handle, beautifully smooth but with just a hint of tack for gripping.
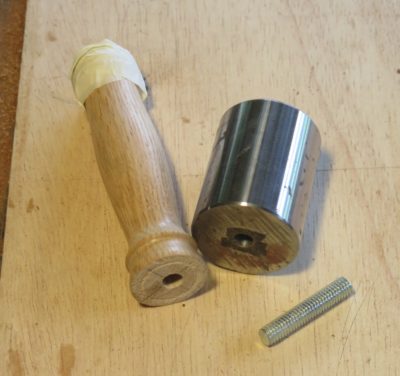
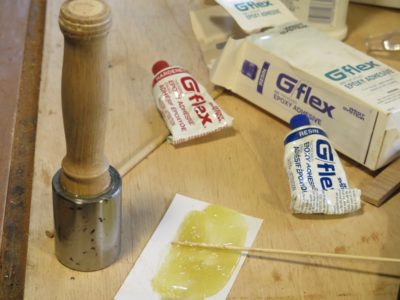
Inserting a threaded rod dowel with epoxy to assemble the two pieces completed the assembly process. I didn’t clamp the assembly and let the hydraulic vacuum of the thick epoxy hold everything steady while it hardened.
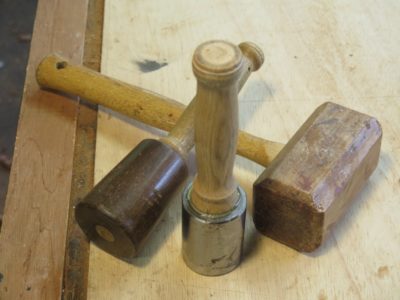
It is now an intriguing addition to my inventory of homemade mallets. I note that of these mallets there is a huge range of shape and weight. The tapered cylinder mallet on the left, made thirty-five years ago, weighs in with a lignum vitae head of a half pound, plus the handle. The tulipwood mallet on the right, made 25+ years ago, weighs in with a head of 3/4 pound. This new one with the steel cylinder has a head weight of two pounds. It just might be a beast. Because of its comparative diminutive size I was thinking of keeping it in my traveling tool kit. With that weight I am reconsidering that decision as it is almost two full pounds more than the lignum vitae one
I will probably wrap the new steel cylinder with leather to diminish any strike damage inflicted onto anything I whack with it.
Stay tuned.
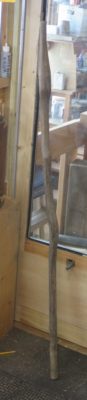
My pal Long Tom generally prefers woodworking in a stylistically primitive form, even though his craftsmanship is sophisticated and exacting. He just loves “woodland” woodworking, making rakes, walking sticks, stools, etc. He generally keeps a nice inventory of walking sticks in the corner of his shop, and around the time we moved to Shangri-la he gave me a shoulder-height stick he had been saving “for something special.” I am pretty sure it is some gnarly white oak he picked up during one of his walks through his woods.
For the first couple of years, it resided next to the cabin front door and received only occasional use as I traipsed through the woods or up the creek. Later as I recovered from my broken hip it became a constant companion on my treks up and down the hill to the barn. After I recovered fully from that injury the staff was used mostly during inclement weather, helping me to keep steady and upright on the steep driveway.
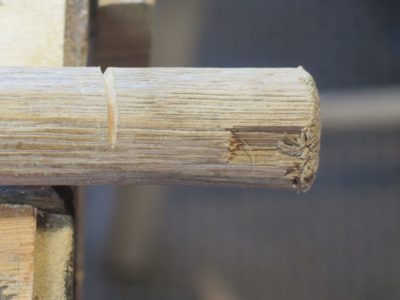
Then last summer after my knee surgery it became a constant companion once again, to the point where the tip was getting pretty beat up. I love that stick and refused to let go of it. So, I decided to make some modifications that will allow it to serve me until they scatter my ashes up on the mountain.
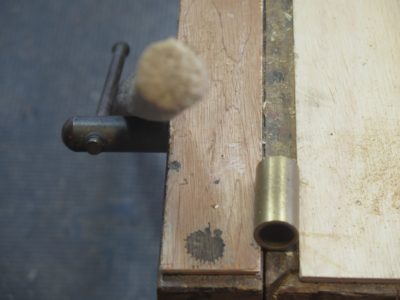
My initial thought was to fit the tip with a ferrule of brass or copper, but when scrounging through my scrap inventory I noticed some bronze bushings including sleeve bushings. I found one of the perfect size and set to work.
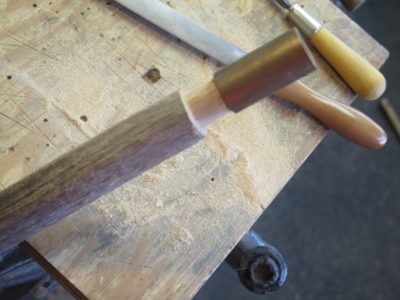
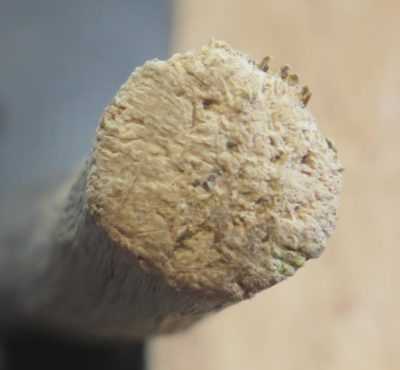
I filed the tip of the stick to fit the inside of the sleeve bushing using an Ariou rasp, working my way slowly around the circumference until it got to the point where I could drive the new bronze ferrule onto it.
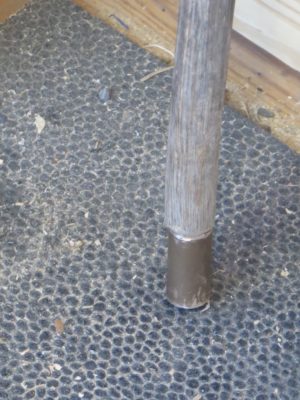
Once that was done I chamfered the adjacent wood to make the fit a bit more elegant, and now I do indeed have a faithful walking companion to last me the rest of my days.

All thanks to Long Tom’s friendship and passion for “found wood” woodcraft.
Some woodworking projects are hidden from others, some are fancy or extravagant, but this one was a simple task to guarantee this friend will remain a treasured gift and companion working for me for many more decades.
Somewhere in the misty memories of the Mesozoic era I picked up a blacksmith-made petite curved adz head, probably at a PATINA tailgate tool swap. At the time I fashioned a handle from a broken shovel and sharpened the head to a keen edge.
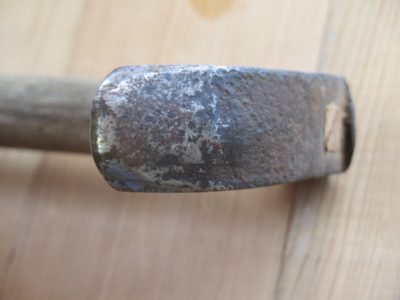
I used it from time to time but not as much as I thought I would. Unfortunately, the tip was convex, rendering it almost useless for any task I might have. So, I decided to reshape the tip into one that would be more useful to be, one that is at least flat, maybe even a bit concave.

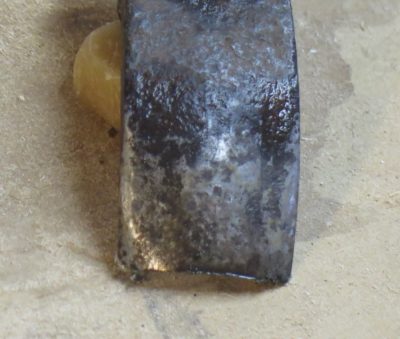
In few minutes on the bench grinder the shape was established, but the ~1/8″ cross section at the new edge was presenting me with the potential of several hours hand grinding and beveling on the inside curve with round slips or sandpaper wrapped around a dowel.
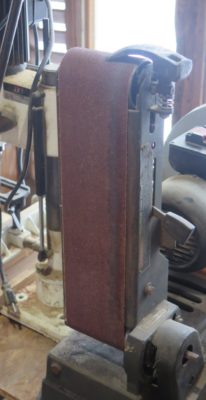

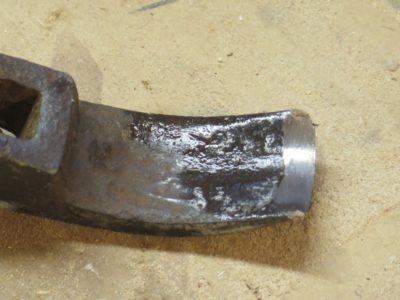
Instead, I had a flash of inspiration and took the top shield off the belt sander in order to access the roller. Miraculously the roller size was absolutely perfect for grinding the new in-cannel bevel. That one thing cut the work time from several hours to several minutes. I like innovations like that!
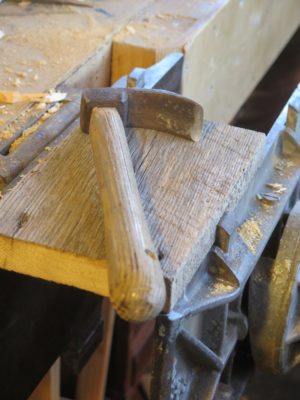
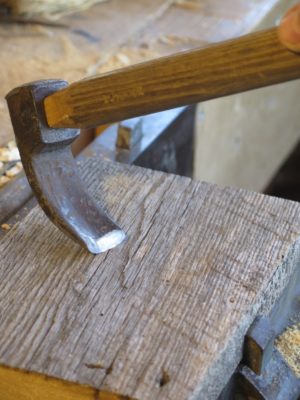
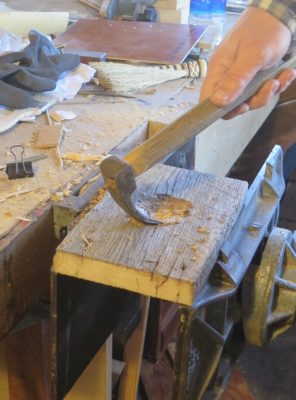
I reattached the handle to the head and gave it a test drive.
Me like.
© 2024 Don Williams

Recent Comments