Maker 1 Meets With Maker 2 – First Part
I (a/k/a “Maker 1”) recently spent some time in the barn with my friend MattC, a tool enthusiast, collector, purveyor, and maker (a/k/a “Maker 2”). Matt wanted to learn about making rubber molds from which wax patterns could be made for lost wax casting, so I demonstrated techniques for doing just that. As a test exercise we used the wood pattern for a hammer he is hoping to produce.
Here’s a very brief report on that process.

First, I embedded the wooden master pattern in sulfur-free modeling clay, to an approximate halfway parting line (sorry for the blurry photo). The “sulfur-free” descriptor is a critical one because silicon molding rubbers will not set in a sulfur-contaminated space. Getting the contact margins with the master pattern is critical to getting a nice, clean two-part mold.
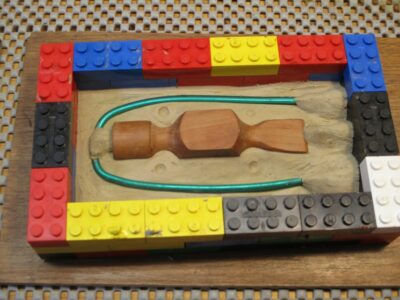
Once the embedding was complete I built a rectangular dam around the assemblage using my old favorite plastic toy bricks. At this point I added a heavy wire sprue to the mold, along with the necessary gates to get the molten wax into the rubber mold. In this case I constructed three funnel gates at the top of the mold and one through gate at the bottom, connecting the sprue and the master pattern. All of these will be hollow voids in the end.

With everything ready to go I mixed up the silicone rubber molding material, using a disposable cup and my digital scale. The rubber I chose for this project was Polytek 71-60, a fairly hard rubber that can accommodate low temp metal casting directly into the rubber mold. I’ve used this product for decades and find it amenable to my work. It is, of course, now discontinued. I do believe that the Smooth-On company makes an analogous product although I have not yet tried it.

Ideally the container of mixed rubber would be placed in a vacuum chamber to draw out any air bubbles, but since I do not have one set up at the moment I just let it sit for a few minutes and popped all the bubbles rising to the surface, essentially reducing the overall vapor pressures within the liquid solution.

Additional methods of dealing with any remnant air bubbles include my holding the cup fairly high over the embedded master pattern and pouring a very thin stream of the liquid into the void. The long, thin stream breaks up most of the remaining bubbles. Furthermore, I always start pouring away from the pattern itself and allow the liquid rubber to flow over the surfaces on its own, which also reduces any bubble issues.

Finally, when the plastic toy brick flask is full, I spend a few minutes popping any bubbles that emerge on the surface, once again reducing the vapor pressure within the liquid and eliminating any risk of bubbles being permanent against the surface of the patter (the ultimate problem).
Depending on the temperature and freshness of the silicon rubber solution (there are definite shelf-life issues with these products), I return to de-mold the first half of the final mold in four to six hours. Usually, I just wait overnight.
Next time – the second half of the mold.

Join the Conversation!