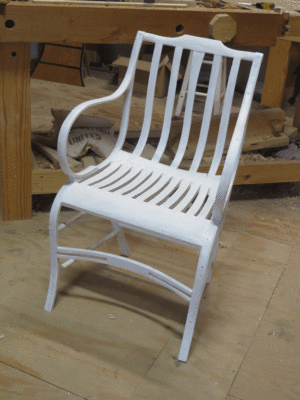
After completing the assembly of the chair structure I moved on to the sculpting of its elements with a variety of gouges, rasps, knives, spokeshaves, spoonshaves, and more, until it was elegant and comfortable (It is. Very.). In another eight hours or so I had it ready to begin painting with a shellac-based primer. This allowed me to see any lines that did not flow as I wanted, and to re-address them with my edge tools. Further, it identified any areas where fills were required.
I make my own fill putty similar to Gragg’s beginning with an oil-based primer and thickening approximately 1:1 with pulverized limestone from the garden center (he used lead white as the filler). Applying that into holes or joints as needed, I actually do not sand the fills, nor the shellac primer for that matter, until after I apply the subsequent heavy oil primer layer. This gives me plenty of body to cut into with sandpaper. My goal at that point is to yield a smooth-yet-faceted surface revealing the tool work that goes into making the chair.
Soon I hope this chair will be ready for me to deliver to my friend and colleague Daniela to paint the peacock feather. Then for me it will be on to new adventures in the World of Gragg.
Stay tuned.
If you are interested in participating in the August 2021 six-day workshop to fabricate a Gragg chair, drop me a line via the “Contact” or “Comments” sections of the web site. At this moment there is one spot remaining. If it is successful I will undoubtedly schedule another for August 2022, 2023, 2024, to infinity and beyond.
These days I am looking for a good laugh wherever I can find one.
Then I found this story about some old chairs with no seat and no backs. And yes indeed, I did laugh.
You are welcome.
Very often in the midst of a lengthy undertaking I need a brief diversion to recharge my batteries. Given my current work on building Gragg chairs and recording the process for video and the seemingly endless work on A Period Finishers Manual I’ve been finding myself sitting at the finishing bench for an hour here or there to continue my exploration of the Asian lacquerwork aesthetic by other means. The particular projects are inspired by the Accidental Woodworker’s frequent exercises building small boxes for his tools, combined with my need to keep better track of the multiple small spokeshaves and spoon-shaves I use when sculpting a Gragg chair’s edges and shape. I’ve also got my sandpaper box that has been primed for years and awaiting its final decorative surface.
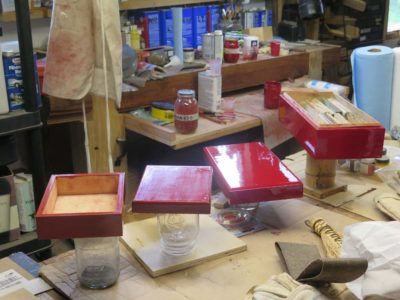
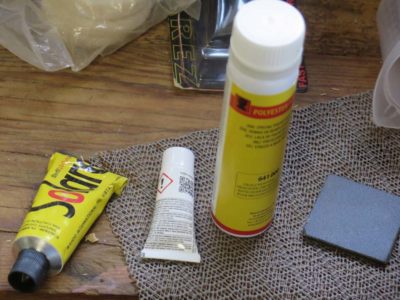
I am particular taken by the lacquerwork aesthetic of the negoru finish, or “rubbed through” surfaces, almost always executed in red and black. Rather than building boxes from scratch I used some of the paulownia or pine boxes from Michael’s that I have acquired over the years as teaching projects for japanning classes. In this case I was working black-over-red, but also had some red-over-black boxes that were never finished.
For the sandpaper box I used oil paint, for the others I used shellac. I have yet to complete a box with polyester but will soon. Some day I’ll post a blog series on these decorative options.
After almost a year’s interruption Chris and I were able to synchronize our calendars and schedule the final three sessions for getting the raw video shot for the Gragg Chair video. It will probably come as no shock to some of you that the timing of my Gragg Chair Challenge was coincident with this development. I was able to use some of the work during the Challenge for the live filming also. When calculating the hours for the Challenge I had to take into consideration the pace of work on the video versus the pace of work when I am by myself.
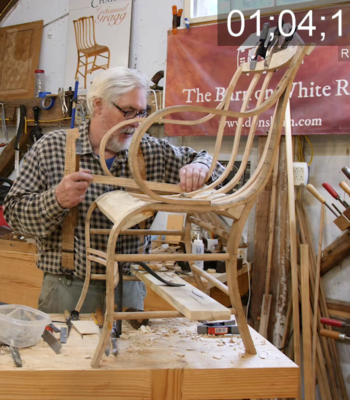
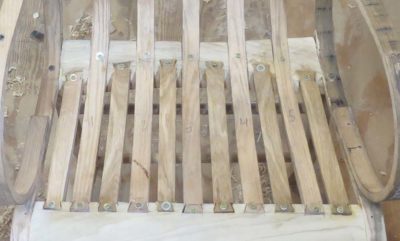
In this pre-penultimate session I spent all the time fitting the short seat slats, by far the largest segment for the entire project. It takes me about 90-minutes per slat, or 9-10 hours for the six, I do think that time will drop a bit as I get more familiar with exploiting the fishtail chisel even more aggressively. I’m also thinking about changing to birch for the seat rails; tulip poplar is a bit too weak for all that short grain in between the slat pockets and the necessary caution slows me down quite a bit.

Two more sessions and all that will be left is for me to review every minute of the almost 40 hours of video we will have in the compewder, and instruct Chris on the edits, chyrons, and segmentations.
The distribution plan is evolving but at this point my desire is to have the project divided into 15-20 episodes (the exact segmentation will depend on my review of the raw files), and they would be available to purchasers at a rate of two per week. Still noodling all that stuff.
Stay tuned.
In my ongoing efforts to replicate Asian lacquerwork without the use of urushiol, the resinous sap from the poison sumac tree that is refined into the coating material, I have been trying a number of alternate options including epoxy, oil/resin varnish, shellac (of course!) and varieties of polyester coatings. The air flow through my studio is controllable and just about perfect for any non-spray finishing from a clean environment perspective. However, virtually all of the polyester products produce noxious fumes when the coating is reacting. Not enough to be hazardous to my health, but plenty stinky enough.
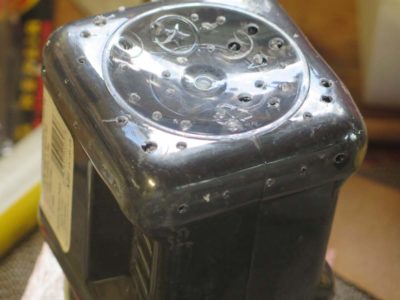
To deal with the problem I have dusted off my old favorite respirator, the 3M EZ Air that fit my head and face perfectly and is comfortable enough that I can wear it for hours. Naturally since it was such a satisfactory product it is no longer available on the market. The organic vapor cannisters are available so this will remain my “go to tool” for respiratory comfort when working on the polyesters,
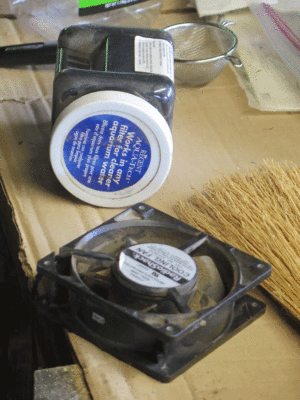
Though a satisfactory solution for ambient odors I also came up with another one for scrubbing the air inside a curing chamber. When I can, I place the newly coated object in a box along with an air scrubber I made just for those occasions. The unit starts as the jar containing activated charcoal flakes, normally used for aquarium filters.

I cut a hole in the lid and affixed a compewder fan and a screen, and drilled a series of small holes in the bottom of the PET jar.
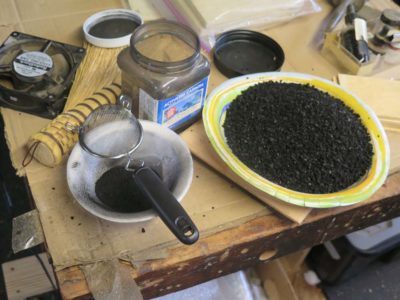
I sifted the activated charcoal to remove any powdered charcoal dust, something I do not want blowing around inside the drying chamber with a wet coating in the immediate vicinity.
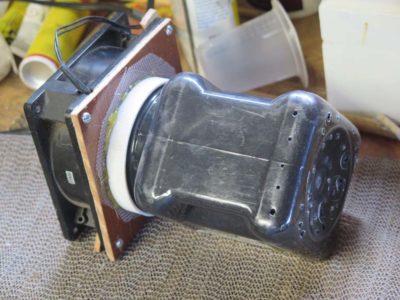
I placed the clean activated charcoal flakes back in the jar and closed up the whole system. Now I can coat the object the the polyester, flip a large cardboard box over onto it to enclose it, and turn on the scrubber. By sucking in the air gently and blowing it through the container of the activated charcoal (which adsorbs the organic molecules off-gassing from the polyester) it removes the odors and I cannot really even notice them while I am at work nearby. When the coating is cured I remove the object and the smell is negligible. I find that if I leave it all in over night there is barely any odor at all.
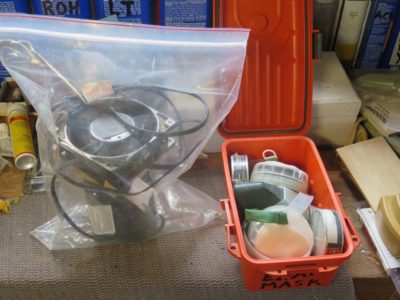
When the air scrubber or respirator are not in use I leave them in sealed containers to extend the working life of their filtering components, whether activated charcoal flakes or organic vapor scrubber cartridges. The fan scrubber goes into a gallon-sixed freezer bag and the respirator into a little sealed box.
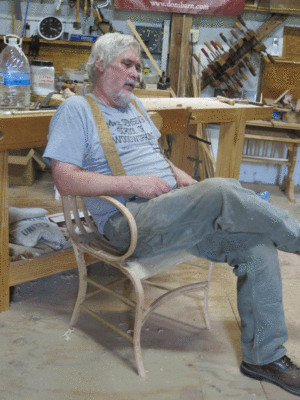
Things are progressing smoothly, at least in those moments when I am not distracted by and intriguing conversation via podcast. At the 32-hour mark I’m up to my eyeballs in dropping in the short seat slats. I should finish them in another few hours of work, and it is looking like the construction will wrap up around Hour 42.

I’m in the midst of a spate of Gragg postings, mostly because that’s what I’m doing a lot of and I don’t think posting a steady diet about working my way through a book manuscript is all that interesting.
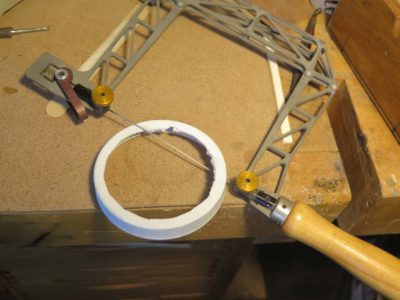
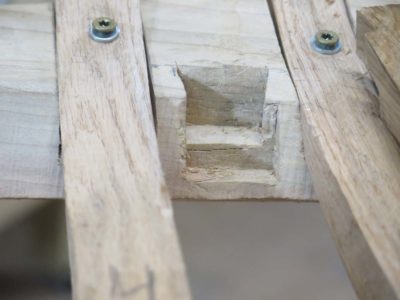
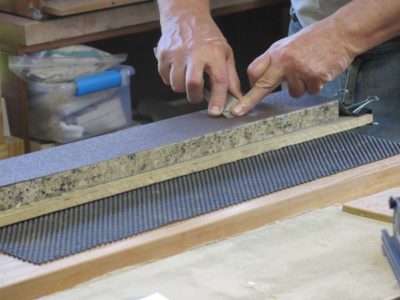
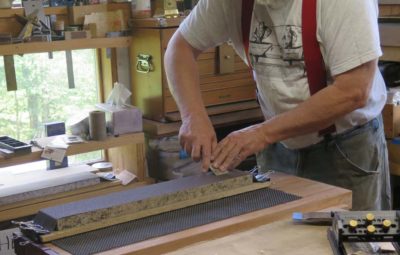
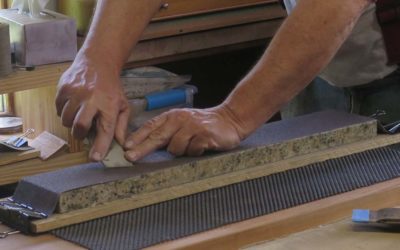
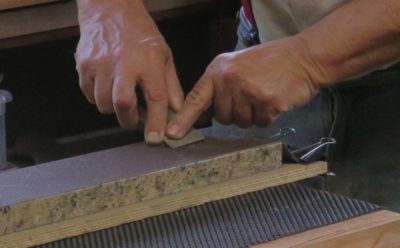
In building a Gragg chair there are two steps that are immensely time consuming. The first is fitting the rear seat rail into the side units, which serves to unify and distribute all the weight stresses. This takes about 4-8 hours for me to do this one element, it depends on how much magic is in my hands and how well my good eye is working that day. The other is cutting 17 open dovetail pocket joints, two on each of the six short splats and the front rail fittings for the five continuous splats. No way to put lipstick on that pig, they are nothing short of tedious. It generally takes me up to two days to finish them.
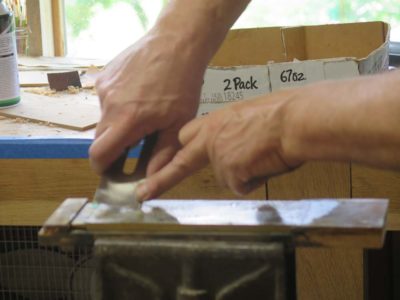
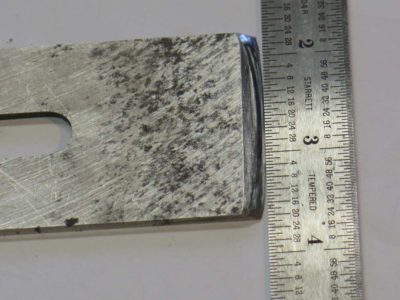
Cutting the insides of a dovetailed open mortise is just a pain, or at least it’s a pain by the eighth or ninth one. I’ve used a variety of tools and approaches — a saw, bench chisels, a skew chisel, utility knife, and especially a fish-tail flat gouge. The last was especially helpful but store-bought versions were just not quite right. The splay of the tool tip was too modest to really get into the sharp inside corners. I made a custom one for this purpose a couple chairs ago but for the life of me cannot find it now. Instead I decided to make another.
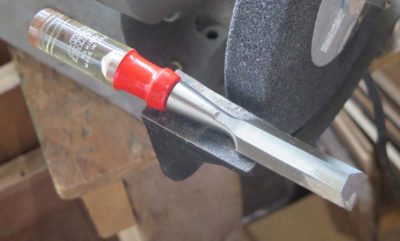
Looking through my box of derelict or disposable tools I found a 3/4″ Stanley “Handyman” chisel. It was a cheap almost cheezy tool of unknown provenance that still had the factory bevel and back. I recall modifying two of its siblings into 1) a dovetail chisel for small corner dovetails and 2) a small, short 3/16″ mortising chisel (this was before I fashioned my set of mini-mortise chisels out of plow plane irons). The thickness of the 3/4″ chisel steel is laughably thin for typical woodworking, but the thickness was precisely what I was looking for.

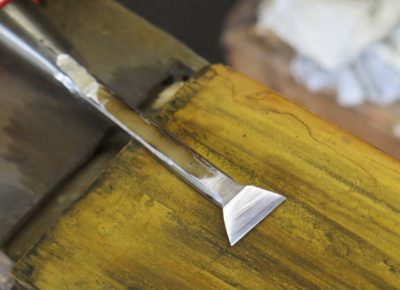
With my stationary grinder I created an extreme splay on the fishtail end of the chisel. Being careful and cutting in from the side I managed to avoid de-tempering the bevel. After running it through my usual sharpening routine I gave it a try.


Absolutely splendid!
It is now an indispensable part of my Gragg tool kit, executing the task perfectly. Even better it reduces the time for cutting one of the dovetailed pockets from an hour to 45 minutes or less. Admittedly, since all of Gragg’s chairs are painted thus obscuring the exact nature of this joint I had to reverse-engineer something that I thought seemed right.
When you have to do 17 of them for each chair, ease and speed count for a lot.
Making this chisel was an extremely well-spent 90 minutes.

So there I was working away during my Gragg Chair Challenge, deep in the midst of the most tedious part of the entire project — fitting the seat slats into their dovetailed open mortises. At that same moment I was completely engrossed in listening to an Econtalk podcast wherein host Russ Roberts was interviewing statistician Nassim Nicholas Taleb on the latter’s observations about Covid-19 (Taleb’s observations cause me to stop and pay attention; I cannot tell sometimes whether he is a man of rare insight or a BS-spewing grifter. As Mark Twain said, “There are lies, damned lies, and statistics.” Taleb himself vacillates between statistics-as-analysis and mathematical-esoterica-as-intimidation).
It must have been a particularly compelling exchange between Roberts and Taleb because I sawed the slat cleanly on the wrong layout line. Try as I might, I cannot seem to stretch the piece longer to fit the space it is supposed to go.
It’ll go into the growing pile of kindling that is left after every Gragg chair.

When it comes to sharpening plane irons I am a sidewinder. I taught myself how to sharpen and this was the way that made the most sense to me as it exploits the natural kinesiology (the study of human motion) of the hand and arm. Straight-ahead sharpening fights the natural motions of the body as you have to constantly adjust the angles of the shoulder, elbow, wrist, and hand. Sidewinding takes advantage of the swinging motion of the arm. All you have to do is establish the bevel angle of the iron and everything else takes care of itself with minimal attention.
The pendulum motion of the swinging arm makes it almost effortless to shape a camber on a plane iron. This one was a new one for a Bailey #5.
My initial shaping of the bevel contour is done with a 60-grit belt on my 50-cent granite backsplash block. My first step is to gauge the bevel angle, which I determine by setting the iron bevel-down on the abrasive surface until the tip and the heel of the bevel are both in contact with it.
Then I start to introduce the curve on the bevel tip by rocking my body forward and backward, and swinging my arm in a pendulum fashion, moving the iron back and forth on the abrasive belt while maintaining the bevel angle. As I am doing this I rotate my hand to push down with my thumb and grind away the trailing corner on the push stroke and press down with my index finger on the opposite corner on the return trip. It really is almost effortless and idiot-proof. For this part of the process I usually wear cloth work gloves as the iron gets really hot, really fast.
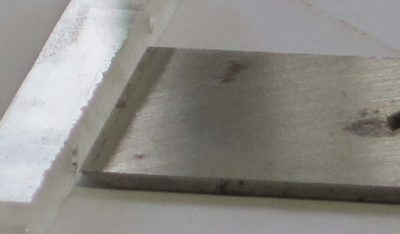
After I get the curved tip I want I move on to finish the iron on my 220 and 1200 diamond plates, then finish it off with the 8000 ceramic stone. Sorry for the fuzzy pic, it’s the curse of the “Automatic” setting on the camera. I use the exact same motion for the sharpening stones as I used for the rough shaping on the granite block.
Originally I titled this post “The 5-Minute Camber” but I timed myself as I created this one. I was off by 40%. It took me just over seven minutes to go from start to finish. Shoot, I took longer to do the photography. I’m trying to teach myself to make short “shop tip” videos, maybe this process would be a good candidate.
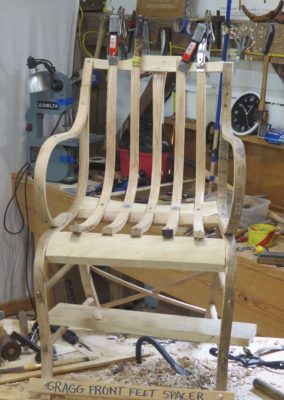
I’ve hit the 24-hour mark of the Gragg Chair Challenge with completing the fitting of the uni-piece bent seat/back elements into the rear seat rail. I’m expecting to finish fitting these into the front seat rail and crest rail somewhere around hour 28, and then chop the mortises for the front and rear rungs. The next big step after that is to disassemble the chair and glue everything together stretchers. After that the only major elements to add are the short seat slats. Then the real sculpting begins.

I’m getting a very good feeling of optimism about a Gragg Chair Workshop in late August 2021. If this interests you, let me know.
I remind you that the goal for the workshop would be the basic construction of the chair. Completing the chair would take at least another week of time. Still, my goal a couple years ago was to get the time expended to complete a chair from raw sticks to delivery at under 150 hours. I’m pretty sure I can get there easily. My next goal will be 120 hours.

Recent Comments