Every winter brings about some damage to the waterline for the hydroelectric turbine, a/k/a the penstock. Usually this is because a tree branch has fallen on some of the 1100′ of 2-inch Schedule 40 PVC, which is cheap but gets really brittle when cold. I knew from the very beginning that replacing some of the PVC every Spring would be an issue but just accepted it as the cost of doing business. Last year was great, I had to replace and patch only two little sections. 2015 was the worst as I had to replace 600-feet of pipe.
Except for the last thirty feet all of the penstock is above ground. I did originally get an estimate to burying the entire penstock well below the frost line, but the >$75k+ price tag was a bit much. My hydroelectric system is more of a hobby than anything else, at least until the EMP or CME or some other grid-down calamity, so that wasn’t in the cards.
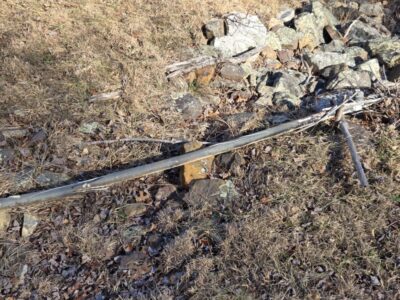
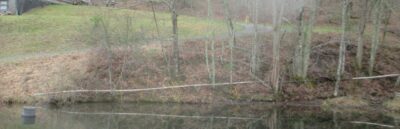
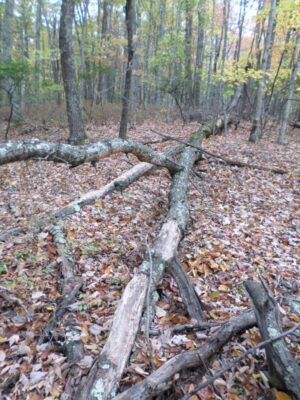
A shredded section of the penstock just before the ice storm.
This damage was peculiar because it was a compound spiral fracture which is only supposed to happen as a result of water freezing in the pipe and bursting it. Since I drained the system in November this damage was a head-scratcher. I am not looking forward to surveying the entire length of pipe once the snow and ice are gone.
I am now rethinking the penstock altogether. Rather than sticking with PVC I am going to check into industrial irrigation polypropylene line which is continuous and much more forgiving to the forces that bust the PVC. Since a pressurized/enclosed water line can run down to about -15 degrees maybe I could even keep it running year-round.
Stay tuned.
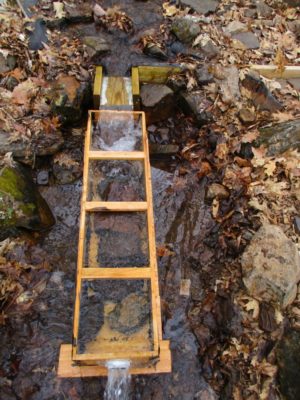
Prior to fabricating and installing the new Coanda-style cover for my hydroelectric capturing box, every couple weeks I would notice a drop-off in the water flow to the turbine. Sometimes it stopped altogether. So, I had to turn off the water at the bottom, flip up the turbine housing and remove the nozzles. Invariably the orifice was crammed solid with a crawdad body, sometimes compressed to the point where I needed to drive it back out with a metal rod. It happened so much I kept a tool right there for the task.
With the former configuration the intake was covered with 1/4″ inch hardware cloth, even then the little crustaceans figured out how to get into the capturing box and were sucked into the pipeline. A minute or two and 1200-feet later they wound up crushed at the bottom when their carcasses were too large to fit through the turbine nozzles. Hence the need for regular clean-out.
Since I installed the new cover there have been zero crawdads in the nozzles. .
A big step forward.
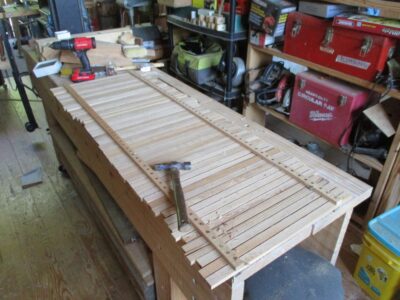
Although I’m not back in the shop full time or anything close, I did sneak in a couple of sessions to make and install the new cypress lid for the hydropower capturing basin. Last winter I saw that something had torn the living starch out of the previous hardware-cloth-over-frame lid, rendering that element useless in filtering out the debris. It was probably a bear, but I really have no idea why a bear would feel the need to tear up the box lid in the middle of a vigorously running stream. The box itself was uninjured, perhaps because it holds about 500 pounds of rocks.
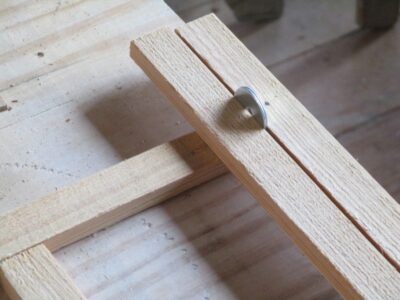
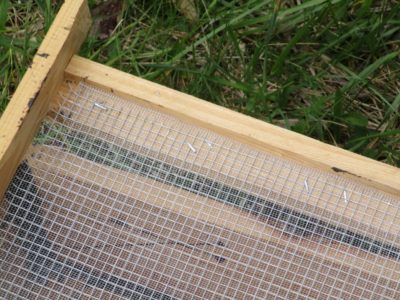
My first step for the new lid was nailing down the side strips to the workbench, then began nailing on the slats spaced two washers apart. This will result in a roughly >1/16″ opening, large enough for the wicking of water through the lid but keeping out the debris and crawdads. I nailed it all together from both sides with copper slatters nails, driven into pre-drilled holes. Once the unit gets saturated the wood will swell and clinch the nails solidly in place.
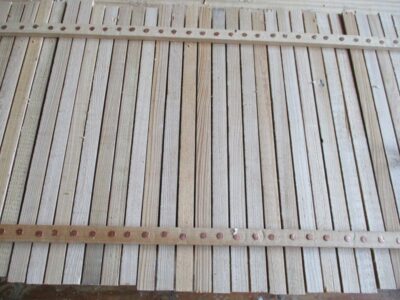
This particular structure is known as a Coanda Screen, although they are usually manufactured from stainless steel rods and screens.
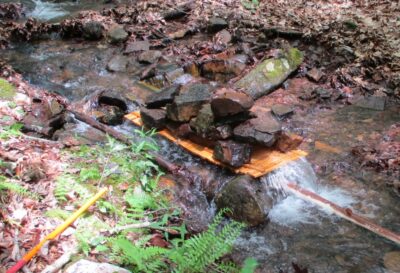
A hike up the hill to clean out the debris from the capturing basin and setting the new lid in place and the system was functional once I made the penstock re-connection that I disconnect when winterizing it. I added another 500 pounds of rocks on top to discourage any four-legged vandals. We’ll see if it works.
Over the summer I will spend a few days working on the penstock incline, building rock berms to flatten out the swales so that maybe, just maybe I can keep it running all winter long. Enclosed water lines can supposedly keep running down to -17F if there is minimal turbulence.
But for now, after a week of vigorous rain (~3″ total) it’s pounding out the power.
Back to finishing up the myriad details for the greenhouse.
Our Mondo March Marathon of Travel is now in the rearview mirror, we are back home in Shangri-la where Spring has definitely sprung. Were home exactly two days last month in between visits to grandsons old and new (and their parents, of course), an exhausting trek for these two geezers. The final push of 700 miles in one day was just about enough to put us in traction.
But now we are home and (mostly) recovered and the chores of spring are in full bloom. Flowers are popping up all over the place and Mrs. Barn is feverishly getting all the garden beds ready for her ministrations. This is her version of being “in the shop.”
I, on the other hand, have gone to the shop only long enough to package up my Donsbarn.com store orders. This will likely continue for another fortnight.
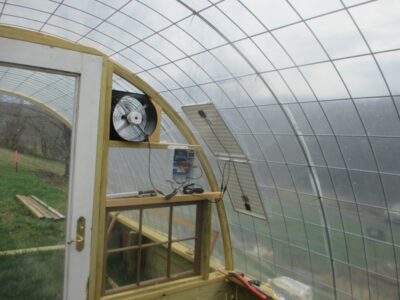
I have spent a couple days working in the greenhouse installing the new thermostat controlled solar powered ventilation fan. We’ll see if it is adequate to the task; the day before I started working on it the space was well over 100 degrees. Yesterday the fan brought it down to the mid-70s, but it was a cloudy day. I’m thinking I will have to augment the fan with a shade cloth. I’ll now spend a couple days finishing up the window framing before proceeding to moving in mulch and soil and building the main raised bed. I am looking forward to now getting fresh vegetables year-round.
Being Spring time it has been my time to re-activate the hydroelectric system. Every year I check the line to repair any winter damage which results from trees falling on the 2” PVC penstock. Normally this occurs at the beginning of March but since Grandson #3 was born on February 28 and Grandsons #1 and #2 have birthdays in mid-March… This year there is much less damage than normal but I am taking the opportunity to reroute a few stretches of pipe in order to flatten out the inclined line of the pipe. Near the bottom and alongside the pond I disconnected, pulled out, then rerouted a 150-foot section, moving it up about three feet but weaving it in behind several trees. Ever try to “sew” with a 200-pound piece of thread? I am very pleased with the result but that one little step took more than two days and my shoulders still ache.
Next week I will do the same thing for three sections before reconnecting it at the top and harvesting the watts. If I can get the incline straight enough, with no swoops and swails all the way to the top, I can (theoretically) keep the system running almost all year long. Maybe all year long in reality. The final project in the coming weeks will be to construct a Coanda cover for the penstock intake.
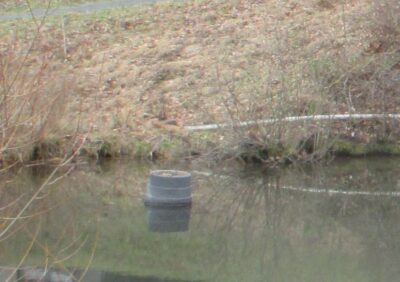
One problem to be solved this year involved re-setting the debris catcher on the top of the pond drain stack. Heavy ice in the pond this winter pushed it aside (sorry, no picture of that) leaving it sorta in place but pretty womperjawed, hanging off to one side. To set the strainer on its axis I had to strip down to my skivvies and shoes and venture neck-deep into the 50-degree water. Brisk. But, I got ‘er done.
That all said I can hardly wait to complete these necessary tasks and get back into the shop with the multitude of projects awaiting me there. Tool cabinet parquetry and fittings, full and 3/4 scale Gragg chairs, writing, editing, writing editing, and more of the same.
Stay tuned.
Since we have had a six-week stretch of amazingly beautiful weather, although to be truthful a day or two of rain would also be nice, I’ve taken some time to go strolling through the woods, trolling for firewood. Here’s the standing inventory of firewood just awaiting harvest within about a hundred yards of the cabin or barn. Expend the perimeter farther and the inventory grows proportionally.
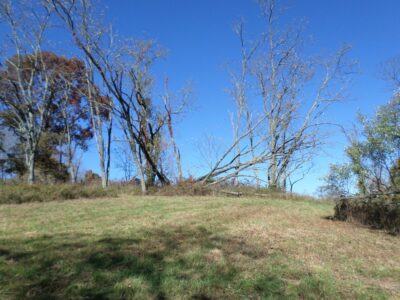
Just above the site of the old shack, recently cleaned up and ready for bush hogging itself, is this cluster of trees from a storm last winter. All tolled I think there are eight long trunks, each around a foot in diameter. Definitely a couple little truck loads. I think these were birches but will confirm with my chainsaw.

Along the same ridge line, about fifty yards above the cabin is this magnificent pair of locust trunks. The tops were snapped off in a windstorm maybe three winters ago. You can just barely make them out in the picture. The trunk on the right is massive, perhaps a dozen feet or more in girth. The one on the left is about eight feet in in girth. Both will require the manly chainsaw of my pal Bob, who will come and fell them some time this winter. If the wood is sound I might try to split them into fence rails. If they are not good for that they will become most excellent firewood, probably two winters’ worth.
The tops of those two trees are laying scattered on the ground and I will harvest them in the coming weeks. Since they are locust they could be downed for many years and still be good firewood. This hunk is almost two feet in diameter.


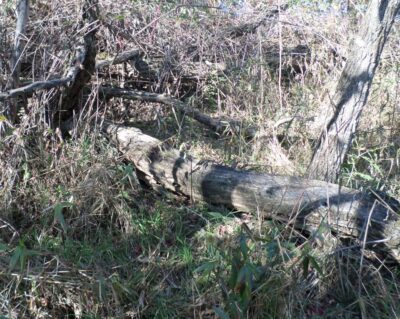
Working west along the same ridge line about 100 yards from the cabin is this pair of mighty big trees, brought down in the same storm as the first cluster in this post. All of the major trunks are 16″-18″ in diameter. One is cherry, I cannot recall what the other one is. Either way that is one honkin’ big pile of firewood.


Moving around to the hill up behind and within sight of the barn is another cornucopia of BTUs. The first picture is of a maple, the second a cherry, and the trunks strewn about in the third picture are all locust.
I can hardly wait to turn my little chain saw loose on cutting all this up and stacking it in the staging area. But it has to wait until I get all done with the greenhouse.
About once a month I walk up in the woods, almost always incorporating a survey of the microhydroelectric waterline. About three weeks ago we had a frog-choker of a rainstorm, probably the residue of one of the tropical storms. Since it had been very, very dry this summer I was looking forward to by hydro turbine picking up the pace, but instead it stopped altogether. I knew what that meant and so last week I trudged the quarter mile to the top of the systems to find the problem. Every time I service or repair the system it requires about four trips up and down a quarter mile of uneven terrain with a 10% incline. Quite a workout.
I’d hoped it was just leaf cloggage, but there was nothing wrong at that end.
So down into the ravine I went to gingerly navigate my way to the bottom and find the problem.

Here it is. During the rainstorm a tree came down and cracked the PVC penstock. PVC is comparatively cheap and easy to work with compared to polypropylene, but it is also comparatively brittle and I encounter some sort of break a couple times a year.
So I grabbed my penstock repair bag and returned to the scene of the crime, after first walking to the top again to turn the entire system off. I cut out the damaged area and grafted in new pipe with couplings and PVC cement, and in a jiffy it was as good as gold.
You might ask why I have my pipeline sitting above ground rather than buried. Well, given the nature of the terrain I can give twenty five thousand reasons, all of them named “Dollar.”
This year I am thinking about a deep dive into configuring the water line system to enable it to work all winter long. Gotta get the incline perfect, though.
Stay tuned.
When I first installed the hydro turbine fifteen (!) years ago I cobbled together a temporary pyramidal doghouse cover from XPS to keep the direct weather off of it until I got the permanent housing cover made. Over the years my incentive for making the new one was low as the old cover lasted much longer than expected. This past winter was the final straw as the old “temporary” cover started coming apart, so I commenced to begin the new, final one. I took advantage of a heavy dew the other day, making me wait for my daily dose of mowing, to finally assemble the new cover.

I began some time ago with making a laminated arch using exterior grade adhesive and copious crown staples. I then screwed on a section of Ondura corrugated asphalt panel roofing for the, well, roof. The unit is light and stiff due to the corrugated arched construction. Once installed I recognized an unintended benefit. The corrugation makes it stiff, yes, but also acts as a sound diffuser on the underside reducing the sound to almost zero once I get more than a few feet away.

If the “temporary” cover using scrap materials lasted fifteen years, I can only imagine how long this one will be doing its job.
Now, back to mowing.
For the past dozen years I have been mothballing the barn’s microhydroelectric system once we get a few consecutive days with daily highs below freezing, usually in late November, then de-mothballing the system once we get to spring-like weather. I learned a painful lesson the first year when I thought I could keep it running all winter long. The result of that error was replacing 600 feet of spiral fractured 2-inch PVC line when the water inside froze solid. Since following the newer strategy I mostly limp through the winter on the output of the solar panels.
As I reassembled the water line every spring, roughly a quarter mile of 2-inch PVC, and walk it top to bottom every year I would find some damage to repair, from ground upheaval (it is truly astounding how much the ground moves in the creek bed ravine over a winter here), extreme water flow during a heavy winter rain or snow melt, or (mostly) fallen trees. Thus, my bringing the system online was usually a two- or three-day event.
Not so this year. When I hooked up the water line from top to bottom, for the first time ever there was no damage! Yes, a few of the soft joints had loosened and needed to be snugged up, no big deal other than getting pretty soaked, but other than that it was a couple hours of good exercise hiking up and down the creek bed.
Let the water and the electrons flow.
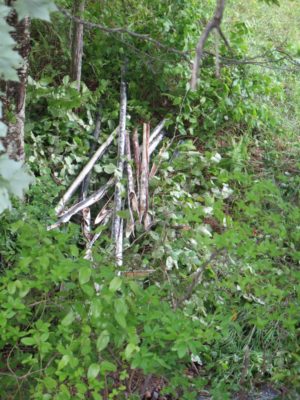
The first of what eventually grew to several piles of thrashed pipeline.
For many years my seasonal regimen for the hydroelectric system has been fairly routine: I drain the waterline some time in November, depending on the temperature trajectory, then recharge the line sometime late in March. I use the descriptor “For many years” because our first winter here also saw the coldest temps since we bought here in 2000 with overnight lows reaching -15F, and my dream of running the system year-round was dashed. The water froze in the pipe, resulting in my need to replace almost 600 feet of pipeline the following spring.
At one time I was rethinking the scheme of having the pipeline above-ground and wondered, could I get it buried beneath the frost line? Since the answer to that question turned out to be, “Of course, all it takes is something north of $75k, and oh by the way it will completely destroy your creek and everything adjacent to it,” I’ve just stuck with the original concept.
So now, every late autumn as soon as we get a string of days with sub-freezing daily high temperature, I shut it down to preserve the line. Notwithstanding that I’ve had to do a little repair every spring, virtually all from trees falling on the line and breaking it (once was from a bear gnawing on it) the routine has worked well.
No big deal. A half-day of work and we’re ready to roll.
Until this year.
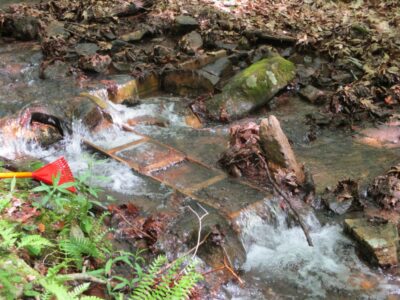
The replaced section near the bottom of the system.
For starters, between travel and yard duties I did not even begin to turn my attention to the hydro system until a couple weeks ago, a full two months later than usual; since I have not been in the shop much and there has been plenty of sunshine, the solar panels did more than enough to keep things copacetic power-wise in the barn.
When I dove into it this week, I encountered almost two hundred feet of shredded pipe near the bottom of the system. The damage was the typical helical fracture pattern of bursting due to water freezing in the pipe. This perplexed me since I had drained the line last fall. My annual draining protocol is to disconnect the pipeline just below the capturing box at the top of the system by loosening the hose clamps holding it together, then moving the pipeline aside a bit. And that’s where the problem this year started. To quote the famous LBJ line, “I reserve the right to be smarter than I used to be.”
Now I are smrt smarter than I used to be.
What almost certainly happened was a fierce rainstorm occurred after the disconnect, with the resulting water flow in the creek high enough to pour into the open disconnected water line and refilling the line. And when the line subsequently froze, BOOM! A couple hundred feet of pipeline turned into confetti.
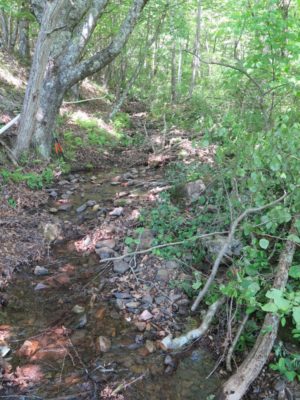
Treacherous footing abounds. One false step can land you flat on a bed of rocks.
I spent this week working on the damaged area, which is an exhausting undertaking. Every footstep has to be considered and calculated given that every single space is uneven, loose rock, most of it slippery from being in a creek bed. Even wearing my best old lumberjack boots, it is treacherous. Especially since it requires good vision to navigate the terrain, a feature I do not possess. (Monday I will be having my 22nd eye surgery, which will provide no enhancement to my very compromised vision but should help to preserve what little vision remains in my used-to-be-dominant eye). Trying to traverse treacherous ground with zero depth perception is a challenge.
I was able to make the repairs with the last of my original inventory of 2″ x 20′ PVC pipe. When I had the first catastrophic winter damage I bought a complete bundle of the necessary pipe, I think it was 80 pieces, and have been using a piece or two every year since the first one.
Yesterday morning I walked to the top of the system and much to my dismay saw serious damage up there too – not from freezing but from destructive/tumultuous water flow in the creek — which I repaired fairly quickly, then reconnected the water line. Just downstream from that repair I discovered another breach. Drat. Walking the line yesterday afternoon I found dozens more breaches, and hundreds more feet of shredded pipe. Double drat. The air was pungent with not-appropriate-for-Sunday-School epithets.
I went to the local farm coop and bought all the pipe they had but still I am way short. This morning I will check with the hardware store the next town over. I’ve gotta get enough material to finish the project next week and bring the hydroelectric turbine back on-line.
Remember the full bundle I bought ten years ago? It was roughly $11 per piece. Now the price is $36 per piece. Ouch.
Lesson learned, albeit a very expensive lesson – put a $1 cap over the end of the pipe intake when you disconnect it, stupid.
The end was definitely in sight. All I needed to do was make the fitted lid with two layers of screen, window screen supported by 1/4″ hardware cloth and haul it the 350 yards to the weir dam. Somehow I have misplaced the camera with most of the lid-making images.

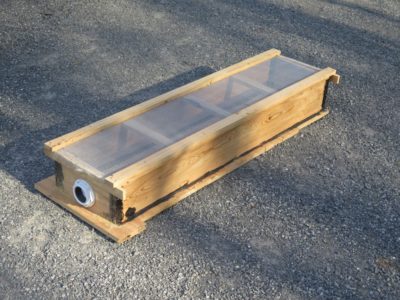
It was very satisfying to see the unit all together, ready to get to work. The only hard part of the project, really, was hauling it up the hill. It is very awkward and though not especially heavy, it was not a feather weight either. I actually strained a tendon in my left hand rasslin’ it up the hill but that is recuperating nicely.

Once I got it up to the top I had to spend some time re-configuring the creek bed since the new box is so different from the old Rubbermaid tub. But when it went in place with a solid WHUMP! as it filled with almost 100 pounds of water I knew the this was just right. To make sure it would stay put from either a rushing thunderstorm torrent or a rummaging bear I filled it with several hundred pounds of rocks.

The connection to the pipeline was a slip-fit gasket inside the shower drain fixture so I hooked it up and we were off to the races.
*Now all I have to do is make a new metal chute and it’s done.

Recent Comments