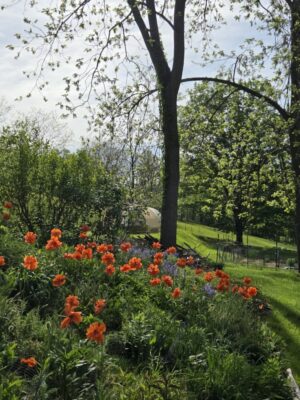
As I continue working on the multitude of details getting the greenhouse ready, Mrs. Barn’s flower garden, carved out of the rocky hillside next to the cabin, has erupted in an explosion of colors as the poppies have burst onto the scene. In a couple months the daylilies will emerge, and in between will be a host of other rainbows of flowers I know nothing about beyond appreciating their beauty. To say that she revels in the beauty of nature and especially flowers would be an understatement. Today is our annual Mrs. Barn’s Birthday Safari to Millmont Gardens to load up with beautiful plants. She has free reign to get whatever she wants, the space in the back of the CRV being the limiting factor.
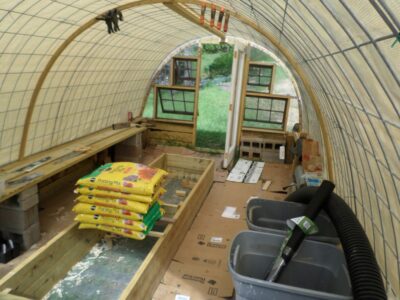
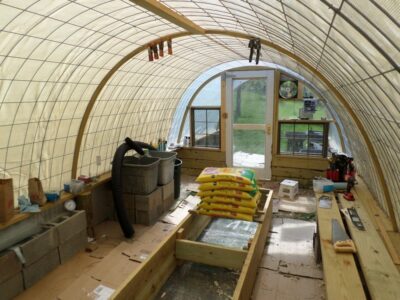
As for the greenhouse itself, we have begun to finalize the interior layout and some seedlings are underway. I have removed much of the construction supplies and tools, bringing a sense of order to the space. Lately we have been scouring the University of Youtube to garner the best information on building self-watering planters.

We have passed through asparagus season, having freshly-picked shoots with almost every meal for more than a fortnight. The bed is now proceeding to the “bush” phase and in short order the asparagus bushes will be 8-10 feet high. She says this is the key to an established perennial asparagus bed, and since it has worked here for two decades I rely on her judgement.

I can just now glimpse returning to the workbench on the horizon. First project is to make a new, sturdier cover for the hydro capturing trough that a bear (?) tore up last autumn.
After what seems like a century we are back in Shangri-la, having logged thousands of miles in traveling for the past two months. We were home twice to swap out luggage but otherwise we were elsewhere.
It began with our arrival in DC for the very birthing day of Grandson #3. Three weeks later we went to Alabama for the third birthday of Grandson #1 and first birthday of Grandson#2. Then back to DC for GS#3’s baptism, a grand week we got to spend with our co-in-laws. My co-father-in-law and I are twin sons of different mothers.

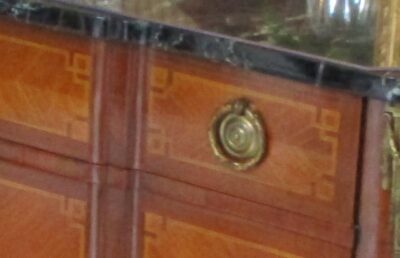
While in Rochester our hostswe squeezed in a visit to the Eastman House museum. This was a charming veneered French-style chest, although almost certainly late 19th or early 20th century (I did not take it apart to confirm that thought). I was especially taken by the “knotted banding” pattern.
After another brief stop to swap out more laundry we wrapped up our journeys with a trip to Rochester NY where I made six presentations to the Rochester Woodworkers Guild — Principles of Furniture Conservation, Case Studies in Furniture Conservation, How Furniture Conservation Affects My Current Furniture Making, demonstrations of various conservation techniques, a review and demonstration of parquetry techniques, and finally a conservation/restoration clinic based on the pieces the attendees brought with them for that purpose.
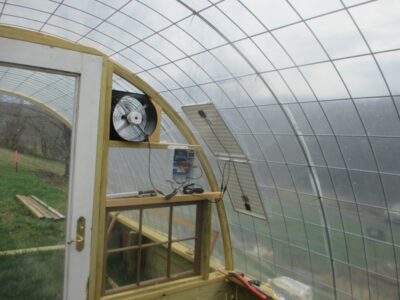
Now back home with summer trying to ramp up we are back at it big time. Mrs. Barn is feverishly working on her gardens and I am hard at work on the greenhouse, finishing the installation of a greenhouse fan, draping the structure with a shade cloth our newest son-in-law gave to us when it turned out to be too large for their patio space, and sealing up the perimeter to protect from the voles that are the bane of Mrs. Barn’s gardening life.

The shade cloth was something we had been wondering about as the inside temps were in the 80s when the outside temp was in the 20s. Now that the sun and outside temps are much higher the issue came front and center. I do not like high temperatures anyway, but when I was working inside the greenhouse in 110-degrees I broke out the shade cloth and affixed it in place. Combined with the fan that lowered the inside temps to a manageable 85 degrees.

Even though the 1/4″ hardware cloth covers the entire floor out to the walls, I made a second hardware cloth “flashing” to be ground-stapled on top of the continuous layer then crown-stapled to the walls. The tricky part is forming it to the posts, which usually required another piece or two to be cut and fitted. If voles get past this a number of Rat Zappers will be awaiting them.

As for vole-proofing the space, that began at the very beginning of the construction phase several months ago. I covered the entire inside space with 1/4″ hardware cloth, and now was the time to tie it all together with new pieces at the bottoms of the walls and posts. One more day of that and it will be time to move on the laying out the inside configuration.
I hope we get to stay home more from now on, but that may be a vain hope. In two months the family of GS#1 and GS#2 will be moving to live within five miles of GS#3. I’m guessing that Grandma and Grandpa will be burning up the roads between here and there.
I am anxious to get back into the shop to work at both the bench and in my writing chair, but that might have to wait a little longer.
This is a bit of an explanation as to why the blog has gone dark for three weeks or so.
Three and a half weeks ago the weather forecasters shocked the snot out of us by getting the “what, when, and how much” guesses right on the mark. I mean dead in the bulls-eye. We got the “eight to fourteen inches of snow” exactly when they predicted.
The next morning I fired up my monster snow blower and got to work. I was thinking it would take me two or three hours to get the driveway and parking spaces cleared. At the end of my first trip to the cattle gate at the entrance to the driveway down by the road, the blower snapped both of its auger/blower drive belts. Okay, I’ll just go into town and get a couple more.
Mrs. Barn and I did just enough shoveling to get my truck off the property and into town. Unfortunately, my experience was replicated many times in the county as this was the first time in four years we needed to get out our snow blowers, and a lot of them broke their belts on the same day. As a result there were none in town. Anywhere.
Okay, I’ll find some close by on the interwebz so it can be here the next day or two. Alas, my phenomenon was apparently replicated thousands of times across the mid-Atlantic and none were close by. Eventually I found a place in Milwaukee that had them “in stock.” It’s been three weeks and they have yet to arrive.
Meanwhile, we spent dozens of hours shoveling the driveway and parking area by had so that life could proceed with little further disruption.
This was not the worst snowfall we’ve seen since buying here 25 years ago. I remember planning to come for a long weekend in maybe 2009(?) or thereabouts to work on the barn, and when I checked with my pal Tony he told me not to bother. “The snow is as deep as the top of the cattle gate. You aren’t getting in.” Two weeks later I got in, no problem.
You see, our normal weather pattern is for a storm front to come through and dump some snow, followed by a couple very cold days, followed by a couple weeks of mild (above freezing in the daytime) weather.
Not so this year. Yes, we had a storm front with the snow, exactly how much is unknown because the howling winds moved it a bunch even after it fell. Yes, I saw and shoveled snow that was 8-inches deep. But, I also saw and shoveled snow that was more than a foot deep.
Patiently we waited for the mild weather to return and take care of the snow cover on the driveways.
It never came. It still hasn’t
Once we started getting the long range forecasts for last week and this week I knew we were in trouble. If it got as cold as predicted we would be using a week’s worth of firewood every day. Every day.
Fortunately I had about half of next winter’s firewood already cut, split and stacked. Unfortunately, it was up next to the barn. This meant I had to get a truck up to the barn to retrieve it. And for that to happen, the whole driveway to the barn and much of the parking area next to the barn had to be shoveled by hand so we could replenish our firewood inventory at the cabin.
So I did. Shovel the complete driveway. This meant that from beginning to end I/we shoveled almost a quarter mile of driveway. By hand. Much of it twice as there were several subsequent weather fronts coming through dropping more snow. Sunday’s yield was 5-6 inches, fortunately light fluffy snow so the shoveling was easy and (comparatively) fast. Still, I would guess that in the ten days between two weeks ago and yesterday I estimate 50 hours with my hands on the shovel. I make a point of going slow and steady. Almost every night I was almost asleep by the time supper was over.
This is by far the most and longest-lasting snow cover we have had in our years here. This coming weekend we will have a few days at or above freezing, with sunshine, and that should cure all the ills. It follows two really cold weeks, including this REALLY cold week with five consecutive nights near or below zero at night. This morning was -10 when I checked at 8AM. We haven’t used a week’s worth of wood per day, but still it’s been a lot. Around a dozen arm loads per 24 hours rather than the normal half dozen.
All that Light has been why the blog has been dark.
My recent post about apple butter making was an account of a “public” event at our friends Pat and Valerie’s place a month ago. A couple weeks ago we learned that there was going to be a second episode of apple butter making, this time pretty much restricted to a close circle of friends. We are, fortunately, part of that circle.
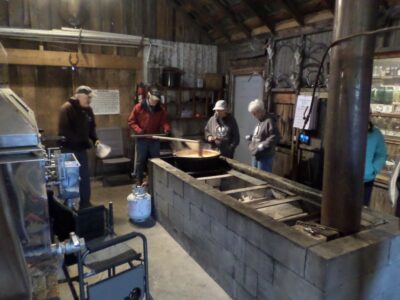
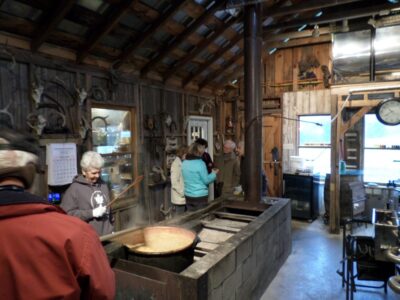
The appointed day for the apple butter rendering was a brutal cold, raw, windy and rainy day. In response Pat and Valerie set up the cauldron inside their boiling hearth, normally holding the sugar water boiling pan for making maple syrup. Being a creative guy, Pat removed the pan and rigged up his cauldron with a propane burner to cook the apple chips. Or maybe it was Valerie’s idea, I don’t rightly remember.
This made the entire event even more charming and cozy.
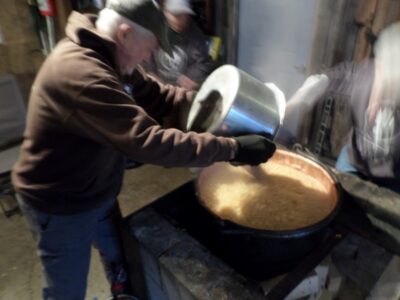
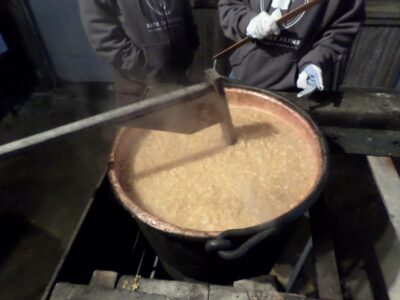
So there we were in this homey setting, stirring and adding apple chips to the bubbling cauldron until after several hours it was time to add the spices. Normally sugar would also be added but this batch of apples was so sweet naturally none was needed.
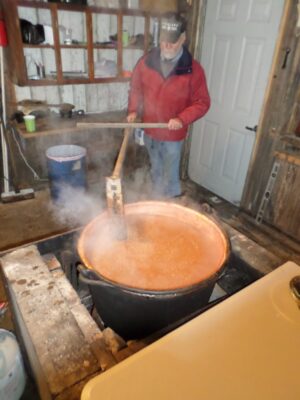
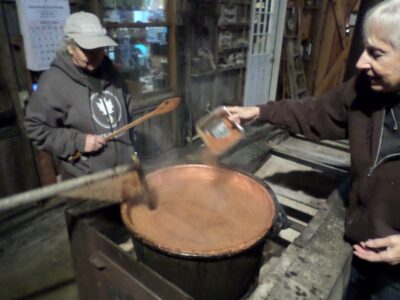
The spices were stirred in for another half hour.
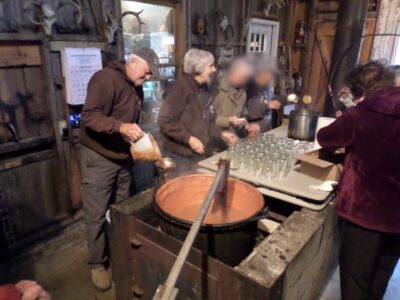
At the proper time the canning began with a well-honed assembly line. Once again my task was to take away the full cases loaded with the still-hot apple butter.
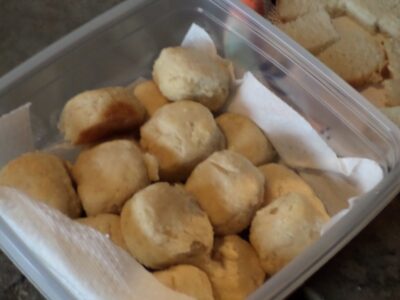

Out came the fresh biscuits, made with loving excellence by Pat’s sister. The scrumptious biscuits were used to clean out the cauldron. Yummmmm.
Another day well spent.
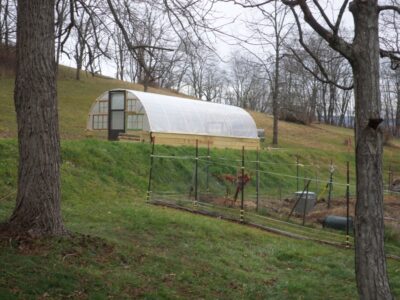
The time was fast approaching when I could button up the wire frame tunnel, wrapping it with the 6mil greenhouse plastic.
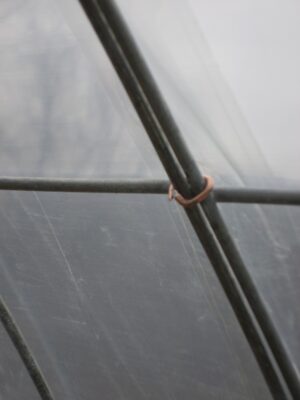
First, concurring with reader EarlM, I secured al the wireframe panel edges with hog rings along the joints. Yes, zip ties are not what was ultimately needed but sufficed for the initial assembly, but the metal hog rings were necessary for the long haul. Addressing the issue of stable edge joints was paramount as the ongoing vibrations of wind against the wire/plastic would eventually breach the film membrane. Not good. However should that ever occur I can repair it with special tape made for that purpose.
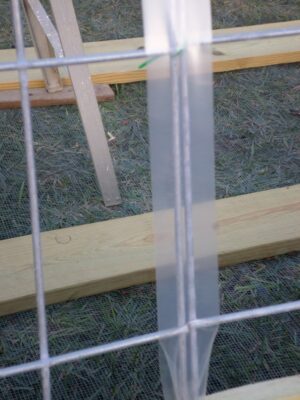
And speaking of tape, I decided to cover the edges and hog rings with Ace Hardware store brand heavyweight packing tape. It is not very good for packing cardboard boxes but really excelled at this application. Two layers of the thick transparent tape had me ready for the final step of this episode — draping the whole thing with the plastic film and affixing said film to the edges of the wooden structure.
I’d arranged for my friend Boyd to come over to help, and he was a great help with excellent ideas on how to actually do the task.

I spent the next few hours tacking down the edges to secure the lid. Not all of it was aesthetically exquisite, but it has been holding fast through some pretty fierce winds already.
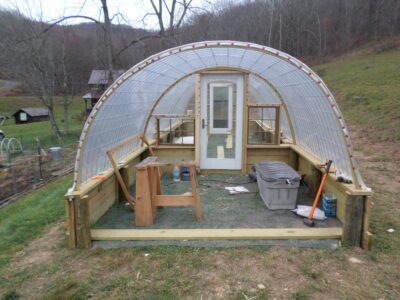
It’s beginning to look a lot like greenhouse, just in time for Christmas.
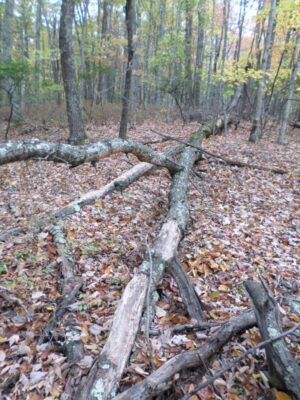
Since we have had a six-week stretch of amazingly beautiful weather, although to be truthful a day or two of rain would also be nice, I’ve taken some time to go strolling through the woods, trolling for firewood. Here’s the standing inventory of firewood just awaiting harvest within about a hundred yards of the cabin or barn. Expend the perimeter farther and the inventory grows proportionally.
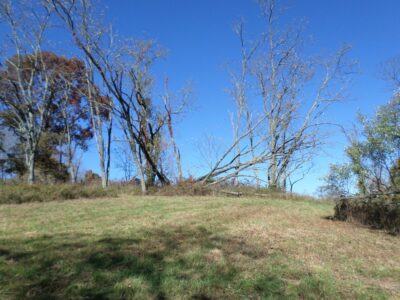
Just above the site of the old shack, recently cleaned up and ready for bush hogging itself, is this cluster of trees from a storm last winter. All tolled I think there are eight long trunks, each around a foot in diameter. Definitely a couple little truck loads. I think these were birches but will confirm with my chainsaw.
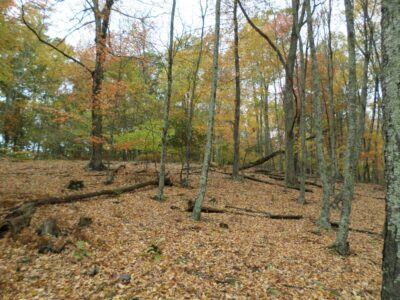
Along the same ridge line, about fifty yards above the cabin is this magnificent pair of locust trunks. The tops were snapped off in a windstorm maybe three winters ago. You can just barely make them out in the picture. The trunk on the right is massive, perhaps a dozen feet or more in girth. The one on the left is about eight feet in in girth. Both will require the manly chainsaw of my pal Bob, who will come and fell them some time this winter. If the wood is sound I might try to split them into fence rails. If they are not good for that they will become most excellent firewood, probably two winters’ worth.
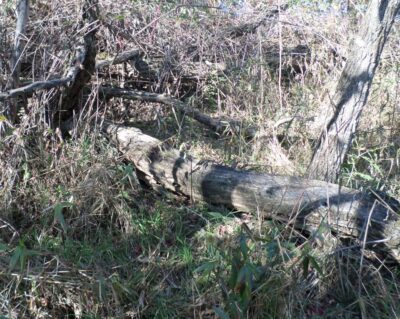
The tops of those two trees are laying scattered on the ground and I will harvest them in the coming weeks. Since they are locust they could be downed for many years and still be good firewood. This hunk is almost two feet in diameter.


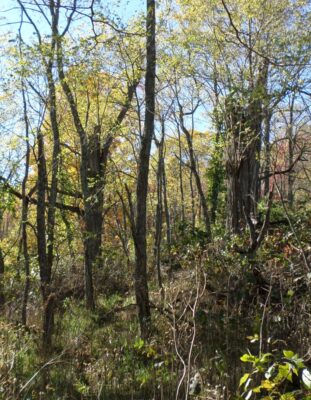
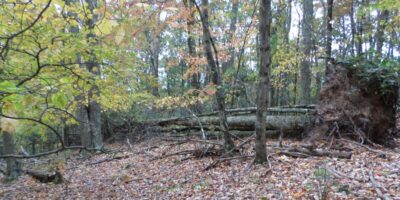
Working west along the same ridge line about 100 yards from the cabin is this pair of mighty big trees, brought down in the same storm as the first cluster in this post. All of the major trunks are 16″-18″ in diameter. One is cherry, I cannot recall what the other one is. Either way that is one honkin’ big pile of firewood.
Moving around to the hill up behind and within sight of the barn is another cornucopia of BTUs. The first picture is of a maple, the second a cherry, and the trunks strewn about in the third picture are all locust.
I can hardly wait to turn my little chain saw loose on cutting all this up and stacking it in the staging area. But it has to wait until I get all done with the greenhouse.
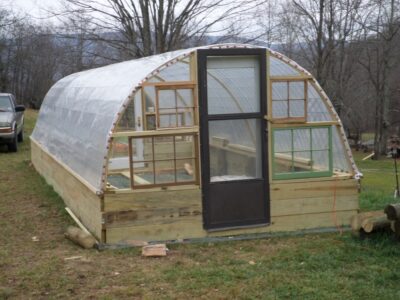
With the wire frame tunnel in place it was time to frame out the ends. It was not as easy as I had hoped given that the perfect semi-circular arc was not, well, perfect. Nor was it even symmetrical for both ends. Mostly a semi-circular arch, but not perfect. That meant that every stick had to be custom cut and fit before assembling with deck screws. plus, the pile driver/local rocky dirt combination meant that the posts themselves were out of perfect by about an eighth of an inch. All of that compounded to make sure the assembling of the end framing was a tedious process.
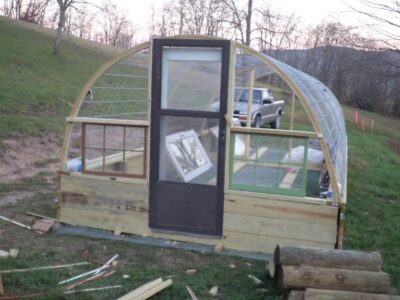
I did have the advantage(?) of lots of recycled windows and doors. When you have replaced all the windows in two houses, you’ve got plenty of inventory. There are two doors at each end, one screened and the other glass. All of the windows will be openable as screened awning windows once the weather is right in the early summer (our “frost free” date is May 30).
Notwithstanding the fact that the arch at the east end of the space was 2″ off-axis due to whatever factor — lunar forces, prevailing trade winds, inherent torque in the raw material — it was an easy enough problem to rectify once I recognized it.
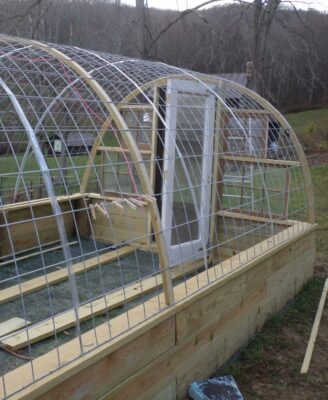
Compounding all of the tedium was that we were at the time of year when I lose usable working light by about 4PM, at least “usable” for these tired old dysfunctional eyes. But after about four days of effort the ends were framed and mostly glazed. I say “mostly” because we are awaiting the arrival of the solar ventilation fan to get installed before everything gets buttoned up.
At least you get the idea.
Up next; draping the plastic. Stay tuned.
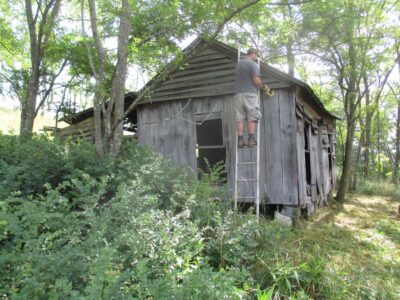
With beautiful autumn weather in the air and the hillside bush hogging (mostly) completed, for a couple days I turned my attention to the last remains of the shack that was once someone’s home a hundred years ago. My brother, nephew and I dismantled and salvaged a great deal of the lumber from the building nine (!) years ago before I was so rudely accosted by a wheelbarrow and the whole project was interrupted. By the time I had recovered fully from my broken hip it was late winter and the inspiration to finish the task had passed.
Flash forward to now.
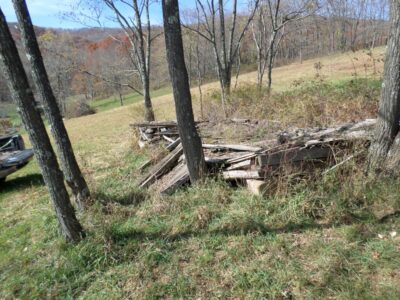
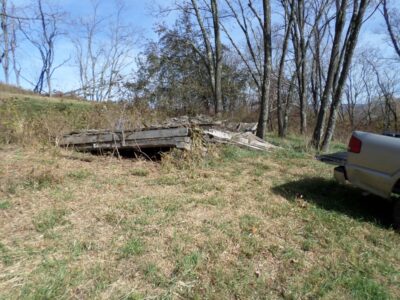
As I was wrestling the bush hog around the site recently, I thought the time had come to finally clean up the mess. I had hoped that there might be some last vestiges to salvage, even if for nothing other than firewood, but that was not the case for 99% of the detritus. It just all needed to be piled in the truck and hauled to the burn pit at the dump.
Three heaping truckloads later all that was left were two large timbers. These were the only elements worth salvaging, and even then it was just for firewood. It’s a real shame, as they were still bearing the axe marks of the men who made this home probably around 1900 or so.

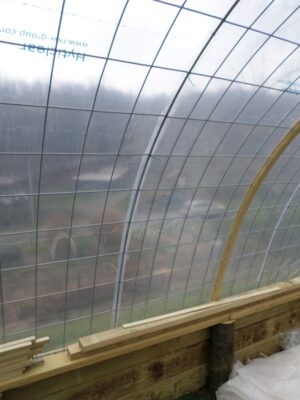
As I assembled the “tunnel” of the greenhouse from the cattle panel fencing I noted a lot of wiggle in the structure, even after tying all the sections together with zip ties at their edges. Yeah, yootoobers swear it can withstand fierce winter weather but my friend Floyd over on the east side of the county, and whose greenhouse was absolutely the inspiration for this one, indicated that our occasional heavy snow (~18″) caused him some problems. Being the over-builder that I am, I decided to add curved ribs inside the tunnel to beef it up.

My first step was to configure to tunnel to be symmetrical which required aligning the center of the arched panels with the center line of the overall structure. Using a simple plumb bob I pushed and pulled the sections to be at least along the same center line. I’d hoped that this combined with the rib-building process would make all the arch curves identical.

With string lashing to keep the arches aligned with the center line, along with diagonal wooden braces, I set about the task.

Using my little table saw more than I have in a long time I sliced off a pile of 3/16″ strips to build the laminations. For the most part simply clamping the strips to the underside of the arches imposed a semi-circular arc, and this was enhanced by the continued build-up of the laminations.


A combination of spring clamps by the bushel, T3 glue and a multitude of crown staples the ribs began to take shape. The enhanced structural robustness became increasingly clear as the glue dried, which took about three days given the moisture content of the PT SYP lumber strips and the weather itself.

All in all it took me almost three days to get the 10-layer ribs finished, but they are now in place for the next step, framing in the ends of the tunnels and adding doors and windows.


Seriously, the structure is now strong enough that I could crawl all the way to the top to staple the fence grid to the ribs.
The conceptual core of this greenhouse design is an arched tunnel made from heavyweight metal grids, known as “cattle panels [fencing].” In fact that is what the product is used for, to fence cows in or out, and it is robust enough to withstand the rubbing of cattle against it. Even our little feed-and-seed hardware store in the middle of the least populous county east of the Mississippi has a stack of it out in the yard, and since the dimensions are 52″ x 16′ I was glad they could and did deliver it to the greenhouse site.

Unfortunately I failed to get a picture of my pile of eight panels, but here is one lying on the ground. They are #6 gauge so plenty stout.
These panels are not heavy but they are unwieldy. Think of trying to handle a full sheet of 1/4″ luan plywood in a windstorm. Once I got the hang of handling these panels and setting them in place on top of the knee walls it went fairly quickly. I first strung parallel lines on top of the wall sills, then drove in nails along those lines. The nails were proud about an inch to “catch” the ends of the fence panels as I placed them where they belonged. In an hour or so they were all in place.

I drove fence staples all along the bottom edges of the panels then joined the panel edges together with zip ties along the joints to yield a single 30-foot panel from the multiple individual four-foot panels.

This is going to be a marvelous addition to the homestead.
Most folks building this style of greenhouse simply drape it with plastic at this point, assuming (correctly) that the arched configuration could withstand all manner of problematic weather. I know this to be true but it felt a little flimsy to me, so I decided to build structural ribs to enhance the robustness of the arch.
That’s what comes next.

Recent Comments