Building the Energy Infrastructure for Off-Grid Woodworking at The Barn on White Run (Part 1)
In 2006 I contacted Rich Buttner of Nooutage.com in Richmond to help me with the electrical engineering, which he did with experience, knowledge, skill, attentiveness, and excellent customer service. A retired power plant engineer who launched a business in the back-up energy world, Rich was excited about contributing to his first complete hydroelectric home-based system. I have been so pleased with Rich’s contribution that he remains my “go to” guy whenever I need advice or hardware about further improvements to my concept.
As he was spec-ing out the project and assembling the hardware, I went to work.
In late 2006 I got my hands dirty for the first time. I had already located the highest elevation on our property where the stream could be harnessed. About 100 feet from where the creek crossed the property line there was a narrowing to about 6-feet that was perfect for a small dam to serve as a capturing basin for the system.
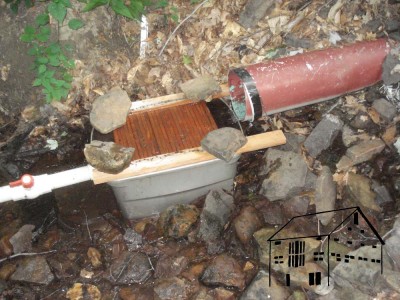
Using sandbags filled with dry concrete I built a double coffer dam about 2 feet high and ten feet wide, about two feet thick. It did not have to be big, it just had to steer the water into the penstock (the pipe that carries the water down hill). I accomplished this task by embedding a 10” culvert into the dam, which in turn channeled the water into a capture basin, which itself was connected to the water line.
Somewhere around this time I ruptured a disc hauling piles of 16’ 1×12 siding up a ladder and nailing while I hooked a leg around the ladder, so I wound up delaying everything by almost two years for rest and physical therapy (with a healthy dose of “Don’t do that again!” scolding). Eventually I was back to full strength and ready to proceed with making a capturing/diversion basin and laying the pipeline.
Since I was still working a the Smithsonian at the time, for a capturing basin I used a museum-quality plastic tub underneath the outflow of the culvert pipe, which I fitted with a museum quality shower drain, which I then attached to a 2” PVC fitting. I topped it off with a home-made Coanda screen filter on the top to keep the debris out of the tub but allow for full capture of the water.
It was then that my friend DickP enhanced his account in the Bank of Don by coming up for the weekend and helping me haul, arrange, fit and connect over a quarter-mile of 2” Schedule 40 PVC pipe. Seriously, I am in his debt more than I can fully articulate. At the end of the weekend we had a continuous line of 2’ PVC from the dam to the powerhouse where the turbine was going at the bottom. I opened the valve at the top and water flowed out the bottom. That was a joyous day!
At this point I will comment on the shortcomings of the workshop I first attended. They really gave short shrift to the construction and more importantly the “lay” of the penstock. Over the years I have been helped by friends and siblings to modify, disassemble and reassemble, and reroute the penstock four times to get it right. Perhaps I am simply stupid, certainly I am stubborn, but more understandng before beginning this stage would have saved me a boatload of trouble. Finally this past spring my friend TomS and I got it right, and I do not foresee any changes at this point other than repairs from falling trees or rolling boulders during a flood or some such.
Up next – Hooking It All Up


Join the Conversation!