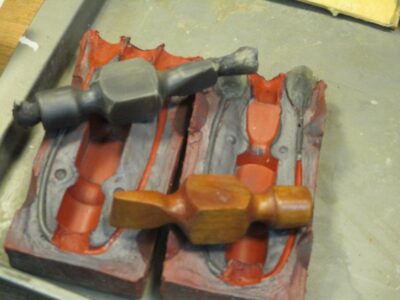
The next morning I demolded the first half of the silicon rubber for MattC’s hammer head. I cleaned all the surfaces of any residual clay from the embedding. I spread a parting agent (petroleum jelly) over all of the silicon mold surfaces and reassembled the first half mold including the original wooden master pattern and the attendant elements. [Sorry for the blurry pic — note to self, do not drop your camera on the concrete floor, it don’t work so good after that)
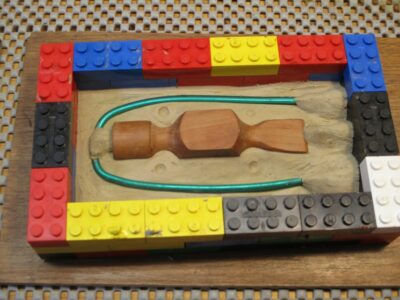
Reconstructing an identical plastic brick dam, I repeated the mixing and Matt poured the liquid silicon molding material and we let it sit again overnight to harden.
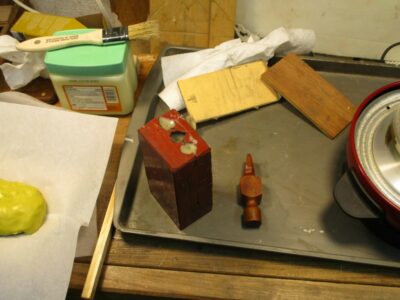
Once the entire rubber mold was separated and cleaned it was ready to go for making wax models for lost wax casting. I did cast one wax pattern and saw that I needed to expand the sprues a little with a scalpel. Had I used a larger piece of wire or tubing there would not have been a problem.
Just for the heck of it I walked him through the process for casting pewter directly into the mold, which requires depositing powdered graphite on all the cast surfaces to reduce the surface tension of the molten metal. I mimicked the process with wax and he got a kick out of the metallic-looking wax pattern.
At this point I turned the mold over to Matt to proceed with the enterprise from his end. My work was done.
I (a/k/a “Maker 1”) recently spent some time in the barn with my friend MattC, a tool enthusiast, collector, purveyor, and maker (a/k/a “Maker 2”). Matt wanted to learn about making rubber molds from which wax patterns could be made for lost wax casting, so I demonstrated techniques for doing just that. As a test exercise we used the wood pattern for a hammer he is hoping to produce.
Here’s a very brief report on that process.
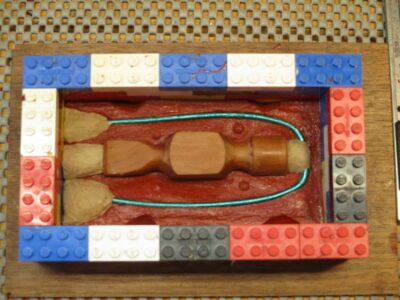
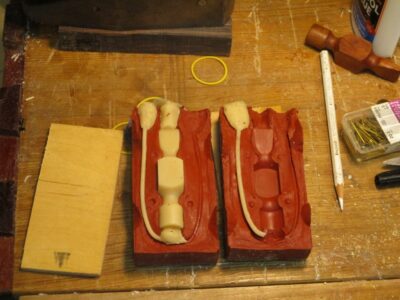
First, I embedded the wooden master pattern in sulfur-free modeling clay, to an approximate halfway parting line (sorry for the blurry photo). The “sulfur-free” descriptor is a critical one because silicon molding rubbers will not set in a sulfur-contaminated space. Getting the contact margins with the master pattern is critical to getting a nice, clean two-part mold.
Once the embedding was complete I built a rectangular dam around the assemblage using my old favorite plastic toy bricks. At this point I added a heavy wire sprue to the mold, along with the necessary gates to get the molten wax into the rubber mold. In this case I constructed three funnel gates at the top of the mold and one through gate at the bottom, connecting the sprue and the master pattern. All of these will be hollow voids in the end.
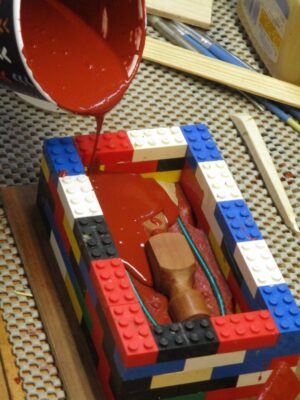
With everything ready to go I mixed up the silicone rubber molding material, using a disposable cup and my digital scale. The rubber I chose for this project was Polytek 71-60, a fairly hard rubber that can accommodate low temp metal casting directly into the rubber mold. I’ve used this product for decades and find it amenable to my work. It is, of course, now discontinued. I do believe that the Smooth-On company makes an analogous product although I have not yet tried it.
Ideally the container of mixed rubber would be placed in a vacuum chamber to draw out any air bubbles, but since I do not have one set up at the moment I just let it sit for a few minutes and popped all the bubbles rising to the surface, essentially reducing the overall vapor pressures within the liquid solution.
Additional methods of dealing with any remnant air bubbles include my holding the cup fairly high over the embedded master pattern and pouring a very thin stream of the liquid into the void. The long, thin stream breaks up most of the remaining bubbles. Furthermore, I always start pouring away from the pattern itself and allow the liquid rubber to flow over the surfaces on its own, which also reduces any bubble issues.
Finally, when the plastic toy brick flask is full, I spend a few minutes popping any bubbles that emerge on the surface, once again reducing the vapor pressure within the liquid and eliminating any risk of bubbles being permanent against the surface of the patter (the ultimate problem).
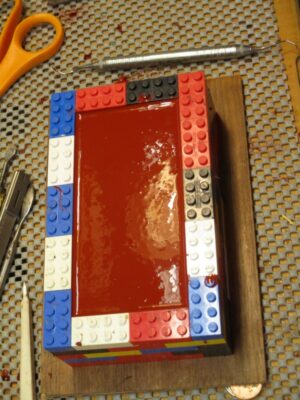
Depending on the temperature and freshness of the silicon rubber solution (there are definite shelf-life issues with these products), I return to de-mold the first half of the final mold in four to six hours. Usually, I just wait overnight.
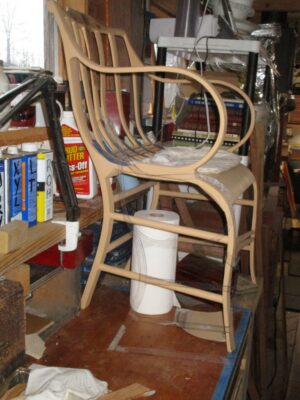
With a momentary semblance of normalcy returning to Shangri-la I was able to get all of the stock planed and dimensioned for the L’il Gragg chair and get set up for a steam bending afternoon.
Bending jigs in place and secured? Check.
Steam box set up? Check.
Plenty of distilled water on hand from the Dollar General? Check.
Okay, let’s load up the steam box and get this stuff cooking!
Since the wood being used was not really “green” any more I gave it a little more cooking time, 40 minutes for the sticks instead of the typical 30 minutes as would be appropriate for the <1/2″ oak.
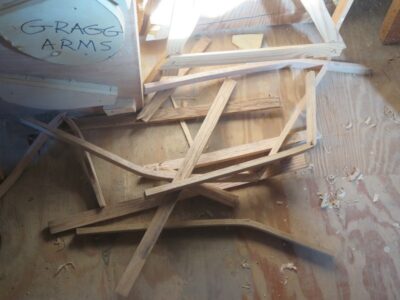
The first piece was almost fully bent when I heard the dispiriting cr-r-r-a-a-a-ck. Okay, let me give it ten more minutes in the steam box and try it again. Same cr-r-r-a-a-ack. Ten more minutes. Same result. Ten more minutes. Same result. Ten more minutes. Same result.
By this time I had a complete pile of broken parts. All of them broke. All twelve of them. A 100% failure rate. Had there been a microphone inside my head the sounds would have peeled paint.
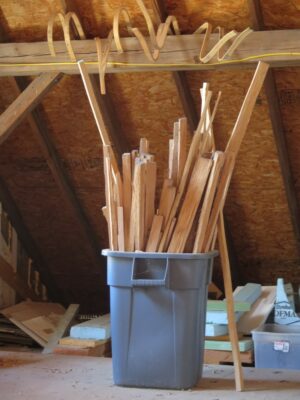
What went wrong? The wood was all harvested by me, by hand, from a newly felled tree. The problem is that harvesting was a dozen years ago. Some of that stock I’ve kept stacked in the basement of the barn and had worked it just fine as recently as 18 months ago. Unfortunately, as I dove into Lake Gragg again a few years ago I moved a lot of the pieces up to the attic of the barn for future use.
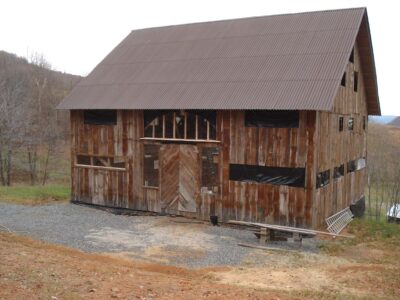
It’s an old image but gives you the scale of the asphalt roof
Given the location of the workspace, directly underneath the asphalt paneled roof, it gets mighty hot up there in the summers.
I am surmising that I now have, in effect, a large stock of kiln dried chair pieces. Even though the material was almost green air-dried wood when I brought it up, several summers worth of scorching heat in the attic resulted in bins full of transformed wood, with both the inter- and intra- molecular moisture having been driven out.
Now the task is to noodle the reconditioning of kiln dried wood for the purposes of steam bending, and that’s what I am going to undertake.
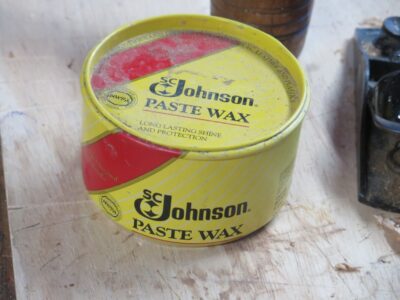
50 years ago my paste wax of choice for almost any paste wax-ey purpose was Behlen’s Blue Label Paste Wax, which for an obvious reason I remember it as “Blue Diamond” paste wax. Regardless, it was a superb product, easy to use and very high performance.
Sometime in the 90s I couldn’t find it any longer and embarked on a quest to find a new go-to wax. There were, and still are, lots of excellent paste waxes on the market (including, apparently, Blue Label; this image was pulled off the interwebz), and also a lot that I would not choose because they were either hard to use, or had potentially deleterious ingredients for use on fragile antique surfaces, or their formulations could either not be ascertained or changed from something better to something not better. NB – this was among the many motivations behind the development of Mel’s Wax.
I ended up with Johnson’s regular yellow-and-red label as the one to use for everything I would have used Blue Diamond for. But a couple years ago this became hard to find and I discovered that it had been discontinued for, to me, inexplicable reasons. Try as I might I could obtain no new cans for a reasonable price, or even a slightly unreasonable price even on Ebay.
Fortunately, I had a bit of it here, a bit of it there, in short I had a can at or near every single workstation I occupy, in the barn or elsewhere. I compiled it all in one place and it turned out that I had a dozen mostly-full tins.
I guess I am more set for it than I first assumed.
All because I have pack rat inclinations, I guess.
Many of you are, like me, familiar with, and probably partakers in, the “tailgating” tool flea markets that are fairly common around MWTCA meetings, tool auctions, and the like. I might only spend a minute or two per year buying clothes and shoes, but I can sink days into scrounging for tools. I carry the same mindset to almost every yard sale or thrift store I encounter, and often with more strategic buys in mind.
In fact, all of my workspaces are chock full of yard sale and thrift store resources. I’ve had a pretty good stretch of useful acquisitions lately.
Here are some treasures from a recent event, a community yard sale just before winter got here. In a few minutes and for a few dollars, I came home with this booty.
My first treasure was this collection of assorted tacks, of which I bought six boxes for $1. I am always on the lookout for vintage fasteners, and this box is the type of assorted tacks that was common in hardware stores in the 1950s and 1960s. At some point when I get bored enough I will sort the contents of the boxes, ranging from 1/4″ in length to 1″.
Grinding shellac anyone? I don’t like coffee, never have. But coffee grinders, especially one for 50 cents? There’s always space for them as I use them to grind up shellac, resin beads, whatever.
What in the world can I do with cake and jello molds? Well, there is a lacquerwork technique I want to experiment with, using my epoxy fauxrushi. This technique involves draping strips or sheets of impregnated fabric over a mold, then demolding after hardening. The molds will have to be sized with whiting first, but they are a terrific testing opportunity for the idea. If my memory is intact this stack was $1.
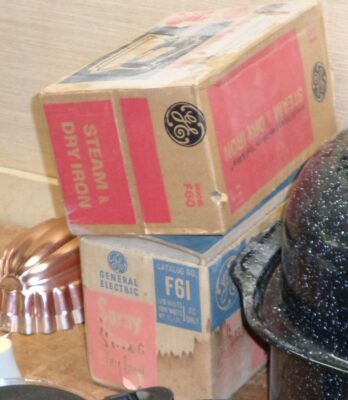
Since I use heat for a lot of functions involving wax or glue, old timey electric irons are just the tool for a lot of applications. These were $2 a piece. In the original boxes no less.
Since I melt wax a lot, and even more in the near future as I delve again into lost wax metal casting, I’ve found that using coffee pots are darned near perfect for material handling. I can melt wax on a hot plate with these beauties, and then pour into whatever form or mold I’m using for whatever project I am creating. I got these four for a buck apiece.
Perhaps my biggest prize, both conceptually and physically, was this very large turkey roasting pan. What in the world do you need with a turkey roasting pan? (Mrs. Barn asked me the very same question). Well, when steaming the wax out of a ceramic investment mold, that is “Losing the wax” in lost-wax metal casting, you gotta invert the investment mold and steam out the wax. This roasting pan is just perfect for the largest investment shell I will ever do. I shelled out big bucks for this one, $4. And worth every penny.
Fifteen minutes, fourteen and a half dollars. Not a bad way to spend a little time and money on the way home from the post office.
PS – between the wedding, and Christmas, and family visits going in both directions, and preparing the Maryland house for new occupants, I don’t think I’ve spent a dozen hours in the shop doing any real work since the beginning of November. “If only I can get past this next thing,” I tell myself… But there is always another dozen things waiting in line.
While undertaking some recent reorganization of my basement workshop in Elderbarndottir’s former house (she got married in November and moved to her husband’s house) I came across this nostalgic and beat-up picture from early 1977, hiding behind one of the shelving units. This French secretaire was my first really high-profile/high-value furniture restoration project at Schindler & Son of the Palm Beaches, where I started working in late 1974. Unfortunately I did not take any detailed pictures of projects at this point of my career – had this happened once I was a museum conservator the project would have been documented with hundreds of photographic images to go along with the written reports. I probably took a picture or two of the interior, it was spectacular. Bat that was almost 50years ago and cannot recall that detail.
Somewhere I have a picture of a Riesener cabinet from the same client, but that picture has not turned up yet.
Prior to this I did a lot of run-of-the-mill restoration for “ordinary” antiques along with a boatload of custom finishing and refinishing; before Schindler’s I was a “scratch and dent man” at a couple of furniture stores.
This project arrived in pieces in the back of Ambassador So-and-so’s Mercedes station wagon. The secretaire bore the inventory stamp of the Chateau de Saint Cloud. It should come as no surprise that the culture from which the word bureaucrat is derived should be punctilious about household inventories, but there you have it.
Over a period of a couple weeks, I reassembled it and made repairs to the rosewood and tulipwood veneers, then finally a couple of days of shellac pad polishing. “Pop” Schindler came almost every day to watch and guide me, it was on this project that he introduced me to hot hide glue.
This was a seed for my fascination with exquisite European furniture, especially of the French variety (along with our company’s work at the Wrightsman estate in Palm Beach and their furniture collection), and was truly the acorn from which my fascination with Roubo sprouted. It was also the prompting for me to embark down the career path of conservation; I entered that stream in 1981 at Winterthur Museum while I was a student in college.
I took some time yesterday from our year-end festivities to chat with my longtime friend Brian Wilson on his “Now For Something Completely Different” show, where we engage in some high-altitude societal imaging and analysis.
If it is the sort of chatter you might find interesting between two radical rabble rousers, give it a listen.
For unto us a child is born, unto us a son is given: and the government shall be upon his shoulder: and his name shall be called Wonderful, Counsellor, The mighty God, The everlasting Father, The Prince of Peace.
The angel went to her and said, “Greetings, you who are highly favored! The Lord is with you.”Mary was greatly troubled at his words and wondered what kind of greeting this might be.But the angel said to her, “Do not be afraid, Mary; you have found favor with God.You will conceive and give birth to a son, and you are to call him Jesus.He will be great and will be called the Son of the Most High. The Lord God will give him the throne of his father David,and he will reign over Jacob’s descendants forever; his kingdom will never end.”
And they said, “Isn’t this the carpenter’s son? Isn’t his mother’s name Mary?”
And I heard a great voice out of heaven saying, Behold, the tabernacle of God is with men, and he will dwell with them, and they shall be his people, and God himself shall be with them, and be their God. And God shall wipe away all tears from their eyes; and there shall be no more death, neither sorrow, nor crying, neither shall there be any more pain: for the former things are passed away.
I pray for you to have a blessed Christmas with loved ones and that you are celebrating the Incarnation, through whom we can be reconciled with The Creator.
The Eagle Eyes amongst you will figure out what’s going on (sorry my template is plexiglass). My only question is, “Can I get this done in time for the mid-March birthday?”
Delphine Galou, that is, the magical contralto in my favorite performance of Handel’s Messiah. Here is my annual link to that version, and if this does not elevate your temporal senses, your sense of well-being, and your sense of The Divine you’d better check your pulse.
Collegium 1704, the Prague-based orchestra and chorale, is committed to performing baroque (and earlier) music being faithful to the original scores and instrumentation. Hence, there are some odd versions of instruments with which we are familiar.
If you watch the concert video closely, you might see what I think is a Virginia woodworking link to this ensemble’s accoutrements.
Smack-dab in the center of the orchestra is an instrument that looks suspiciously like a Taylor & Boody console pipe organ. T&B is a premier, internationally renowned pipe organ maker just over the mountain from us near Staunton, Virginia, on the way to Joel Salatin’s Polyface Farm, for those of you familiar with his work in food production practices (featured in The Omnivore’s Dilemma). I am acquainted with T&B’s head woodworker and have visited there a several times.
During one of the visits as a family they were just finishing up a magnificent organ for the chapel at Yale, with all presentation surfaces painted and marbleized with platinum leaf detailing. Spectacular. The gigantic instrument was to begin disassembly the following day, for transport to New Haven. The fit was so tricky they replicated precisely the balcony where it was to be installed in their fabrication shop and built the organ to fit that space. Exactly.
While touring and gawking we got to see one of their console pipe organs, basically the size of a roll-top desk and similar to this one. Elderbarndottir, being a pipe organist herself, asked if she could have one. “It only costs as much as a house, Dad.”
The workmanship was astounding, and the sound is almost incomprehensively sublime given the size of the entire unit. The inside is packed about like under-the-hood of a ’68 Mustang 428 Boss, barely even room for your hand to slither in for anything.
So try to spot and listen for the organ in this incomparable performance of Handel’s Messiah.


Recent Comments