A couple weeks ago I blogged over at Lost Art Press about the initial distribution of manuscript pieces for A Period Finisher’s Manual to my first-tier reviewers, four hearty volunteers who have pledged to stay with me to the bitter end. I assure you they will be just as tired of the project as I will be by the time it makes it into print. Thanks again Bill, Bob, Gina, and Josh for your yeoman’s work to make this esoteric topic into an engaging and informative volume.
The first broadside was the “Introduction,” a non-technical roadmap for the project. Later this week I will be sending them at least part of (maybe the whole of) the first section, “Preparing the Surface.” There is nary a drum sander or jitterbug to be found.
I look forward to their feedback. Once it gets integrated into the manuscript text, that “final” version will be winging electronically to my second tier reviewers Bill, John, Len, and Mike for any final thoughts before the whole pile lands on The Schwarz’ desk. I have only so many words in me, so periodically I fall silent here as I restock the lexiconic inventory.
The only current unexpected hurdle is that a bolt on the rocker mechanism for my Eames knockoff chair broke on Friday so I have to get that fixed pronto. It’s my writing nest in The Waxerie, where I spend part of every day massaging words.
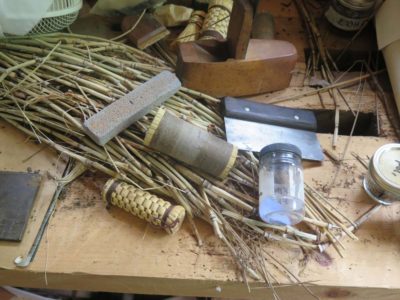
Last week for the first time ever I saw this faint embossed pictogram on the rosewood plane. It was all a matter of the light hitting it at precisely the correct angle. It is fascinating but not especially helpful a priori as my literacy of Chinese pictograms is exactly where it was the moment before — nil. If anyone knows what this means I would love to know.
I’m still thinking of fabricating a wood-planing iron for this beast and putting it to work. I believe one of the blog’s readers identified the original tool as an apothacarist’s or herbalist’s plane for shaving plant medicines, or perhaps a cook’s plane for shaving vegetables. If I can make an iron made for it and working well it would be a beast of a wood plane.
Even though it is Workbench Wednesday I have not made any progress on Tim’s Partner Gunsmithing Bench for a couple weeks (I will post about those other goings-on soon) and do not really want to post yet about some other workbench-y things in the barn.
I did, however, come across this video of a truly ingenious adaptation of a Roman workbench that I thought you might find as engaging as did I.
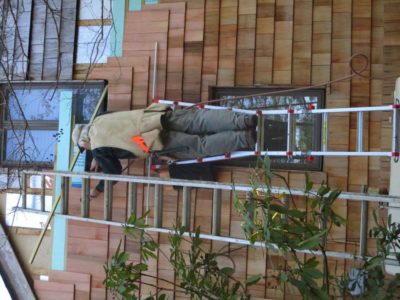
Over the winter and into Spring I was able to go to Maryland a few times to work on replacing the cedar shingle siding on our daughter’s house there. The progress was steady but slow. For starters, a things progressed the work got higher and higher on the ladders and I simply do not scamper up and down like I used to, added to the inherent risk of high ladder work I was exceedingly cautious while working.
In October I noticed that my knee began to progress(?) from a constant dull ache to a sharper twinge and finally to an acute pain that kept me mostly on the coach with ice and heat. Turned out the episodic ice-pick-through-the-knee was due to an inflamed/damaged meniscus, and after almost going down in the middle of a flat parking lot Mrs. Barn put her foot down and directed me to actually to go to the doctor, who prescribed Physical Therapy for a month. The results were spectacular and I continue a 75-minute exercise routine on alternating days and now I’ve been feeling no discomfort in the knee for the first time in 50 years.
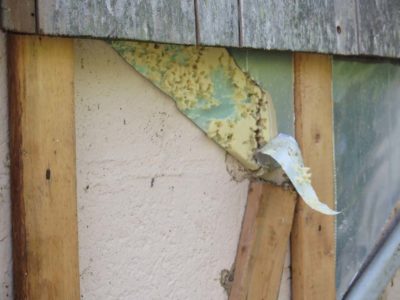
As for the house siding project one of the most difficult aspects was the safe removal of the 2′ x8′ cedar shingle panels I installed 35 years ago. In the intervening period there was a lot of penetration with plumbing and electrical projects, requiring several of them to be cut away in pieces while up on the ladder before carrying them down the ladder and over to the trash pile. While there was very little additional damage from the cockroach’s cousin in the wood there was a lot of nesting/penetration in the rigid foam insulation. I replaced a lot of that and added another layer of insulation in between the horizontal firring strips required by the new cedar shingling.
I evaluated the production of my days by the number of tote bags filled with shingles I used, and a really good day had me installing a half dozen. Now the end is definitely in sight.
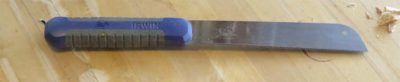
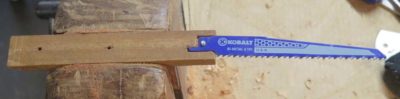
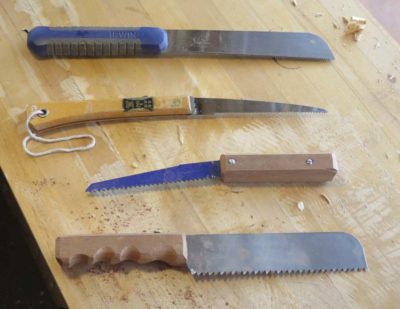
I recently posted about the wonderful little pull saw I bought at Lowes and how I use it constantly while working on the new cedar shingle siding. My only complaint about it is that it is just a smidge too big to fit neatly into any pocket of my old Skillers carpenter vest, a shortcoming I decided to address with other tools. So, I now have three more saws that do fit into one of the pockets, saws that are getting used with ongoing frequency.
The first of these is the little folding Japanese saw that I have had for ages. When fitting individual cedar shingles as one must, I find that there are many times when for several shingles in a row each and every shingle has to be custom cut and fitted, requiring lots of sawing. This is going to occur either on the ground or at the top of the ladder, and given the age and mileage on my knees I prefer it take place up on the ladder. When folded this little beauty fits perfectly in the breast pocket of the vest alongside at utility knife. Perfecto. It is so robust and inexpensive I will probably order another bunch of them so that I can keep one wherever I might need it.
Two other saws were shop made for beefier tasks like localized small scale demo work, which also needed to occur with some regularity as I was cutting away the old cedar siding paneling. Either of them allows me to work efficiently but under fairly delicate control as I was cutting away old materials from around electrical or coolant lines, places where I did not want to fire up the reciprocating saw.
The first of these two saws use a leftover piece of bowsaw blade about 10 inches long. I rounded one end on the grinder and cut the other end of the blade with my rotary tool to remove the teeth and make a shaft for embedding into a handle.
I scuffed the surfaces of the blade handle then sandwiched it between two scraps of wood, using Gelfex epoxy to glue it all together.
I trimmed and filed the handle to fit my hand and it was off to the races, working perfectly for its intended function.
The second shop-made saw employed a blade from the reciprocal saw, the butt of which was inset into another two-piece scrap handle and embedded with epoxy as the handle halves were screwed together.
I now have an elegant sufficiency of little saws with large performance.
I am finding the gathering of accurate information about the current state of affairs in the ongoing proto martial law (at least here in Virginia where our knucklehead governor and his posse are making noises about portions of the lockdowns lasting for another couple of years). I found this brief video summary to be exceedingly helpful in comprehending the situation. You might, too.
Recently I have been working with planemaker and friend Steve Voigt to help him create a wax polish for his exquisite new historic-style wooden planes. Well, Steve has been doing all the work, I am just supplying the materials and a few formulations based on the results I’ve had in recent years. His desire was for a beautiful appearance and a non-slick surface so that his planes could be handled with the tiniest bit of tack against the bare hand.
Based on some correspondence and a recent Instagram post, he has apparently arrived at the finish line. He is strongly recommending I make this product for others with similar interests and asked if I had ever made this formulation before, because it was in his words, “Da Bomb.” You can tell he has been a college professor, what with all that hipster lingo. (He is actually a pretty hip guy, especially compared to me being just a lovable curmudgeon shouting at the clouds)
My reply was, “Yes I had, and yes it was.”
It just might be time for a new product in the Don’s Barn Store. I’ve actually been playing with quite a few ideas…
During (another) recent pre-martial-law episode of basement workshop archaeology at my daughter’s house I rediscovered a successful “proof of concept” prototype, a phrase I learned from my pal Ripplin’ John and have come to use with great regularity. I cannot even recall the particular project at this point, but only vaguely remember that I needed to do a lot of sanding in the winter, hence it would be inside. I needed a dust control scheme so efficient that Mrs. Barn would not even notice a speck of the dust upstairs, the basement steps ending/beginning immediately off the kitchen.
I had designed a downdraft table for dust control during upholstery stripping decades before and it worked wonderfully for the furniture conservation group I designed it for. In the intervening years downdraft sanding tables had become more common, but I did not have the space or need for one of these big units, 24″ x 36″ or thereabouts was all I needed. Pus, it had to be a benchtop unit given the restricted footprint of my basement workshop.
Being someone who rarely throws away anything that could theoretically become useful in the future I had almost everything I needed to build the unit. The only thing I needed to buy was a 24″ 48″ piece of pegboard from the home improvement center.
I had some nice scraps of 1/2″ tempered foam core sheet and made the box walls from them, sawing them on the table saw. I glued them together into the frame using hot melt glue. Double- or triple-wall carboard would have worked just as well. (One of the reasons I did not use wood walls was my desire for the unit to be ultra light weight; wood would have increased the weight several fold.)
I knew that my small unit, unlike the large downdraft tables, would need to have the air drawn from one end rather than from underneath so the internal air-flow volume had to be tapered, fattest at the end where the fitting was inserted to draw the air and very shallow at the other end. This tapered plenum provided a more equal air flow over (and through) the work surface of the unit, much like reduced/increased ducting controls the evenness of air pressure within air conditioning and heating systems. I found in practice the unit performed admirably in this regard.
The taper was achieved by gluing parallel strips of wood to the insides of the box fame, then stapling on a bottom of corrugated plastic sheet. Again, all it had to do was direct air and not support anything but itself.
For the working surface of the unit I simply cut and glued on a piece of pegboard, with only one cross rib in the center since the dimensions preluded any severe sagging given the pieces I was working on.
When I first set up my tiny basement workshop I purchased a larger-than-necessary cyclone collector, a machine that served me magnificently for all those years and remains the cornerstone of shop cleaning in the barn to this day. I cut a hole in the fat end of the plenum to insert the 3-inch hose fitting from the collector and the unit was done.
I am really glad I rediscovered this accessory and have kept it in my barn workshop since I do everything I can there to keep airborne dust to a minimum. I was recently using it to do some sanding and it still works great.
All it took those many years ago was a bunch of scrap materials and about an hour’s time to make. It was the perfect solution to the problem I had, and if you have an indoor space with the same constraints you might give it a try.
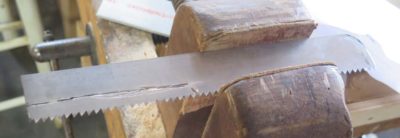
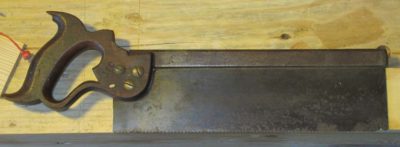
At many points in the distant past I picked up several pretty far gone saws with the expectation that some day I might get them rehabbed and put back to work. Well, for some of them that day has come and gone and several are now in service. Today I will start with the simplest one.
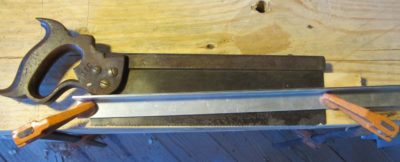
The first saw was a nicely proportioned back saw plagued with deep corrosion pitting on the plate extending up more than a half inch from the teeth at the toe. There was no way I could remove all the pitting from the plate, but I decided to cut the plate back to good metal for filing in some new teeth and at least salvaging the tool. My strategy was to achieve a tapered configuration, losing a good bit at the toe and almost nothing at the heel.
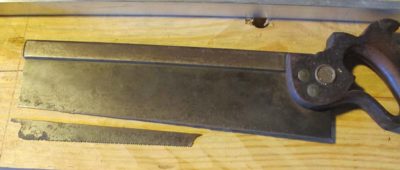
With a carbide scribe, hacksaw, and my trusty rotary tool and a one inch grinding disk (well, several actually) I made the cut, then cleaned it up by sanding the upright saw on my granite block I normally use for restoring edge blades, equipped with a 60 grit belt.
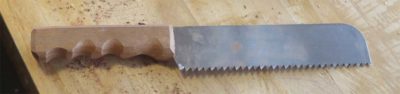
After that it was a very simple matter of re-toothing the saw, I vaguely recall making it into a 16-point ripsaw. Somehow I managed to forget where the pictures of the finished saw are, but you can use your imagination. After getting it to the point I was satisfied I included it in a shipment to Rob Hanson, my personal “Care” packages to a fellow craftsman who lost his home, shop, and business in the California wildfires almost two years ago. I hope he is giving it a good workout.
Which reminds me, I need to get another box of tools packaged and sent to him.
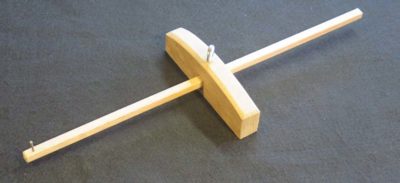
Once I finished the marking/mortise gauge for the Japanese tool box I noticed (of course) that the tool box contents did not include a panel gauge. Instantly my gaze swept over to the small cabinet hanging on one of the timber posts, holding several similar tools.
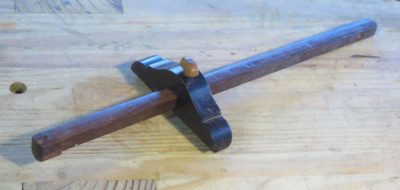
Included there was one set I created from one of my favorite tools, a panel gauge with a Cuban mahogany beam, a rosewood block, and a boxwood screw.
Still, I actually do not use a panel gauge all that much, even one as lovely as this one. But, I like this tool so much that I actually made an additional component for it just for the pleasure of using it more often than otherwise: I made a short cherry beam with a mortise for the cutter to make it a marking gauge as well.
I knew immediately that the scheme would work perfectly for the Japanese tool box with the spectacular advantage that it would consume almost no additional volume. Given the configuration of the irons and the block I could easily make a panel-length beam and simply slide it into place instead of the irons and the clamping pad.
The complexity of the new component was extreme. I had to go to one of my scrap wood buckets and pick out a nice straight piece of white oak left over from making the Studley workbench top, and rip off a square slightly larger than the 1/2″ x 1/2″ hole in the block.
I planed it clean so that it fit snugly through the block and added a finishing nail marking tip which I filed into a sharp edge, and the tool modification was complete.
It fits the definition of a “two-fer” almost perfectly.


Recent Comments