Our little community is down to one chimney sweep, a not inconsiderable logistical problem when there are probably around a thousand fireplaces and woodstoves in use here. Getting on Rick the Chimney Sweep’s calendar early is an important consideration, and this year we did not get on the calendar as early as we should. But just in time for chilly weather he worked us in to clean out our beautiful stone chimney. Fortunately, our exhaust flue is not prone to build-up and combining that with the choice of fuel — always well-seasoned hardwood — gives us a lot of latitude, chimney cleaning-wise.
The easy part for Rick is to climb a ladder to the top of the chimney and sweep it from the top down a la Bert the chimney sweep from Mary Poppins. I’m not afraid of heights but Mrs. Barn insists that my amygdala is not as sensitive as it should be so I take more risks than I should. Thus, she is delighted we can hire someone to work at the height required.
Rick is, among other things, an enthusiastic spelunker so crawling around in the fireplace behind the insert suits him just fine. He gave our fire exhaust system a clean bill of health and said that we may not even need an annual cleanout.
His ministrations were just in time as the temps will drop precipitously over the next few days with snow coming next Tuesday and Friday. I expect we will fire it up in the next 36 hours or so if for no other reason than Li’l T and his parents are visiting for several days and we want to keep him warm.
As for the barn, it is easy enough for me to disassemble and clean the stovepipe, which I did last spring.
All set.
PS I’m about halfway through the task of splitting and stacking firewood for next winter, and by the time I finish with the entire mountain of wood in the parking area next to the barn I’ll be ready through winter 2024/2025.
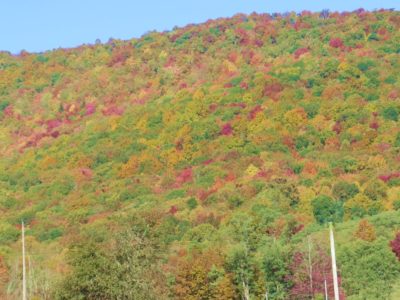
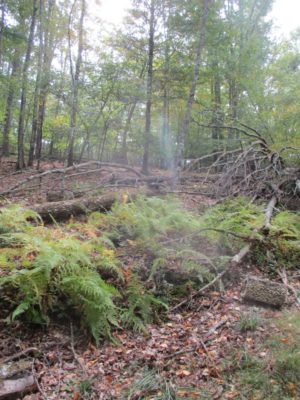
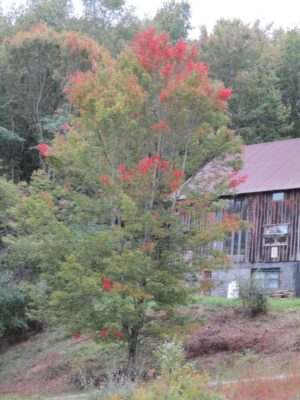
Even on a slightly hazy morning, the drive back from the hardware store featured a landscape of almost fluorescent colors on the mountain behind the cabin.
Autmn beauty is a fleeting thing here in the Virginia Highlands, a good year giving us at best three weeks of polychromy. This year we had about a fortnight plus a day or two.
Hard to not be distracted when this is the view from the window.
During that fat fortnight the drive up the road and the view outside the shop windows was glorious.
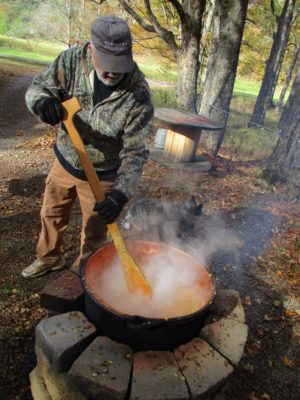
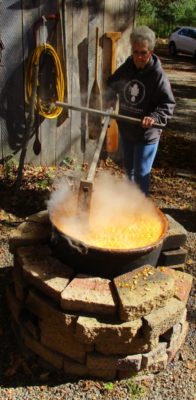
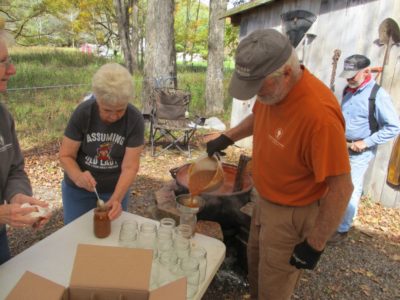
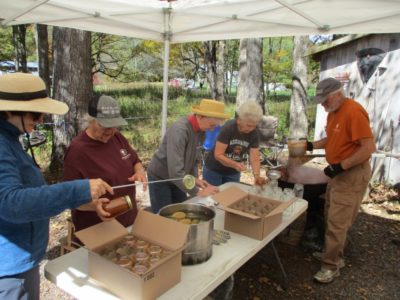
Another splendiferous happening during autumn in these parts is the annual making of apple butter the old-fashioned way. Twice we have been able to go to our friends Pat and Valerie to help cook, stir, and can apple butter in accordance with Pat’s mom’s recipe (I think), using a giant copper-lined cauldron resting above a wood fire. This year we had brilliant, crisp days for the event and garnered almost 150 pints each day.
The assembly line firing on all cylinders.
Perhaps the truest from of magnificence on these days is when we got to scrape caramelized apple butter off the bottom of the cauldron with fresh biscuits and popping the treat into our mouths.
Years ago when my sister’s family was visiting and we were giving the kids a walking tour of the property, one of my nephew’s exclaimed, “Uncle Don, it’s just like you live in a state park!” As you can probably deduce from some of the firewood-harvesting pics, the topography for much of the property is, shall we say with literary license, exuberant. One moment of inattention or one spot of poor footing can put you on the ground in a twinkle of the eye. Given my poor vision with almost zero binocular depth perception and my history of injury I am becoming increasingly attentive to keeping upright in the place I want to be moving or standing still.
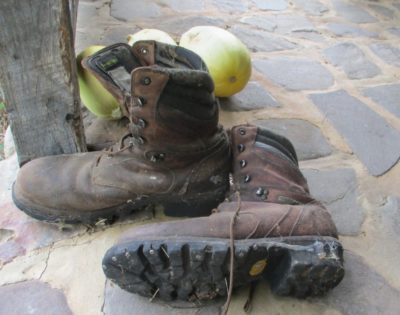
Traipsing around up and down and across the hills requires good footing and for all of these years I have relied on an old pair of lumberjack-ish boots. For standing, these are the most comfortable footwear I have ever worn, but as my excursions into the forest have become more purposeful, they were wanting. For starters, as the knobby soles became worn they were less able to grab the ground as needed, but even worse is the fact that they weigh about 8 lbs apiece making the traversing of rough terrain all the more problematic. Hiking around iffy ground with a brick lashed to each leg is not optimal.
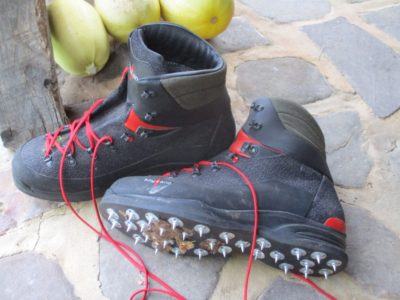
Since firewood-harvesting became integral to my routine here I started looking into spiked-sole lumberjack boots (the term for this type of boot or shoe is “calked;” I have no idea of this etymology) as a response to slippery footing.
After much browning of the interwebz I found this pair of “calked” boots built on a hiking boot platform, thus reducing their weight by around 50%. They are comfortable, lightweight, and grab the ground like they were, uh, spiked to the ground. They have transformed my time in the woods or when bush hogging the hillsides, or even just mowing the yard (although I must be attentive to where the water hoses are so as to avoid stepping on them). In these arenas, they are perhaps my most important tools.
Given my longstanding allergies to pollen and my fortnight in the hospital with pneumonia this past July I am increasingly attentive to what I breathe, especially when doing yard work.
For several years I wore a fitted industrial respirator when mowing and trimming, but even then I often had several days of wheezing and sneezing afterwards. While in the hospital in July I noticed that several of the caregivers wore powered air filtration helmets. They seemed like a near perfect solution to my problem. Their units were designed for medical/laboratory conditions and cost roughly $3k so that was not where I was going to go, but then I recalled the filter helmets often worn by wood turners and began my exploration there.
My first choice was the Axminster APF10 unit from England. It seemed to have the most streamlined configuration and the most comfortable fit. On inquiry I was informed that the company did not ship to the US so I had to remove them from consideration. (I am uncertain as to their current shipping regs; I might still like to get one, so if you are going to the UK and would be willing to pick one up for me there, let me know.)
In the end the only option left to me was the Trend Airshield Pro unit, which I did order. In some respects it is a fine unit, in other aspects not so much. There are other options, generally for the sandblasting and welding arena, but the prices for many of those units ($1500 and up) put them outside my immediate consideration.
When evaluating the Trend Airshield primary functionality, keeping the nasties out of my lungs, it does an excellent job. I have worn it several times mowing with nary a sneeze, wheeze, nor runny nose in the aftermath.
Alas, the unit is clearly designed for a static posture in use, in other words being used by someone standing in one place, not moving or bending very much. It is very top-heavy so the motions involved with mowing or trimming are problematic. It has fallen from its perch several times in use.
Getting the headband to fit properly remains a challenge, at least for my head, despite adjusting everything there is to adjust. On a comfortability scale from 1 to 10, I would rate the unit a minus 3. To get it snug enough to stay put while I am mowing or trimming or brush-hogging it is painful to wear as the front band imbeds into my forehead. I am working on devising a padding system to make it tolerable, but I am not there just yet. It seems that there is something just not right about the configuration.
As for the final consideration, namely price, at around $350 it seems expensive but a cost I am more than willing to bear given my respiratory allergies and desire for wheeze-free living.
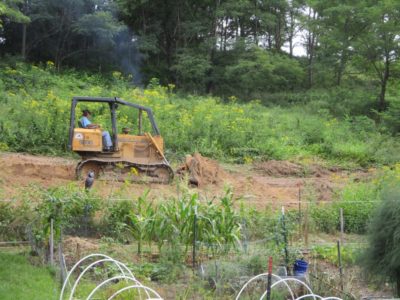
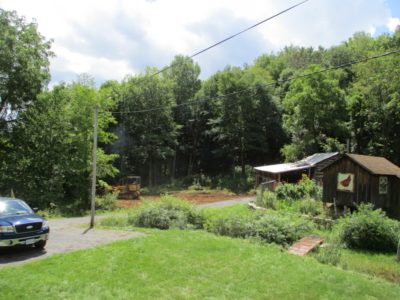
At long last Mrs. Barn has agreed that the time has come for me to build her a year-round playground. This required a new terrace to be cut into the hillside just above the garden plot, which in turn required a bulldozer to accomplish same. Since I do not own a bulldozer, rendering me as less of a man I know, I asked around and three friends independently gave me the name SteveB as the guy to do the job.
After several weeks of back-and-forth phoning he finally showed up a few weeks ago to do the deed. There is nothing quite so much fun as watching a good ol’ boy and his bulldozer at work.
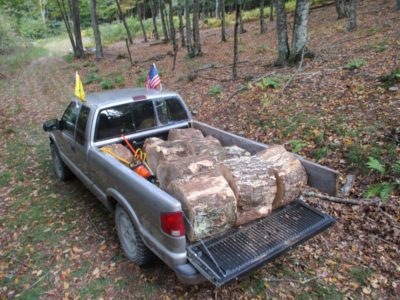
I literally set up a lawn chair in the bed of my pickup and sat watching him all day.
It took him about six hours, back and forth in the space, to finish the job.
Working just by eye he created a long, wide, flat platform and when he surveyed the project afterward, he confirmed that it was not perfectly flat; it was a couple inches higher at one end than the other. For a 150-foot-long run that struck me as pretty good.
The greenhouse I will be using as my model, belonging to my friend F.
So, what will go there? For starters I will be copying my friend F’s greenhouse, hoping to get that built over the next few weeks, weather and family commitments allowing. Once that is up and running I expect Mrs. Barn to spend almost every day there through the winter since she loves puttering in the dirt and hates the gloom of short days and cold weather.
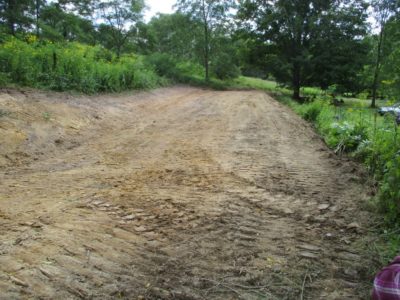
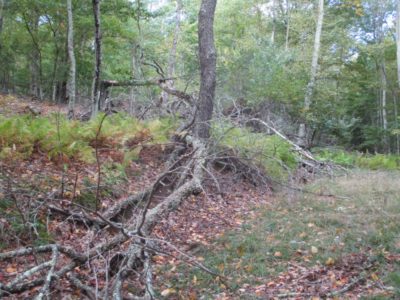
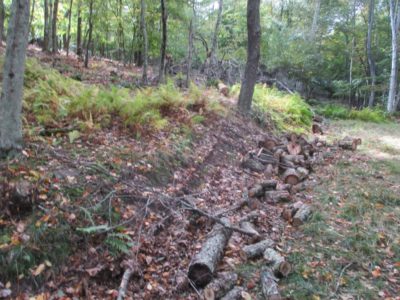
Once he was done with the new terrace SteveB he moved across the creek to smooth out the gnarly terrain in the space where we had felled a number of trees eighteen months ago to give better sunshine to the garden plot on that side of the creek.
That outcome was every bit as successful as the terrace, and we now have a wide range of options for using this plot of land. I’ll probably start with a parking spot and a small bed of gravel.
I seeded both patches of dirt and there are now flourishing stands of pasture grass there.
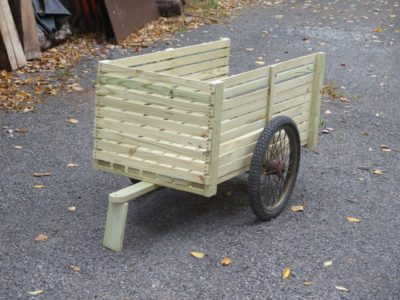
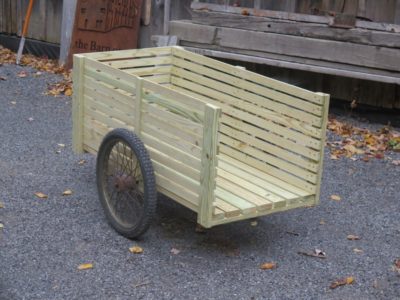
One of the curses(?) of occupying a space as large as the barn is that there is often little incentive to throw things away when their useful life is over. Even if some artifact is no longer functional, you see, its carcass may serve as the raw material for some new application. Such was the case with this simple project.
After many years of faithful service the old garden cart simply rotted away. The wood panels forming the box of the cart were friable to the point of needing no tools for the disassembly, gloved hands were all it took to take the detritus and toss it into the fire pit. The wheels and axel, however, remained robust albeit a bit rusty, and were kept in waiting in the basement of the barn for several years, just waiting for the new generation of use.
Once I got a new hefty riding lawnmower I realized that the homestead needed a tow-behind wagon for moving mulch, compost, etc., for Mrs. Barn’s gardening efforts. So I made one. Simple, sturdy and functional.
I ripped a pile of PT-SYP and assembled the unit with deck screws. I will make and affix the tail gate at some point soon, depending on weather and other projects. I’ll also fit it with a tarp liner so dirt and gravel can be hauled without falling through the cracks.
It was satisfying to get such a nice project in just a few hours of low-intensity work, requiring little precision and only a framing square and screw gun for assembly.
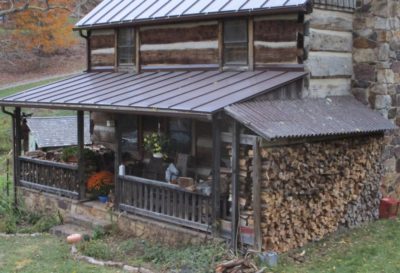
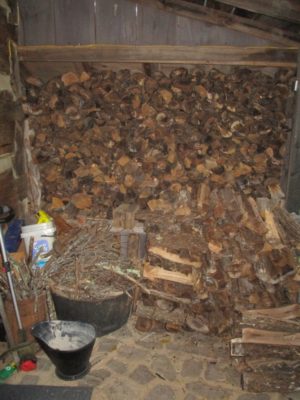
It’s time for the ceremonial portraits of this winter’s firewood. Even with the side crib already almost half-full after last winter, it took four days for me to load the pickup and move wood from the stacks of seasoned wood into the crib and on to the front porch. I’m working as hard as I always have but the output is diminished.
After the performance of the cabin envelope last winter following the complete re-chinking the previous year (that alone cost twice as much as my first house) and the crawl space sealing and insulating the year before, I am fully confident that even with a severe winter we are all set. In previous winters it took almost two full side cribs plus the porch-full to keep Mrs. Barn warm enough, this past winter it took the porch-full plus half a crib-full. I’m liking that trend line.
We’ve got new high performance windows on order to replace the 80s era windows now in place, windows with the particular feature of providing wonderful ventilation year round, open or closed. Depending on the performance of the supply chain we will be getting the new windows installed just before the dead of winter. Keeping fingers crossed. With new windows, the cabin should be cozier than ever.
Tomorrow I start splitting, stacking, and seasoning the firewood for the coming winters. There’s still at least two or three dozen heaping trucks full of timber on the ground. If I get done with everything already on the ground, I calculate 4-6 winters of firewood a-waitin’.
This coming winter is already taken care of, so now I am working on winters 2023, 2024, 2025, etc. This week I have done nothing but retrieve a small portion of the windfall over the past year, yielding a heaping pickup every day. Thus far my mountain of firewood to be split and stacked is about 1-1/2 winters, maybe more if the new cabin windows make the same difference as did the two previous projects — insulating and sealing the crawl space under the cabin, and replacing all the chinking between the logs. These two ventures resulted in cutting our firwood needs by almost 50% last winter.
The road up to the previously felled timber is blocked by windfall trees which must be cut up and removed to even get to the upper inventory. Each of these trees renders almost a full pickup load of cut bolts.
I haven’t even made it to this tree yet, with its 40+-feet of clear trunk almost 24″ in diameter. If it were less logistically challenging, I would contemplate getting this one milled into slabs.
I’ve retrieved four truckloads, with at least another dozen still awaiting my ministrations.
This maple log was a particular challenge as I had to use some block-and-tackle to enable my little pickup to drag it uphill and on to the road so I could work it. This made me appreciate my little Stihl saw all the more. It is small and lightweight but can handle an 18-inch bar due to its narrow chain. I keep the chain sharpened several times a day and have to swap out the current chain because I’ve worn it to the nub.
This week also brought the first swatches of color to the local flora.
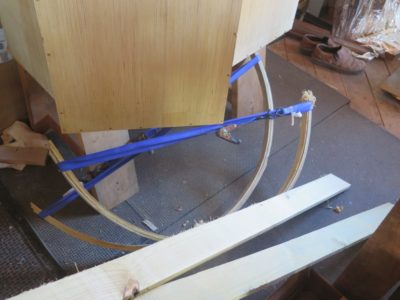
With the form for the curved ribs in hand I set about to making the four necessary ribs from 3/16″ strips of pressure treated lumber. Using the combination of T3 adhesive and my fender washer/deck screw method I clamped the laminations to the form, followed by a boat load of crown staples.
When the glue had set (but not hardened fully) I removed the ribs from the form and strapped them to maintain the proper dimension until everything was dry and hard. Unfortunately I do not have any pictures of the skeleton all assembled (I should follow the example of RalphB who is scrupulous about photographing his projects).
With the skeleton finished I stapled 1/2″ hardware cloth as a skin. This was a bit of a problem until I had a blinding flash of the obvious. The tip of the pneumatic stapler kept sliding off the wire of the hardware cloth, that is until I filed a tiny notch in the center of the stapler tip, the part that slides up as a safety measure. After that the process went amazingly fast.
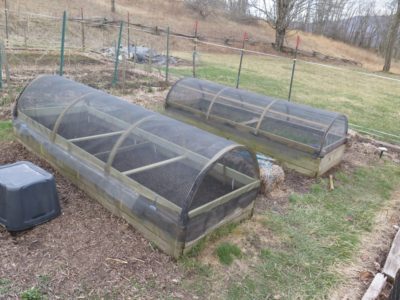
The hoop covers were really light and easy to maneuver into the proper place. Mrs. Barn wanted them to be attached and hinged so I made that happen, then covered them with a second skin of window screen to keep out the moths that love to eat up the veggies she grows inside.
Come winter we will cover these with plastic to turn them into mini-greenhouses so that she can grow things inside year-round. This works well enough, but a big improvement in this regard is coming soon to the homestead.
It’s that time of year when there’s a run-up to firewood season. I will soon find myself building a mountain of cut firwood next to the splitter and spending several days splitting and stacking the finished product to season and await its use. We do not need any firewood for the coming winter, and perhaps even into the start of next winter, but my goal is to get ahead of the heating fuel curve by three winters.
In addition to that we’ve had some work done on the homestead (more on that later) that is prompting some aggressive brush cleanup around the log barn near where my pal Bob felled some trees eighteen months ago. To that end I’ve spent the past two weeks working in the area extracting brush, cutting wood, and bush hogging.
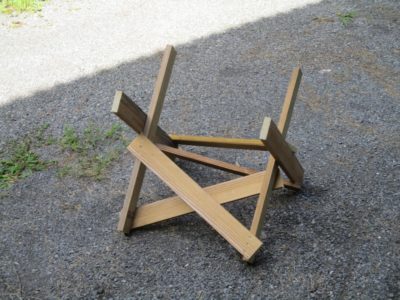
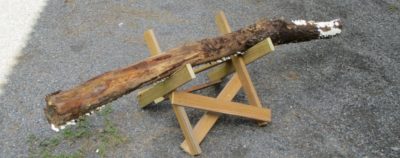
A simple tool I made from, once again, wood from the scrap inventory and decking screws, has been exceedingly helpful; a saw buck. It was made from pressure treated pieces left over from some long-forgotten project, took very little time or energy to become manifest. In sort, a perfect “mundanity.”
Exploiting the properties of triangles and diagonal bracing the saw buck is very light — I can move and maneuver it easily with one hand while the other is holding the idling chain saw — and also exceeding strong with a holding capacity of several hundred pounds. Thus I can easily get the piece(s) to be sawn up off the ground so that I don’t have to finesse the saw bar to keep it from touching the ground. Around here if the running chain hits the ground, it hits a rock, and off to sharpening it goes.


Recent Comments