Gluing Curved Panels With Roubo’s Coopering Cradles
When constructing a bowed or undulating panal or structure, one of the challenges is to decide the manner of achieving the shape. Commonly there are main four methods employed: sculpting/carving from solid slabs, a la bombe’ chests; glued laminations (home made curved plywood); contour- sawn layers or segments glued together in a stack, sometimes called “brickwork”; or coopering, which involves the assembling of long sticks or boards that are isosceles trapezoids in cross-section (“staves”) with the legs of the trapezoid angled such that the assemblage follows a desired curve.
If you consider the forms of furniture common in Roubo’s time, it is clear that there was a need to produce large numbers of curved panels reliably and quickly. This calls for coopering. And, for each individual curvature/radius a unique set-up was required. Roubo presents two distinct solutions to the problem. The first, marked “a” in his drawing, shows a pincer/bar clamp and a group of spacer shims to align the individual staves to assure the proper configuration while the glue sets. This approach strikes me as very finicky, and thus time consuming, to achieve standardized results.
Roubo’s preference was stated unequivocally in his commentary on Plate 102.
Before speaking of gluing curved wood, it is good to enter into the details of gluing those pieces which, although straight along their length, are only curved on their width, like panels that are curved in plane, columns, etc.
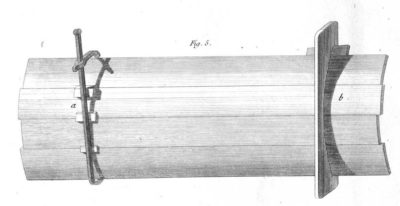
For curved panels [in plane], they hardly differ from straight ones. As to the manner of joining them and gluing them, it is only a matter of using a clamp to bring together the joints because when these same panels are a bit curved, the clamps always make them a bit more or less curved than is necessary. You remedy this by putting cauls between the panel and the clamps [bar], which is always placed at the side of the bulge, as you can see in figure 5, side a. No matter what precautions you take, the cauls that you are required to tighten or loosen twist the joints and prevent the glue from working properly. Even when the panels are thin, the clamps bend them and even break them. That is why it is much better to make cradles that you [cut] hollow in the same shape as the panel, which you join and hold in the cradle by means of a wedge, see figure 5, side b.
There must always be at least two of these cradles for gluing a panel and even three for one a bit larger. One should also observe that the angle of the hook “holding the wedges” of these cradles be a bit sharp [acute] so that the panel cannot shift when closing it, see figure 6.
I do not know how to conceal the fact that this method takes much longer and consequently is more costly than the first one because it is necessary to make as many cradles as one has of panels of different curves. These considerations should diminish the advantages that result from using these cradles. These same cradles also serve to fasten [peg] the curved work, which is always better than the clamps, which distort the joints and sometimes break curved crosspieces.

The second approach, marked “b” in the top drawing and important enough to make another detail drawing to communicate the essence of it, makes more sense to me. In fact I have used this approach countless times beginning back in the pattern shop where we produced dozens/hundreds(?) of core boxes for creating cores for casting pipes. Although our patterns were permanently assembled, the process is conceptually identical to using a coopering cradle.

The general process is pretty fool proof. First, lay out the curve with a compass or trammel on a pair (or more) of wooden timbers. Cut out the concave form. Since these would be used for gluing it is almost certainly true that these would be slathered with wax or tallow to prevent the curved panel from being glued to the form as it is being built.


Saw as many staves as are needed for the panel being built. On the edges of the staves plane or saw a slight chamfer so that the staves fit nicely into the curved form, with intimate gluing surfaces aligning between each stave. This angle can be determined during the layout of the panel, and transferred with a bevel gauge.

Place the beveled staves into the form to confirm the fit. Make sure the forms are square to each other.

Fill any extra space with loose boards, and pinch the curved panel staves together with individual or compound wedges. If there is glue between the coopered staves, once that dries the task is finished and after knocking out the wedges the curved panel can be removed to work further.

Brilliant solution.
Curved pieces definitely ads visual interest to a lot of project, like chest lids etc.
Brgds
Jonas