I spent a day steam bending the conditioned dry wood with very instructive results. Not success, per se, but definitely instructive about the pathway to success.


I’ll backtrack to review the protocols for conditioning the dry wood.
Using some PVC from the stash I made three 40-inch-long tubes into which I placed two serpentine pieces, two arm pieces, two uni-splats, and two rear legs from the mini-Gragg. In the first one I created a 1% surfactant solution with distilled water, in the second a 1% ethanol solution with distilled water, and the third was a 1% fabric softener solution with distilled water. All pieces were fully submerged for the duration.
I let these sit for seven days and fired up the steamer.
To accentuate any effect of the conditioning I steamed the pieces for 1-1/2 times longer than might be expected for steaming green-ish wood, then bent them as quickly as possible. This meant 30 seconds of intensity after 35 minutes of steaming for the thinner components, and 75 minutes for the rear legs.
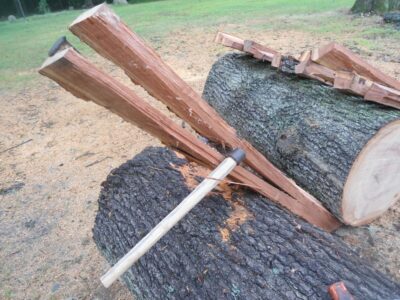
The results were instructive but not particularly encouraging for the extremely bent pieces, namely the arms and serpentines. That said I could definitely feel a differences, it just wasn’t enough for complete success.
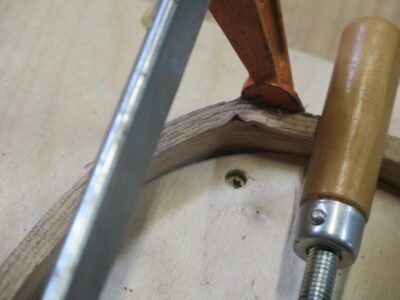
Somehow, I missed this excessive run-out on the side when I was toothing the faces. This piece was never a good candidate under any circumstances.
In each protocol the uni-splats worked almost perfectly, with the only failure being due to a wood grain flaw that I somehow missed during the preparations.
This bend was “this close” to making a successful bend, but at the final instant let loose with enough tension to break. It is possible that this piece could be salvaged with epoxy impregnation.
This one busted right away…
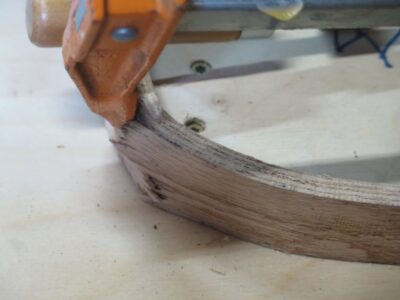
… while this one flat out ‘sploded.
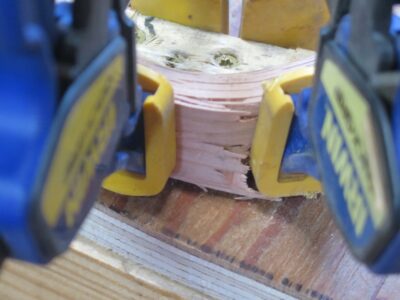
In bending the twelve extreme pieces – 6 arms, 6 serpentines – the failure rate was 100%. The pieces felt very plastic, bending nicely until an instantaneous catastrophic failure. It was abundantly clear that the fabric softener worked the best of all the conditioning approaches.
I did have one instance of compression buckling. Why this one? I got no idea.
The takeaways were indisputable and I will tinker with these further. 1) use fabric softener to condition the wood, and 2) the serpentine and arm configurations cannot be accomplished without compression straps. For the full-size Graggs I have used plumbers straps screwed to the bending stock but for these I will make compression straps from aluminum flashing, then tack them with aluminum tacks to the stock prior to inserting the pieces into the steamer. That way when the wood is cooked I can remove them and bend them instantly. The reason I am taking this approach is that I need for the compression straps to be exactly the width of the bent element and plumbers straps are narrower than the components. And, I do not need to keep the surfaces of the bent elements pristine since they will be painted once the chair is assembled and thus any tack holes will be filled with primer.
Stay tuned as I dive in again.
A few weekends ago I attended the PATINA monthly gathering, as always getting my tool-flea-market fix (I bought only a few small items) before going inside for the presentation on infill planes by Lee Richmond of The Best Things tools, towards whom I have sent very many dollars over the years.
The talk and Q&A were excellent and very informative and I learned a lot, particularly the history of infill plane kits that were available to craftsmen, and the prevalence of planemakers making tools to be marketed under other branding than their own. More about both points in a minute.
It got me wondering about my own inventory of infill planes which, when compiled, was more numerous than I initially thought. I don’t know why as these are tools I use regularly. I guess I just never thought of them in that way.
Here is my own collection, presented in no particular order.

The prize of my collection is my Robert Towell miter/shooting plane, probably from the second quarter of the 19th century. Towell was one of the makers who produced tools bearing his own imprint and sold from his own shop, along with unmarked planes sold by other purveyors. Mine is one of the latter, devoid of any maker’s marks but with all the hallmarks of his work. His planes were apparently of this form and are highly desirable by collectors, provided they bear his mark.

This image from the interwebz shows the maker’s mark that is missing on my plane. That lacunae is what made this plane affordable, otherwise the $5k price tag would have been beyond the realm of consideration for me. And, Mrs. Barn would have probably killed me…
Since mine is unmarked, it was “affordable” to me (still pricey by my standards but only 10% of the price had it borne his stamp) and I bought it from a flea market session at Martin Donnelly’s about 20 years ago. The throat is so tight (about 1/3 mm) I find the only useful purpose it has for me is trimming the end grain of boards on a shooting jig.

Contemporary tool maker Raney Nelson of Daed Tools made a series of Towell-inspired planes maybe 20 years ago and I got it through trading some other materials and tools for it, otherwise I could have never afforded it.

Like Towell and Raney’s friend Konrad Sauer the construction is hammered dovetails, with I think African Blackwood as the infill. I really should ask him more about this tool the next time our paths cross, as they do occasionally.

It’s just a bit too small to use as a block plane, but perfect for small shooting tasks. This plane might have evolved into the “collectible” realm as I am not sure how much plane making Raney does any more since he and Chris Schwarz started Crucible Tools.


This still-under-restoration smoother is one of those Richmond said was probably a kit of sorts, with the metal shell being sold as a chassis for a woodworker to make the wooden infill components. I got this late 19th century tool in a box lot of other derelict tools at a flea market, devoid of iron or wedge, looking like at had a stint inside a concrete mixer. I cobbled it together as a functioning plane after restoring the totally trashed wooden infills, ebonizing them and leaning the steel shell.

I was never really happy with the wedge or the iron I dug out of my spare parts drawer, so I asked my friend Josh Clark to look through his inventory to see what he had. I soon received a really nice double iron in the mail that fits the sole mouth very tightly and have been puttering on making a wedge off and on ever since. If I have success with a wooden wedge I just might make another out of ivory. Just because I can.

For many years Ron Hock used to sell kits to make planes, and this started as one of those. The maker in this instance was my friend Joe who gave it to me 15(?) years ago for reasons I can no longer recall. It was a very nice plane but underweight for what I wanted.


During the first Roubo manuscript I modified it with heavy brass cheeks and a bit of stylizing to use it as a veneer/parquetry shooting plane.

Some years ago at a Lie-Nielson event I bought this infill plane from Mateo Panzica of Lazarus Planes in Louisville KY. His fabrication approach is almost 180 degrees opposite from Towell and Nelson but you cannot argue with the results.


This weighty smoother is simply superb and gets regular use at my bench, perhaps more than any plane (other than my sleigh-style block plane that is going into the grave with me, unless of course it goes to L’il T or his brother). If I needed more new planes I would probably divide my money between Lazarus and Steve Voigt, although the Lasso of Truth would reveal I do not really need any more. (Other than a toother from Steve Voigt, if he ever gets them to market).
An infill I made all by my lonesome is this plane designed specifically for, and not useful otherwise to tell you the truth, shooting the edges of sawn parquetry elements. I saw Paterick Edwards demonstrate a vintage version of this plane at Williamsburg several years ago and decided I had to have one myownself.
I started out with a derelict one-inch rabbet plane body and beveled one side, then silver soldered the brass shell. I am really pleased with its performance.
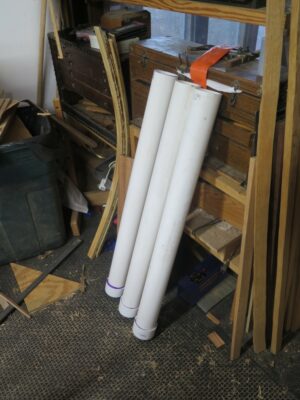
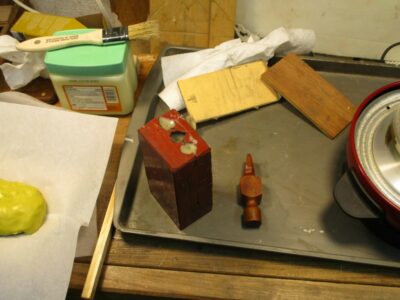
I took a 10-foot piece of 3-inch PVC pipe and cut it into three 40″ pieces and glued on end caps to use as my re-conditioning chambers for the dried wood in preparation for steam bending it. I filled each of the three with “modified” distilled water.

In the first case I added 1% Everclear 151, if you recall I have a lot laying around, to do nothing more than reduce the surface tension of the water and induce greater and quicker penetration.
For the second tube I added 1% of a mild detergent to act as a surfactant. I would have used some Kodak Photo-Flow, an artifact from ancient days when photography was a film-based process rather than the electron aggregation it is now. I could not find my bottle of Photo Flow (ordering more now) so I added some mild soy-based detergent, fairly neutral in its properties. Were I being anal retentive I would have used Triton-100 pH neutral detergent but I don’t have all that much of it left and it is pricey. Like the ethanol the purpose of the detergent is to act as a surfactant “wetting” agent and induce greater and quicker penetration of the water.

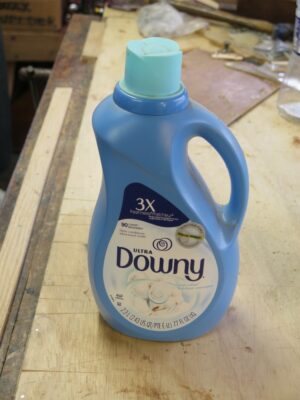
The final tube of distilled water was enhanced by 1% Downy fabric softener, to impart lubricity to the wood fibers. I have to assume that the Downy has some portion of surfactant/detergent in it for the same purposes I am using, namely penetration and induced lubricity between the wood fibers.
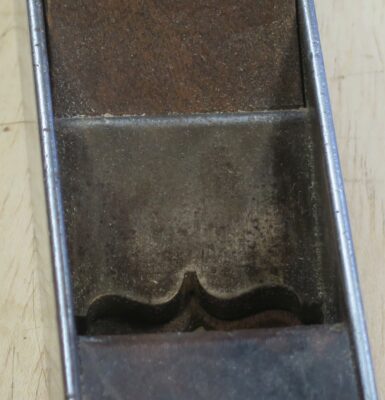
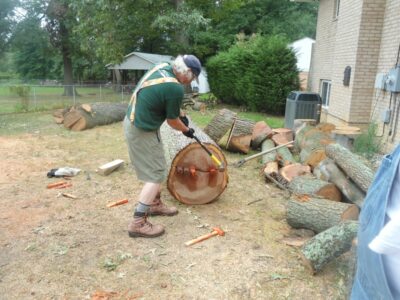
I added one more of the modifications to this exercise, namely the increase of the wood surface area via a toothing plane. Using one of my toothing planes I worked the flat sides of the wood strips until they were completely toothed, thus doubling the surface area. Combining the expanded surface area with the surfactants in the modified water I can envision excellent penetration and wetting/re-conditioning.
I prepared a couple of each of the bent wood elements, serpentines, arms, and uni-splats, and stuck them into the tubes of wetter water. To make sure they were completely submerged on the top end I cut and stuffed pieces of hardware cloth into the ends then topped off the tubes. What I’m reading from the interwebz and private correspondence the pieces need to stay submerged for a week, so it’s looking like Friday morning will be Steam Bending Day.
I await the event with anticipation. Even if everything is a complete failure I will have learned something important. But, if everything is successful I will have the necessary parts in hand to begin L’il Gragg. Probably not in time to finish before L’il T’s birthday, alas.
Over my many years of teaching furniture conservation, essentially an amalgam of materials science and aesthetics with a dash of esoteric problem solving, I always emphasized my conception of Synthetic Thinking. By that I meant employing/combining, or synthesizing, both the observable physical effects of doing this-or-that, along with the unobservable — ideas, knowledge, speculations, hunches, theories — roaming around inside our heads. In bringing both to the problem we would be synthesizing the Phenomenon, that which can be observed, with the Noumenon, that which can only be contemplated. I am reminded of the opening lines to historian Paul Johnson’s monumental work Modern Times, a history of the 20th century. As Johnson remarked, as I recall but it’s been a number of years since I read the book, Hiroshima and Nagasaki proved that Einstein’s theories were no longer just theories.
For now I am in the “Noumenon” phase of addressing the problem of steam bending dried wood. The Phenomenon phase will come soon enough as I put those noumenon contemplations to the test in reality.
For starters, there is great doubt as to whether kiln dried wood can be re-moisturized exactly as the wood was before it got dried, or whether it can only be conditioned to mimic green-ish-ness for the purposes of bending the wood. I suppose the chemical thermodynamics of re-integrating water molecules into or in between the wood fiber molecules could be accomplished, as my late friend and colleague Mel Wachowiak used to comment, “With enough force you can pull the tail off a living cow.” For now all I am trying to imagine is mimicking the effects of that integration.
So, how do I best get water into the wood to make it “green” again? (This may be the only time I will ever utter any desire to make things “green.”) There are many considerations to test out, but the point is how do I, or can I even, get water back into the wood to affect its behavior under the conditions I want, i.e. steam bending dried wood?
Merely soaking the wood in water is a place to begin conceptually, but by itself I surmise this to be a low efficiency way to approach the problem. Example: when I was trying to ebonize some tulip poplar to see if I could use it as banding for my tool cabinet, I soaked some 1/4″ pieces of the wood in a bath of India ink. Since the ink was waterborne shellac with a carbon black colorant, I could discern the effectiveness of the penetration by simply sectioning the wood and see what happened. What happened was that two weeks’ soaking submerged in the bath yielded a penetration of less than 1/16″. Though the objective was entirely different then than now, the memory of that exercise makes me less optimistic about that approach for re-moisturizing wood as a precursor steam bending. True, moisture diffusion in tulip poplar is not the same as with oak, whose moisture transport is much more dynamic. Even the oaks are dramatically different in their moisture transport, with red oak being much more transparent to moisture transmission than white oak due to the comparatively open cell/fiber structure.
Even so I considered several ways to enhance the introduction of moisture and came up with a few ideas to test out.
Modifying the Water
What could happen if I could make the water into something better? How about if I —
Make water wetter?
If I could make water wetter, in other words to increase its capacity for infiltration into the wood, I just might have something. Well, the two methods I have at my disposal for making water wetter involve reduction the surface tension of the water, to make it wick or flow better into the substrate more aggressively than it would on its own. The two methods are to 1) add surfactant, and 2) add solvent. In the first case simply adding some detergent or soap would greatly reduce the surface tension of the water and let it soak in more deeply and more quickly. In the second, adding water miscible (compatible) solvent like ethanol or propanol would do the same thing.
Increase surface area for better penetration
Regardless of how the water is modified, it is, I think, an undeniable proposition that giving it a greater surface area in which it does its penetrating magic is a winner. The question is, how do I go about that? I could easily multiply the surface area by dragging the surface over a bandsaw blade but that simultaneously imparts a multitude of cross grain irregularities, which would serve as a focal point for fracture origination.


But, how about increasing the surface area with along-the-grain striations? Something as simple as quickly working the surface along the grain with a toothing plane would increase the surface area by some factor approximating 2X. I think I’m liking this noumenon.
Or, changing the chemistry/structure of the wood on hand – ammonia gas at pressure, surfactant/fabric softener lubricity
I do not have either a pressure/vacuum chamber adequate for the chair pieces, so that isn’t even something to really contemplate. Maybe some day, but not this day. Besides, I do not expect to ever possess gaseous ammonia. Because. Besides, when using ammonia to facilitate bending wood there could be a lengthy off-gassing period.
On the other hand I do have fabric softener in the shop. I cannot pretend to possess a full understanding of how that would work but the product’s main functionality is to “fluff” fibers through ionic interactions, but also, more importantly, penetrate into fiber bundles and impart lubricity. Sure, wood fibers are not identical to textile fibers but they just might be close enough to do the same trick.
Quote David Bowie
How about some p-p-p-pressure? Or its inverse? As I said earlier I do not possess a vacuum/pressure chamber to force the water in or suck the air out, resulting in the wood sucking the water in, while this is a definite winner it requires technology I do not possess.
Use bending straps
Bending straps are a routine part of the equation when I’m bending full-scale Gragg parts, generally somewhere in the neighborhood of 1-1/8″ x 5/8″ in cross section. Since the Gragg chairs are always painted I just screw plumbers’ straps in the necessary places and get going. But for the L’il Gragg the pieces are only 1″ x 3/8″, with a bending cross section only half as much. I really hope to bend these without straps but will use them if needed.
Exploit Thermodynamics
In its most basic and fundamental applications, thermodynamics is the study of energy (applied to some function) x time (that the energy in applied). At our level of work we can assume some general inverse relativity; more energy means less time, more time means less energy to accomplish the same task. This may or may not work here as there are activation energy thresholds. But what about changing the formula for steam bending from 1 hour per inch of wood to 2 hours, 3 hours, X number of hours? It might just work, but my steam generator only holds about 1-1/4 hours of water. If I take a lengthy trip down this theoretically sensible route, I would have to devise a whole new water heating/steam delivery system. That strikes these lazy bones as non-optimal.
Using different wood (harvest new trees)
It could be that in the end none of these options, individually or in concert, will do the trick. In that case, fire up the chain saw and reach for my bag of wedges and the froe. It’s about time to continue work on next winter’s firewood harvest so maybe that’s the route.
But not until I gather some phenomena.

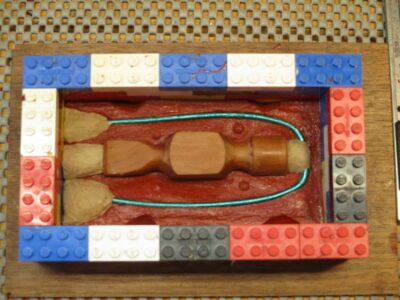
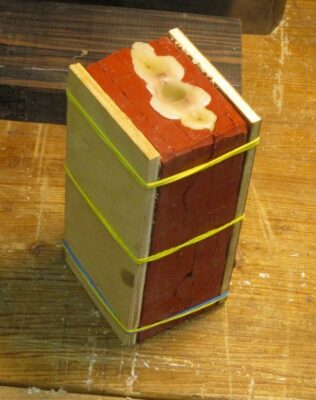
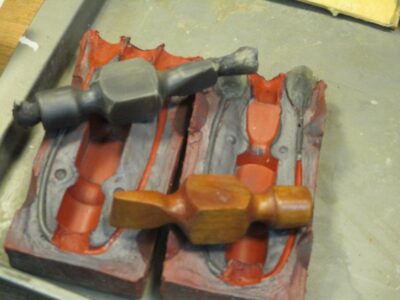
The next morning I demolded the first half of the silicon rubber for MattC’s hammer head. I cleaned all the surfaces of any residual clay from the embedding. I spread a parting agent (petroleum jelly) over all of the silicon mold surfaces and reassembled the first half mold including the original wooden master pattern and the attendant elements. [Sorry for the blurry pic — note to self, do not drop your camera on the concrete floor, it don’t work so good after that)

Reconstructing an identical plastic brick dam, I repeated the mixing and Matt poured the liquid silicon molding material and we let it sit again overnight to harden.
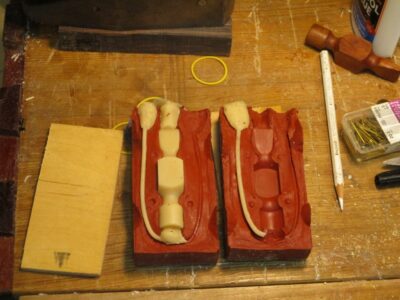
Once the entire rubber mold was separated and cleaned it was ready to go for making wax models for lost wax casting. I did cast one wax pattern and saw that I needed to expand the sprues a little with a scalpel. Had I used a larger piece of wire or tubing there would not have been a problem.
Just for the heck of it I walked him through the process for casting pewter directly into the mold, which requires depositing powdered graphite on all the cast surfaces to reduce the surface tension of the molten metal. I mimicked the process with wax and he got a kick out of the metallic-looking wax pattern.
At this point I turned the mold over to Matt to proceed with the enterprise from his end. My work was done.
Except for the second hammer head. Stay tuned.
I (a/k/a “Maker 1”) recently spent some time in the barn with my friend MattC, a tool enthusiast, collector, purveyor, and maker (a/k/a “Maker 2”). Matt wanted to learn about making rubber molds from which wax patterns could be made for lost wax casting, so I demonstrated techniques for doing just that. As a test exercise we used the wood pattern for a hammer he is hoping to produce.
Here’s a very brief report on that process.

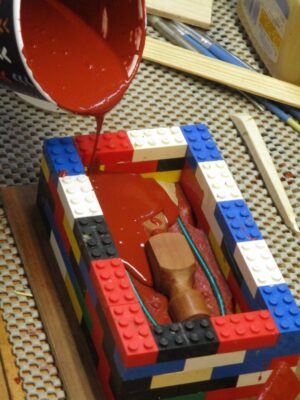
First, I embedded the wooden master pattern in sulfur-free modeling clay, to an approximate halfway parting line (sorry for the blurry photo). The “sulfur-free” descriptor is a critical one because silicon molding rubbers will not set in a sulfur-contaminated space. Getting the contact margins with the master pattern is critical to getting a nice, clean two-part mold.
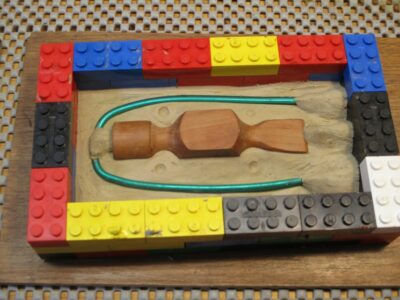
Once the embedding was complete I built a rectangular dam around the assemblage using my old favorite plastic toy bricks. At this point I added a heavy wire sprue to the mold, along with the necessary gates to get the molten wax into the rubber mold. In this case I constructed three funnel gates at the top of the mold and one through gate at the bottom, connecting the sprue and the master pattern. All of these will be hollow voids in the end.

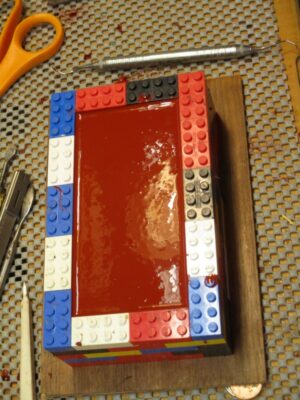
With everything ready to go I mixed up the silicone rubber molding material, using a disposable cup and my digital scale. The rubber I chose for this project was Polytek 71-60, a fairly hard rubber that can accommodate low temp metal casting directly into the rubber mold. I’ve used this product for decades and find it amenable to my work. It is, of course, now discontinued. I do believe that the Smooth-On company makes an analogous product although I have not yet tried it.

Ideally the container of mixed rubber would be placed in a vacuum chamber to draw out any air bubbles, but since I do not have one set up at the moment I just let it sit for a few minutes and popped all the bubbles rising to the surface, essentially reducing the overall vapor pressures within the liquid solution.

Additional methods of dealing with any remnant air bubbles include my holding the cup fairly high over the embedded master pattern and pouring a very thin stream of the liquid into the void. The long, thin stream breaks up most of the remaining bubbles. Furthermore, I always start pouring away from the pattern itself and allow the liquid rubber to flow over the surfaces on its own, which also reduces any bubble issues.

Finally, when the plastic toy brick flask is full, I spend a few minutes popping any bubbles that emerge on the surface, once again reducing the vapor pressure within the liquid and eliminating any risk of bubbles being permanent against the surface of the patter (the ultimate problem).
Depending on the temperature and freshness of the silicon rubber solution (there are definite shelf-life issues with these products), I return to de-mold the first half of the final mold in four to six hours. Usually, I just wait overnight.
Next time – the second half of the mold.
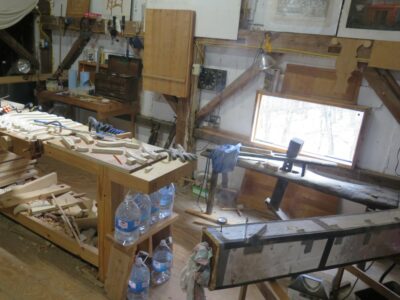
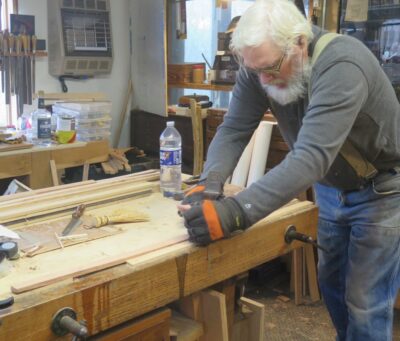
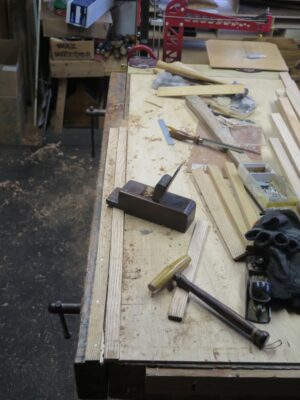
With a momentary semblance of normalcy returning to Shangri-la I was able to get all of the stock planed and dimensioned for the L’il Gragg chair and get set up for a steam bending afternoon.
Bending jigs in place and secured? Check.
Steam box set up? Check.
Plenty of distilled water on hand from the Dollar General? Check.
Okay, let’s load up the steam box and get this stuff cooking!
Since the wood being used was not really “green” any more I gave it a little more cooking time, 40 minutes for the sticks instead of the typical 30 minutes as would be appropriate for the <1/2″ oak.
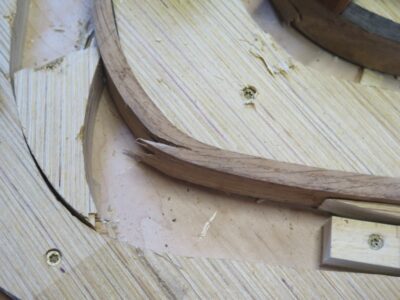
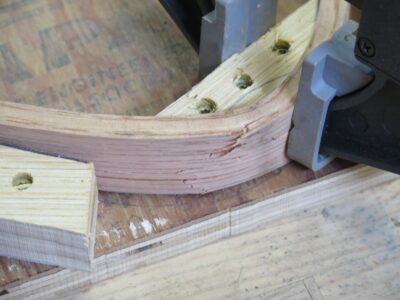
The first piece was almost fully bent when I heard the dispiriting cr-r-r-a-a-a-ck. Okay, let me give it ten more minutes in the steam box and try it again. Same cr-r-r-a-a-ack. Ten more minutes. Same result. Ten more minutes. Same result. Ten more minutes. Same result.
By this time I had a complete pile of broken parts. All of them broke. All twelve of them. A 100% failure rate. Had there been a microphone inside my head the sounds would have peeled paint.
What went wrong? The wood was all harvested by me, by hand, from a newly felled tree. The problem is that harvesting was a dozen years ago. Some of that stock I’ve kept stacked in the basement of the barn and had worked it just fine as recently as 18 months ago. Unfortunately, as I dove into Lake Gragg again a few years ago I moved a lot of the pieces up to the attic of the barn for future use.
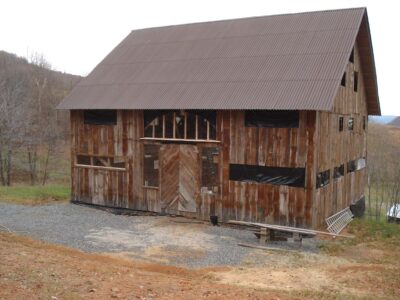
It’s an old image but gives you the scale of the asphalt roof
Given the location of the workspace, directly underneath the asphalt paneled roof, it gets mighty hot up there in the summers.
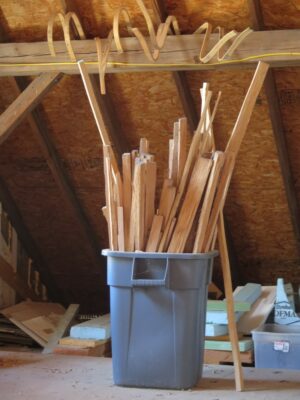
I am surmising that I now have, in effect, a large stock of kiln dried chair pieces. Even though the material was almost green air-dried wood when I brought it up, several summers worth of scorching heat in the attic resulted in bins full of transformed wood, with both the inter- and intra- molecular moisture having been driven out.
Now the task is to noodle the reconditioning of kiln dried wood for the purposes of steam bending, and that’s what I am going to undertake.
Stay tuned.

50 years ago my paste wax of choice for almost any paste wax-ey purpose was Behlen’s Blue Label Paste Wax, which for an obvious reason I remember it as “Blue Diamond” paste wax. Regardless, it was a superb product, easy to use and very high performance.
Sometime in the 90s I couldn’t find it any longer and embarked on a quest to find a new go-to wax. There were, and still are, lots of excellent paste waxes on the market (including, apparently, Blue Label; this image was pulled off the interwebz), and also a lot that I would not choose because they were either hard to use, or had potentially deleterious ingredients for use on fragile antique surfaces, or their formulations could either not be ascertained or changed from something better to something not better. NB – this was among the many motivations behind the development of Mel’s Wax.
I ended up with Johnson’s regular yellow-and-red label as the one to use for everything I would have used Blue Diamond for. But a couple years ago this became hard to find and I discovered that it had been discontinued for, to me, inexplicable reasons. Try as I might I could obtain no new cans for a reasonable price, or even a slightly unreasonable price even on Ebay.
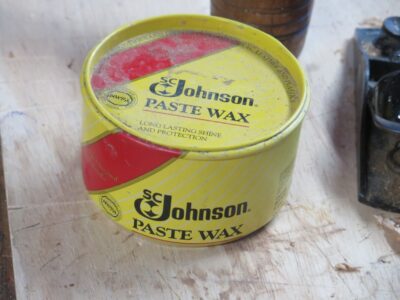
Fortunately, I had a bit of it here, a bit of it there, in short I had a can at or near every single workstation I occupy, in the barn or elsewhere. I compiled it all in one place and it turned out that I had a dozen mostly-full tins.
I guess I am more set for it than I first assumed.
All because I have pack rat inclinations, I guess.

I may have already recounted the story of a presentation I was making at a regional woodworker’s club 25(?) years ago, and prior to my presentation there was a Show-N-Tell among the members, as there usually is for gatherings like this. Well, this particular episode was all about incredibly complex and even convoluted jigs enabling the members to not work wood but rather to machine wood with great precision. I recall rolling my eyes so hard it could probably be heard throughout the room. I mean, real woodworkers work wood by hand, not by machines or power tools and certainly not with jigs. Jigs! For cryin’ out loud. Were these guys even “real” woodworkers?
I have since become, to quote Lyndon Johnson, “Smarter today than I used to be.” Mea culpa, mea culpa, mea maxima culpa.

Roubo’s jig for gluing up coopered panels.
The second major barricade to fall in the bigotry against jigs was during the initial phases of the Roubo Project. Roubo was all about jigs, forms, and templates. In a world where the typical craftsman was only a few days ahead of malnutrition anything that helped get him from Point A to Finished and Paid For was a requisite component for working and getting fed, sheltered, and clothed.
But the first hurdle for my obstinance was when I dove deep into the world of Samuel Gragg’s Elastic Chairs. There is simply no way to construct these without having a boat load of jigs for every step of the journey, from preparing the stock to steam-bending the parts to sculpting the seat rails and crest rail, through the ultimate assembly. I spent dozens of hours in that research trying many different schemes for the jigs involved.
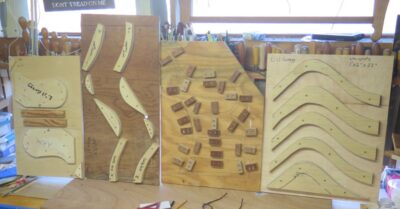
When I started down the path of making a scaled-down version of the Gragg chair for L’il T I had hoped to have it done long ago, but then life interfered and I’ve just now returned to the shop after almost three months’ absence. I finally completed the inventory of jigs needed and will now turn my attention to prepping the hand-riven stock.
I’ve still got six weeks before his birthday…
Stay tuned.
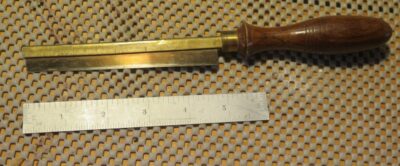
I recently picked up this little jewel from my friend JohnD, now a full-time tool monger in his retirement. The scale of this English-marked saw is fascinating, as is its form. Especially intriguing is the saw plate is only 0.012″ thick! While pistol-grip handles are fine I generally prefer a round handle for smaller tools, and my first (c. 1970) and still-favorite dovetail saw is of this form.
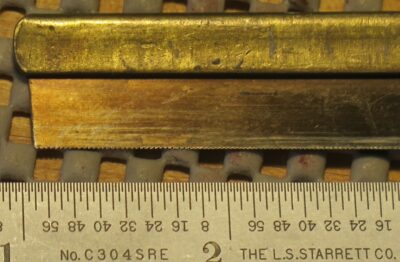
This little saw may be perfect for the petite work I often do, making boxes and drawers from 1/4″-3/8″ stock. The teeth are worn, in the center they are worn away, so I will have to flatten the tooth-edge and re-cut the teeth. Time to grab my surgical binoculars. It is currently configured at 42 (!) t.p.i., I will likely reconfigure it for 32 t.p.i.
If this works out well, I will almost certainly make a new one or two or three, so that one is ready for both Li’l T and his soon-to-arrive brother. Ordering materials from McMaster-Carr is just another day ending in “Y” here in the mountains.
PS After a crazy hectic three months this is the first honest-to-goodness week of work in the barn shop. It feels pretty good.

Recent Comments