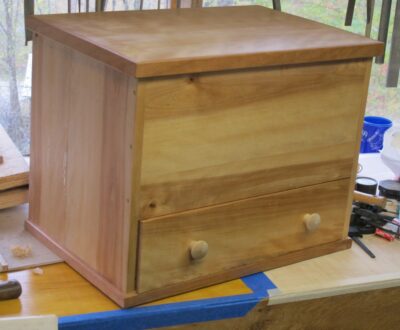
In preparation for his visit to me a couple months ago for us to build his black walnut split-top Roubo bench, Webmeister Tim got together with a woodworking pal and built a small toolbox which he presented to me as a gift. It’s 20″ wide x 14″ deep x 16″ high.


I had already decided to retire my traveling toolbox of the last decade-plus, a repurposed and augmented mahogany box originally made for housing a surveyor’s theodolite. Not that I will be discarding it, but for now it will serve as the repository for small-ish tools gathered for a little boy whose use of them will begin sooner than we can contemplate.

Back to the new box.
The box is exceedingly well-built and sturdy (read: heavy) and capacious so I need to be careful in outfitting it; I still have to haul it to wherever I am working away from the barn. As to the space inside, I will be tricking it out to have lots of sub-sections and fittings to hold the tools I might need to accomplish a full range of woodworking tasks while away from Shangri-la.
To that end I will be spending many hours over the coming weeks to make of its interior what I want and need. Probably not as obsessively as did Henry Studley with his tool cabinet, (our only “profile” of Studley is his tool cabinet and based on that I would guess he was wrapped pretty tight) and certainly not as elegantly — there will be no ivory, mother of pearl, or ebony fittings –but I will have stops and starts as I compose the interior of the box. I will of course be musing silently and not-so-silently about Studley and his interior layout for his preposterously magnificent opus.
Stay tuned on that.
As for the exterior of the box I am undecided. Do I make it a canvas for fauxrushi, or French marquetry? Decisions, decisions. At the moment I am contemplating leaving the recto of the lid alone to let it serve as a work surface.
Thanks to Webmeister Tim’s generosity I have a delightful puzzle to solve.
As I assemble a tool kit for Li’l T I find myself reminiscing about my own first ventures into Tooldom. Thanks to the guidance of my own Dad when it came to buying real tools I followed the path of Quality. In 1969 that meant Sears/Craftsman (Woodcraft, Constantine, and other catalog merchants came into my orbit much later). My first few tools, screwdriver and pliers, were bought at the new Sears in North Palm Beach, Florida with my lawnmowing money. When I finally got steady income working illegally in a scaffolding yard at 15, then legally at a bakery at 16, the purchases became more substantial. Wrenches. Ratchets and sockets. Screwdriver sets. Channel Locks. A tool box.
Now more than 50 years later I still have all those tools and use them regularly. After all, this was when Craftsman was still, well, Craftsman.
My very first tool was the black folding tri-blade Boy Scout knife, now that I think of it probably bought not in Florida but at the Sears in my hometown of Owatonna, Minnesota, around 1965. It still resides in the top drawer of the end table next to my recliner. It was probably 3 or 4 dollars, maybe only $2, still a lot of money to a kid making 25-cents per lawn to mow. I just can’t remember exactly, but it would have been during my very brief tenure in the Scouts (I just couldn’t take the structure and hierarchy. It’s amusing to think of iconoclastic me trying to enlist in the US Navy in 1973. That would not have been a happy outcome as I do not respond well to arbitrary orders.) I’m pretty sure I blogged about that knife some time ago.

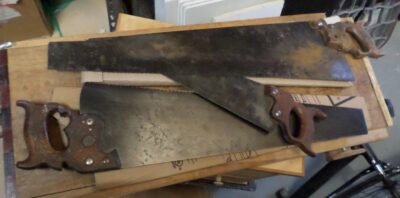
My first honest to goodness woodworking tools were these two, a Craftsman (Stanley) block plane that is still a favorite, and this dovetail saw that has cut an untold number of joints in the past five decades. It was a “Craftsman” probably made by Disston, although it is devoid of marks. I do remember that each tool was $13, a number I recall because it was the number of Wilt Chamberlain.
As I compile to tool kit for L’il T and his new sibling (early March 2024) it will be real tools, sharp and ready to go. His/their Dad and I will teach them the right way to use them, just as my Dad taught me. (Li’l T’s other Grandpa was a high school shop teacher so the heritage runs deep) And if Elderbarndottir and her new husband are blessed with children, they will be getting real tools from Grandpa too.

Married, that is. Elderbarndottir and her beloved were joined in Holy Matrimony in a beautiful day of bountiful blessing on Saturday, in the worshipful company of several hundred of their friends they have met over the years. Mrs. Barn did a fantastic job of pulling it all together vis-a-vie the reception and we were back at the house by 4.30 to collapse. Quite a divergence from our own wedding 43 years ago, with a dozen folks in my parents living room.
Yesterday was the first day of feeling “normal” in the aftermath, today is our Thanksgiving, and I’ll get back to woodworking today.
The best part (?) of the entire affair is that I now have two magnificent sons, neither of whom I had to navigate adolescence with.

… Elderbarndottir will be a brand new Mrs. We will rejoice and, likely, collapse. It’s been a hectic fortnight, now with her house now being overrun with flowers. The first pile o’ bouquets is cooling their heels on the back porch until they are called into the game Saturday morning.
Not a whole lot of woodworking this week.
A longtime friend, great furniture maker, military historian, tank commander SteveD (West Point’76 IIRC), once put this day into the best and most concise perspective I have ever heard.
I wrote a blank check to this nation and signed it with my blood.
Though uttered in a casual conversation many years ago, the sentiment expressed has never left my mind. My heartfelt thanks to him and all those who have made this pledge on my/our behalf, especially my beloved baby brother and my two sons.

For a lot of my routine sharpening I finish off with an 8000 grit water stone, and I recently had a stretch where I did not attend to the stone’s needs as conscientiously as I should have and it got wallowed out. That it was my setup at my daughter’s house was no excuse, but in all honesty I am more attentive out in the barn shop.

Not having my marble slab for referencing the surface to flatten this one, I relied on one of the theorems (or was it a Postulate or Law?) from eighth grade Geometry class. That is, “every circle defines a plane.” Using a concrete block with a piece of mirror I had laying around and a sheet of sandpaper I was able to flatten the dried-out stone face-down on the abrasive by pressing and moving it in a roughly 1-to-2-inch circular motion. Before long I had a super flat stone and got it back to work.

I’m glad that some lessons from 55 years ago took root, allowing me to minister to this stone in need of, well, ministrations.
The cost? One sheet of 80-grit sandpaper, five minutes of my time, and a bit of elbow grease.
The result? Priceless.
If I were somehow told to restrict myself to just one standing/stationary power machine in the shop I would almost certainly refuse to play that False Dilemma scenario. Instead, I would opt for two bench top units, a drill press (probably using my Jet mortiser as it is just an extra-stout drill press with some specialized features) and a bandsaw. Of the latter I would further refine the choice to not one but two, my little Delta 9″ which I find integral to milling veneer, and my Rikon 12″ which is adequate for just about everything else (as long as I keep it tuned and outfitted with a variety of sharp blades). I’ve checked, and even combined they do not nearly occupy the volume of one venerable Delta 14″ bandsaw or similar, probably the standard by which — aside from the near-mandatory table saw clogging the center of the work space — almost any woodworking shop in the US is measured. Plus, to confound the meta-Prisoner’s Dilemma variation even further, the little Delta 9″ is light enough to move easily for use or storage under a bench or table. So, I won’t play that game.
What does this to do with the title?
Well, I recently installed a new blade on the Rikon and as I was adjusting it I noticed a little bitty thump-thump-thump as I turned the wheels by hand, centering the blade on the tire crowns and got the guide blocks where they needed to be. I closed it up thinking I would touch the weld joint sides and rear with a stone when at full speed to smooth out the little thumping sound. It almost always does. Not entirely correct. It ALWAYS has resolved the problem before on any of my bandsaws.
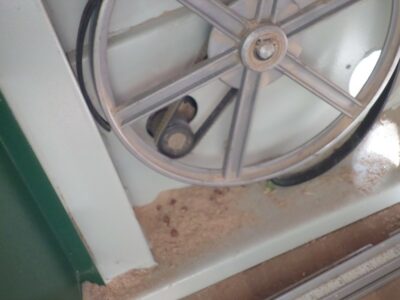
But this time, under power the thump-thump thump almost instantly became THUMP-THUMP-THUMP followed by a WHAM! and the sound of the blade becoming a weird piece of modern sculpture.

Short and sweet — the original tire on the wheel had finished coming apart and in so doing tore up the blade in the lower wheel box. There was no real damage to the saw, fortunately.
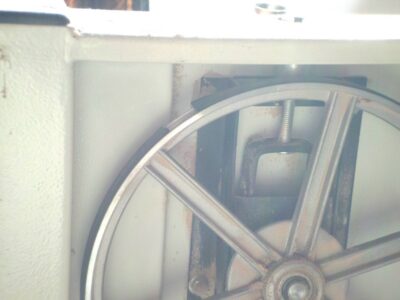
I ordered and installed two pairs of new tires (second pair is backup for if/when the phenomenon reprises). The lower tire needed nothing to get it off, it was already in pieces. The upper tire actually broke as soon as I started removing it, revealing a pre-existing split that was well along the path to destruction of its own.
All back together and tuned up now.
Back in the day when I still watched broadcast television there was a strategic plotting device known as “the story arc,” wherein minor plot threads would be interjected into numerous episodes even though the prominent episode themes were stand-alone. With life on the homestead settling down, a bit at least, and (hopefully) become more manifest after barndottir #1’s wedding in a couple weeks (plus barndottir #2 has Lil’T’s sibling in the oven), the “long arc” will likely become an occasional feature on the blog. Not THE feature, but A feature. It’s just that many of my upcoming and ongoing shop projects are just that, ongoing. And going, and going…
Prominent among them will be making new and salvaging and repurposing old tools. While I still use The Accidental Woodworker as my go-to reference for a lot of tool restoration, I’ll let you peek over my shoulder as I indulge my own whimsies in this realm.
First up will be some accounts of rescuing and modifying old saws, including my advice on buying old saws and the methods I use to salvage and sharpen them.
Repurposing my old and tricking-out my new traveling tool boxes.
And my creating a special case of the former, repurposing a vintage tool chest (probably late 19thC) to house my 18th Century-style woodworking kit.
And lots of other stuff that isn’t popping into my brain right now.
Stay tuned.
Just a few days ago we were out and about in t-shirts, and this is what greeted us this morning in Shangri-la. The expected high today is in the 20s.

Mrs. Barn said a ferocious storm front came through around 4AM, but I slept right through it. That’s when the snowfall began. When I went out to sweep off the solar panels the snow was as deep as my balled fist.
Interspersed between sessions of working on the cherry trim for the new bay window I began the process of transforming the pine-veneer-over-particle-board shelf of the unit into something that is visually cherry-ish. The shelf will be used as a mini-greenhouse by Mrs. Barn through the winter, so the finish needed to be really robust. To that end, I sealed the surface thoroughly with a brushcoat of thinned West System Epoxy for best penetration to get it as impregnated and protected against moisture as possible.

To impart the coloration for the board I used a commercial cherry stain as an intermediate glaze coat, probably an iffy proposition. Actually, in hindsight since it was a complete mess of an outcome — perhaps the worst finishing clusterflunk I have ever encountered — it was way worse than “iffy.” I did not even document the process, I had glazed probably ten thousand surfaces over my career so why document this one? (Perhaps some day I should write a series of blog posts about imparting coloration for matching, and the various techniques — staining, dyeing, toning, and glazing).
The glazing went fairly well but it took three days for the glaze to set before I could recoat, versus the normal 2-6 hours. I abraded it lightly to reduce the effects of dust and bugs and miscellaneous debris that became embedded during those drying days. I followed this with a light brush coat of my favorite oil/resin varnish, Pratt and Lambert 38 (no longer available, alas), just before going to bed. With the varnish seal coat over the stain glaze it looked awfully good.
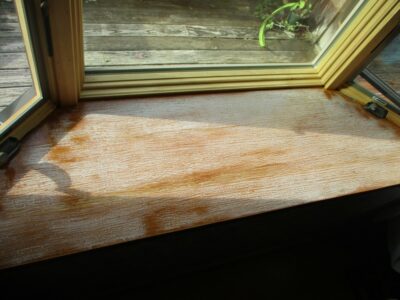
Imagine my surprise when I got up the next morning and saw the most highly blushed coating I have seen in my 50+ years of finishing. Even more than times when I was lacquering on a sweltering Floriduh summer day with a driving thunderstorm outside. Something in the stain/glaze clearly did not like something in the varnish seal coat. I mean, REALLY did not like it. In fact, I have never before seen an oil varnish blush. Never. And this was an oil varnish over an epoxy base.
Back to the drawing board. Gotta noodle this one for a while. Stay tuned.

Recent Comments