Workbench Wednesday- #1, 1986/7
This is the first in an occasional series on the dozen-plus workbenches I have. These are presented roughly in the order in which they entered my orbit. — DCW
================================================
1984 was a monumental year for us, as we finished up our time in college (my third try was a charm), both got jobs we wanted (in the same town!) and bought a little house just outside the Mordor Beltway on 3.7 acres to expand (the house, not the property). Though I still had one more year of evening classes to graduate life was beginning to settle down from the maelstrom of a heavy college load and workto pay for college occurring simultaneously (I refused to borrow money for college). I was a poor role model for my daughters’ friends, I took 14 years to get through college.
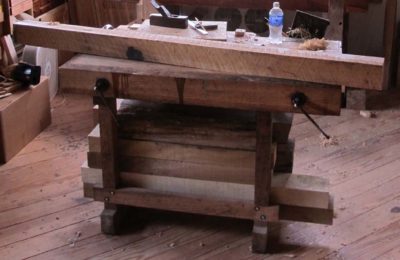
By late 1986 it was time to fashion a workbench for the small work space (10′ x 22′ x 6′-3″) I had carved out in the basement for household and furniture conservation projects for private clients who wanted to throw money at me. We wanted to get ahead as much financially as we could before our family started. Oops, too late. Daughter #1 arrived that autumn. Nevertheless it was time for my first real purpose built custom-made-to-my-specs workbench. Until then I’d had “make do” with whatever I could scrounge together.

The process of bench design weighed several competing and complimentary considerations. The manner in which I resolved and fulfilled them resulted in a workbench that is my third child.
First, I had very limited space, especially when you consider the amount of machinery I had stuffed into the space. A unisaw, a 12″ radial arm saw, a 14″ combination planer joiner, standing drill press, large air compressor, etc., were all taking up residence there, along with a full-sized explosion proof solvent cabinet for my finishing and conservation supplies. There was no way I could afford the luxury of an 8-foot patternmaker’s bench with an accompanying assembly table, which is what I’d had in the foundry, nor an 8-foot Euro bench like the row of them in the conservation studio at Winterthur and the Smithsonian, or the English wall bench from the Dominy shop. I would be lucky to get four feet of bench in my basement workshop. In the end the bench’s overall dimensions are 48″ long, 33″ deep, and 35 inches high.
Second, I was not going to be making much furniture in the basement, or anywhere else for that matter. As it turned out the few pieces I did make in the coming years were assembled either on the front porch or out in the 15×25 barn-ish shed we had for the lawn equipment. It wasn’t so much of a footprint issue as it was headroom.
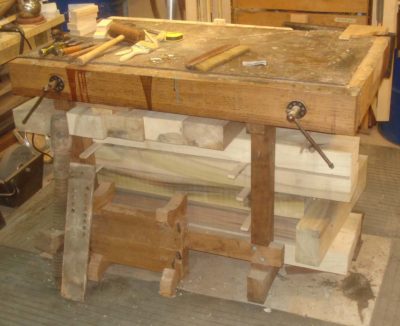
Third, I was very much enamored, and still am, with the concept of the torsion box structure for workbenches and table tops. I’d seen Ian Kirby’s version and really liked it. Not the MDF part, but certainly the design simplicity for his workbenches. I had not become persuaded by the planarity of the sides for many years yet.
Fourth, an Emmert K-1 vise had become part of my work vocabulary in my years at the pattern shop, and I had subsequently purchased a couple of fine vintage ones and was going to design the bench around them, or at least one of them.
Fifth, though I was not a chair maker and would never really become one I was attracted to the expanse of large twin screw face vise often found in their shops.
Finally, I was not the aficionado of hand-work that I have become so keeping hand work to a minimum was desired.
I purchased a pile of 12/4 and 8/4 white oak and a couple sheets of 3/4″ birch plywood and got to work. Unfortunately I have zero pictures of the building process, all these come from much later.
Up until this time my “workbench” was a salvaged 36″ wide solid core door sitting on a pair of sawhorses, which makes for a lousy workbench but a great assembly table.
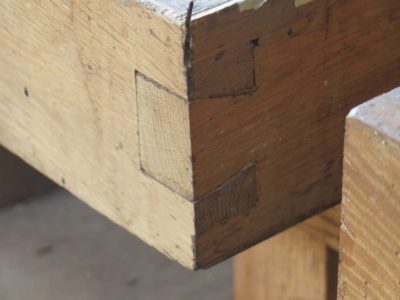
Cutting the 3/4″ plywood on the table saw I constructed the 24x48x5 torsion box bench top, fitting it into a rabeted perimeter of 8/4 oak dovetailed at the corners.
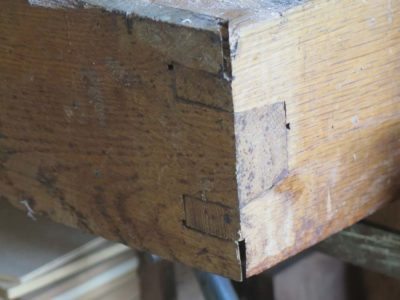
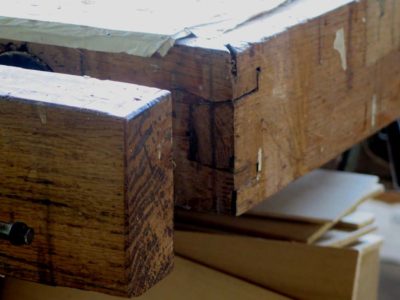
These were my first man-sized dovetails and the inexperience shows, especially in the corners where I laid out and cut the joint adequately but inverted the angles. Think of a dovetail joint where the tails do not spread but rather taper at the same angle and you get the idea. It’s not terribly made, but it’s not proper either. It remains a constant reminder to be more careful and make sure I am envisioning things correctly. I am neither proud nor dishonored by these corners, they were an honest representation of my joinery skills 32 years ago, and emphasize the different skill sets of a conservator and a furniture maker. I have improved in the intervening years.

This top went over a simple trestle-and-stretcher base that was half-lapped on the radial arm saw and bolted together. To attach the top to the base I drilled and screwed threaded brass inserts into the top and drilled the corresponding holes in the trestle top crosspieces, bolting them together. The general assembly scheme has worked for the intervening years without a fuss. Every now and then I crank down on the bolts when anything loosens up, but the unit has remained remarkably trouble-free.
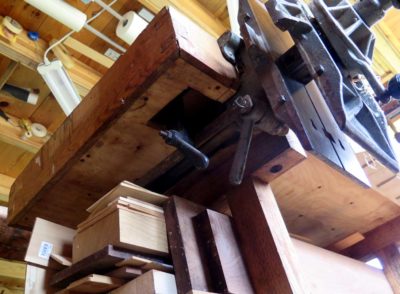
It was in installing the Emmert that I realized a couple of mistakes that I could have corrected, one a nuisance and the other a fundamental problem I will eventually correct. For starters the 5″ thick torsion box was way too thick for the Emmert configuration and I had to cut through the torsion box skin and ribs in order to make it all fit and work. Fortunately this did not weaken the top appreciably.
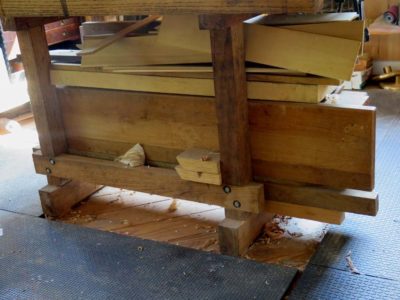
But another miscalculation has required compensation ever since I built it. Rather than fit the Emmert between the trestles I designed it to be outboard of the trestle at that end, rendering the whole thing unbalanced and susceptible to tipping when under load. I’d thought that the weight of the 12/4 & 8/4 oak trestle structure would be enough, but I was wrong. I really should have made the trestle longer to allow the vise to be installed in between the two ends. I finally settled on something resembling a solution when I turned the bench base into a lumber storage unit. The addition of several hundred pounds of counterweight does the trick, but a third trestle (or moving the current one) outboard of the Emmert would be even trickier.
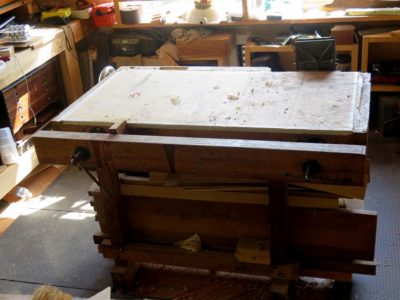
On the long side opposite the Emmert I added a full-length twin screw face vise using hardware I think I bought from the bargain bin at WSJenks, a famed DC hardware store. The movable jaw is 2-1/2″ x 5″ x 48″ in white oak with 32″ between the screws (zero flex), and it is a fixture that is used pretty much constantly.
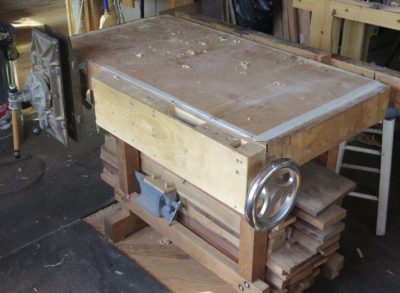
Years later I made a wagon-wheel vise for the side with and aligned with the inner jaw of the Emmert, a project I chronicled in a Popular Woodworking article. It is a useful addition, but since I have so many other options for the same function it does not get used much these days.
While not without flaws and limitations, this bench has remained my “go to” work station for more than three decades, and is only now grudgingly giving up its status as my one and only workbench. It still gets my time and energies every day.


I love the miscut dovetail on this bench! I still remember the moment holding the two pieces together in shocked disbelief the first (and hopefully last) time I did that. Way more instructive than any article or video on cutting dovetails.
Yes, it calls for a whole new kind of celebration. I have never repeated that mistake either. I know it is a not uncommon mistake for folks the first time they cut dovetails unsupervised. Perhaps it is a rite of passage. It would be interesting to know how often it occurs.