By the start of the second day everyone’s trains were barreling down the tracks and all we had to do was keep on keeping on. Even as I entered the barn the sounds of sawing, filing, and sanding filled the air.

I had given each of the students one of these DARPA funded, MIT developed tools to work on the ogee tips at either end of the squares. One side was flat and the other was round, and when wrapped with sandpaper the tool was perfect for the task of finishing the shape. The uninitiated might think these were simply a 3/8″ dowel split in half on the bandsaw, but they would be properly ignorant of the national security dark technology pedigree of the tool.


Pretty soon the tips were more-or-less derived.

One procedure that was replicated perhaps a hundred times that day was returning to the abrasive covered granite blocks to bring the squares closer to “true,” a process that would be continued until after the torch work and the “square-ness” was perfected versus the Vesper final word square.


Len was the first to get the brilliant idea of creating a 30-60-90 triangle from the remaining scrap of rectangular brass plate left over from the four nested squares. Using my older version of the Knew Concepts Mark III saw he set to work and soon had the inside design cut out.


Meanwhile Dave, John and Pete got their tips shaped and polished.

Len finished the interior of the piercing of the triangle.

All the while the pile of brass filings and shavings built up at every work station. This continued until the very end and we compiled an impressive pile of scraps and waste filings, I’d estimate somewhere around five pounds worth.

All of this was prelude for the tasks presented after lunch as the shoes for the beams were brazed in place with silver containing solder. Once the mating surfaces were perfected it was time to move to the torch work stations.
The set-up was designed for efficient and safe torch work. I will blog about making a perfect set-up for bench top brazing in the next couple of weeks.

Fortunately I had all the things I needed on hand; fire bricks, kiln shelves to use as brazing platforms, and inexpensive lazy susan bearings so each place could turn. I placed three work stations on top of cement backer board from a home improvement center. For this project it was important to isolate the workpieces from the shelf and the bricks as much as possible to reduce the amount of heat loss from direct contact during the brazing. That is why the work pieces are raised up from the shelf by two small pieces of scrap brass.
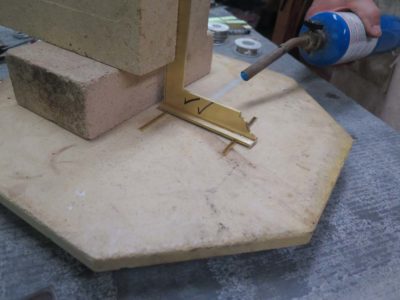
After slathering on the flux to the contact edge of the square it was placed on the horizontally situated shoe, in the center. Then the torch was lit and the heat turned up. We were using both propane and MAPP torches, the first was fine and the second faster.

Once the assemblage was heated up and the brass began to get a coppery tone it was time to simply flow the coiled solder into the back side of the joint and let the heat draw it underneath the joint toward the flame.

Dave gave the quenched joint a fierce testing, and was impressed at the strength of it.


Then everyone set to brazing on the bases of their respective squares, then began the cleaning up process.


And that’s how we spent the rest of Day 2.
Just the sight of this brutal work made me all the more delighted that I passed the task on to other folks. With hammer and chisel and prybar the several hundred linear feet of concrete chinking was removed, along with the mesh lath and fiberglass insulation underneath. There was a mountain of debris at the end of every day, carefully collected and hauled off.
We had them start the project with this side of the cabin because this is where Mrs. Barn plants her pole beans, and we needed to get that done first.
After the joint void was cleaned and any decrepit wood was removed to leave a clean and sound substrate (there was a fair bit of this as the original chinking had not been relieved and the top of each course of chinking acted like a gutter, drawing in rain. Good thing the logs were old growth chestnut. It’s probably the only thing that saved them), the joint surfaces were saturated with borate solution to increase the rot resistance of the structure.
Though this description is brief I can attest to the scope of the work that took several days to accomplish.
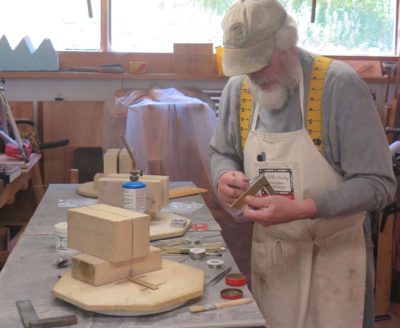
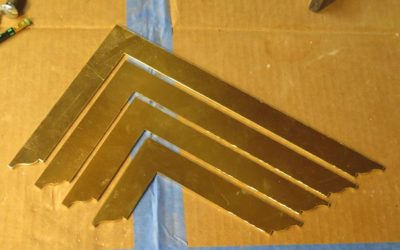
Last week I hosted a workshop that reflected my peculiarities as a craftsman, a woodworker who loves metal work. Four skilled craftsmen, Dave, John, Len, and Pete joined me for three terrific days of fellowship and making. In this case making a nested set of Roubo-esque solid brass squares a la Plate 308, Figure 2.

The starting point for the three days was a 9″x12″x1/8″ brass plate.

Using my puny table saw and sled with a waste block to reduce the shrapnel, everyone cut a series of descending size squares.

After the table saw cuts, stopped to avoid over-cutting at the intersection of the inner edges, the cuts were finished with deep-throat fret saws and #6 jeweler’s blades which I provided. Pete had his wondrous Knew Concepts coping saw that worked like a charm.


And then the filing began. To protect the inner corner of the squares we ground off one edge of the mill files that everyone brought, starting with the disc sander followed by a diamond stone. This allowed for pretty aggressive work in the corners.


The filing was done on both inside corners of the cut squares and the outside corners of the remaining rectangles in preparation for cutting out the next smaller square, followed by truing on sandpaper over a granite block. (You can see the sublime Vesper square that was our “final word” truing reference for the workshop.)

This scene pretty much sums up the whole day. I was working right alongside the students making another set of the squares. I find this approach works best for the students to see me working on the same exact project, several times they came to look over my shoulder at some point in the day.


Before long everyone had their four rough squares ready for the next step, which was to trace and cut the offset/stepped ogees on each end. The small rectangle of brass remaining from the first four squares could be used later for a petite pair of squares and a couple of 30-60-90 triangles.


These were roughed out on the bandsaw, ready for filing the rest of the way.


That’s where we were at the end of the first day.
Stay tuned for Day 2.

During last week’s workshop Make A Set of Roubo Squares (more about that soon) one of the tools I used fairly regularly was this Roubo-esque and very stout exquisite palm-sized square. I vaguely recall it being in a box lot of stuff I bought at a Donnelly auction several years ago but that could be a false memory.


I have not been able to identify the tool maker but I do not consider myself to be well-versed in that world. The blade is stamped “Anderson” in script. It is a fine tool with a lot of heft, sitting in the apron pocket like a brick.
Anyone have an idea?
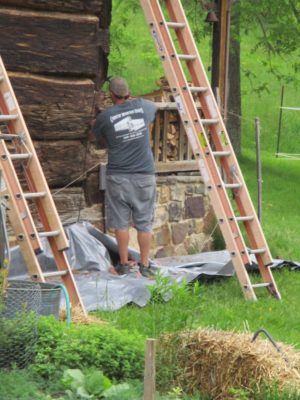
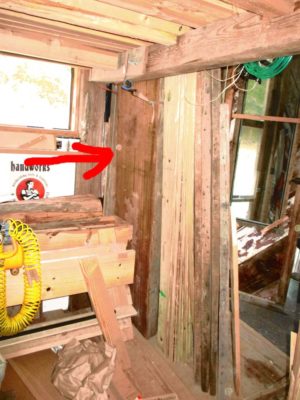
This year in addition to insulating the foundation walls of the cabin crawl space we decided to replace the ancient chinking between the massive chestnut logs of the cabin itself in order to make it more weather tight. We live in a fairly windy place and with the decrepit chinking in place there was often a brisk airflow through the cabin.

The first process was pressure cleaning the entire structure in order to identify the conditions underneath all the surface crud.
The size of that project was such that we contracted it out to a local log cabin restorer. If I had tried to do it myself it would have probably taken two years and eaten all of my free time. And made me grumpy since it would have kept me out of the shop most of that time.
Top to bottom all the stuff between the logs had to be removed with hammers and chisels. The crew cleaned the job site every evening, but the pile grew as each day went on.
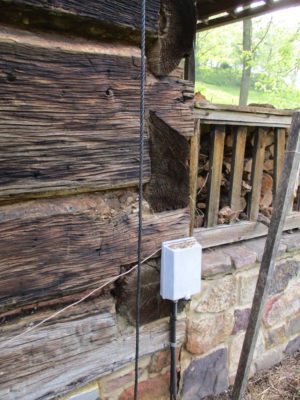

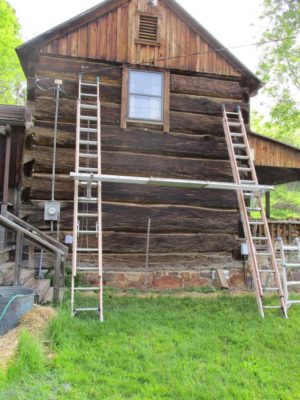
It was fascinating to see between and behind the logs to the sub-wall of vertical boards on the inside. We found newspapers in there indicating that the inner sub-wall had been there since before WWI.
The scale of the project was indeed daunting. The old chinking and lath has to be chipped out, the underlying insulation and debris and, as Mrs. Barn called it, “the biosphere of the logs” (snakes, rodents, and a bazillion lady bug carcasses), cleaned out completely, followed by a multitude of steps following. All of this for the better part of a thousand linear feet of joint lines. That scale alone precluded me from undertaking the project, especially once you add to the equation the necessary scaffolding and equipment needed to execute the job efficiently and the few places of rotted or damaged wood that needed attention.

The north wall was in pretty tough shape and would need the most work. You can see a void from the rot big enough to put my entire fist through to the inner sub-wall.
Over the three weeks of the project there was a crew of stout lads here doing all the work. That made me smile. All I had to do was watch and sign the check.
Stay tuned.

For several months my broom maker has been up to his eyeballs in alligators as 1) his brooms have been selling like hotcakes and 2) he’s been finishing building their dream house on the family farm. As a result my inventory was low at first then gone altogether. Last week I got an infusion of polissoirs so I can now fill my back-orders, which will ship out tomorrow.
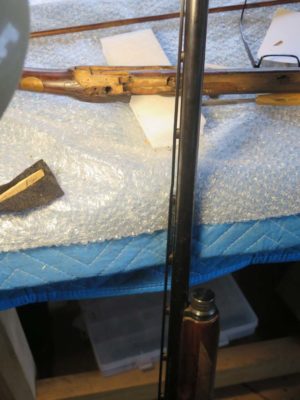
Some time way back I had my Browning shotgun leaning against the bench and much to my dismay it fell over, whacking into a stool in the way down and inducing a pretty severe bend one section of the gallery(?) running o top of the barrel (I am not 100% sure of this part’s name, I am not really a shotgun guy). The gauge of the metal that was bent is about 1.8″ x 1/4″ and the section about 3″ long. Although the shotgun still worked fine it looked pretty sketch with this damage. At the time I tried to un-bend the damage with opposing carpenter’s shims but the metal was too strong to budge.
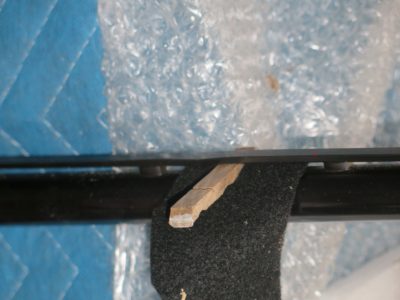
Recently I tried a different tactic, instead using a half of a hardwood clothespin for the tapered wedge to drive between the barrel and the bent element and it worked like a charm. I first laid a piece of felt against the barrel to keep from scratching it, and gently drove in the tapered clothespin. It actually took some fairly robust whacks but eventually the gallery went back into place just fine with almost no noticeable permanent damage. If you look closely there is still a tiny bit of distortion but it does not shout at you from across the room like before.
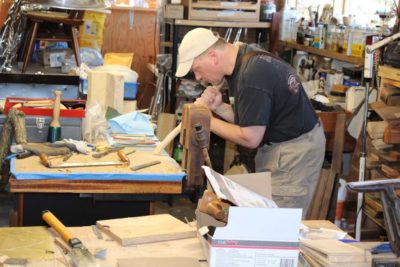
Just another day at the barn. You can’t get much more low-tech than this.
A few weeks ago my friend B came for a couple days to test drive the shoulder knife making workshop that will be at The Barn later this summer (August 23/24). We had a great time of visiting while he was working on a natural branch from a fallen tree, cleaning it up an fitting it to his torso for use as a marqueteur’s shoulder knife.
He made great progress and we are anxious for the real event in a couple months. If you would like to come and make a shoulder knife for yourself, just drop me a line.
As for my current activities I have been busying myself getting ready for the students arriving for the Make A Set of Roubo Squares workshop later this week.
Returning unapologetic after a week of spending time with the family, and even missing the ostensible subject by one day, let me spend a few minutes looking forward in the context of Workbench Wednesday. As we last left the subject I posted a gallery of past and current inventory of workbenches either in the Barn or made by me in the barn. But make no mistake, this does not end the string of workbenches by my hands. So here goes a glimpse of what the future might look like. There are many projects at various stages of development and planning extant.

Tim’s Bench
Next up on the workbench agenda is to make a massive 10-foot Nicholson-style gunsmith’s partner’s bench for my friend TimD. Tim is a gunsmith making superb late 18th century long rifles and often teaches workshops on the subject. For that reason Tim wanted a workbench that could suffice for both his own work but that of a student on the other side as well. As is often the case for me the starting point is select SYP from Virginia Frame in Fishersville VA. I’ll get this delivered to Tim sometime later in the summer, but first we have to line up two additional stout fellows at the finished bench will weigh in at just under 450 pounds.
The Mahogany and Walnut Roubo
When I first encountered the H.O. Studley menagerie in person I was particularly struck by his workbench. While I could not imagine myself using his tool cabinet as a routine matter, I definitely saw the workbench as a valued addition to my work space. Then, when the famed lumber store in the Cincinnati area closed I asked Chris Schwarz to get me a slab of mahogany from which I could make such a bench. He acquired a sweet 7-1/2′ x 24″ x 4″ slab. Subsequent visits and close inspection of Studley’s bench revealed it was not a mahogany slab but rather a laminated top with oak cores and mahogany faces. I set the mahogany slab aside and now know that I will turn it into the over-the-top Roubo bench it was evidently destined to become. In addition to the magnificent mahogany slab I have the necessary 6″ x 8″ vintage black walnut stock to make the legs. This should be a real eye catcher when finished.
The Ultimate On-Site Restoration Bench
This knock-down lightweight bench is the third generation of the concept, and will include many new features but not sacrifice much of the lightness. I started this bench a few years ago and set it aside but hope to get back to it in the coming days. Stay tuned.

photos courtesy of Shannon Rogers
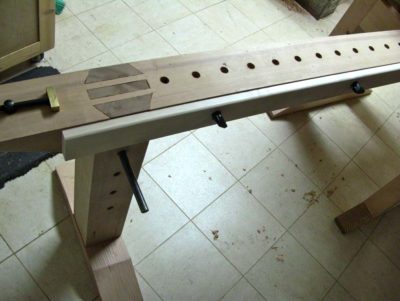
Replicating Shannon Rogers’ Joinery Bench(es)
The first time I saw Shannon Rogers’ two-part joinery bench with the tall, standing bench and its companion planning beam I offered the highest compliment I could: “Darn, I wish I had thought of that design for myself.” At this point of my working life I cannot say that I actually need it right now, but I can definitely see a time where a differing living situation might make this a perfect fit for me.
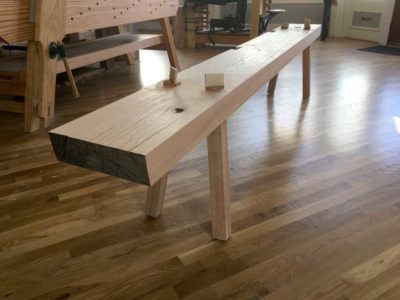
photo courtesy of Christopher Schwarz
The Roman Bench
Since Chris Schwarz made his research into this low slung bench, and viewing Jonathan Fisher’s iteration of it, I knew this bench was something I needed to build and have around. In great part this is because it might make great allowance for working while sitting down. Plus, since I also dabble in fiction writing I would like to incorporate the workbench into a series of short stories I am trying to sketch about the working life of Joshua Bar Joseph, a/k/a Jesus of Nazareth, prior to his assumption of His earthly ministry. Having this bench around to inspire me could, well, inspire me.

Curly Maple and Oak Roubo
Over the years I have compiled a substantial inventory of lumber including some pretty big stuff. Included in this is a slab of curly maple I have squirreled away, along with some fabulous 6×6 oak for the legs of a sweet Roubo. I have worked on the slab on-and-off for a few years, but perhaps this autumn is the time to bring this ting to the finish line.

photo courtesy of William Duffield
Replicating William’s Benchtop Auxiliary
Some time ago at an SAPFM regional chapter meeting my friend WilliamD showed his auxiliary bench-top-bench, a concept I first heard about from Steve Latta. The appeal of this appendage is pretty evident in that it reduces the amount of bending over that is required for detail work. At the moment I just use a nice piece of plywood sitting on a pair of shoji-work-style mini-horses.
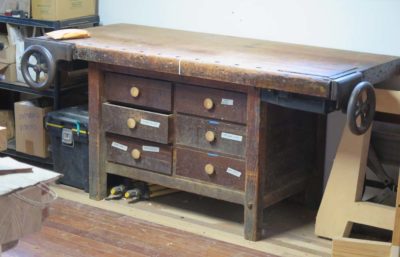
Restoring My Piano Maker’s Bench
This thing needs a thorough going over including adding a new layer of mahogany over the current top which would first be flattened. Oh, and the vises both need cleaning, polishing, and nickel plating.

Bob’s Slabs
My pal Bob got these 10″ x 15″ white oak timbers ( two are 10′, one is 8′) from his brother, who works for a hardwood saw mill, to chop up as firewood. Bob thought I might put them to better use as workbenches or something and I agree. When I look at this stack all I can see is a bunch of Roubo bench tops.

More Workbenches for A Possible Gragg Chair Workshop
Should I decide to offer a Gragg Chair Building Workshop, to which I am about 90% leaning, we will need another three or four workbenches up in the attic studio, the only place large enough to host such a class. If I do go in this direction these benches, almost certainly Nicholsons, would would be a winter time project at the end of this year.
That’s all I can think of for now. I might need to think about an annex for The Barn…
I chatted recently with the cattle man who runs his herd on the pasture through which I drive coming and going to and from the homestead, and he was fine with me harvesting the Juncus that is burgeoning in the fields. I am pretty sure I will be able to harvest as much of it as I can possibly use, and then some, come August or so. Fortunately the cattle have no interest in it so it should just keep on growing until I harvest the bundles and get them drying. The clusters of the grass popped their heads last week, so now it is simply a matter of waiting for nature to take its course. Fortunately most of the densest growth is adjacent to the road.

Over the winter I will start making Juncus polissoirs for sale, although since I have to do every step myself by hand they will be pricey. If they do not sell, I will just keep them here for workshop students to use.


Recent Comments