During our recent visit to flyover country to celebrate Ripplin’ John’s MFA exhibit I was able to spend most of a day with him in the shop. John’s fascination with undulation has progressed well beyond ripple molding machines into the realm of Rose Engine lathes, of which he has at least two.
This is a gargantuan vintage machine,
which has been augmented with this modern unit made by Davil Lindell, if I remember correctly.
He let me noodle on the Lindell for a few hours, including the cutting of this pattern on the end of a small box.
What a joy it is to spend time with the people you admire doing stuff that is just pure, unadulterated fun.
My circle of friends is mostly populated with men who inspire me due to their knowledge, skills, talents, temperaments and character. No person better embodies this than my long-time friend Ripplin’ John (you can meet him at my booth at Handworks). Engineer, craftsman, and theologian, his company is a treasured enrichment to my life.
Mrs. Barn and I recently traveled to attend his exhibit as he received his Sculpture MFA safely into his eighth decade of life! He is indominable rather than monomaniacal, a distinction worthy of note. The exhibit attendees were treated to an impressive compilation of work and creativity; his thesis dealt with the question “What Is Art?”
The attendees in rapt attention as John elucidates the purposes of his artworks.
Congratulations, John, and thanks for being my friend and fellow Christian soldier.
Here are some pics from the exhibit.
One of the many beautiful objects crafted by John’s hands and tools
One of a series of miniature turned boxes John created with his Rose Engine Lathe, a creative technology completely unknown to most of those in attendance,
The assignment here was to create a sculptural artwork from a book. John excavated and epoxy-laminated a stack of pages, then turned the resulting block on his lathe.
John was exploring the realm of formed, enameled metal medallions.
One of the many facets of John’s program was to teach a class. This is the student workshop where he instructed the kids in basic metalwork. From what I could see they related wonderfully to this graduate student the same age and their great-grandparents.
No doubt, the most bizarre moment of the visit to the college campus was spotting this dispensary in the men’s restroom. Our culture is doomed.
During my ongoing/never-ending efforts to impose order in the barn I came across some pieces of very large bamboo (~5″). These were no doubt the remaining fragments of a pickup load I harvested thirty years ago from the giant bamboo forest of Clemson University when I was there for a conference. If I could ever connect with someone there again, I would return to get more.
These pieces caused me to reflect on what I could do with them, and once again Maki Fushimi was a source of inspiration.
About 35 years ago as our girls were getting tall enough to use the bathroom sink and help Mama in the kitchen we used large, unwieldy folding stools for them to accomplish the tasks. I decided to use some scrap birch plywood and made a foot-high two-step stool for each of them, Older Daughter, Younger Daughter, and Mrs. Barn. They were simple and sturdy, painted with some leftovers from unknown projects; black, red, baby blue. They were stout enough that all three of them are still in service today after three decades of service.
A couple years ago I made a similar one for L’il T, painted in what were at the time his favorite colors with a little pizzazz.
Last week I finished the stool for his little brother, ‘Dozer. (L’il T is long and lean, ‘Dozer is not, and not. A nose tackle in the making.) We weren’t sure what his favorite colors were, are, or will be so I left it to my own discretion.
In a year I’ll be making one for grandson #3, and the same for grandson #4 the year after. These are so simple that they are not really even “woodworking,” but they are treasures that will likely last several lifetimes.
Building precious memories and robust traditions, one stepstool at a time.
Or as the distinguished Congresswoman from home state of Minnesota might say. “What Winter Hath Wrought, Eleven.”
Once things finally melted off from this past Snowzilla, I discovered another severe after-effect.
The stone foundation walls leading to the underground root cellar were pretty much wrecked by the ice-rain-sleet-rain deep freeze in late January. After more than a hundred years of being in place the base rocks were literally pushed out of place by the block of ice accumulating behind it. Yikes.
I’m hoping my brother is feeling strong as I plan to excavate and reinstall several hundred pounds of rock wall during his scheduled fall visit. It can’t be all firewood fun and games.
One of Mrs. Barn’s favorite things is the annual visit from “Eddie the Spoon Guy” at the craft market during our local celebration of all things pertaining to maple syrup. She stocks up on a multitude of wooden spoons, spatulas and similar items to use and to give as gifts throughout the year. This year Eddie had some teensy spoons that she thought would be perfect as gifts for each of the grandsons.
Once she had them home she asked, “Wouldn’t it be nice to have their names carved into the handles?” What could I say, other than, “Of course.”
Sorry, just can’t seem to get this image to load horizontally.
Givin the diminutive size of the workpieces my first task was to find a good work holding system, something that would hold these itty bitty pieces solidly yet allow me to have access to the surfaces to be worked. Fortunately, I have a jeweler’s bench top rotating vise with movable jaws, allowing a close fit for the round a tapered handles. To maximize the grip and eliminate the risk of damage I used abrasive pads to cushion the jaws. That solution worked perfectly, padding the wood yet gabbing the spoons hard and steady.
Then the question was, “What do I use for the incising?” Using a chip carving knife was not within my ken as the pieces were like carving names on a round pencil. In other words, beyond my confident skill set. I thought about using one of my engraving burins or a tiny chasing tool, but practice with them was not encouraging. Looking through my box of carving tools I came across a 1mm veiner from a project I cannot even remember now. That was just the ticket.
The end result was great. I won’t show that as I strive to protect my loved ones from the netbots.
In my never-ending quest to organize and reorganize the barn, I often find myself in a Christmas moment; “Wow, I forgot that I had this!” or more likely, “Oh, so that’s where I put this.” Four floors of tools, books, and supplies to sort will do that to you.
I recently had an instance that was and was not one of these times. I found myself relocating a chair frame I commissioned Philippe Lafargue to make for me probably more than three decades ago. It served for so many years as my reading and writing chair at S.I. and for some time at the barn.
Being a classically trained chairmaker at Ecole Boulle this project was like falling off a log for Philippe since virtually all of his fabrication work was curvy fancy French chairs. This severe boxy form was no challenge for him.
He was there long before the beginning of the Roubo Project, he translated the Table of Contents for me around 1987 when he was a post-graduate Fellow with me in the Furniture Conservation Studio. That ToC burned brightly for me, and when Michele Pagan and I started the project for real more than a decade later we knew that Philippe had to be part of it. Philippe was a classically trained 18th Century Ecole Boulle craftsman, where he completed the full four-year curriculum, simultaneously conversant in 18th craft technique and lexicon, a native Francophone and fully conversant in vernacular and academic English.
For the years of the project until his untimely death a few months ago (somewhat unnerving to us since his fatal illness was the same one that took Mel Wachowiak from me a decade earlier) his contribution was a vital connection to reality.
I am now diligently searching for someone to take up his portfolio. If you know anyone who fits the job description above, let me know. Really, let me know.
This was the last time Philippe and I were together in person, at the premier of the Deluxe version of Roubo on Marquetry during the 2013 Woodworking in America shindig. He eventually wound up back in France, fleeing his domestic life here in the States.
About once a month I get together with a small group of local friends primarily to talk about living in the hinterboonies and all the topics adjacent to homesteading. Lately the topic of communication has been prominent as we’ve been talking about using small walkie-talkie type tools to keep in touch in the event of the phone or power systems going down (not a crazy paranoia out here where one or the other goes out occasionally). Last week I talked about my six decades of experience listening. In that arena I’ve found listening to AM and shortwave to be useful and entertaining. Here is what I talked about, in part. I figured there had to be one or two of you interested in this topic. If I’m wrong? The sun will still come up tomorrow morning.
>>>>>>>>>>>>>>>>>>>>>>>>>>>>>>>>>>>>>>>>>>
If there are regional power/internet outages -– we have experienced week-long outages in both Maryland and here in Virginia, and getting news was nearly impossible – alternatives for knowing what is going on are useful. I have found that AM and Shortwave radio listening are really useful for that task. Most stereo systems have dreadful AM receivers and are not useful tools for AM listening. Instead I have tried out dozens of units over the decades and hands-down the best performance/best value are the portable radios based on the GE SupeRadio platform. Obviously GE started the platform as a consumer product but many, many other companies followed suit, either borrowing, licensing, or stealing the design and technology. I’ve seen many new models on the marketplace that look similar but have not tried them out. I would suggest looking ebayto find a gently used one or even occasionally a new-old-stock version, prices ranging from $15-75. I bought mine for about $20 back in the mezozoic era. They are still so cheap and available I honestly would not bother with anything else.
These models have good long internal AM ferrite rod antennae, and analog tuning.
A critical additional accessory is an inductive antenna, a/k/a an external tunable loop AM antenna. These devices are set adjacent to the radio, usually perpendicular to the unit, and increase the sensitivity by up to a hundred-fold by adjusting the potential of the copper wire loop with a rheostat, “tuning” the antenna to the station on the radio. They operate much like a magnifying glass for visible light, but only in the much longer RF electromagnetic frequencies. Just as a magnifying glass amplifies and focuses light, the tunable loop antenna focuses radio waves onto the internal antenna of the radio.
The loop antenna I showed was one of several I bought from Radio Shack 40-50 years ago for about $20 IIRC. I have not seen another one like it for at least 30 years. The only loop antennas I know still on the market are made by Grundigand certainly would work just fine. I’ve never looked to see how available they are. The Grundig tunable loop antenna is based on an earlier design called the Terk, a version of which is currently on the Walmart site for $45. The Cadillac of tunable loop antennas is called the Select-A-Tenna, of which I have two. I have not seen one of these since forever. Mine cost about $80 each new, and I still find them from time to time on ebay.
I cannot overemphasize the necessity for these inductive tunable loop antennas. They can make a pocket transistor radio pull in stations from unbelievable distances. Even at dusk during our meeting I was able to use my $20 radio and $20 antenna to easily pull in signals from St. Louis, Chicago and Detroit. In the middle of the night you can occasionally get stations from Canada all the way to South America.
This is an inexpensive and high-performance way to get information from a great distance away. The utility of that should be self evident.
The other radio platform I used was a shortwave receiver-only unit. This is where some real money can be spent. My experience has shown that the best quality/value brands are Sony, Sangean, and Grundig. They are not cheap, the one I showed you was probably $300 in 1980. I cannot remember if I brought my Sony 2002 or 7600 model. The Sangean 909 I showed you was bought at Radio Shack for about $200 way back then. A long lost treasure was my Sony 2010 monster portable multiband radio. Its motherboard got fried way back when. (CME? Hmmmm.) A $750 radio down the hole. It had digital tuning and I could even pick up signals from the eastern slope of the Rockies with that baby combined with a loop antenna.
Both the Sony and Sangean portable multiband radios I’ve normally used were digital tuners, many times programmable with station memories.
Very good deals on portable shortwave radios, usually referred to as “portable multiband radio” are available at ebay. I just saw one identical to my Sony 2002 (but in black rather than silver) for about $25 over there. I see a lot of similar-looking radios on the Walmart website but usually do not recognize the maker. If you know what to look for high-quality vintage radios are out there in great quantities, hundredson ebay right now.
As with standard AM radios, an antenna accessory is critical to the performance of a portable shortwave. You gotta, gotta, gotta have a wire reel or spool antenna that can be used in concert with the retractable FM antenna on the unit. I recall mine being about $7 from Radio Shack. CCraneradio has them for about $15, Amazon has a Sangean model for about $30.
Fix the wire antenna fitting to the extension antenna on the radio, then get the wire as high as you can while running as much as you can horizontally.
And don’t forget batteries. I buy lots of them, they last for a decade or two in cool, dry storage conditions. Rechargeable batteries are also an excellent option, I’ve found the Energizer brand to be excellent. You can get 110v plug in chargers but you should also have some off-grid charging capacity.
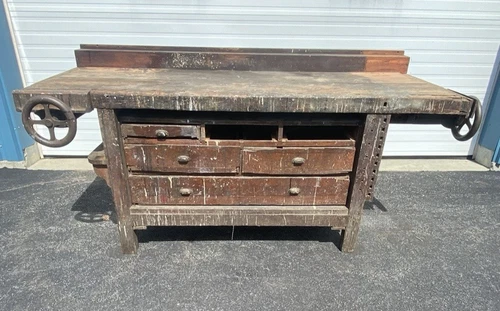
My friend JimM alerted me to this recent listing on ebay, for those of you with a hankerin’ to own a Studley-era piano maker’s workbench with two wheel vises.
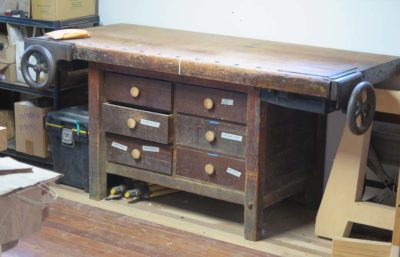
It’s remarkably similar to the one I own. Someday I will restore mine fully and pass it down to the next generation.


Recent Comments