In the aftermath of my “attempted suicide by lawnmower” I spent the afternoon in low intensity activity in the shop. Most of that time I spent finishing off the negoru finish on my sandpaper box. I cannot exactly recall where I found this box years ago but it suits my need perfectly for a place to house the 1/8th sheets of sandpaper that I use for most of my work. In the past few weeks I’ve been using this project and others as diversions to recharge my batteries when I get tired of writing.
For the past several few years the box has been performing its tasks while only partially dressed, wearing only a nice coating of my favorite primer called “Sanding Putty” from Fine Paints of Europe. Crazy expensive but worth every penny. In the past few weeks I’ve been using this project and others as diversions when I get tired of writing. I’m sorry I do not have a picture of the box at this point, the project was just a whimsy at the beginning. I have another box I am likely to use for the same finish, and when I do I will document it more carefully.
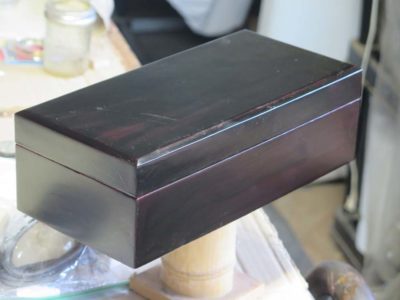
After sanding the primer I laid down two coats of Schreuder Hascolac red paint to provide the chromatic foundation for the final presentation. This also comes from Fine Paints of Europe but I think they have changed the product nomenclature since I bought mine. Like the Sanding Putty these paints are simply incomparable to anything else I found in the market. I wet sanded between coats with 600 sandpaper.
Once the foundation was ready (I usually wait a week between each coat of this oil paint) I wet sanded again and added a single coating of the Schreuder black paint.
Then using 400 wet-or-dry sandpaper I abraded away most of the black to an appearance I liked.
This was followed by several applications of Epifanes Spar Varnish, a European analog to Waterlox Original Gloss Varnish. I had never used Epifanes before but it is highly regarded in the architectural restoration world and I had some so I thought I would give it a try. It certainly does lay down nice. As before I gave it a nice sanding between coats.
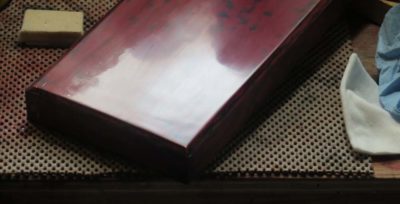
Once it was all done and the varnish was hardened, always an issue with spar varnishes as they are formulated to not get as hard as regular varnishes, I set out to polish it up. This began with a wet sanding of 1500 grit sandpaper, followed in turn with 1 micron and .05 micron agglomerated microalumina abrasives. For flat surfaces such as these I use homemade blocks of 1/2″ soft-ish felt glued to a thin plywood backing, with mineral spirits as my slurry liquid
All that is left is the very final polishing with whiting on my dampened fingertips, a maintenance coating of Mel’s Wax, and it will be done.
I had a close call today, a couple inches one way or the other, a couple degrees more off center, or a slight differential in the gravitational constant and Mrs. Barn would be trying to figure out how the survivor benefits of my pension plan worked.
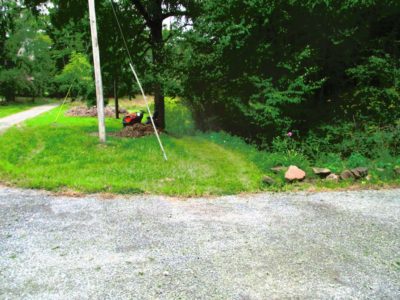
The weather has been uncooperative lately, raining a lot and clear only when I was unavailable to mow, so the grass was getting mighty lush. Today it was supposed to rain in the afternoon, and the grass was wet from a light overnight rain, but it was not raining this morning. So, I decided that even though the grass was wet my new monster riding mower could at least knock it down. It’s a 24 HP V-Twin Husqvarna with a 48″ deck and can pretty much mow the whole place except for the trim work in under two hours, including the hillside next to the pond.
I was zipping around getting it done and was working between the driveway and the creek. When I turned the wheel to the left just before the mulch pile, due to the slickness of the wet grass the mower went straight and then off the edge of the ravine with the creek. In the blink of an eye I was tumbling down while in the saddle of a quarter–ton machine that was in the process of flipping over on top of me. It happened so quickly I had no time to react. A six-foot fall later I wound up prostrate in the creek underneath the overturned mower resting on my legs. Seriously, had it gone an inch or two one way or the other, or rolled another couple of degrees, it would have snapped my legs and been resting entirely on my torso/chest. It could just have easily been a fatal mishap in that event. As it was the mower was balanced precariously, trapping but not really damaging my legs. I lay extremely still so as not to disturb the entropy of the situation.
I gently called my bride over from her gardening to assess the situation, and at first she did not know where to go since I was out of sight She immediately called 911 and they sent out the call to any volunteer rescuers in the neighborhood. In about ten (?) minutes the first rescuer ( a Deputy Sheriff) arrived but the machine was far too heavy for him to budge (Mrs. Barn had known at a glance she could not help physically). Soon two more rescuers arrived, and it took all they had for those three burly mountain men to roll the mower just enough for me to withdraw my legs and feet. With the Deputy’s help I was able to extract myself from the invigorating experience of laying in 56-degree water with a rough bed of rocks underneath me. By then the Rescue Squad ambulance and attendants arrived and I scampered up the ravine wall and they checked me out. Well, maybe not actually scampering, but I was upright and under my own power after the numbness of my feet was gone. My BP was 130/70, my heart rate was ~70, and my respiration about 18. One of the medics asked me how I could be so calm, but I figured the jitters would probably come in a couple hours (they did not)
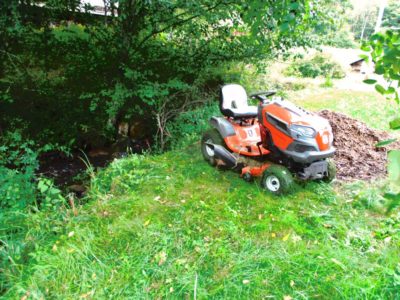
After I assured them I was not badly injured, the first rescuers rolled the mower upright and out of the creek bed and towed it up the ravine bank and back up onto good flat ground. The “hood” had all come apart and was whomperjawed, but it is all snapped together in the first place and I did not observe anything broken. I am certain I can put it all together without much fuss. I let the mower sit until after lunch and it started right up, blew out a little oily smoke from being upside down, and drove into the barn without a hitch.
I probably should have had two broken legs and at least one broken foot/ankle, and substantial structural damage to the torso and head. But, nothing much at all. My left shin and calf are pretty sore and swollen and will really hurt tomorrow. My right triceps is sore as is a right rib from laying on the rocks in the creek bed. Oddly enough my gimpy knee seems to have emerged unscathed. There may be other sore places tonight or in the morning, but I call out fervent thanks for God’s mercy in saving me from any more serious injury, or sparing Mrs. Barn far-too-early widowhood. God’s lovingkindness is ever bountiful, even when things do not go especially how we would like them, and even more especially when we do them to ourselves. It is truly miraculous, and I do not use the word as hyperbole, that I was not seriously hurt or killed. Given the situation it should have been catastrophic,
I will now know to not mow anywhere close to the creek with the lawn tractor, no matter what.
I spent the afternoon working in the barn and will probably take it easy this evening. I now pray for a painless and dreamless night’s sleep.
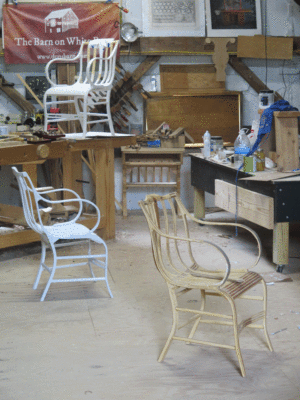
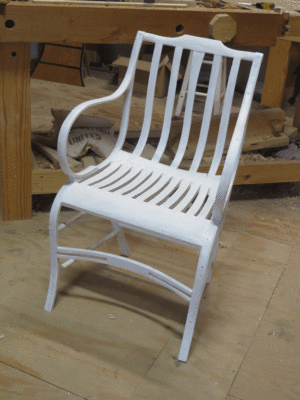
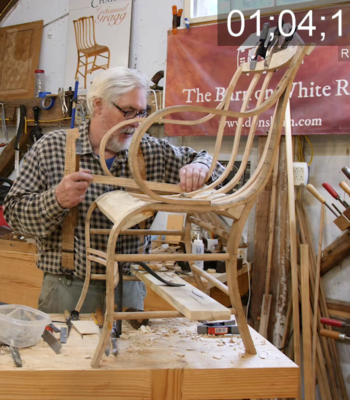
Currently in the studio there are three generations of my Gragg chairs, beginning with the very first one completed in 2011 (nearest the camera), a second one that was one of two begun three years ago and whose construction has been filmed (on the work bench), and a third one from the ongoing Gragg Chair Challenge to be also include in the video project that will have its final in-studio session on Friday. Given the “special feature” of restoring the original chair so badly damaged at a woodworking show all three chairs are integral to the video project.
Though they are fairly close in the timeline, they each mark an important development in my work of making them. This in turn is reflected in the amount of time required for me to make them. The first one took me almost 250 hours as I was working out many of the construction and decorative details. The second one was about half that time and the third one even faster by the time it is finished. Still the greatest expenditure of time on the whole project is the pinstriping, which takes me about four days to complete.
My revisions of the construction process in particular continue to progress, even this week I implemented an approach to the construction that will shave several hours off the construction. Given that all of the construction is reverse-engineered based on examining the painted originals with their hidden and obscured internal details and deducing the assembly regimen, I have broad latitude in recreating Gragg’s work.
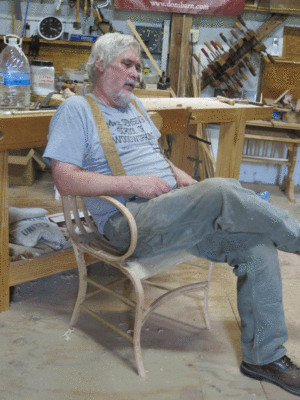
After completing the assembly of the chair structure I moved on to the sculpting of its elements with a variety of gouges, rasps, knives, spokeshaves, spoonshaves, and more, until it was elegant and comfortable (It is. Very.). In another eight hours or so I had it ready to begin painting with a shellac-based primer. This allowed me to see any lines that did not flow as I wanted, and to re-address them with my edge tools. Further, it identified any areas where fills were required.
I make my own fill putty similar to Gragg’s beginning with an oil-based primer and thickening approximately 1:1 with pulverized limestone from the garden center (he used lead white as the filler). Applying that into holes or joints as needed, I actually do not sand the fills, nor the shellac primer for that matter, until after I apply the subsequent heavy oil primer layer. This gives me plenty of body to cut into with sandpaper. My goal at that point is to yield a smooth-yet-faceted surface revealing the tool work that goes into making the chair.
Soon I hope this chair will be ready for me to deliver to my friend and colleague Daniela to paint the peacock feather. Then for me it will be on to new adventures in the World of Gragg.
Stay tuned.
If you are interested in participating in the August 2021 six-day workshop to fabricate a Gragg chair, drop me a line via the “Contact” or “Comments” sections of the web site. At this moment there is one spot remaining. If it is successful I will undoubtedly schedule another for August 2022, 2023, 2024, to infinity and beyond.
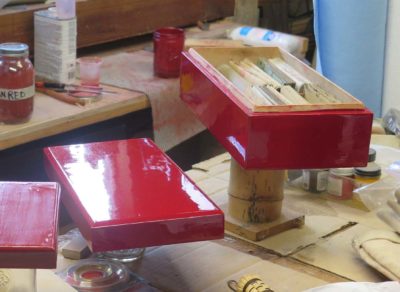
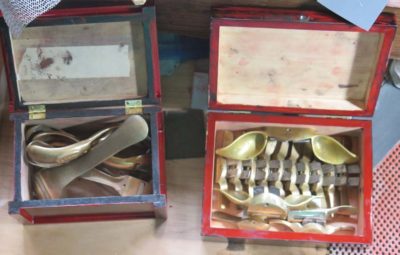
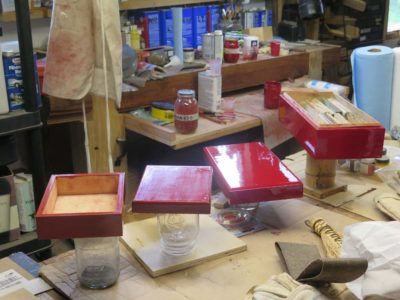
Today I wrapped up (mostly) three of the “rubbed through” boxes and have put two to work to hold some of my smaller Gragg sculpting tools.
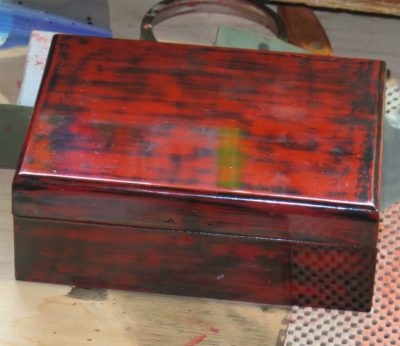
This one is black-over-red.
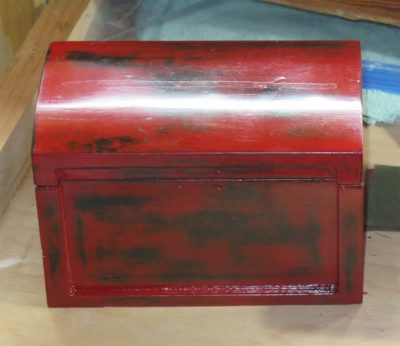
This one is red-over-black.
I did both of these with pigmented shellac with lemon shellac as the film forming component. I added Bone Black and Vermillion Red powders to taste, then three or four clear coats over the top after composing the pattern with wet sanding. Since these will get jostled at least if not outright “beat up” I have no plans to bring them to a mirror surface. I might rub them out with some Liberon steel wool and Mel’s Wax once the surfaces get really hard in a few weeks.
It is nice to have most of my smallest brass spokeshaves in the same box. I bought four sets of the ones offered by many tool merchants 35(?) years ago and am delighted to have them on hand. With duplicate sets I have total freedom to modify them as needed. These tiny tools are amazingly productive but it takes strong finger tips and a good “feel” for using them. Fortunately Mrs. Barn lets me massage her feet for a couple hours most evenings so my hands are up to the challenge.
Very often in the midst of a lengthy undertaking I need a brief diversion to recharge my batteries. Given my current work on building Gragg chairs and recording the process for video and the seemingly endless work on A Period Finishers Manual I’ve been finding myself sitting at the finishing bench for an hour here or there to continue my exploration of the Asian lacquerwork aesthetic by other means. The particular projects are inspired by the Accidental Woodworker’s frequent exercises building small boxes for his tools, combined with my need to keep better track of the multiple small spokeshaves and spoon-shaves I use when sculpting a Gragg chair’s edges and shape. I’ve also got my sandpaper box that has been primed for years and awaiting its final decorative surface.
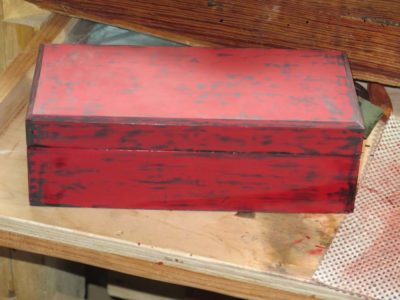
I am particular taken by the lacquerwork aesthetic of the negoru finish, or “rubbed through” surfaces, almost always executed in red and black. Rather than building boxes from scratch I used some of the paulownia or pine boxes from Michael’s that I have acquired over the years as teaching projects for japanning classes. In this case I was working black-over-red, but also had some red-over-black boxes that were never finished.
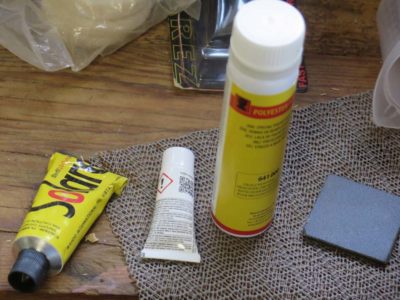
For the sandpaper box I used oil paint, for the others I used shellac. I have yet to complete a box with polyester but will soon. Some day I’ll post a blog series on these decorative options.
After almost a year’s interruption Chris and I were able to synchronize our calendars and schedule the final three sessions for getting the raw video shot for the Gragg Chair video. It will probably come as no shock to some of you that the timing of my Gragg Chair Challenge was coincident with this development. I was able to use some of the work during the Challenge for the live filming also. When calculating the hours for the Challenge I had to take into consideration the pace of work on the video versus the pace of work when I am by myself.
In this pre-penultimate session I spent all the time fitting the short seat slats, by far the largest segment for the entire project. It takes me about 90-minutes per slat, or 9-10 hours for the six, I do think that time will drop a bit as I get more familiar with exploiting the fishtail chisel even more aggressively. I’m also thinking about changing to birch for the seat rails; tulip poplar is a bit too weak for all that short grain in between the slat pockets and the necessary caution slows me down quite a bit.
Two more sessions and all that will be left is for me to review every minute of the almost 40 hours of video we will have in the compewder, and instruct Chris on the edits, chyrons, and segmentations.
The distribution plan is evolving but at this point my desire is to have the project divided into 15-20 episodes (the exact segmentation will depend on my review of the raw files), and they would be available to purchasers at a rate of two per week. Still noodling all that stuff.
In my ongoing efforts to replicate Asian lacquerwork without the use of urushiol, the resinous sap from the poison sumac tree that is refined into the coating material, I have been trying a number of alternate options including epoxy, oil/resin varnish, shellac (of course!) and varieties of polyester coatings. The air flow through my studio is controllable and just about perfect for any non-spray finishing from a clean environment perspective. However, virtually all of the polyester products produce noxious fumes when the coating is reacting. Not enough to be hazardous to my health, but plenty stinky enough.
To deal with the problem I have dusted off my old favorite respirator, the 3M EZ Air that fit my head and face perfectly and is comfortable enough that I can wear it for hours. Naturally since it was such a satisfactory product it is no longer available on the market. The organic vapor cannisters are available so this will remain my “go to tool” for respiratory comfort when working on the polyesters,
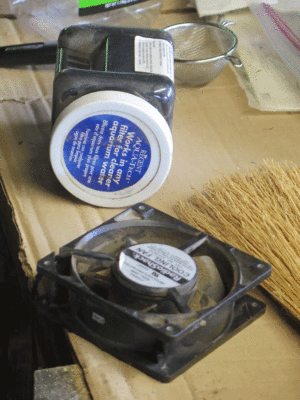
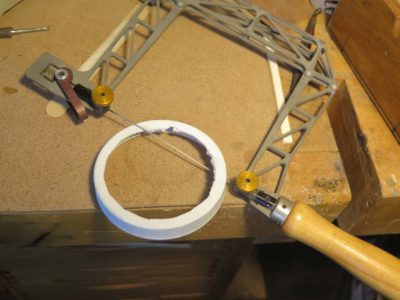
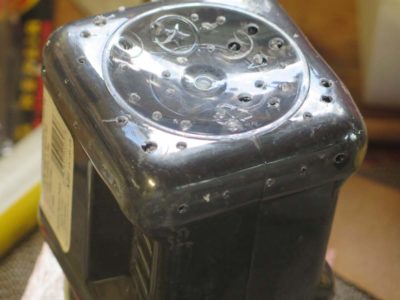
Though a satisfactory solution for ambient odors I also came up with another one for scrubbing the air inside a curing chamber. When I can, I place the newly coated object in a box along with an air scrubber I made just for those occasions. The unit starts as the jar containing activated charcoal flakes, normally used for aquarium filters.
I cut a hole in the lid and affixed a compewder fan and a screen, and drilled a series of small holes in the bottom of the PET jar.
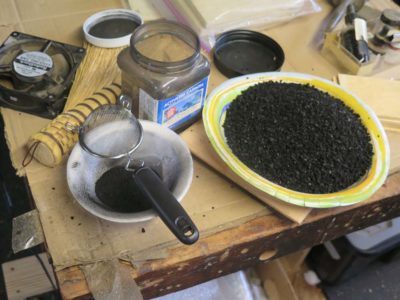
I sifted the activated charcoal to remove any powdered charcoal dust, something I do not want blowing around inside the drying chamber with a wet coating in the immediate vicinity.
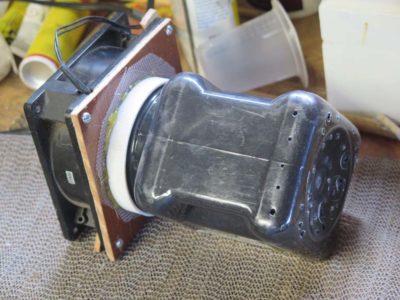
I placed the clean activated charcoal flakes back in the jar and closed up the whole system. Now I can coat the object the the polyester, flip a large cardboard box over onto it to enclose it, and turn on the scrubber. By sucking in the air gently and blowing it through the container of the activated charcoal (which adsorbs the organic molecules off-gassing from the polyester) it removes the odors and I cannot really even notice them while I am at work nearby. When the coating is cured I remove the object and the smell is negligible. I find that if I leave it all in over night there is barely any odor at all.
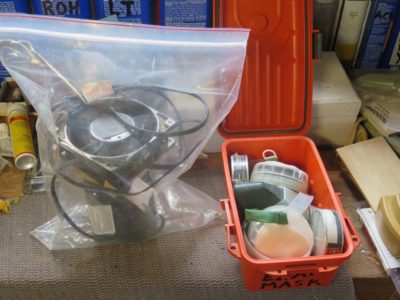
When the air scrubber or respirator are not in use I leave them in sealed containers to extend the working life of their filtering components, whether activated charcoal flakes or organic vapor scrubber cartridges. The fan scrubber goes into a gallon-sixed freezer bag and the respirator into a little sealed box.


Recent Comments