
With the three students in-house by Sunday evening of last week, we began with a quick tour of the attic space we would be using for the chair building; it was the only space large enough for the four of us to be building four chairs simultaneously. We were delighting in the acquaintance-making yet tempered with the knowledge that the fourth student, one of my earliest and most ardent Gragg enthusiasts, had died suddenly and unexpectedly last month while I was preparing for the workshop. His memory was never far from my mind through the week.
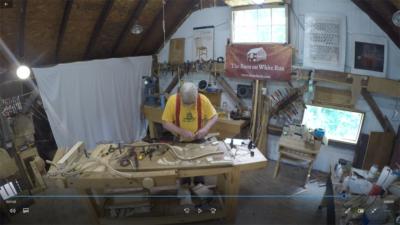
We then descended to my second floor studio where I treated them to the uninterrupted (except for my commentary) hour-long time lapse video of my “40-hour Challenge,” allowing them to see the entire process from beginning to end. With that, we were ready to hit the ground running Monday morning.
Next Monday will be the first day of the inaugural “Build A Gragg Chair” workshop at the barn. I’ve been aiming for this week for the past decade. For a couple weeks I have been preparing the space up on the fourth floor, the space normally used as my video studio. It was the only place in the barn with enough open space for four workbenches, assembly tables, and the steam box.
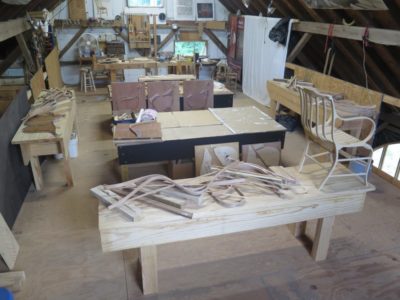
In addition to getting everything tidied up I built three additional assembly jigs and steam bent a few of the parts I forgot to do when my pal JohnH was here earlier getting all the parts bent for student use. That’s the only way we could get chairs built in six days, having all the individual steam-bent parts ready in advance.
It’s gonna be a gas.
I’m praying for cooler weather as last week was the hottest here in fifteen years; it was near 100 in the barn attic. It has since cooled down to normal and I hope it remains so, high 70s in the day and mid-50s at night.
As a general rule I think of “cut lists” as further indication of the inexorable decline of Western Civilization. Still, one of the participants for next August’s “Making A Gragg Chair” workshop at the barn has asked me for a list of parts for the chair. Since he is not likely to be the only one with interest, here goes (these are all nominal sizes, the finished elements are somewhat smaller):
long serpentine (2 pcs) – 1-1/8″ wide x 1/2″ thick x 50″ long
arm (2 pcs)- 1-1/4″ wide x 1/2″ thick x 36″ long
rear leg (2 pcs)- 1-1/8″ wide x 1″ thick x 23″ long
curved seat/back splat (5 pcs) – 1″ wide x 3/4″ thick x 32″ long *
short seat slats (6 pcs) – 3/4″ wide x 1″ thick x 14″ long
Crest rail (1 pc) – 2-1/4″ wide x 2-1/4″ thick x 19″ long **
Rear seat rail (1 pc) – 3-1/2″ wide x 3-1/2″ thick x 19″ long **
Front seat rail (1 pc) – 4″ wide x 1-3/4″ thick x 22″ long **
front stretcher (1 pc) – 1-1/2″ wide x 1/2″ thick x 21″ long
side and rear rungs (6 pcs) – 3/4″ oak dowel x 19″ long
*the center curved splat is widened by tapered glued elements at the top
** these are sculpted elements, not steam bent
Another thing I am working on is a set of full scale construction drawings for the students of the workshop. If there is interest I could see about having them for sale in the Barn Store. Stay tuned on that one.

I’ve got one opening for a student in the six-day “Make A Gragg Chair” workshop, the last week of August, and two openings for “Historic Woodfinishing” over Columbus Day weekend. If you are interested drop me a line at the “Contact” page.

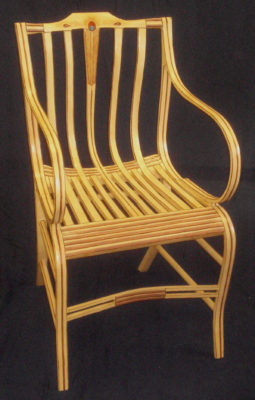
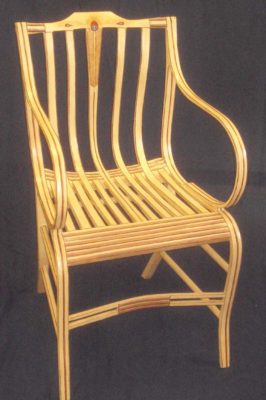
Like Henry Studley, we do not know much about the personality of Samuel Gragg. Obviously we can deduce from his Elastic Chair that Gragg was both aesthetically and technically adventurous. While he made the Elastic Chair for only a few years before moving on to more typical chair forms (read: more profitable) even then he could be a bit outside-the-box.
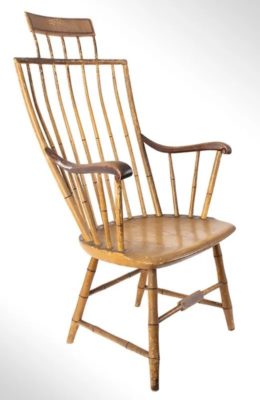
Recently reader BrianA sent me a link to a current “For Sale” Gragg chair that is sorta Windsor, using that descriptor very loosely.
I’m thinking I would have liked this guy.
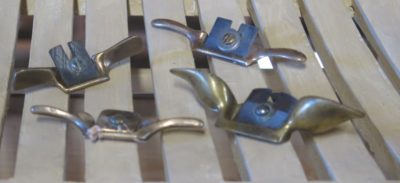
In my recent post about small high-quality brass spokeshaves I remarked that they were 1) indispensable for making Gragg chairs (and any other voluptuous forms), and 2) increasingly difficult to find. In response to that post I was contacted by Hayden Castagno, a Krenov school alumnus who has embarked on a new enterprise of making tools. After a bit of back-and-forth correspondence I became increasingly intrigued by his new miniature brass spokeshaves and purchased a set, full price.
Like me, Hayden is drawn not only to making things but making the tools used in making things. This theme will become even more prominent in my own work and this blog in the coming weeks and months. When I asked him about his creative process he replied, in truly Krenovian fashion:
To me, there is far more to toolmaking (or any craftsmanship, for that matter) than any romantic viewpoint would suggest, but it is in some sense a window to the depth that these topics contain.
I find a life force in wood. I am given energy by making a device that can—with the trust in experienced hands—pull out that life force to be used as a message. Wood offers itself when it is shown a combination of disciplined craftsmanship and good tools. For me, there is great satisfaction in making that good tool and forming a friendship with the craftsperson.
And,
My dad was a welding and manufacturing professor before he started a custom fabrication shop. I essentially grew up inside the shop, learning all the steps of design and manufacturing, and becoming skilled with machines. I was most attracted to what I learned about sculpting and bonding metals by hand. Amongst them, silver-brazing is the favorite.
One of the most impactful experiences that led to my interest in toolmaking was the time … [meeting] toolmakers like Ron Hock, Yeung Chan, and Kevin Glen Drake. That is also where I became aware of tools that aren’t made any more, or are difficult to find.
This leads to the more specific topic of how I recreated the miniature brass spokeshaves. I thought of casting, but I wanted to produce something more hand-made and unique: something of my own design. So, I cut three separate pieces from a sheet of brass and silver-braze the layers by hand. The shaping of the bottoms is done also by hand. I then use chemical polishing techniques to give the shaves the desired shine. Every step is performed by myself at the moment.
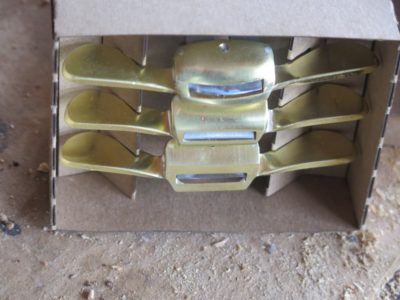
While I am not enticed by packaging I recognize that these are nicely packaged and presented, but even more important is that they are fully sharpened and ready to use right out of the box! Well, they do need to have the blades set-up, they are retracted into the body for shipping. There is a definite “feel” aspect to setting blades on such a tiny, simple tool. I learned this 45 years ago in the pattern shop where we used similar tools for both hogging off stock and feathering contours. My approach is to loosen the screw, press the blade in or out until I can feel the purchase, tighten the screw lightly enough so it does not fall out and then address the edge to the workpiece. If I have it where I want it I tighten down on the screw to lock the blade, if not I adjust it until it is. Given the low mass of the tool it is critical to get the set-up just right or you will get chatter out the wazoo and the spokeshave will literally jump out of your grip.
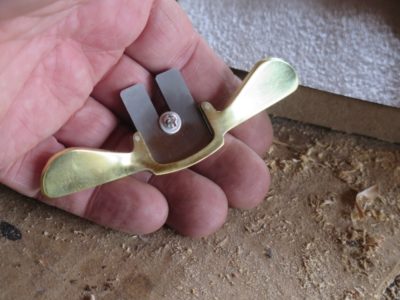
One difference with this tool is immediately apparent when picking it up and using it: it was made by someone who knows how the tool is used and it fits into the hands of a human being. The same cannot be said for some other tools of the same general category. Especially in the shape, configuration, angle, and size of the handles it is a keeper. Clearly this was designed by someone who actually used it.
I gave all three a good test drive on a curved Gragg arm element and was so pleased I was sorry that I did not have a pile of them to work on right away. While they will not become my sole spokeshaves for a Gragg project, dispatching my “lamb’s ear” spokeshaves or the one I made in the foundry in 1978 are not in the cards, I can definitely say that they will be right alongside them to pick up and use at a moment’s notice.
My only “criticism” of the tools after a bit of use is that they are finished too crisply. The edges and the corners are a little too clean for me and I found that I was taking needle files to some of the places where my grip pressed hard enough to leave creased indentations on my fingertips. This is hardly a condemnation as I consider almost every tool that comes into the shop to be a kit and I modify them as needed. You, too may find that the tool needs some miniscule sculpting to fit your individual fingers as well. It is perhaps churlish to note that a semi-custom tool is “too well finished.”
If you are unable to find high-quality miniature brass spokeshaves for your work, Castagno’s just might be the perfect solution for you.
In closing let me say that Hayden’s spokeshaves reinforce my contention that we are living in the Golden Age of Tools. Never before have so many high-quality tools been available and affordable to earnest woodworkers, vocational or avocational.
I look forward to see what he has in his menu of future developments.
In addition to the peculiar tools critical to building a Gragg chair there is a selection of ordinary hand tools that come to play in the exercise.
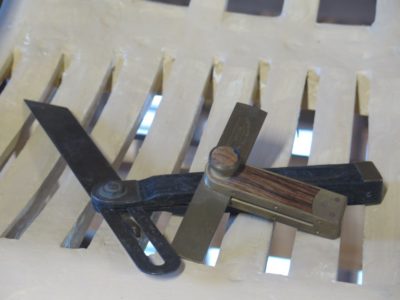
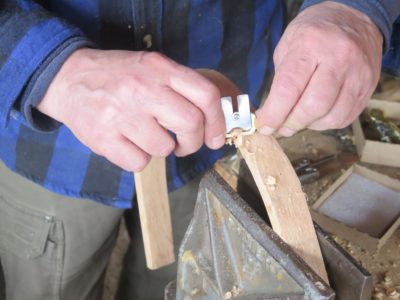
When beginning the actual assembly of the upright chair one of the challenges is to get all these parts balanced with the same splay angles, so bevel squares are the quickest solution. I keep a large one and a small one handy.

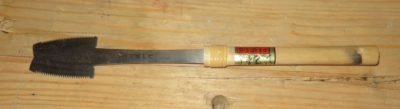
It seems that my mid-sized Japanese saw gets used all the time, for one thing or another.


While building a Gragg chair is not a precision undertaking there is still a fair bit of measuring and layout, so a 6-inch engineer’s scale is never far from reach. I generally use mine for laying out the half-blind dovetails for joining the seat slats to the seat rails. Concurrently a couple pair of dividers are just the tool needed for spacing those elements.

I keep a couple of 4-inch movable squares handy for general layout work, and they seem to get picked up quite a bit.
I use a block plane when finishing the front seat rail, in combination with the previously mentioned rasps and spokeshaves.
An eggbeater drill comes in mighty handy when pre-drilling holes for the screws that are used throughout the joinery, and when adding the steel pins in the mortise-and-tenon joints of the rungs.

When it comes time to countersink and finish off the joinery screws I use my brace and the requisite bits frequently during those stages of assembly. I use old fashioned slotted flat head screws in the final assembly so I make sure to have those screwdriver bits for the brace. Since there is a lot of assembly-and-disassembly in the early staged of the putting-together I find a battery powered drill the be irreplaceable for sinking and removing the deck screws I use for the task.


And, it’s always good to have a small hammer and a mallet, along with a handful of spring clamps.

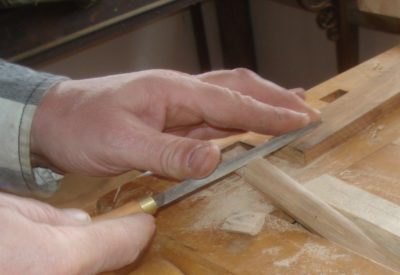
Making a Gragg chair requires chopping 17 mortises for their respective tenon partners. No big deal. Except these mortises are only 1/8″ wide. For that task you obviously have to possess a 1/8″ mortising chisel. You could get by with something 5/32″, but probably not 3/16″ The stock is just not beefy enough to try that.
I have three chisels in my arsenal for this process. The first is one that came for a box of tools I got at a flea market, it is a 1/8″ long chisel with a turned bulb handle. A second is from a no account 1/4″ Stanley chisel that I ground down to 1/8″ wide, and the third an my “go to” chisel is one I made from a derelict plow plane iron. All three are delightfully short in their overall length, a definite advantage when working inside the quirky confines of of the Gragg chair.


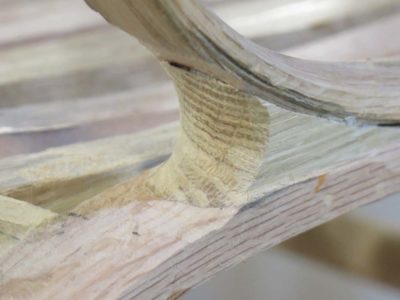
The mortises in question are for the rungs and fitting the seat slat tenons into the underside of the crest rail.
I’m not sure if the 1/8″ mortise chisel is THE most important tool in the project, but I do know that Gragg himself did not use the mortise-and-tenon method for attaching the rungs – he just drilled full-size holes and punched the rungs through – and every Gragg chair I have seen is broken at this point. This is definitely one case where an acolyte can improve on the methods of the master. I once asked some engineers to analyze my approach with Gragg’s, and they told me the 1/8″ M-n-T construction was ultimately 4x to 5x less likely to fracture than the original.
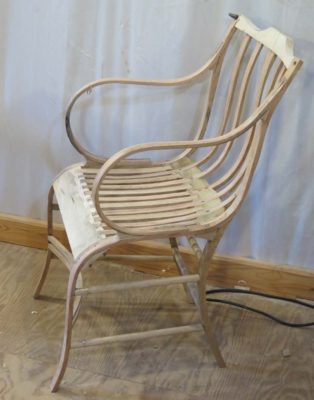
The Gragg chair is more like a sculptural assemblage of curvy parts in space and at several points in shaping the chair components there is only one tool type to suffice for the task, namely the rasp. Or in my case, a few rasps and similar tools like floats.
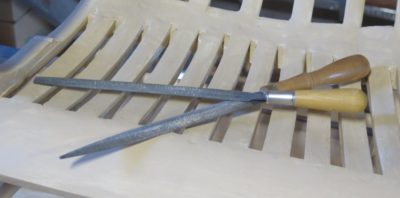
I generally include four tools in this category; an Ariou cabinetmaker’s 10″ rasp (or its analog a Nicholson #50 patternmaker’s rasp),
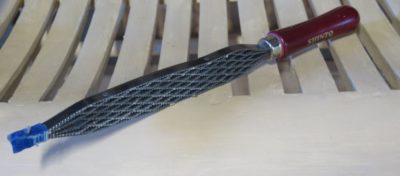
a Shinto rasp, and a pair of fine Iwasaki floats, both flat and half-round. In procedural order the processes requiring them are as follows. Sorry about there being no picture but I could not find one in my compewder. They’re there, I just cannot find them.
First is the touch up of the diminutive tenons for the rungs when the side units are assembled. This is necessary only when the tenons are cut too full and need to be nibbled down to fit the mortises. Generally I accomplish this task with either the Shinto rasp, if there a a fair bit to remove, or the flat Iwasaki float or small Ariou rasp if just a little.
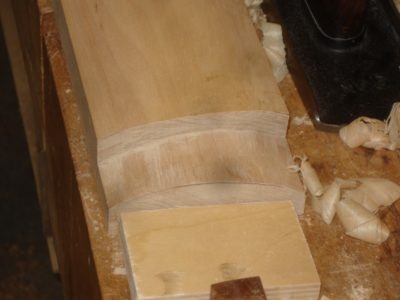
Once the assembly of the cross elements begins I tend to concentrate on the front seat rail, letting the rear seat rail and the crest rail dimensions be established with tacking strips. For the front seat rail the rasp is critical for two distinct steps. First the curved surface of the end lap joints must be shaped to fit the underside of the serpentine leg element. Though most of this step is accomplished with a saw and chisel, the final fitting is fastest with the Shinto rasp.
Then, once the stock is fitted and affixed in place I remove the most of the square shoulders of the excess with a block plane but the configuration of space and the element means that the heavy lifting for roughing the shape (and the embedded half-blind dovetailed seat slats) falls to the rasp.

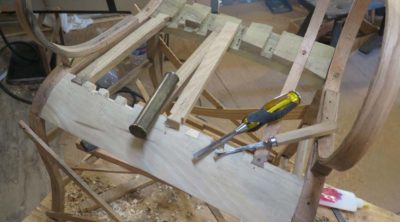
Fitting the crest rail to the tops of the serpentine pieces is a mix of saw and Shinto rasp, but the actual sculpting of the crest rail shape is accomplished through a combination of spokeshaves and the Ariou rasp, followed up with the pair of Iawsakis to get a surface ready to paint.

The final place for rasp work is both a “mere detail” and an elegant hallmark of a Gragg chair, the rounded glue block underneath the front of the curved arm and the meta-volute at the bottom terminus of the arm. With the Ariou rasp I can usually cut these shapes into the square-ish stock in about 5-10 minutes.
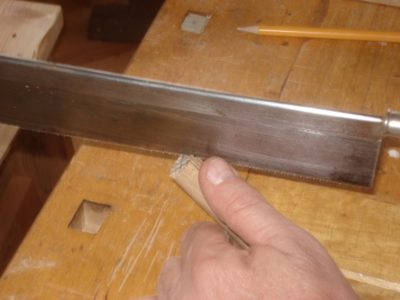
While not necessarily unique to making Gragg chairs a variety of detail saws are certainly part of several processes in the making of one.


Probably the most peculiar of these is cutting the curved dadoes in the rear seat rail to accept the bentwood seat/back slat elements. While I know that making the curved bottom configuration of the dado can be achieved in multiple ways perhaps my favorite is to use a Japanese veneer saw, which with its deeply curved cutting edge is very well suited for the task. One problem I have encountered recently is that I cannot seem to find source for the saw, so I will probably attempt to make some myself.
One option I have tried is to employ a Japanese mortising saw, with some success. The problem with this saw is the exceedingly long neck which causes some flopping around of the head. I’ll probably order another saw and move the handle up next to the head.

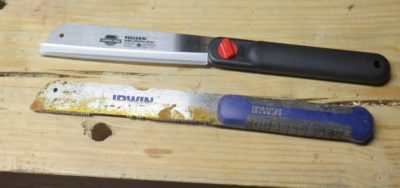
Without having the saw in the tool kit it is possible to cut the margins of the dado with a small Japanese detail saw and then excavate the curved bottom of the groove with a bevel-down bench chisel. Actually I find myself reaching for the Irwin and Shark saws far more often than I first expected. Clearly, this Irwin has had a tough life in my carpentry kit, I need to re-cut teeth on it.

Elsewhere on the chair there is the need to cut the shoulders of the half blind dovetails on both the front and rear seat rails,


and the tenons on the ends of the back slats to insert their tops into the underside of the crest rail, and to cut the tenons on the ends of the rungs. For these tasks pretty much any fine back saw will work, I go back and forth between my custom specced Bad Axe (now in their inventory), my treasured old Sears backsaw I bought new in about 1970, and my Japanese dovetail saw. My habit is to cut the half blind dovetails with the Japanese dovetail saw and all the teeny tenons with the Bad Axe.
Next time – rasps.

Recent Comments