When my friend Sam, a restoration carpenter, bought a portable sawmill he volunteered to practice on the walnut logs from the tree my pal Bob and I felled a few years ago (as a lifelong logger/timberman Bob did all the felling with great expertise, I did the watching and cleaning up after). Though the walnut tree was a beauty, it was a beauty that cast an impenetrable shadow on one of Mrs. Barn’s prized gardening locations.
Nix one walnut tree.
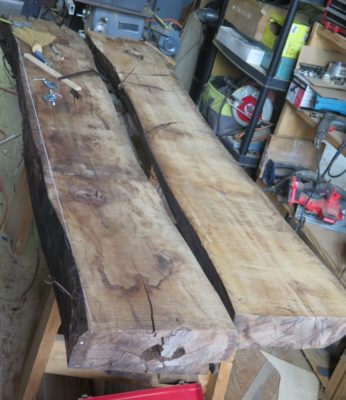
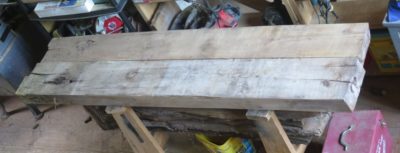
For the last eighteen months the sawn walnut has been sitting in the middle of the large room on the main floor of the barn, awaiting the next chapter in its journey. That journey will come to fruition later this summer as Webmeister Tim will be coming to the barn for a week-long visit and our project for the time will be building him a workbench. He is a turner moving into hand tool bench work so we need to make sure he has a proper bench.
Although the slabs resultant from that felling and milling are not fully dried — the traditional rule of thumb was “one year per inch,” which means another couple of years to reach “air dry” — I think that they are far enough along that trajectory to allow us to move forward with making his bench.
NB: here in the mountains there are old-time timbermen who swear by a different rule for seasoning wood. For them, the time is “one year for the first inch, two more years for the second inch, three more years for the third inch,” and so on. By that measure these four-inch-plus slabs need at least another half-decade to be “air dried.” However, given the structure and features of a slab-top bench I think it is safe to proceed.
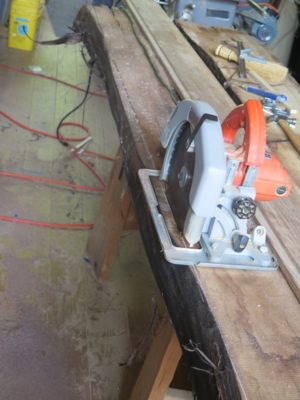
To get to that point I am prepping the thick walnut slab stock. Since I had to rip edges of the slabs in place I dusted off my 10″ Milwaukee portable circular saw for the first time since I can remember.
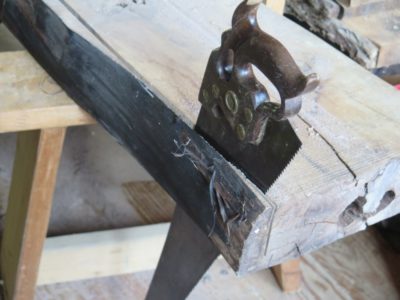
Sawing from one face only the saw got to within about 3/4-inch of a through-and-through cut so I finished up with my venerable rip saw.
I wound up with two beautiful half-slabs, en toto ~21″ x 4-1/2″ x 84″. I’ll leave them alone now until Tim comes and we can move forward, depending on the details he wants for the bench. I don’t have any machinery to handle something like these so there will be plenty of hand work from this point on.
In the meantime I am thinking about slabbing the white oak timbers that have been sitting outside the barn for several years. The smaller one on top of the pile is 8″ x 15″ x 102″. The bigger ones are a full 10″ x 15″ x 125″.
Just another quick reminder about the two upcoming workshops focusing on shellac and wax finishing.
The workshop at the barn (my final one here due to my already recounted business insurance termination) will be June 19-21. For that workshop contact me directly.
The identical workshop will be held at Joshua Farnsworth’s school/shop in Earlysville VA, July 17-19. Contact Joshua for registration and other information.
Recently while visiting our older daughter and her posse I snuck down to the basement workshop while the rest were up in the dining room playing board games (have some pity on Mrs. Barn, she loves board games and dancing, two activities for which I have near-zero proclivity), spending some time assembling sub-units of the tool cabinet parquetry. It’s an easy project I can take with me in a shoe box.
This parquetry topic will play an increasingly prominent role on the blog over the next year.
The work itself is fairly mindless, giving my attention plenty of opportunity to wander here and there. One of the ruminations it settled on was the numerous work spaces I inhabit, and the many sets of tools these places are populated with.
Of course there is my workshop in the barn, with its plethora of tools for woodworking and metal working.
That’s the first pile o’ tools.
Even in the barn there is the subset of tools up on the fourth floor where I build Gragg chairs. I created this space and its accoutrements after getting mighty tired of walking up and down stairs every time I needed this or that.
Thus, a second pile o’ tools.
Just down the hill from my main barn is the vintage log barn, originally a livestock housing but now a storage bin for lumber. Attached to this barn is the lean-to where all the lawn equipment is stored. And stored along with the equipment is the substantial collection of tools requisite for keeping things in operating order.
Third pile o’ tools.
Just across the creek from the lean-to is the cabin, and like almost every domicile it has a fairly extensive set of tools to keep everything there running smoothly, from electrical to plumbing to woodworking to who knows what else.
Fourth pile o’ tools.
Then we’ve got three vehicles, each with their necessary tool kits in case anything goes wrong while on the road.
Tool piles five, six, and seven.
Then there is the aforementioned workshop at my daughter’s house with fairly complete workshop in the basement (pile #8) and my carpentry tools and power machines in her little barn (#9).
Even though I do not have a workshop nor tool collection at my other daughter and son-in-law (he’s got an excellent inventory himself) I’ve got a couple selections of tools I take whenever we go there.
Piles 10 & 11.
Some might say I “have a tool problem,” I refute the accusation vigorously. I do not have “a tool problem,” I have a lot of tools.
The first of what eventually grew to several piles of thrashed pipeline.
For many years my seasonal regimen for the hydroelectric system has been fairly routine: I drain the waterline some time in November, depending on the temperature trajectory, then recharge the line sometime late in March. I use the descriptor “For many years” because our first winter here also saw the coldest temps since we bought here in 2000 with overnight lows reaching -15F, and my dream of running the system year-round was dashed. The water froze in the pipe, resulting in my need to replace almost 600 feet of pipeline the following spring.
At one time I was rethinking the scheme of having the pipeline above-ground and wondered, could I get it buried beneath the frost line? Since the answer to that question turned out to be, “Of course, all it takes is something north of $75k, and oh by the way it will completely destroy your creek and everything adjacent to it,” I’ve just stuck with the original concept.
So now, every late autumn as soon as we get a string of days with sub-freezing daily high temperature, I shut it down to preserve the line. Notwithstanding that I’ve had to do a little repair every spring, virtually all from trees falling on the line and breaking it (once was from a bear gnawing on it) the routine has worked well.
No big deal. A half-day of work and we’re ready to roll.
Until this year.
The replaced section near the bottom of the system.
For starters, between travel and yard duties I did not even begin to turn my attention to the hydro system until a couple weeks ago, a full two months later than usual; since I have not been in the shop much and there has been plenty of sunshine, the solar panels did more than enough to keep things copacetic power-wise in the barn.
When I dove into it this week, I encountered almost two hundred feet of shredded pipe near the bottom of the system. The damage was the typical helical fracture pattern of bursting due to water freezing in the pipe. This perplexed me since I had drained the line last fall. My annual draining protocol is to disconnect the pipeline just below the capturing box at the top of the system by loosening the hose clamps holding it together, then moving the pipeline aside a bit. And that’s where the problem this year started. To quote the famous LBJ line, “I reserve the right to be smarter than I used to be.”
Now I are smrt smarter than I used to be.
What almost certainly happened was a fierce rainstorm occurred after the disconnect, with the resulting water flow in the creek high enough to pour into the open disconnected water line and refilling the line. And when the line subsequently froze, BOOM! A couple hundred feet of pipeline turned into confetti.
Treacherous footing abounds. One false step can land you flat on a bed of rocks.
I spent this week working on the damaged area, which is an exhausting undertaking. Every footstep has to be considered and calculated given that every single space is uneven, loose rock, most of it slippery from being in a creek bed. Even wearing my best old lumberjack boots, it is treacherous. Especially since it requires good vision to navigate the terrain, a feature I do not possess. (Monday I will be having my 22nd eye surgery, which will provide no enhancement to my very compromised vision but should help to preserve what little vision remains in my used-to-be-dominant eye). Trying to traverse treacherous ground with zero depth perception is a challenge.
I was able to make the repairs with the last of my original inventory of 2″ x 20′ PVC pipe. When I had the first catastrophic winter damage I bought a complete bundle of the necessary pipe, I think it was 80 pieces, and have been using a piece or two every year since the first one.
Yesterday morning I walked to the top of the system and much to my dismay saw serious damage up there too – not from freezing but from destructive/tumultuous water flow in the creek — which I repaired fairly quickly, then reconnected the water line. Just downstream from that repair I discovered another breach. Drat. Walking the line yesterday afternoon I found dozens more breaches, and hundreds more feet of shredded pipe. Double drat. The air was pungent with not-appropriate-for-Sunday-School epithets.
I went to the local farm coop and bought all the pipe they had but still I am way short. This morning I will check with the hardware store the next town over. I’ve gotta get enough material to finish the project next week and bring the hydroelectric turbine back on-line.
Remember the full bundle I bought ten years ago? It was roughly $11 per piece. Now the price is $36 per piece. Ouch.
Lesson learned, albeit a very expensive lesson – put a $1 cap over the end of the pipe intake when you disconnect it, stupid.
At the end of July I’ll be building a premium workbench for Webmeister Tim, who will be visiting. In order to get in the mind-groove I was browsing youtube for inspiration, not that I really need it, and stumbled across this wonderful short video chronicling the construction of a bench the analog of which I have built four or five. I probably use at least one my three remaining iterations of them on an almost daily basis (given my inventory of more than a dozen workbenches, one is never more than a step or two away from one). Easy and inexpensive to build, yielding a heritage workbench for centuries to come.
I might take a slightly different path for some of it but en toto this one is solid gold.
The big yardscaping push after extensive travel is winding down to the “ongoing maintenance” of summertime, when the living ain’t exactly easy trying to keep three or four acres of hillside under control. The grass was so deep here it took three back-to-back-to-back mowings to get it under control, some even required using the DR brush mower.
I am hoping we are now down to a routine weekly mowing, but even then it takes two or three days to get it all done.
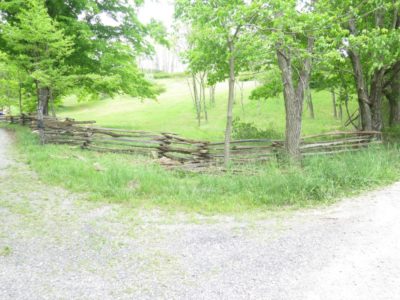
One of the unexpected tasks on our return was to rebuild the split rail fences alongside the driveway. While we were gone there was such severe weather that sections were blown over, and if one section of stacked split rail fence goes down you pretty much have to restack the whole length.
I made a couple rookie mistakes on the photos. First, I did not take a “Before” picture of the split rail fence all falled down, and 2) I forgot to check the camera settings which had been adjusted to reflect much different light conditions of a different project.
Sigh
I am trying to get caught up enough to begin erecting the greenhouse by the end of next week. Wish me luck.
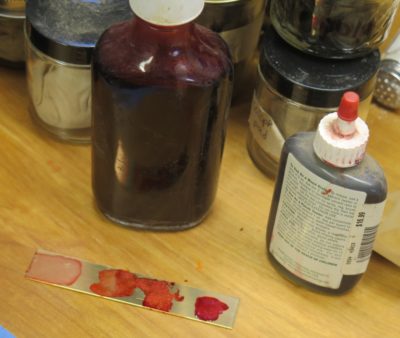
Not too long ago I needed to do some precision layout on brass stock for making some specialty squares and patterns for assembling the Roentgenesque parquetry units for the tool cabinet. (Those projects will be on these pages shortly.) Try as I might I could not find my bottle of Dykem, the standard layout dye for the metal working trade since the days of the Mayflower. So being in the hinterlands on a Saturday afternoon, I made my own.
The starting point, not too surprisingly, was a dilute solution of lemon shellac (given the amount I needed it turns out to have been way too much). I started with a deposit of the shellac flour adequate to cover the bottom of the bottle fully.
I then filled the bottle with ethanol to dissolve the shellac. To this I added some Trans Tints until the chromatic intensity got to where I wanted.
And with that, I was done. The bottle I now have will certainly last me long into the afterlife, I should have only made about 1/10th as much.
I am certain that as soon as I complete these projects my original bottle of Dykem will be in plain sight.
PS We are finally back to Shangri-la after three weeks of time with the family. L’il T is just a gas. Once we get the yard dealt with (literally knee deep) I’ll be resuming my “normal” routine.
My longtime pal Ripplin’John sent me photos of his latest project en route to an MFA (at our age John, what were you thinkin’?). Seriously, I am immensely proud that we are friends, my circle of close friends is actually quite small, and of his artistic and technical accomplishments while exploring the realm of artistically integrating wood and metal. Some time ago I gave him a copy of the Matthew Boulton book and is now going to town.
This “lunch box” employs classic boullework techniques, right down to the engraving. In his own words,
I changed the normal procedure somewhat. I printed the drawing on PNP paper and then transferred it to a brass blank slightly larger than the size of the sides. After engraving the brass, I assembled the packet with shop-made veneer and cut out the pieces as needed. Doing it this way meant that I was engraving much larger pieces of brass. Holding the very small pieces after cut out would have been pretty tough.
Each assembly was then glued to another piece of veneer before gluing to the box. This was done to ensure that a failure of the glue up on one side would not wreck the whole piece.
The corners, finial and cheese crackers are cast bronze.
Well done, sir. You can tell him so in person at Handworks where he will be helping me in my booth.
A couple weeks ago I had a terrific three days teaching “Shellac Finishing” to members of the Howard County (MD) Woodworker’s Guild. A good time was had by all, but alas I left my camera behind so I have no pics to chare.
My teaching calendar for the remainder of the year is as follows:
May 20 The H.O. Studley Tool Cabinet and Workbench banquet presentation for the Annual Meeting of the Early American Industries Association, Staunton VA
June 19-21 Historic Woodfinishing 3-day workshop for the regional chapter of the Society of American Period Furniture Makers, at the Barn
July 17-19 Historic Woodfinishing 3-day workshop at Wood & Shop, Earlysville VA
August 21-23 Introduction to Parquetry 3-day workshop at Wood & Shop, Earlysville VA
For as long as I can remember I’ve been wearing carpenter pants with a side pocket (for a while my favorite jeans from Bailey’s had them on both sides!), into which fit perfectly the best little flashlights I ever used. These were machined aluminum case Ozark Trails flashlights, one of the proprietary brands from WalMart. The first crack in this edifice was when WM discontinued this particular line of flashlights in favor of lesser but presumably more profitable models. (I can only imagine Sam Walton spinning in his grave at the thought of what a malevolent entity his empire has become) The old ones were robust almost to the point of indestructability, a determination at which I arrived when I drove over one in my truck and it emerged functionally unscathed, although a little scratched. It took a lickin’ and kept on tickin’.
But then came the inexorable tyranny of, to quote the inestimable David Bowie, “F-f-f-fashion.” With the emergent ubiquity of “smart” phones (I think they have uses but on balance make the populace stoopider) the narrow confines of side pockets, originally configured for a folding carpenter’s rule, grew in size to accommodate these surveillance devices most American now carry. What, you thought their purpose was communication? Now, that’s funny!
Anyway, the newer larger side pockets were ill suited for my small flashlight as the flashlight just sorta wallowed around inside the bigger pockets, falling out whenever the opportunity arose. Like whenever I sat down in my recliner or in a car. I cannot recount the number of times I had to retrieve my flashlight from one of these locations.
This frustration led me to search for a new flashlight that fit the larger side pocket a little more better. There are lots of options on-line but I generally like to purchase items after I can examine them in person. Durning a recent trip to the hardware store I found a DieHard brand flashlight whose configuration fit the requirements perfectly. It was a bit more expensive than its predecessor, maybe, ($35 2023 dollars vs. $15 2005 dollars) but fit the new side pocket size perfectly and was touted as a better, brighter tool. I plunked down my money and started carrying it a couple months ago.
The real bolt-of-lightning occurred shortly thereafter, when I remembered just before bedtime that I maybe left the glue cooking on the coffee cup warmer and rather than fuss about it all night long I walked up to the barn to check it out (I had turned it off but had no clear memory of the event, a phenomenon that rears its ugly head periodically as I approach 70). As I headed up, then back down, I turned on the new flashlight and WOW I was accompanied by a wall of light in the rural darkness. My old flashlight was 150 lumens and the new one is 1000. Just wow.
The new flashlight also appears to be a solid aluminum case, but I’ll only be able to confirm its robustness when/if I drive over it and it keeps on tickin’.
My Every Day Carry inventory has now been upgraded.


Recent Comments