Finally comes the time for priming the Gragg chairs, the foundation for the decoration to come. In my earlier Gragg exercises I used a gesso base followed by pigmented shellac, but that was before the technical analysis of the original Gragg paint was conducted. This analysis revealed his work to be almost entirely executed in oil paint. I have revised my current procedures to reflect that newer knowledge.
My scheme for the early finishing schedule is roughly as follows:
Fill the most egregious voids with putty. I made my own putty my mixing some of the oil primer with additional whiting until I got a thick paste.
After sanding off any excess putty, prime the surface with a solid coat of Zinsser shellac-based white primer.
Once that primer coat is dry, apply two coats of Brushing Putty from Fine Paints of Europe. I tinted this with a little yellow ochre.
Once these two coats are fully dried, sand the surface completely with 120 sandpaper.
Finally, apply two coats of flat white oil paint strongly tinted with dry yellow ochre pigment. Somehow I failed to get a picture of this final prep, or it is on my other camera.
Unfortunately, due to the competition between my calendar and Chris’ calendar we did not get these steps on video camera. We will have to film it on the next chair.
I recently attended and spoke at Groopshop 2019, about 25 miles southeast of Minneapolis on our friend Matt’s farm. I do not recall the finally tally of attendees but I’m estimating about 60 folks convened for three days of intense fellowship and exchanging of knowledge and ideas related to the furniture restoration enterprise.
My talks were on the topics of insect eradication in infested wooden objects (video recorded en toto and certainly to make it to the interwebz at some point) and toolmaking, especially low tech tool making as part of the restorer’s art.
Topics for the other presentations and demonstrations included the far-flung topics of Wood Finishing Terminology, Custom/Production guitar Finishing, Repairing Metal Hardware, Leather Repair, Museum Upholstery, Polishing Out Finishes, Reactive Colorants In/On Wood, History and Technology Of Aerosols, Government Regulations for Refinishing Shops, and many more.
The sessions were interspersed with eating and small groups congregating, and I look forward to our next gathering. A truly grand time was had by all.
Since its beginning Groop has been a moderated email forum but we learned that on Jan 1 it transitions into a private Facebook discussion group.
Now that the construction of the first Gragg chair is finished and the second one close behind, I got to thinking again, “Could I offer a workshop in building one of these?” Since I have never built one start-to-finish uninterrupted I simply do not know. Up to this point when working on these chairs I was constrained by the realities of video recording as I had to make sure my work was presented to the camera and my running commentary was comprehensible to a viewer. So, how quickly could I work without consideration of the camera nor pretending to be a friendly soliloquist?
Some time over the next couple months I am likely to find out as I undertake the making of one while “on the clock,” talking only to myself with an endless stream of criticism.
I believe that the only way to get one built in six days would be for students to start with all the necessary parts and with complete set of jigs. That is where I shall begin on some upcoming Monday morning. Then, with a time lapse camera running, I will see if I can get one constructed in five days. If I can, I would think a student could do it in six.
The workshop could not begin with a tree, as I do with the chairs I’m building, and not even with the raw riven material. Nor could it begin with steam bending all the parts, although that would be covered and demonstrated one-on-one with each student in a staggered schedule. The raw stock takes too much time to prepare for this context and the bent pieces need too much time settling down ex poste for this to be a realistic starting point so I would by necessity have all the stock prep and bending done in advance. However if it goes much faster than I am estimating I could enfold some of that by-passed content into a real syllabus.
I’m thinking my exercise will take place in late November or early December of this year. Wish me luck. If I do get the chair built in five days, working 9-6 with a lunch break, I will feel more confident in offering a six-day workshop in autumn 2020 for four students to come and build their own.
Wish me luck. I will be providing a daily update on the progress as the challenge unfolds.
I was wandering around youtube the other night and stumbled cross this half-hour video we made as a bonus for my PopWood video on Historic Wood Finishing. I vaguely recall making this but did not recall it was now residing on youtube. I’m pretty sure I have not posted this video before, but if I did I’ve forgotten and you get it once again.
Enjoy (and I hope you laugh in all the right places).
While reading the profile of my long time friend and fellow Lost Art Press author Joshua Klein I was reminded of his small (tiny?) workshop when I visited him for the first time many years ago. This in turn caused me to continue my reflection on the blessings of my own work space where I have a generous space for virtually each of my undertakings, roughly 6500-7000 s.f available to me. AS I wrote recently, there will come a time when life in the hinterlands will likely become too challenging for us as we eventually approach our dotage, and the cabin and barn will be in the rear view mirror.
Though I pray that day is still long over the horizon I remain cognizant of the need to one day be constrained in my shop footprint. When we eventually build our geezer-friendly final home I expect my shop space will be limited to a 10×15 shed, perhaps with a four-foot wide lean-to storage shed on three sides. As I ruminate on that distant eventuality I find myself looking to see what other folks are doing with tiny spaces for shops.
I stumbled across this shop tour recently. To say it is the opposite end of the spectrum from my current locale would be a gross understatement, but I found it immensely engaging nonetheless.
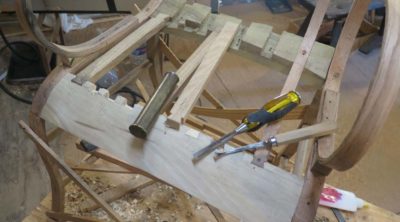
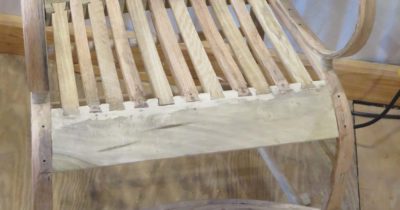
One of the challenges when building Gragg chairs is that the short seat slats are half-blind dovetailed into the front and rear seat rails (well, the front of the continuous slat are too, but it is mor difficult for these ones). As a practical matter this can only occur after the chair has been mostly assembled, so the work is in tight and awkward quarters. I generally cut the mortise shoulders of the dovetails as deeply as I can to make waste removal as easy as possible with a narrow dovetail chisel, but then I have to remove the remaining waste very carefully so as not to damage the joint fitting.
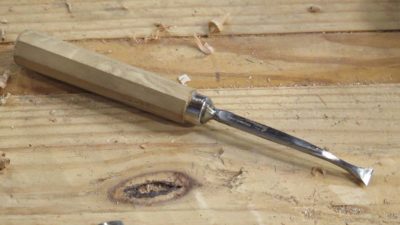
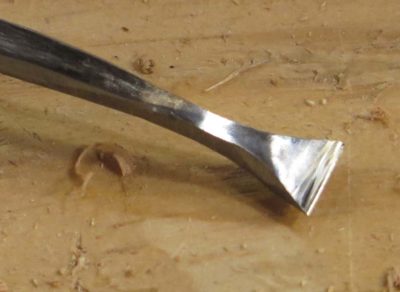
A tool that is extremely helpful in this undertaking is a custom-made curved flat fishtail gouge. I tried store-bought curved flat fishtails and although the are fine tools but they do not flare enough to be particularly useful. Instead I took a 1/2″ curved flat fishtail and ground away the shoulders to make their flare much more pronounced, and that works just fine. It allows me to reach way into the interior corners of the dovetail mortise and get them clean.
Still, it does make for a mighty long work session.
I have enough trouble keeping the joint shoulders intact without creating additional hurdles to jump. At this pint of the project that light at the end of the tunnel is getting brighter.
I just realized that I had some more episodes of this initial, free, video. In this one I cut out the fitted patch with a jeweler’s saw on a bench pin or sawing platform. If I recall correctly, it was below freezing that day in the attic studio.
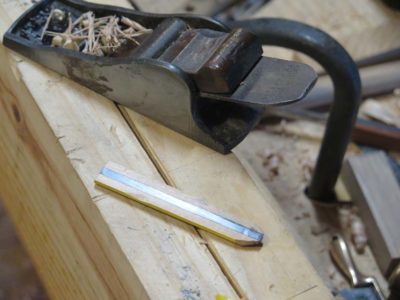
I’m certain I am not even the millionth person to transform a pencil into at tracing gauge, but it is a tool that I use whenever I am making the intermediate seat slats for the Gragg chair, transferring the shape from the steam bent unified bottom/back slats.
I prefer to start with a carpenter’s pencil, saw it in half length-wise, then shave off most of one side with a utility knife.
Then I plane it flat with a block plane to reveal fully the graphite core.
To keep the open graphite from smearing all over everything I simply place some transparent tape over it and burnish it to make it perfectly intimate with that surface, then trim the excess tape. That way I can not only handle the new tool but place it directly on a surface to be traced without contaminating that surface. I make the tip sharpened, leaving the graphite/tape side flat and beveling the other three facets and place the tape side against whatever contour I am trying to trace, transferring the shape onto the workpiece being made to fit that shape.
Yup, when fabricating the seat of a Gragg chair the most important tool was free and required almost five full minutes to modify.
Mrs. Barn and I often listen to audio books when traveling, and recently we heard a story in which on-line gaming was an element. Truth be told I cannot see the attraction for such things, even board games hold little interest for me, and that’s with the other players sitting right beside me. The notion of playing a game with strangers over the interwebz simply strikes me as bizarre, even though a family friend actually earns money playing on-line games as people pay to watch him play. I guess this is no weirder than paying to watch baseball or something similar (although one of the surprises in recent years has been he ease with which not watching sports television has become manifest since moving to the mountains. Even when in a place where televised sports is available I find that a quarter of football or a few innings of baseball is about all I can take. And of course pro basketball is dreck now.)
But really, how much stranger is compewder game playing than browsing for news, instruction, or contact with people I have never met and am unlikely ever to cross IRL? (I just learned that acronym). Yes, the web allows us to make and maintain contacts we would otherwise never encounter.
As I have written previously I connected with and have been corresponding for some time now with woodworker and tool maker Rob Hanson, whose Paradise CA home and shop were reduced to ashes in last year’s catastrophic wildfires. Since the physical assets of his business were completely obliterated and I have accumulated a stash of surplus tools, I have been packaging and sending him tools. Almost none are new, but none are junk either. They can be put to work to help him rebuild his family’s lives.
Recently Rob returned to visit his former home and wrote this to me.
The cleanup work in Paradise is nearly complete. There have been hordes of dump trucks on the roads all over the area hauling the refuse away, some 6,000,000 tons of debris had to be removed. Driving out there was somewhat surreal because everything looks extremely different than it used to, and what once was a very lush and green forested area is now dead. There are literally thousands and I would venture to guess tens of thousands if not many many more dead trees everywhere.
Mentally, It’s kind of like being held in a holding cell and each time they bring you out you see something different. Of course while you’re in the holding cell your life is continuing on in a new vein, but every so often you get to go look at your old life, and it’s just a snapshot of what’s going on in your old life for a moment. So your last memory of everything being normal is you know, you had your home in your shop and all your stuff in your yard and your life was happy and everything was set up the way you wanted it.
The next snapshot is that everything is burnt to an absolute, blacksmith Forge Crisp, and you see that a couple of times completely soggy with rain and rust is on everything that has been burned, and everything else is just ashes. And then you finally see it completely excavated and cleaned up and stuffed in dump trucks and gone. What’s left behind has remnants of things that you recognize before the most part it looks like the moon, with spray on hydrotreat grass seed everywhere. Nothing is manicured anymore, and weeds where they have never been before are everywhere.
Got that? Six million tons of debris! Now that is compelling IRL. And if yu follow the news from there you know that the rebuilding efforts face monumental changes, not the least being mny of the local water sources have been thoroughly contaminated, and the complete utility infrastructure need to be rebuilt.
It is a rare day when I do not reflect on the travails of Rob’s family and the tens of thousands like them, while the poltroons in public office wail and gnash their teeth over plastic straws. I think it was Mark Twain who said something like, “America has no native criminal class, except for politicians.”
I’m sending another box of tools to Rob this week.
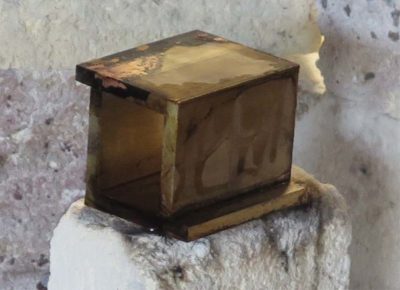
Of all the tools I’ve encountered that have seduced me Henry Studley’s infill mallet ranks at the top of the list. To continue the unenviable task of keeping my probably ADD self amused I decided to play with making something similar, a project I could work on intermittently while some glue or paint was drying, or when I needed a distraction while I cogitate. For the raw material I ordered 1/4″ wall thickness right-angle brass stock from McMaster Carr to serve as my starting point. Since this was more a “proof of concept” exercise, the concept being proven being the silver soldering of very heavy stock, it seemed like a sensible approach. Perhaps for a “proof of concept” exercise I should have started with aluminum rather than brass, but that’s where I started nevertheless.
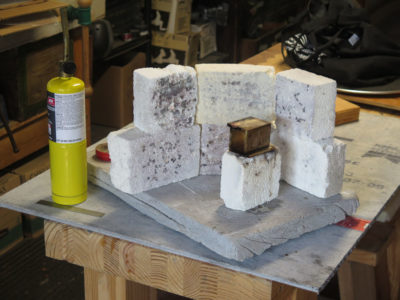
With the measurements in-hand I chopped the requisite segments and set up a soldering set-up on my heat-work station (I think I will probably write a series of posts about setting up such a work station yourself as I hope you will all follow me down this rabbit trail). My strategy was to simply overlap the two sections with each other as shown and fire up the torch. Even though I could/would only do one seam at a time I slathered generous dollops of paste flux on both interfacial surfaces.
After heating the entire mass I concentrated on the seam joint and introduced the silver solder on the inside corner of the seam and let the torch heat draw the solder through the joint.







Recent Comments