Our little corner of paradise has many idyllic features fitting my “Want List,” compiled over 30 years, almost perfectly. Remote? Check (as the realtors have advertised, we are three mountains back from the nuclear blast zones). Sparse population? Check (reputedly the lowest population of any county east of the Mississippi River). Isolation? Check (nearest permanent neighbors a mile away). Geographic beauty? Oh yeah.
Rich, loamy soil perfect for gardening? Uh, not so much. I actually think that the primary “agricultural” product of our region is not cattle and sheep but rocks. Even now after a dozen years of gardening the same spot Mrs. Barn gathers a new pile of rocks every Spring during her pre-planting preparations. By the way, this has to be done by hand as the “soil” will beat the ever lovin’ snot out of a garden tiller. I once rented a trencher to bury some electrical conduit. Didn’t last five minutes.

Recognizing the nature of the “soil” here I built a series of raised beds for gardening before we moved here. I ordered a truck load of “topsoil” that had to be screened to remove all the gravel, then filled the boxes with that screened dirt. Soon enough there were green shoots popping up.

Early on I affixed PVC hoops ribs on the boxes so they could be netted in the summer and covered with plastic in the winter. On two of the boxes I built removable screened hoop covers for the beds, and this past winter I was informed that the two screened covers were plumb wore out and needed to be replaced.

Given the importance of the enclosed raised beds I decided to make some first-class hoop covers for them. I began by taking the time to make a form on which I could assemble laminated curved ribs. Then the work got serious.
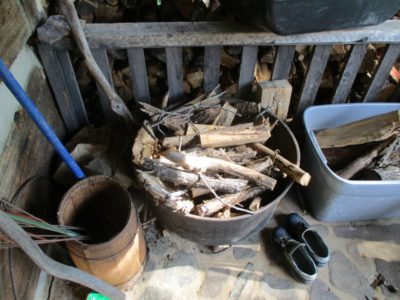
One of the things about living on the edge of the forest, especially if you are trying to carve out more space along the edge, is that you have to deal with a lot of wood and brush. Bigger trees are not a strategic problem, they get cut, split, and stacked as firewood. For branches smaller than wrist-sized it is a judgment call, are they firewood or are they kindling? For the most part in recent years the primary use was as kindling as Mrs. Barn, normally the fire tender as she gets up earlier than I do, would fill the giant cauldron on the front porch with sticks to serve that function throughout the winter.
The simplest way to deal with excess brush and branches is to just throw them back further into the frontier at the edge of the forest, a “solution” that bites you when eventually pushing that frontier back as we are doing right now. For the most part the ultimate solution is to either get a chipper or burn up the inventory in a burn pit or barrel.
Recently Mrs. Barn came up with brilliant idea — turn the excess into charcoal. This plan may or may not have coincided with her exploration of the Weber grill as a smoker/outdoor oven/broiler to keep heat out of the kitchen when it gets hot here (in the 80s). She has been experimenting with great success in that realm. Combined with my own interest in charcoal-making it seemed like this was the time to begin skipping down that path.
I hired a local fellow to do a ton of weed eating around the homestead, and one of the things that venture revealed was the number and size of brush piles we had underneath the greenery. So, I’ve been slowly pulling out the brush and clearing the path to the felled firwood trees out behind the log barn. Since it was going to be burned up anyway, why not try to turn some of it into charcoal?
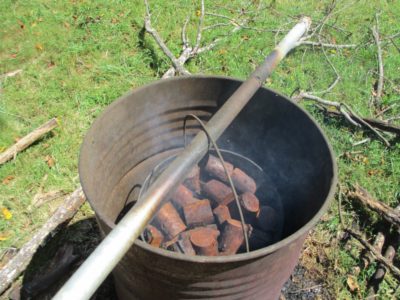
I’d attended a charcoal-making workshop many years ago and remembered that the “controlled ignition” system while more efficient was also much trickier; you gotta get the burn conditions just right to cause the raw material to smolder until it was fully carbonized and no farther. The “retort” system — essentially cooking the wood down to its basic carbon form — though less efficient, struck me as much simpler and easier. So, I dug out a heavyweight small trash can, took it to the burn barrel, and gave it a try. With great success!
Actually the first step was to select a few wrist-sized branches and haul them up to the barn and cut them into 3″ pieces on the chop saw. When the small trash can was full it was time to head down to the burn barrel and give it a try.
I built about a six-inch bed of twigs at the bottom of the burn barrel and lit that, letting it burn and adding fuel until I had a hot fire. Then I lifted the small trash can into the barrel and sat it on the bottom fire. This was not particularly easy as the contents of the trash can had not been seasoned in any meaningful way, they had just been a pile of brush in the tall grass. The can was really heavy.

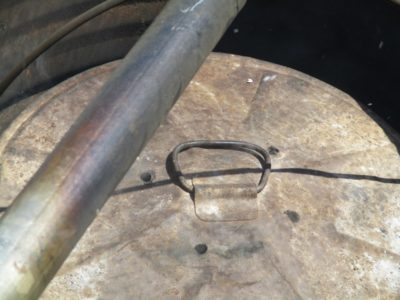
One I had the trash can situated in the barrel I fed a large galvanized pipe through the handle so that the trash can would hang once the bottom fire burned down. I did not know if this was a useful approach but it seemed like a smart way to even out the heat through the charcoal can. I then selected a large number of smaller branches, 1″ – 2″, and hand cut them into 6-inch pieces which I then fed into the barrel all around the outside of the charcoal can, filling up the barrel to the lid of the charcoal can. I laid a handful of 2-inch sticks on top of the trash can and waited to see what happened.
As expected, soon enough there was a plume of steam coming out of the four holes I had pre-drilled into the lid of the trash can, as first the unbound water and then the bound water was distilled out of the wood. This process took about three or four hours. All I had to do was stand there and watch.
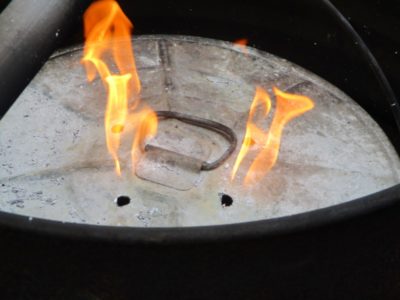

The real excitement occurred at about the 4-5 hour mark as the moisture was all gone — the presence of the moisture had regulated the internal temperature to 212 degrees (remember 9th grade Physical Science?) — and the temperature inside the trash can jumped to the point where formaldehyde and methanol were being distilled off from the carbonizing wood. Quick as a flash I had jets of flame whooshing out of the holes in the lid and from around the rim where the lid fit the trash can. For almost an hour the flames did their job, then they were gone.
After that I let the entire barrel-and-trash-can stay undisturbed while any remaining fuel burned off and the whole thing cooled down over night.
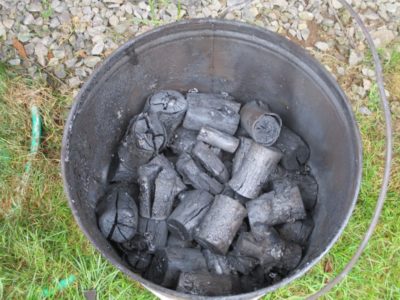
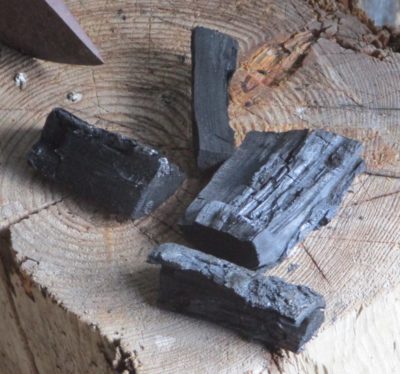
In the morning I could hardly wait to see what I had wrought. The results were spectacularly successful, beautiful charcoal just waiting to be put to use on the grill. The end product was 1/3 smaller and 3/4 lighter than the original. I’ve got the system down pat and will make more charcoal as the spirit leads. I’m going to burn up all the wood anyway.

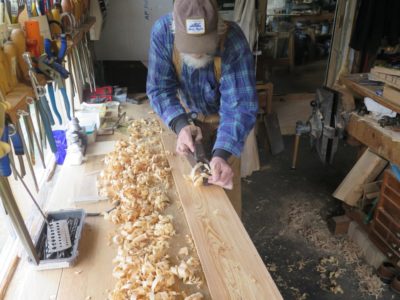
Another of the regular winter/spring/summer rituals here in Shangri-la is to re-think the carpentry needs for the gardens, and this year two new hoops over the raised beds percolated to the top of the pile. There had been hoops before but those were made in haste and only lasted ten years. The time had come for something a bit more robust. They get used year round, in the winter to serve as mini-greenhouses, in the summer to keep out the cabbage butterflies.


I decided to make the ribs with three lamina instead of two, so I ripped the requisite number of 1/4″ strips from pressure-treated 2x lumber. The actual forming/laminating process began with constructing a form that can serve to fabricate laminated hoop ribs from now until I become part of the landscape myself. I used scrap materials for the form and used clamps for making the first curved ribs. I used up all the clamps I had that would fit and kept them engaged for 24-hours (I used T3 adhesive).

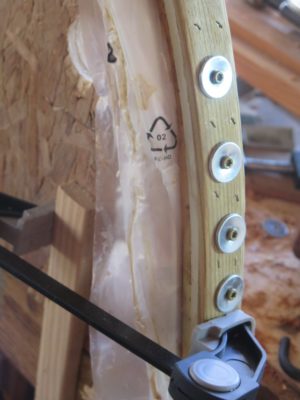
I got smarter. On subsequent ribs I used deck screws and fender washers to clamp the laminations to the form. With the addition of crown staples I was able to assemble two ribs per day.
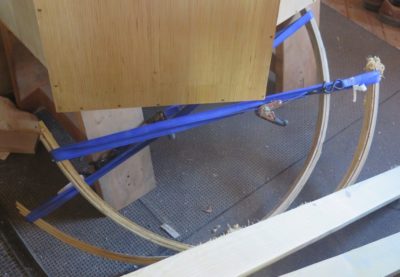
After removing the laminated ribs from the form I restrained them with ratchet straps to keep the correct shape and size, and set them aside. Once I had enough I could assemble the skeleton and cover it with the screening.
Stay tuned.
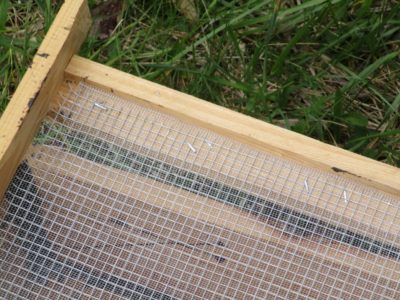
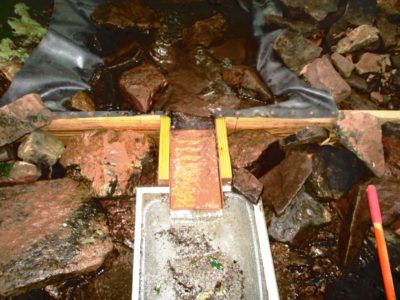
The end was definitely in sight. All I needed to do was make the fitted lid with two layers of screen, window screen supported by 1/4″ hardware cloth and haul it the 350 yards to the weir dam. Somehow I have misplaced the camera with most of the lid-making images.

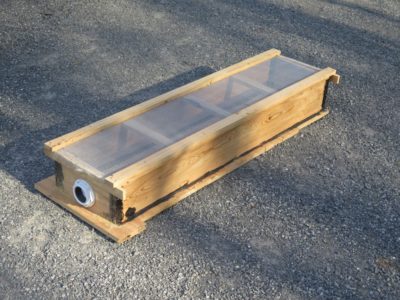
It was very satisfying to see the unit all together, ready to get to work. The only hard part of the project, really, was hauling it up the hill. It is very awkward and though not especially heavy, it was not a feather weight either. I actually strained a tendon in my left hand rasslin’ it up the hill but that is recuperating nicely.

Once I got it up to the top I had to spend some time re-configuring the creek bed since the new box is so different from the old Rubbermaid tub. But when it went in place with a solid WHUMP! as it filled with almost 100 pounds of water I knew the this was just right. To make sure it would stay put from either a rushing thunderstorm torrent or a rummaging bear I filled it with several hundred pounds of rocks.

The connection to the pipeline was a slip-fit gasket inside the shower drain fixture so I hooked it up and we were off to the races.
*Now all I have to do is make a new metal chute and it’s done.
With the dovetailed box sides assembled I moved on to attaching the board bottom. The orientation of the wood there was such that it will cause the maximum swelling and thus compression sealing that panel.

My strategery was to lay down a bead of asphalt and screw thing down tight for each board. I left each board over-length by about an inch to reduce the risk of splitting from the screws. I left the end board even longer to allow for a more stable outrigger effect when sitting in the stream after installation.
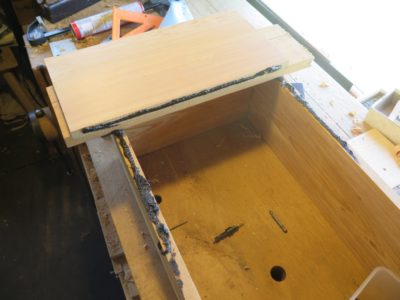
The successive board was tarred to both the sides and the preceding board. Tidiness was not the objective, sturdy durability and performance was. My only real objective was squeeze-out.
When the bottom was in place I turned my attention to one of the side boards that had a bit of surface cracking. I trowelled on some tar on that whole surface just to make sure it would remain intact. Probably overkill.


A line of tar on the inside and outside of each corner completed the assembly. Using a hole drill I installed the shower drain fixture that served as the connector for the penstock water line.
Now all I had to do was make the screen lid and haul the monster up the hill.
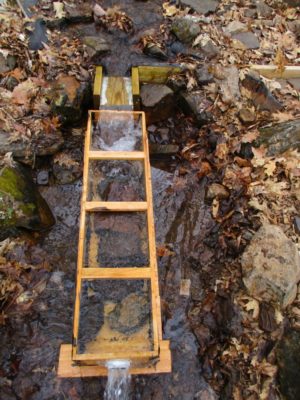
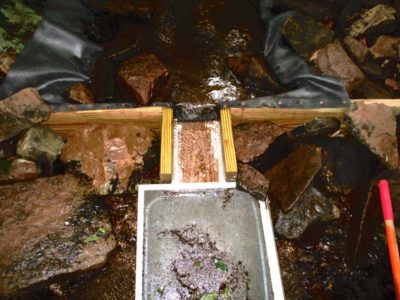
Not only was the severity of the winter weather manifest in the damage to the pipeline and master valve, the existing intake setup (pictured above) at the top of the system was thrashed. The Rubbermaid tub was several yards downstream from the weir (dam) and the copper chute was missing altogether. I cobbled the system back together to give myself a few days to make a new capturing basin. The time had come to construct the collector box I have vowed to make ever since installing the system.
Using some of my prized c.1840 11/4 bald cypress lumber I made the box I have always wanted. The first step was resawing the 11/4 stock into three equal boards roughly 4-feet long and eight inches wide for the long sides and a foot long for the ends, and the requisite number of cross-boards for the bottom. I started the process by cutting the initial kerfs on the table saw, then finishing the task by hand (the lumber was too wide for my upstairs band saw. I could’ve used the resaw bandsaw in the basement but would have had to move a whole lot of stuff to excavate it.) Sorry, no pics for this process.


The boards were foreplaned as the finished surface. Incidentally, even though the wood is 180+ years old it is still tacky on the inside when re-sawn and planed, and cypress’ typical smell of patchouli oil fills the air! BTW I hate square-post-through-the-bench-top planing stops a la Roubo and always have. I much prefer the right-angle stop in the leg vise as shown here. It’s just how I roll, or rile, or whatever.

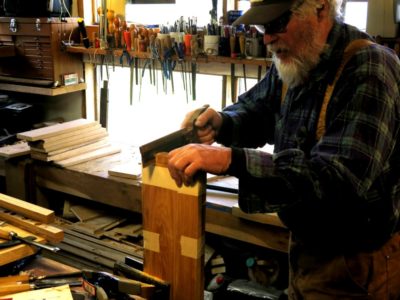
With the lumber prepped I set to cutting the dovetails in the corners. As is my custom I cut the tails on both pieces at the same time. Normally I nail the two boards together but this time I decided to tape them.


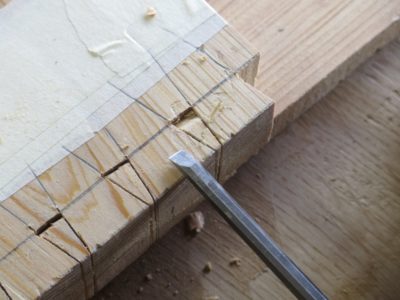

Another of my multitude of peculiarities is a dislike of sawing out the dovetail waste. I just incise the shoulder, pare out a bit, then go back and wail on the waste. In a minute or two they are done. I cut the pins basically the same way.
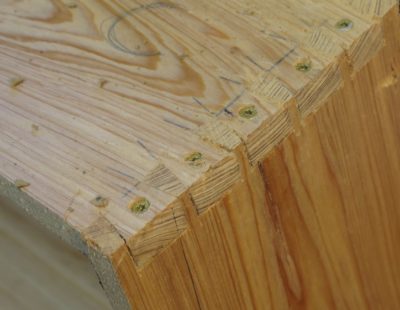
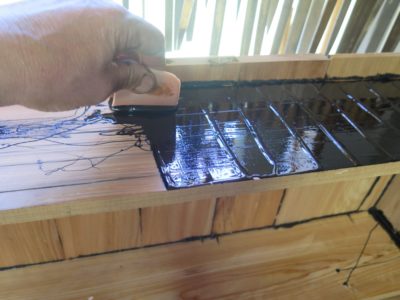
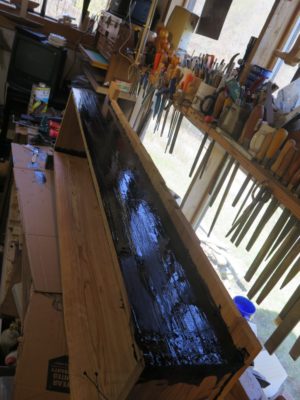
The dovetailed corners were screwed together with decking crews (pre-drilled and countersunk) since adhesive was not likely to perform permanently under water. With the screws and the swelling from the moisture I expect these joints to remain tight until forever. Even so, before installation I slathered the corners inside and out with tar, just to make sure.
Stay tuned
Once I got the water flowing through the repaired penstock I trudged down to the turbine to check the result. As I approached the turbine I was gratified to hear the soft whine of the mechanism, and exasperated by the sound of spraying water. Once I got close enough to see, I noticed an absolute geyser of water spouting from the master valve that allows me to shut down the system to allow for maintenance (read: extracting fogs or crawdads from the nozzles).

So I hiked back up to the first soft joint — there are a half-dozen joints that are actually radiator hose from a bulldozer, held in place by four hose clamps (this method is designed to allow the penstock to blow itself apart without damage if there is an obstruction downstream) and disconnected it. Yup, the master gate valve housing was split, big time. There was no way to do anything except replace and re-plumb the business end of the system. A hairline fracture I could possible deal with. An eighth of an inch? Not so much.

I decided it was time to make some substantial changes to the water routing at the bottom. as it happens I was in town, i.e. “over the mountain” on other business so I dropped into the farm supply store there to upgrade my valve system to a 2″ solid brass spigot valve rather than the low-tech, low cost, and low strength PVC sliding gate valve.

I also decided to take advantage of the opportunity of the completely disassembled plumbing to enact a longstanding goal of upgrading the system and complete the second line into the turbine housing, something I had been hesitant to do while the overall system was working well. This upgrade 1) balances the forces on the impellor shaft by directing the water jet to strike the impeller from both sides, and 2) allows for a near-doubling of the wattage output as well.
For the connections between the new brass valve and the turbine housing I used new 1-1/8″ heater hose from the auto parts store. The water pressure at the bottom of the system is 40-45 p.s.i so these flexible hoses should work just fine.
Finally, the new setup has me contemplating changing my strategy of mothballing the system over the winter. Given the increased robustness of the new valve and the elasticity of the hose connections, why not just let the system run all winter long? Water can flow well below freezing temperatures, particularly water within a pressurized construct (pipeline). This feature is enhanced by particulates suspended in the water itself (the water coming though the pipe is very hard, essentially mineral water) so that fact alone would suppress the freezing point. Thank you Mr. Auletta, my 9th grade Physical Science instructor, for 53 years ago relating the anecdote of the coal fields’ slurry pipelines that can keep on flowing until 15 degrees below zero Fahrenheit, or 47 degrees below freeing! And, if I wrapped the bottom plumbing with heat tape to keep the smaller lines and the nozzles above freezing, couldn’t it keep running all winter long when our coldest temps are just barely below zero, and only for a few hours at a time?
Hmmm.
Time to turn my attentions to the intake end of the system.
The end of winter here in the Shangri-la highlands is accompanied by a number of traditions, not the least of which is the status assessment and repair/maintenance of the power system. Sometimes this occurs as early as mid-March, but with travels back and forth to visit Li’l T and his parents and the deposition of several inches of snow as recently as last week, this year “spring” and its requisite duties is/are late in coming.
It is an undeniable truth that when you are “off grid,” a prominent blessing is that you are your own power company. It is also an undeniable truth that when you are “off grid,” a prominent bane is that you are, well, your own power company. Last week I split my time going over the mountains to get some service on my truck (I am old; I remember buying a complete set of new tires for my first car, a 1961 Ford Galaxy 500 with a trunk big enough to hold six feet of a 4×8 sheet of plywood, for $50 in 1970. Now, two tires for my F150 are $500! Sigh.) and working on the water line.

I walked the quarter-mile of water line last Sunday to gauge the level of repair needed. Even though the winter seemed fairly ordinary judging by memory and the consumption of firewood, the condition of the hydro system penstock suggested a different history.

In six places the penstock was breached and fractured with classic helical ruptures as evidence of water freezing in the line. This was surprising as I thought I had been pretty conscientious when mothballing (draining) the system in November, but the proof of the contrary is unavoidable. And, this was not even the full extent of the damage to the system (more about that later).
I spent the better part of three days walking up and down the creek to make the repairs to the line itself. I’m still sore. I wound up grafting in about 80′ of new line, requiring 14 new joints.

As occurs every spring I spent some time refining the path of the water line to streamline it and increase its efficiency. And still, every winter I must endure the damage that nature inflicts on it.
Is there a solution to this neverendingly onerous burden? Sure. All it would take is to find someone who could bury 1/4 mile of water line 48-inches deep in a mostly-solid rock substrate. Finding that someone would be a challenge, finding someone to sign the check for maybe $125k is an even bigger problem.
Thus, I learn to embrace the responsibility of putting the system back together every “spring.” There is a lesson there. Whenever I face a particular challenge or hardship, I try ask, “Okay YHWH, what are you teaching me with this one?”
While we were away for a glorious weekend of Easter worship and fellowship, an arctic locomotive roared through Shangri-la, dumping eight inches of snow and driving down temperatures to near 20 degrees.

By the time we got home on Tuesday much of the snow had melted (this image is from Wednesday), and we are expecting almost 80-degrees over this coming weekend. Too late for the apple blossoms, though. I guess the weather did not realize we are more’n halfway to May.
Though I have been exceedingly pleased with my latest iteration of the hydropower capturing basin, a/k/a “Rubbermaid tub with a window screen” and its attendant weir flow sluice eliminating 99% of any debris build-up, a recent trip up the hill has revealed a fundamental shortcoming to the system — it cannot withstand a bear (?) attack. The plastic tub-and-screen assembly was, to put it technically, knocked all whomperjawed. The problem was temporarily resolved but now that it is winter and the system is mothballed for the season, the time has come for a more robust response to the travails of life here where there are plenty of big critters.
I’m thinking of fabricating a more robust wooden basin from some of my exquisite c.1840 cypress, designed along the same lines as the plastic tub and its screening feature but with the addition of long horizontal cleats on the underside of the box. That way I can restrain the entire unit under a thousand pounds of rocks. And it the megafauna tears that one up? Hmmm.
I may also try to “straighten” the hydro line to allow year-round operation. since water will flow in a contained line well below zero degrees F, there is no conceptual reason I cannot operate it here all the time.
Gotta noodle that one.
Plus, it is time to get going on the second water turbine that absolutely positively can run year-round.
Stay tuned.

Recent Comments