A few weekends ago I attended the PATINA monthly gathering, as always getting my tool-flea-market fix (I bought only a few small items) before going inside for the presentation on infill planes by Lee Richmond of The Best Things tools, towards whom I have sent very many dollars over the years.
The talk and Q&A were excellent and very informative and I learned a lot, particularly the history of infill plane kits that were available to craftsmen, and the prevalence of planemakers making tools to be marketed under other branding than their own. More about both points in a minute.
It got me wondering about my own inventory of infill planes which, when compiled, was more numerous than I initially thought. I don’t know why as these are tools I use regularly. I guess I just never thought of them in that way.
Here is my own collection, presented in no particular order.
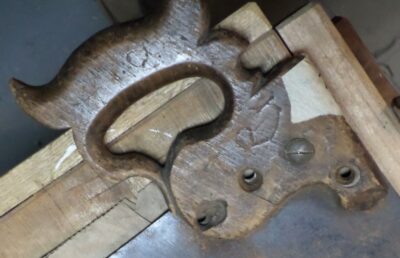
The prize of my collection is my Robert Towell miter/shooting plane, probably from the second quarter of the 19th century. Towell was one of the makers who produced tools bearing his own imprint and sold from his own shop, along with unmarked planes sold by other purveyors. Mine is one of the latter, devoid of any maker’s marks but with all the hallmarks of his work. His planes were apparently of this form and are highly desirable by collectors, provided they bear his mark.
This image from the interwebz shows the maker’s mark that is missing on my plane. That lacunae is what made this plane affordable, otherwise the $5k price tag would have been beyond the realm of consideration for me. And, Mrs. Barn would have probably killed me…
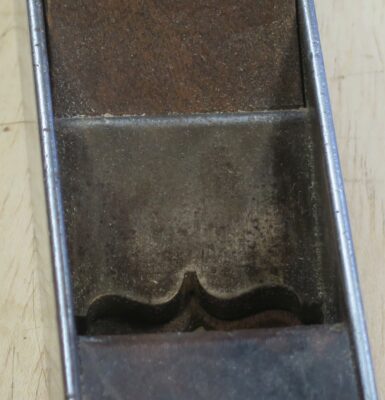
Since mine is unmarked, it was “affordable” to me (still pricey by my standards but only 10% of the price had it borne his stamp) and I bought it from a flea market session at Martin Donnelly’s about 20 years ago. The throat is so tight (about 1/3 mm) I find the only useful purpose it has for me is trimming the end grain of boards on a shooting jig.
Contemporary tool maker Raney Nelson of Daed Tools made a series of Towell-inspired planes maybe 20 years ago and I got it through trading some other materials and tools for it, otherwise I could have never afforded it.
Like Towell and Raney’s friend Konrad Sauer the construction is hammered dovetails, with I think African Blackwood as the infill. I really should ask him more about this tool the next time our paths cross, as they do occasionally.
It’s just a bit too small to use as a block plane, but perfect for small shooting tasks. This plane might have evolved into the “collectible” realm as I am not sure how much plane making Raney does any more since he and Chris Schwarz started Crucible Tools.
This still-under-restoration smoother is one of those Richmond said was probably a kit of sorts, with the metal shell being sold as a chassis for a woodworker to make the wooden infill components. I got this late 19th century tool in a box lot of other derelict tools at a flea market, devoid of iron or wedge, looking like at had a stint inside a concrete mixer. I cobbled it together as a functioning plane after restoring the totally trashed wooden infills, ebonizing them and leaning the steel shell.
I was never really happy with the wedge or the iron I dug out of my spare parts drawer, so I asked my friend Josh Clark to look through his inventory to see what he had. I soon received a really nice double iron in the mail that fits the sole mouth very tightly and have been puttering on making a wedge off and on ever since. If I have success with a wooden wedge I just might make another out of ivory. Just because I can.
For many years Ron Hock used to sell kits to make planes, and this started as one of those. The maker in this instance was my friend Joe who gave it to me 15(?) years ago for reasons I can no longer recall. It was a very nice plane but underweight for what I wanted.
During the first Roubo manuscript I modified it with heavy brass cheeks and a bit of stylizing to use it as a veneer/parquetry shooting plane.
Some years ago at a Lie-Nielson event I bought this infill plane from Mateo Panzica of Lazarus Planes in Louisville KY. His fabrication approach is almost 180 degrees opposite from Towell and Nelson but you cannot argue with the results.
This weighty smoother is simply superb and gets regular use at my bench, perhaps more than any plane (other than my sleigh-style block plane that is going into the grave with me, unless of course it goes to L’il T or his brother). If I needed more new planes I would probably divide my money between Lazarus and Steve Voigt, although the Lasso of Truth would reveal I do not really need any more. (Other than a toother from Steve Voigt, if he ever gets them to market).
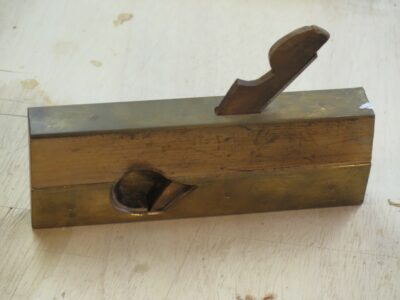
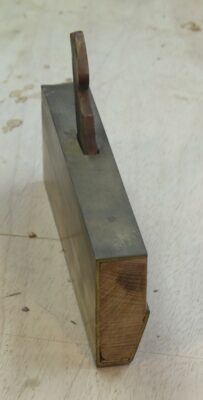
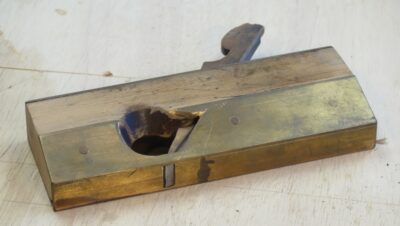
An infill I made all by my lonesome is this plane designed specifically for, and not useful otherwise to tell you the truth, shooting the edges of sawn parquetry elements. I saw Paterick Edwards demonstrate a vintage version of this plane at Williamsburg several years ago and decided I had to have one myownself.
I started out with a derelict one-inch rabbet plane body and beveled one side, then silver soldered the brass shell. I am really pleased with its performance.
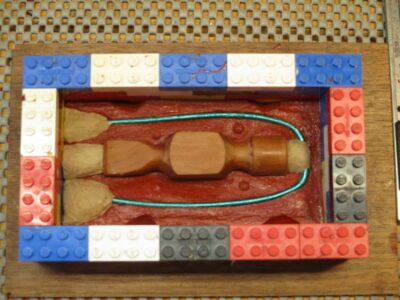
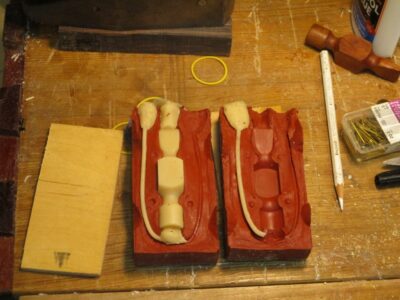
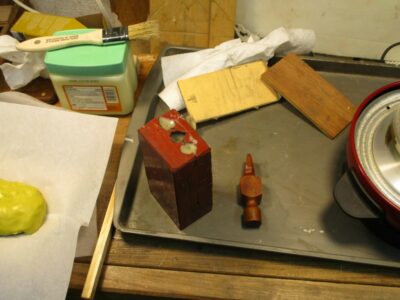
The next morning I demolded the first half of the silicon rubber for MattC’s hammer head. I cleaned all the surfaces of any residual clay from the embedding. I spread a parting agent (petroleum jelly) over all of the silicon mold surfaces and reassembled the first half mold including the original wooden master pattern and the attendant elements. [Sorry for the blurry pic — note to self, do not drop your camera on the concrete floor, it don’t work so good after that)
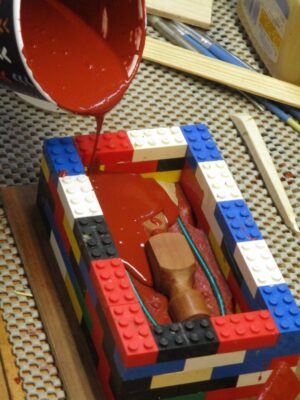
Reconstructing an identical plastic brick dam, I repeated the mixing and Matt poured the liquid silicon molding material and we let it sit again overnight to harden.
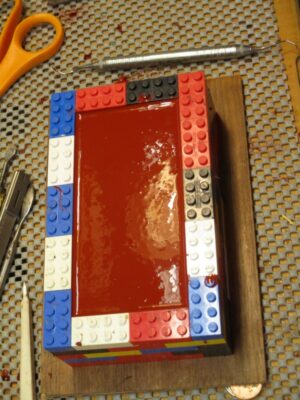
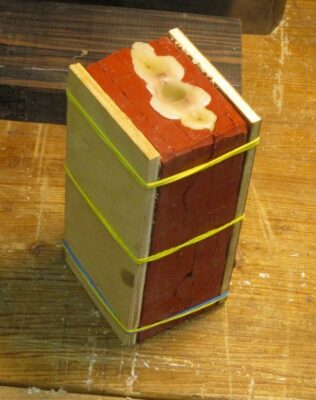
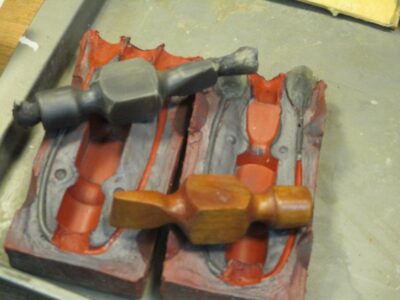
Once the entire rubber mold was separated and cleaned it was ready to go for making wax models for lost wax casting. I did cast one wax pattern and saw that I needed to expand the sprues a little with a scalpel. Had I used a larger piece of wire or tubing there would not have been a problem.
Just for the heck of it I walked him through the process for casting pewter directly into the mold, which requires depositing powdered graphite on all the cast surfaces to reduce the surface tension of the molten metal. I mimicked the process with wax and he got a kick out of the metallic-looking wax pattern.
At this point I turned the mold over to Matt to proceed with the enterprise from his end. My work was done.
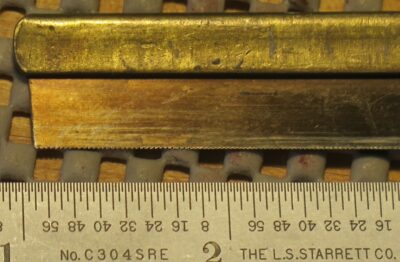
I recently picked up this little jewel from my friend JohnD, now a full-time tool monger in his retirement. The scale of this English-marked saw is fascinating, as is its form. Especially intriguing is the saw plate is only 0.012″ thick! While pistol-grip handles are fine I generally prefer a round handle for smaller tools, and my first (c. 1970) and still-favorite dovetail saw is of this form.
This little saw may be perfect for the petite work I often do, making boxes and drawers from 1/4″-3/8″ stock. The teeth are worn, in the center they are worn away, so I will have to flatten the tooth-edge and re-cut the teeth. Time to grab my surgical binoculars. It is currently configured at 42 (!) t.p.i., I will likely reconfigure it for 32 t.p.i.
If this works out well, I will almost certainly make a new one or two or three, so that one is ready for both Li’l T and his soon-to-arrive brother. Ordering materials from McMaster-Carr is just another day ending in “Y” here in the mountains.
PS After a crazy hectic three months this is the first honest-to-goodness week of work in the barn shop. It feels pretty good.
Many of you are, like me, familiar with, and probably partakers in, the “tailgating” tool flea markets that are fairly common around MWTCA meetings, tool auctions, and the like. I might only spend a minute or two per year buying clothes and shoes, but I can sink days into scrounging for tools. I carry the same mindset to almost every yard sale or thrift store I encounter, and often with more strategic buys in mind.
In fact, all of my workspaces are chock full of yard sale and thrift store resources. I’ve had a pretty good stretch of useful acquisitions lately.
Here are some treasures from a recent event, a community yard sale just before winter got here. In a few minutes and for a few dollars, I came home with this booty.
My first treasure was this collection of assorted tacks, of which I bought six boxes for $1. I am always on the lookout for vintage fasteners, and this box is the type of assorted tacks that was common in hardware stores in the 1950s and 1960s. At some point when I get bored enough I will sort the contents of the boxes, ranging from 1/4″ in length to 1″.
Grinding shellac anyone? I don’t like coffee, never have. But coffee grinders, especially one for 50 cents? There’s always space for them as I use them to grind up shellac, resin beads, whatever.
What in the world can I do with cake and jello molds? Well, there is a lacquerwork technique I want to experiment with, using my epoxy fauxrushi. This technique involves draping strips or sheets of impregnated fabric over a mold, then demolding after hardening. The molds will have to be sized with whiting first, but they are a terrific testing opportunity for the idea. If my memory is intact this stack was $1.
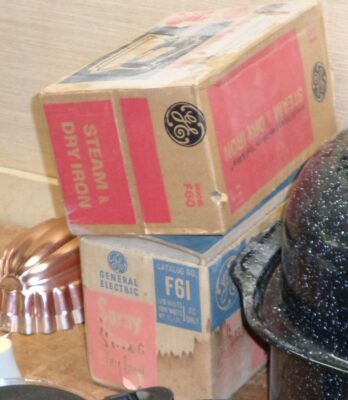
Since I use heat for a lot of functions involving wax or glue, old timey electric irons are just the tool for a lot of applications. These were $2 a piece. In the original boxes no less.
Since I melt wax a lot, and even more in the near future as I delve again into lost wax metal casting, I’ve found that using coffee pots are darned near perfect for material handling. I can melt wax on a hot plate with these beauties, and then pour into whatever form or mold I’m using for whatever project I am creating. I got these four for a buck apiece.
Perhaps my biggest prize, both conceptually and physically, was this very large turkey roasting pan. What in the world do you need with a turkey roasting pan? (Mrs. Barn asked me the very same question). Well, when steaming the wax out of a ceramic investment mold, that is “Losing the wax” in lost-wax metal casting, you gotta invert the investment mold and steam out the wax. This roasting pan is just perfect for the largest investment shell I will ever do. I shelled out big bucks for this one, $4. And worth every penny.
Fifteen minutes, fourteen and a half dollars. Not a bad way to spend a little time and money on the way home from the post office.
PS – between the wedding, and Christmas, and family visits going in both directions, and preparing the Maryland house for new occupants, I don’t think I’ve spent a dozen hours in the shop doing any real work since the beginning of November. “If only I can get past this next thing,” I tell myself… But there is always another dozen things waiting in line.
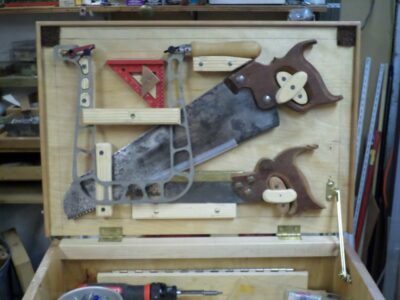
My first efforts for the new tool box addressed the empty canvas of the lid verso. As with the retrofitting of the large vintage tool chest for my 18thC tool demos (more about that much later) I decided the underside of the lid would be a good place for the saws that did not neatly fit elsewhere in the toolbox. So, I made some fittings and hung the saws there.
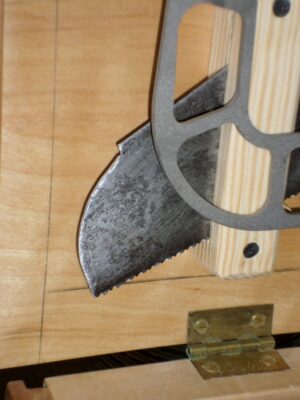
The first step in this was to trim the tip of the lovely little panel saw that was oversized by about a half inch. By rounding the top corner of the saw tip it fit the space diagonally just right.
The size and configuration of the exquisite Knew Concepts saw frame made it a problematic fit in the inner space, so it wound up being hung here as well. It was overlaid on the panel saw and my re-fashioned Tyzak dovetail saw was inserted in-between. The void in the center of the coping saw was just right for the DelVe square to hang right there.
I read recently that my old friend and Martin Donnelly auction companion Josh Clark is dispersing Tom Law’s inventory of saws. I did not know Tom well but I always tried to find a few minutes to chat with him during the PATINA annual tool extravaganza. He knew more about saws in his pinkie finger than almost any woodworkers know in their whole bodies and was an indefatigable rescuer and rehabilitator of old saws. In a way it does not surprise me that his inventory was roughly one thousand saws at the time of his death. It makes my “collection” of two dozen carpenter’s handsaws puny by any comparison.
All of the saws in my “collection” are or will be working saws, most that I have purchased at tool swaps and the like. I have an approach to selecting a vintage saw for use (or gifting) with the menu of features including the following.
Saws Are Like Pizza
This is a near-perfect candidate for my own tool kit. The plate is heavy, the tip is nearly 3″ wide, indicating it has not been re-toothed, the surface rust is pretty minor (the pitting after cleaning will be minor), and the planarity is nearly perfect. The slight flattening and sharpening will be demonstrated in coming posts. Plus, it was only five bucks at a MWTCA shindig.
Like pizza a vintage saw plate better have lotsa meat. I like saw plates that have not been used or sharpened a lot, definitely not re-toothed. I like them to be not only thick in gauge but also as wide as possible. In other words, in “as new” configuration even if not in “as new” condition.
No Bad Skin Cancer
A little surface rust is fine, maybe even a little more than that, providing the overall strength/integrity of the plate is intact. It only takes me a minute to determine whether the surface can be polished enough to make the tool work smoothly.
Unlike Elected Officials, No Kinks
I know that real saw maestros can reclaim a badly bent saw plate, but I do not possess the skill nor the desire to do so. I don’t mind a teensy bit of bend in the plate, providing it is not literally creased, but a gentle level of un-planarity can be addressed easily and quickly. There are many videos on-line to show how this is done, the best one for me is Bob Rozaieski’s video.
He’s The One With A Full Set Of Teeth.
Many years ago I was trying to identify one of the colorful local fellows to Mrs. Barn, and I was getting nowhere with my attempt. Old guy. White beard. Glasses. Baseball cap. I was having no luck sparking her memory as that list describes 90% of the men in the region. Then I latched on to the descriptor that prompted her memory. “He’s the one with a full set of teeth.” Immediately she knew who I was talking about.
That also describes what I want when buying a vintage hand saw. All the teeth, in good condition. It’s okay if they need sharpening, but they all gotta be there and in good overall shape. Once you master saw sharpening it becomes quite pleasurable to do.
No Need for a Handle
The handle is of little importance to me. If it is in nice condition and a configuration I want that’s fine. The saw handle in this image was somehow married, and mutilated in the matchmaking, to the plate it was on when I got this saw (all the nut holes were wallowed out to somehow “fit” the holes in the plate). What was once a very nice handle has been ruined and ready for the kindling pile.
Making a saw handle is actually a lot of fun and can be a great act of creativity using a piece of wood you want and your own hand as the template.
If a saw meets these criteria, I’m good to go provided the price is right.
Here’s a sharpening tip I have used for the past several years.
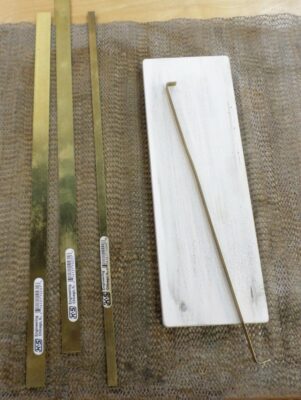
In order to get the back-bevel secondary angle consistent and effortless, many folks use the “ruler method” and rest the back side of the blade on a metal ruler to get the back bevel/micro secondary bevel. Since some of my machinists’ rules have different thickness, in addition to the preference for not using an actual rule since they can move during the process, I pulled out a thin brass strip from my supply box and cut and bent it to fit the stone in question.
By overbending the tips a smidge the metal strip is basically spring-loaded into place, thus the micro-bevel jig stays put during the final few strokes of sharpening.
The brass strips are available at almost any hardware or hobby store, usually for a dollar or two. Obviously you could use any thin strip of sheet metal as well, flashing would work just fine.
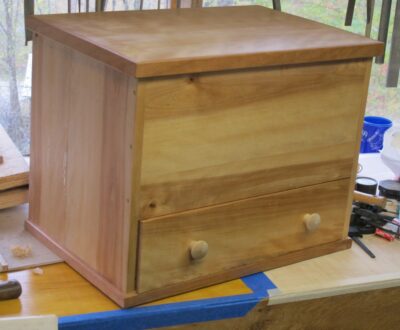
In preparation for his visit to me a couple months ago for us to build his black walnut split-top Roubo bench, Webmeister Tim got together with a woodworking pal and built a small toolbox which he presented to me as a gift. It’s 20″ wide x 14″ deep x 16″ high.
I had already decided to retire my traveling toolbox of the last decade-plus, a repurposed and augmented mahogany box originally made for housing a surveyor’s theodolite. Not that I will be discarding it, but for now it will serve as the repository for small-ish tools gathered for a little boy whose use of them will begin sooner than we can contemplate.
Back to the new box.
The box is exceedingly well-built and sturdy (read: heavy) and capacious so I need to be careful in outfitting it; I still have to haul it to wherever I am working away from the barn. As to the space inside, I will be tricking it out to have lots of sub-sections and fittings to hold the tools I might need to accomplish a full range of woodworking tasks while away from Shangri-la.
To that end I will be spending many hours over the coming weeks to make of its interior what I want and need. Probably not as obsessively as did Henry Studley with his tool cabinet, (our only “profile” of Studley is his tool cabinet and based on that I would guess he was wrapped pretty tight) and certainly not as elegantly — there will be no ivory, mother of pearl, or ebony fittings –but I will have stops and starts as I compose the interior of the box. I will of course be musing silently and not-so-silently about Studley and his interior layout for his preposterously magnificent opus.
Stay tuned on that.
As for the exterior of the box I am undecided. Do I make it a canvas for fauxrushi, or French marquetry? Decisions, decisions. At the moment I am contemplating leaving the recto of the lid alone to let it serve as a work surface.
Thanks to Webmeister Tim’s generosity I have a delightful puzzle to solve.
As I assemble a tool kit for Li’l T I find myself reminiscing about my own first ventures into Tooldom. Thanks to the guidance of my own Dad when it came to buying real tools I followed the path of Quality. In 1969 that meant Sears/Craftsman (Woodcraft, Constantine, and other catalog merchants came into my orbit much later). My first few tools, screwdriver and pliers, were bought at the new Sears in North Palm Beach, Florida with my lawnmowing money. When I finally got steady income working illegally in a scaffolding yard at 15, then legally at a bakery at 16, the purchases became more substantial. Wrenches. Ratchets and sockets. Screwdriver sets. Channel Locks. A tool box.
Now more than 50 years later I still have all those tools and use them regularly. After all, this was when Craftsman was still, well, Craftsman.
My very first tool was the black folding tri-blade Boy Scout knife, now that I think of it probably bought not in Florida but at the Sears in my hometown of Owatonna, Minnesota, around 1965. It still resides in the top drawer of the end table next to my recliner. It was probably 3 or 4 dollars, maybe only $2, still a lot of money to a kid making 25-cents per lawn to mow. I just can’t remember exactly, but it would have been during my very brief tenure in the Scouts (I just couldn’t take the structure and hierarchy. It’s amusing to think of iconoclastic me trying to enlist in the US Navy in 1973. That would not have been a happy outcome as I do not respond well to arbitrary orders.) I’m pretty sure I blogged about that knife some time ago.
My first honest to goodness woodworking tools were these two, a Craftsman (Stanley) block plane that is still a favorite, and this dovetail saw that has cut an untold number of joints in the past five decades. It was a “Craftsman” probably made by Disston, although it is devoid of marks. I do remember that each tool was $13, a number I recall because it was the number of Wilt Chamberlain.
As I compile to tool kit for L’il T and his new sibling (early March 2024) it will be real tools, sharp and ready to go. His/their Dad and I will teach them the right way to use them, just as my Dad taught me. (Li’l T’s other Grandpa was a high school shop teacher so the heritage runs deep) And if Elderbarndottir and her new husband are blessed with children, they will be getting real tools from Grandpa too.
For a lot of my routine sharpening I finish off with an 8000 grit water stone, and I recently had a stretch where I did not attend to the stone’s needs as conscientiously as I should have and it got wallowed out. That it was my setup at my daughter’s house was no excuse, but in all honesty I am more attentive out in the barn shop.
Not having my marble slab for referencing the surface to flatten this one, I relied on one of the theorems (or was it a Postulate or Law?) from eighth grade Geometry class. That is, “every circle defines a plane.” Using a concrete block with a piece of mirror I had laying around and a sheet of sandpaper I was able to flatten the dried-out stone face-down on the abrasive by pressing and moving it in a roughly 1-to-2-inch circular motion. Before long I had a super flat stone and got it back to work.
I’m glad that some lessons from 55 years ago took root, allowing me to minister to this stone in need of, well, ministrations.
The cost? One sheet of 80-grit sandpaper, five minutes of my time, and a bit of elbow grease.


Recent Comments