Back by popular demand – sandblasting! I am delighted to profile my complete sandblasting system.
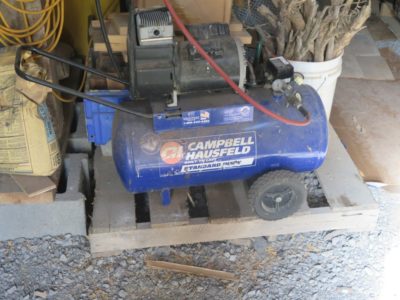
The starting point is my “nothing special” $75 Craiglist compressor in the basement of the barn, residing there because it is a diaphragm compressor head rather than a piston head and thus pretty noisy. The compressor unit is a 2 HP motor/head attached to a 10 gallon tank. The compressor is attached to the air-abrasive gun via a typical reguator/air hose system and quick-release pneumatic fittings. I generally operate my blasting gun at around 40 psi which gives me good control and adequate aggressiveness and is well within the capacity of the compressor.
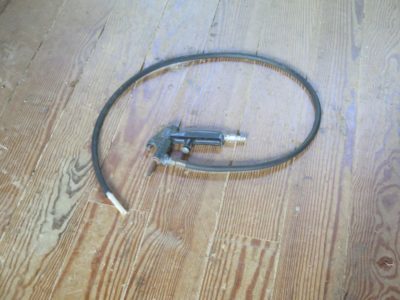
The blasting gun attached to the hose is a siphon-feed unit, ancient (probably Craftsman) but indistinguishable from some thing you could buy tomorrow at Harbor Freight.
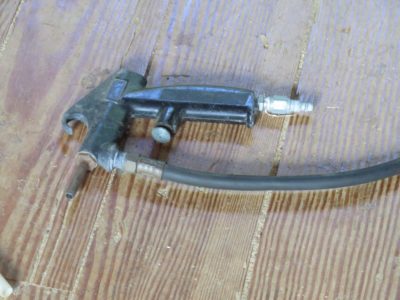
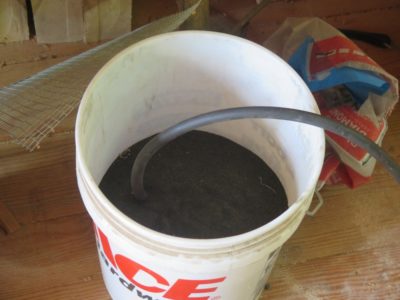
The system operates like this: The air running through the gun nozzle creates a partial vacuum in another feed-line fitting/tube which draws the abrasive medium through the siphon tube. In that effect it is identical to a paint spray gun, but instead of pulling up liquid paint and atomizing it through an atomizing nozzle it is sucking up the abrasive and focusing it through the gun output aperture. As a general practice I simply jam the end of the siphon tube into the bottom of the abrasive reservoir, almost always just a bag of the abrasive or a five gallon bucket if I am feeling fancy. I refill the bag/bucket with “overspray” abrasive gathered from the trash can. I’ve thought about getting a fixed metal “hopper” reservoir but the bag/bucket work just fine for me.
One final word: make sure to wear eye, hand, and face protection. Really. I generally use a face shield, light leather or rubber gloves, and a dust mask or respirator. You do not want to get even a smidge of this in your eyes or lungs.
===============================================
BTW I got my stitches out yesterday and much to the doc’s surprise I have had zero discomfort since Saturday, when I became pain free and cane free. As he commented, “This level of recovery is unusual for someone at your stage of life.” Apparently for geezoids like me the cartilage pain is compounded by an even more severe arthritis pain, which I do have some but not yet to the serious pain level. If arthritis is the foundational pain problem, repairing the cartilage will not diminish the pain to my current level of “0.” Still a little stiffness but that will disappear with motion and PT. I’ve been told to take it easy for a month, which I will probably sorta do. Off to mow the lawn.
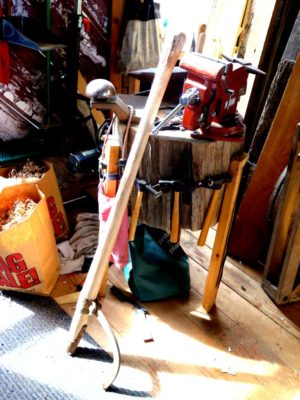
One of the tools integral to a multidimensional shop is a sandblasting rig. All it takes is an air compressor and hoses, a blasting gun, and some abrasive to feed through the gun.
Since I have been doing some tool and metal restoration and finishing lately it was time for me to dust off my vintage sandblasting gun, itself an artifact of unknown age from my late Dad’s workshop. It still works like a charm for my needs. One aspect of sandblasting that often discourages new users is that the medium (the particulate abrasive used to scour the surface) tends to go everywhere and the entire space gets gritty in a big hurry. The typical solution to the problem is an enclosed blasting cabinet, and almost every commercial metals shop has one. But I am not a commercial shop and did not want to dedicate the space and money to get one for my occasional uses.
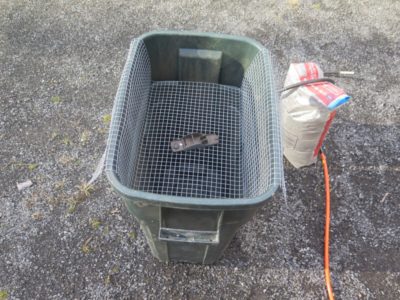
After giving the problem a bit of thought I came up with a solution that suits my needs perfectly, and that solution was to create a cradle inside a trash can to use as my blasting platform. With a piece of 1/2″ x 1/2″ hardware cloth from my scrap inventory I cut and bent it to fit down inside one of my trash containers such that the object being blasted was about nine inches below the top lip. Working that far down, and always blasting in a downward direction, meant that the gritty abrasive went to the bottom of the container. This not only prevents widespread deposits of the grit everywhere, it also allows for me to simply pour it back into the abrasive bag to reuse the next time I fired up the system. There is a bit of fine dust coming out of the chamber but I deal with that by simply taking the plastic trash can out into the driveway and let the air current waft it away.
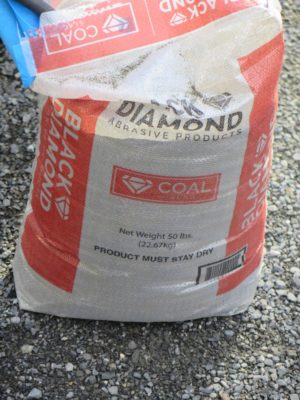
As for the abrasive medium itself I just buy it from Tractor Supply. I get two grit sizes but mostly rely on the fine grit. The coarse grit is reserved for anything really encrusted with rust or other accretions.
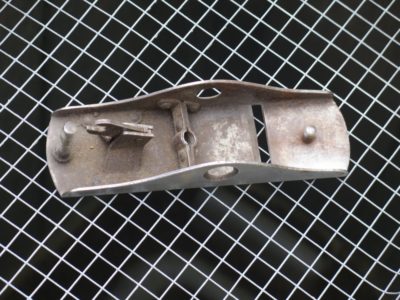

For restoring the hand planes as gifts my air abrasive system gets an old plane stripped of rust and old chipped paint and ready for restoring in about 90 seconds.
One of the pleasant tasks I undertake, one I am sure I share with many of you, is restoring vintage tools to both infuse new life into them and then impart them to loved ones who will appreciate and use them. Given the addition of a son-in-law to the family almost four years ago (we had two daughters who are now interested in skilled trades but were too busy being dancers and valedictorians and eventually summa cum lauds to join me in the basement shop when we lived in the same house those many years ago) I almost always have a project of three in mind for him as he continues building the tool inventory of his own. He is pretty well set for metalworking tools, he was trained as an engineer after all, but I can be most helpful in the woodworking department.
As has been my custom for a couple decades I buy block and bench planes inexpensively at flea markets and auctions, then restore them to sublime condition. My guidance for this often comes from RalphB over at The Accidental Woodworker, whose blog is truly a tutorial on the subject of plane restoration.

My usual starting point is to browse my collection of aged beauties to see if there are any compete and intact candidates.
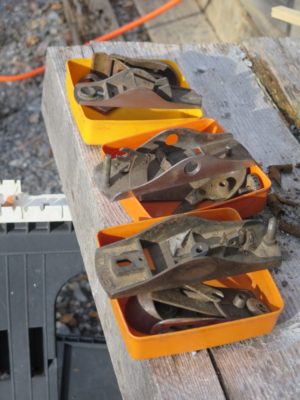
Then I dismantle the candidates to confirm their completeness and intact-ness. If there is a damaged element and I can plug in a replacement part from another damaged tool I am now ready to proceed.
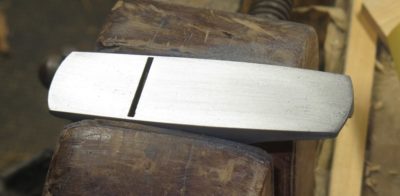
A third preliminary step is to examine and even flatten the sole because if the sole is damaged beyond repair there is no point in going any further. Planes with unsalvageable soles become parts donors.
This past fall I picked out a few candidates for the Lt. Cdr. as Christmas gifts and set to work on them.
Stay tuned.
Here are more of the items sifted from the cleaning-out of my father-in-law’s house. Some of these treasures were left behind, but many of them are now ensconced in the barn.


As I get older I gravitate more and more toward rulers rather than tape measures (especially at the bench), notwithstanding the reality that a Stanley 12-foot Powerlock tape fits perfectly and resides in my coin pocket virtually 100% of the time I am not at church or the doctor’s office. In Dick’s menagerie was this four-foot folding cabinetmaker’s rule, and it is now nestled in my carpenter’s tote.

Many years ago my pal MikeM made a vest pin out of a Shinola brand shoe polish tin, a much loved artifact that remains in my collection. When coming across this bottle of shoe polish how could I not bring this back home to go into the gallery in the barn? Perhaps I can even use it to analyze the utterances of public officials to see if I can distinguish, uh, stuff, from Shinola.

Being a real guy, Dick probably went out and bought a new tool when he could not find his other one (at least I have been told that this is a tendency; hmmm, it might explain my half-dozen caulk guns), which would justify the three torque wrenches in the garage. I brought one home and gave the other two away to good homes. I cannot recall the last time I needed a torque wrench myself, probably when I rebuilt an industrial planer in 1982, but if I have to do it gain I am equipped.
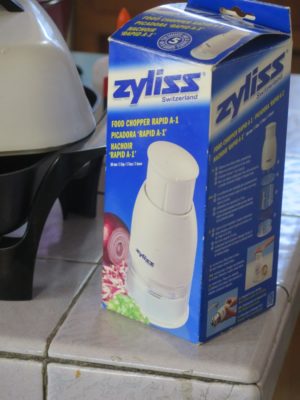
One of the items I left behind was something that truly surprised me. I had not known that the Zyliss company made more than the renowned vises, of which I own a half dozen and find them nearly irreplaceable when making Gragg chairs of teaching marquetry. Lo and behold there was this NIB food chopper in the kitchen cabinet. I almost wish I had brought it back.

The final item, and one which holds great sentimental value for me, was this can of the revered Man O’ War brand of spar varnish. It was of an indefinable age, but nearly full and the contents were in perfect condition. I remember using Man O’ War on some very expensive porch furniture (not mine) back around 1975, and it was sublime in both workability and performance. I left it behind because it would have been problematic to ship it back from The Peoples Republic of Kalifornistan, for the same reason that I refuse to ship Mel’s Wax to Cali.
Though it was superb I could not justify shipping home a vintage 4-inch Wilton torpedo vise or the tool boxes full of pliers, screwdrivers, wrenches, and socket sets.
Since my father-in-law died two days after my mom’s memorial service in January, we have been up to our eyeballs in alligators working to settle his estate and clean out his house. As Mrs. Barn and I noted last night, even after almost four months it is still a shock to not be making a phone call to him every evening at 7:30.
Fortunately my sister-in-law is the executor and point of contact for all the estate stuff, but we have been actively involved in the house-cleaning-out process, spending almost a month in total on the ground and getting dirty. It is a humungous task as my father-in-law was a child of the Depression who lived in the same house for sixty years in a SoCal suburb. So, there’s lots of stuff.
Much of my time over a couple of recent weeks has been to clean out the garage, which had a tunnel for the car but I called the rest the Wall of Voodoo. It was exhausting work as there were literally tons of junk to move out and stack for the disposal crew to remove, and to also sort through the Wall of Voodoo to separate the treasure from the trash. In addition to the hundreds of used spark plugs, the dozens of carburetors and alternators, there were tools. Lots of tools. Mounds of tools. He was a mechanical savant and a mechanical engineer, so the inventory of those implements was huge. Among the treasure were a few things that I was able to ship home to the barn. Here are a few of them.
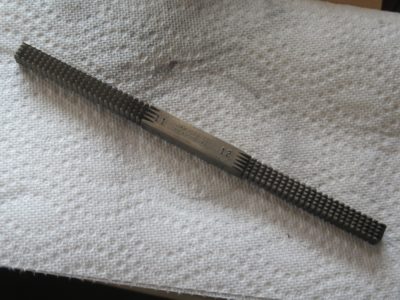
A tool I have always wanted was a square broach style thread file. Now I have one.
I’m so old that when I took drafting classes we had to sharpen our own wooden pencils with a knife and sandpaper. It was in the “advanced” classes where the students were using retracting-lead pencils with precision sharpeners that could put a needle sharp tip on the lead. Dick probably had this from when he went to engineering school back in the 50s. Since I have saved or acquired a half dozen of these pencils, I rejoiced at finding this sharpener in a box of paperwork.
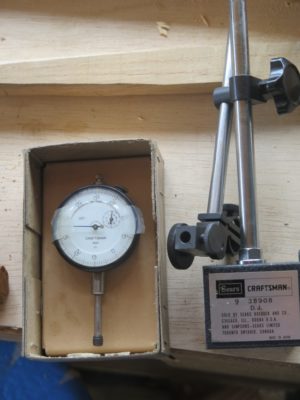
This is the year for bringing all my metalworking capacity on line, including pair of machinists’ lathes and a horizontal milling machine. To tune up these machines an indicator gauge in a requirement. Now I have another, so that each machine can have one permanently.
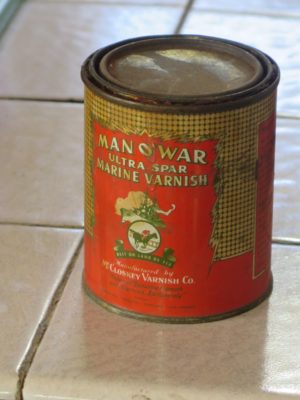
Though I did not bring this home, I was delighted to find this can of an old, revered varnish. The contents were still in perfect condition. I left this at the house in SoCal but may try to figure out how to get it home to my menagerie here.
And, there are still more treasures, some en route from West to East. I’ll report on them anon.
I am not a tool collector.
To be sure I have a lot of tools, perhaps (probably) even to excess as there are many tools of which I have multiple representations. Some of this is a result of having tool sets in several different places, for example the workshop in the basement of my daughter’s house, the video studio up on the fourth floor of the barn, and my own workshop on the second floor, etc.

In addition I have a number of tools that are slight variations of each other; what other explanation is there for my inventory of more than a dozen toothing planes?
I recall vividly a conversation between Mrs. Barn and Robin Lee of Lee Valley Tools Tools during the set-up of a Handworks event, where the full panoply of the Veritas offerings was on proud display.
Mystified by the range of hand planes on display, she asked him, “How many planes do you really need?”
Robin’s reply was, “How many are there?”
Another reason (excuse?) for having too many tools is that I have upgraded a particular tool for a slightly better version of the same thing but failing to dispense with the previous one. That might explain my owning at least a half dozen shooting planes.
Yet another reason for having excess tools is my affinity for designing and making tools that would be, by definition, unique as my personal creations.
Nevertheless I can state unironically I am not a tool collector since I do not have any tools for the mere purpose of possessing them for whatever reason. I cannot think of a single tool in my possession that I would not use in the shop. Some do not get used frequently, nevertheless I own them for the purpose of working the materials in my milieu.


I do have a few tools that are of “collectible” stature, most notably a near-pristine c.1800 Robert Towell miter/shooting plane. I could afford it only because Towell was lackadaisical about stamping his work and even though this is almost certainly one of his it is not stamped. Thus, its purchase price was only 10% of what it would have been otherwise.

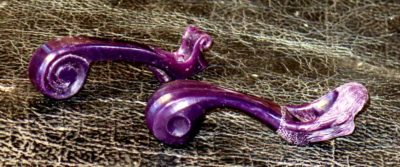
I also have a couple of small Art Nouveau-ish tools by contemporary jeweler/sculptor Chris Laarman’s that are simply lovely to my eye and hand.

My set of “whale” luthier’s finger planes and a whimsical pair of “pig’s ear” user-made spokeshaves are a pleasure to all the relevant senses, including my sense of well-being and my sense of satisfaction and contentment in the shop.
These tools are Objects of Inspiration as I live out and move forward with my own creativity. In particular I am orienting increasingly toward the world of tool making, not necessarily “wooden thing” making. In coming weeks, months, and years creative metalwork will become an ever greater emphasis of my own work especially in the world of “precious,” purely indulgent tool forms starting with these unfinished models for two finger planes that have been in the drawer since I first designed them fifteen years ago.

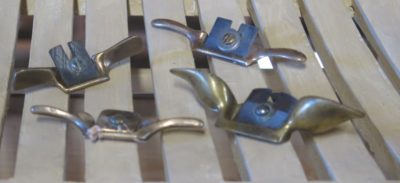
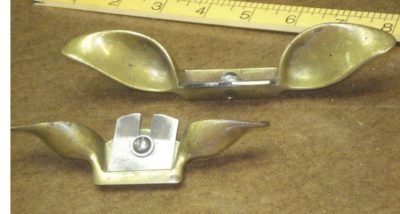
In my recent post about small high-quality brass spokeshaves I remarked that they were 1) indispensable for making Gragg chairs (and any other voluptuous forms), and 2) increasingly difficult to find. In response to that post I was contacted by Hayden Castagno, a Krenov school alumnus who has embarked on a new enterprise of making tools. After a bit of back-and-forth correspondence I became increasingly intrigued by his new miniature brass spokeshaves and purchased a set, full price.
Like me, Hayden is drawn not only to making things but making the tools used in making things. This theme will become even more prominent in my own work and this blog in the coming weeks and months. When I asked him about his creative process he replied, in truly Krenovian fashion:
To me, there is far more to toolmaking (or any craftsmanship, for that matter) than any romantic viewpoint would suggest, but it is in some sense a window to the depth that these topics contain.
I find a life force in wood. I am given energy by making a device that can—with the trust in experienced hands—pull out that life force to be used as a message. Wood offers itself when it is shown a combination of disciplined craftsmanship and good tools. For me, there is great satisfaction in making that good tool and forming a friendship with the craftsperson.
And,
My dad was a welding and manufacturing professor before he started a custom fabrication shop. I essentially grew up inside the shop, learning all the steps of design and manufacturing, and becoming skilled with machines. I was most attracted to what I learned about sculpting and bonding metals by hand. Amongst them, silver-brazing is the favorite.
One of the most impactful experiences that led to my interest in toolmaking was the time … [meeting] toolmakers like Ron Hock, Yeung Chan, and Kevin Glen Drake. That is also where I became aware of tools that aren’t made any more, or are difficult to find.
This leads to the more specific topic of how I recreated the miniature brass spokeshaves. I thought of casting, but I wanted to produce something more hand-made and unique: something of my own design. So, I cut three separate pieces from a sheet of brass and silver-braze the layers by hand. The shaping of the bottoms is done also by hand. I then use chemical polishing techniques to give the shaves the desired shine. Every step is performed by myself at the moment.
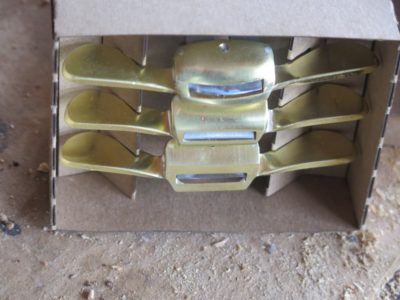
While I am not enticed by packaging I recognize that these are nicely packaged and presented, but even more important is that they are fully sharpened and ready to use right out of the box! Well, they do need to have the blades set-up, they are retracted into the body for shipping. There is a definite “feel” aspect to setting blades on such a tiny, simple tool. I learned this 45 years ago in the pattern shop where we used similar tools for both hogging off stock and feathering contours. My approach is to loosen the screw, press the blade in or out until I can feel the purchase, tighten the screw lightly enough so it does not fall out and then address the edge to the workpiece. If I have it where I want it I tighten down on the screw to lock the blade, if not I adjust it until it is. Given the low mass of the tool it is critical to get the set-up just right or you will get chatter out the wazoo and the spokeshave will literally jump out of your grip.
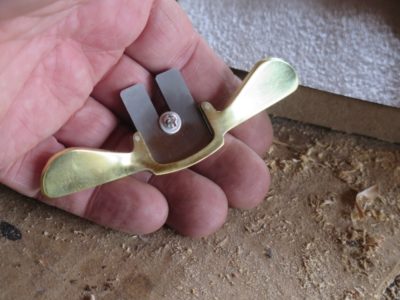
One difference with this tool is immediately apparent when picking it up and using it: it was made by someone who knows how the tool is used and it fits into the hands of a human being. The same cannot be said for some other tools of the same general category. Especially in the shape, configuration, angle, and size of the handles it is a keeper. Clearly this was designed by someone who actually used it.
I gave all three a good test drive on a curved Gragg arm element and was so pleased I was sorry that I did not have a pile of them to work on right away. While they will not become my sole spokeshaves for a Gragg project, dispatching my “lamb’s ear” spokeshaves or the one I made in the foundry in 1978 are not in the cards, I can definitely say that they will be right alongside them to pick up and use at a moment’s notice.
My only “criticism” of the tools after a bit of use is that they are finished too crisply. The edges and the corners are a little too clean for me and I found that I was taking needle files to some of the places where my grip pressed hard enough to leave creased indentations on my fingertips. This is hardly a condemnation as I consider almost every tool that comes into the shop to be a kit and I modify them as needed. You, too may find that the tool needs some miniscule sculpting to fit your individual fingers as well. It is perhaps churlish to note that a semi-custom tool is “too well finished.”
If you are unable to find high-quality miniature brass spokeshaves for your work, Castagno’s just might be the perfect solution for you.
In closing let me say that Hayden’s spokeshaves reinforce my contention that we are living in the Golden Age of Tools. Never before have so many high-quality tools been available and affordable to earnest woodworkers, vocational or avocational.
I look forward to see what he has in his menu of future developments.
As my Year of Metalworking unfolds I am drawing on lessons from my far distant past. About forty years ago I started a stint working with Don Heller, Silver Objects Conservator at Winterthur Museum. A gruff, curmudgeonly fellow with a heart of gold, Don spent a lifetime as a traditional silversmith before coming to the museum. While most of his job was caring for the stupendous collection of silver artifacts in the museum, a much smaller component was teaching the graduate students of the University of Delaware Art Conservation Graduate Program (I was the first recipient of the undergraduate degree from the same program). Don was constantly vexed by a student or two who only wanted their projects to be, “shiny, not finished.” By this he meant that they wanted to short-cut the process instead of working systematically through the time honored practices of moving deliberately through the steps of getting from Point A to Finished. Instead they would simply make it “shiny” while leaving behind all the marks of the intervening processes, marks that needed to be removed in order for it to be “finished.”
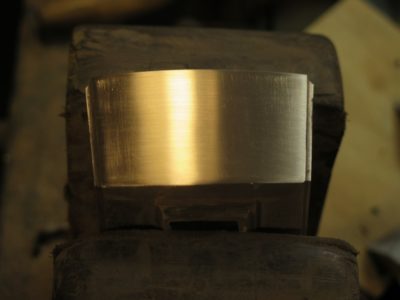
I am once again reviving those lessons from Don in working the shell castings for the Studleyesque infill mallet heads. When they arrive the side surfaces have been cleaned of their cast texture, but that is just the starting point for me. (NB – My assessment of Studely’s original is that the surface is essentially straight from the sand mold, lightly cleaned. Whoever cast the shell was a genius.)

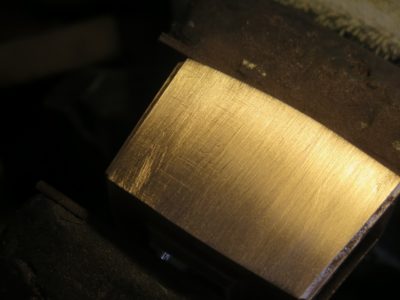
Harkening back to Don’s instructions I step through ever finer abrasive papers to get to the point I want. I do this by first using 80 grit working perpendicular to the pattern left by Bill Martley in his cleaning of the original casting. When I get to the point that none of the original “direction” from Bill is evident I can move to the next step with a finer abrasive.
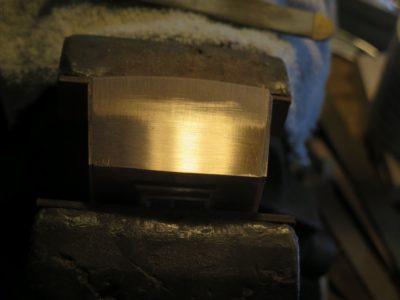
Then I switch to 150-grit paper, working perpendicular to my 80-grit pattern until all the 80-grit markings are eradicated.
Then 220-grit, perpendicular to the 150-grit until all the 150-grit tracks are gone.
Then 320-grit.
Then 400-grit.
Then 600-grit. And all the evidence of the previous steps has been eradicated, but that absence is proof of their being executed. Finished, not Shiny.
At this point the surface is ready for my final treatment of it.
In addition to the peculiar tools critical to building a Gragg chair there is a selection of ordinary hand tools that come to play in the exercise.
When beginning the actual assembly of the upright chair one of the challenges is to get all these parts balanced with the same splay angles, so bevel squares are the quickest solution. I keep a large one and a small one handy.

It seems that my mid-sized Japanese saw gets used all the time, for one thing or another.


While building a Gragg chair is not a precision undertaking there is still a fair bit of measuring and layout, so a 6-inch engineer’s scale is never far from reach. I generally use mine for laying out the half-blind dovetails for joining the seat slats to the seat rails. Concurrently a couple pair of dividers are just the tool needed for spacing those elements.

I keep a couple of 4-inch movable squares handy for general layout work, and they seem to get picked up quite a bit.
I use a block plane when finishing the front seat rail, in combination with the previously mentioned rasps and spokeshaves.
An eggbeater drill comes in mighty handy when pre-drilling holes for the screws that are used throughout the joinery, and when adding the steel pins in the mortise-and-tenon joints of the rungs.

When it comes time to countersink and finish off the joinery screws I use my brace and the requisite bits frequently during those stages of assembly. I use old fashioned slotted flat head screws in the final assembly so I make sure to have those screwdriver bits for the brace. Since there is a lot of assembly-and-disassembly in the early staged of the putting-together I find a battery powered drill the be irreplaceable for sinking and removing the deck screws I use for the task.


And, it’s always good to have a small hammer and a mallet, along with a handful of spring clamps.
Last Spring while wandering around the woods above the barn I made a surprising discovery, the hook and tip from a logger’s cant hook, the tool used to turn and manipulate logs on the ground. I have no idea of the vintage nor heritage of these tool components, they were muddy and rusty but still beefy enough to be sound and perhaps reused. I’ve only been harvesting trees for less than a decade and these tool parts were certainly not mine; the previous log harvesting was four decades ago, long before I was on the scene.
I brought them back to the barn and stuck them in my “tool projects” box.
When I began setting-up to work firewood again a couple weeks ago in the aftermath of clearing the trees around the log barn, and not coincidentally opening the sky to provide copious sunshine for Mrs. Barn’s little orchard and garden adjacent to the stone wall, I recalled this earlier find. There was no handle remaining for the cant hook parts so I checked with the hardware store. They did not have anything suitable for use. Instead of ordering one I checked my lumber stash and Surprise! found the perfect scrap of vintage white oak to make a new handle. The rough stock was no account, having the live-edge running the full length of the narrow 10/4 board that I probably saved because I could not bring myself to throw away a piece of wood that “could be used for some project, some time.” Happily that time had come.
Even though I already had two log-handling tools, one a standard cant hook to roll a log over, the other a timberjack to roll the log over and lift it up off the ground for easier chainsawing, I decided to make a new handle for the cant hook parts and thus have one in reserve. Adding to the tool inventory is pretty much always an irresistible enticement.
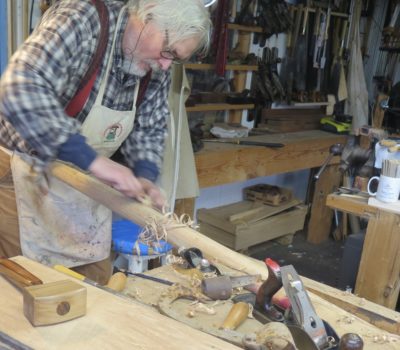

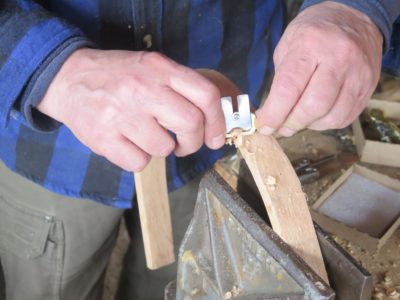
I sawed out the blank for the handle and set to working on it, starting with the tapered end to match the metal fittings. A drawknife, spokeshave and rasp accomplished this in short order. Then I just started wailing away on the blank to make it rounded and swelled or tapered as needed for comfortable use. The hours spent with hand tools, working hard and even working up a good sweat in so doing, goes in the WIN column in my book. In a couple of hours, with my hands and arms tired from the exertion, the handle began to take shape. Actually I was working the metal spokeshave so vigorously that I had to wear gloves to protect my hands from the heat of friction. No kidding. Even with a sharp blade and a waxed sole the tool got really hot.
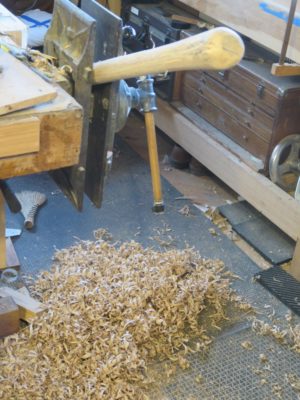
As I was extracting the desired handle shape from the rough stock the pile of long, sinuous shavings grew repeatedly underfoot. In their own way detritus like this (and from rendering Gragg chair parts) is treasured in our little Shangri-la as it provides perfect tinder for rejuvenating the wood stove every morning. Being an early-riser Mrs. Barn relishes being able to deposit a handful of these shavings on the bed of coals from the overnight fire along with some kindling and gets the fire going in just a minute or two while she sits and reads with a cup of tea as the sun is coming up.

Put another check mark in the WIN column.

As I approached the final shape and size of the new handle I affixed the hook and serrated tip on it so I could actually hold it and mock-use it to get the size and shape just the way I wanted it. A few more minutes of shaving a bit here, a smidge there, and it was ready to be put to work. The only thing left was to paint the handle fluorescent orange like the rest of my woodlot tools (to find them much easier on the work site).
A vintage tool rehabilitated and added to the working inventory of the barn without having to reach for my wallet? A big WIN.
So, an ordinary discovery deep in the woods yields a Win, Win, Win opportunity.

Recent Comments