The events of the past several months, including Mrs. Barn and me losing our remaining parents and my becoming closer to 70 than 60, are leading me on a path of deliberate winnowing of my shop and barn contents. Given that my sister is still going through my mom’s stuff — and she lived her last years in a one room “mother in law” apartment with my brother and sister-in-law — and the literal tons of belongings in my father-in-law’s four bedroom, two car garage house with a large back yard where he lived for 59 years, I am determined to reduce my material possession burden to my heirs as much as possible. Since my mom died at 103 I may have some time to get it all resolved, which is a good thing when there are 7,000 square feet and 70+ acres in the discussion.
Other contributors to this long-term process are the realizations that barn-based workshops will not have the prominence that I once thought would be true, and given my current set-up on the fourth floor I really do not need a second floor classroom outfitted with a perimeter of workbenches (I do however still use that space mostly for development of the ripple molding cutter). Also I recognize that at some point in time life in the mountains would just become too hard physically, and I would see the barn in my rearview mirror. Not any time soon, but it is inevitable in 10, or 15, or 20 years. One small step we are taking to delay that day as long as possible is to try to find someone who can execute most of the mowing and bush-hogging tasks around the homestead, but when you live in the least populous county east of the Mississippi River it can be a challenge to find someone to work for you.
One of my upcoming tasks will be winnowing the workbench inventory. Do I really need eight workbenches in my own workspace? Of course not. So, I will begin reducing that particular footprint almost immediately and there are definite “Workbench Wednesday” implications.

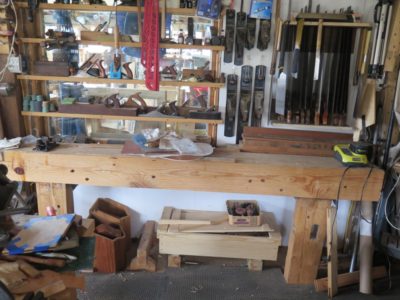
The first of these will be to replace my first workbench built for the space, the timber planing beam, with a low bench of the Jonathan Fischer/Roman/Estonian variety. Since completing my French Oak Roubo Project bench I have had no need for the planing beam so it will be resawn and joined to become the slab for that bench. It will occupy roughly the same space but serve a more immediate need as my knees and hips are becoming more troublesome and working while sitting is ever more congenial.

This change will also allow me to construct a standing tool chest to hold a copious inventory of hand tools, to be placed at the end of the low bench where my saw rack and metal hand planes hang on the wall. Since seeing Walter Wittmann’s cabinet a few years ago I have seen this as a solution to my tool storage problem and now is the time to act on it. The Japanese tool box will reside where Walter’s large lower drawers are located.
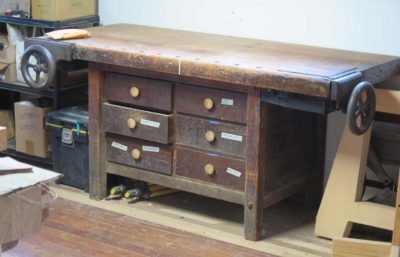
Of the plans for the workshop changes these are two of the three at the top of the list. The third is to restore my piano-maker’s workbench in order to make it a proper gift for my son-in-law, and move it out of my workspace. I m still cogitating on the ultimate home for the Studley-ish bench I built for the exhibit.
On top of everything else I have stock for at least another half dozen workbenches still unbuilt, but that may be moved on to other folks with the time, energy, and need that I do not have. Among these are the gigantic mahogany slab and vintage walnut 6×6 that would result in an eye-popping Roubo bench, a 14/4 curly maple slab already glued up, a stack of oak 10x15s, some 12-foot long 7×15 Douglas Fir timbers…
Stay tuned.

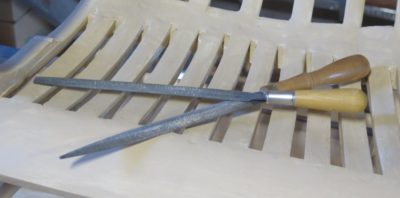
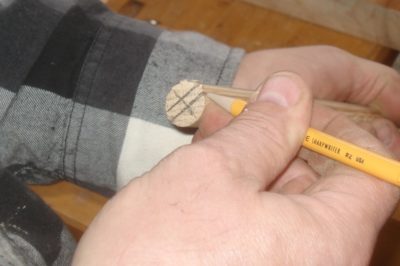
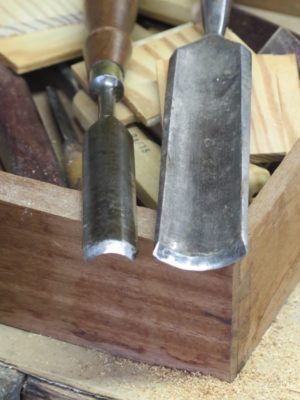
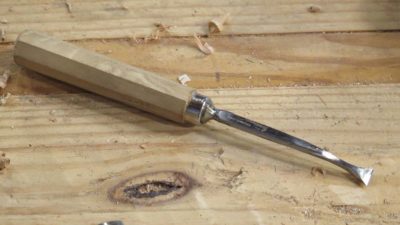
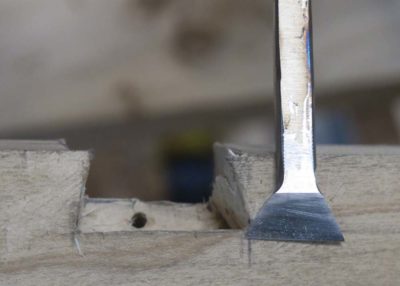
Making a Gragg chair requires chopping 17 mortises for their respective tenon partners. No big deal. Except these mortises are only 1/8″ wide. For that task you obviously have to possess a 1/8″ mortising chisel. You could get by with something 5/32″, but probably not 3/16″ The stock is just not beefy enough to try that.
I have three chisels in my arsenal for this process. The first is one that came for a box of tools I got at a flea market, it is a 1/8″ long chisel with a turned bulb handle. A second is from a no account 1/4″ Stanley chisel that I ground down to 1/8″ wide, and the third an my “go to” chisel is one I made from a derelict plow plane iron. All three are delightfully short in their overall length, a definite advantage when working inside the quirky confines of of the Gragg chair.


The mortises in question are for the rungs and fitting the seat slat tenons into the underside of the crest rail.
I’m not sure if the 1/8″ mortise chisel is THE most important tool in the project, but I do know that Gragg himself did not use the mortise-and-tenon method for attaching the rungs – he just drilled full-size holes and punched the rungs through – and every Gragg chair I have seen is broken at this point. This is definitely one case where an acolyte can improve on the methods of the master. I once asked some engineers to analyze my approach with Gragg’s, and they told me the 1/8″ M-n-T construction was ultimately 4x to 5x less likely to fracture than the original.
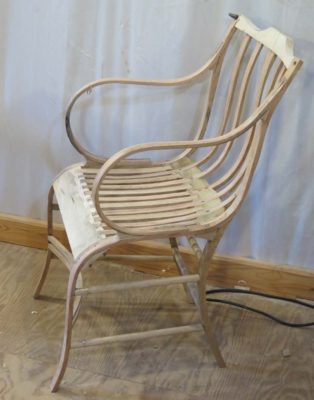
The Gragg chair is more like a sculptural assemblage of curvy parts in space and at several points in shaping the chair components there is only one tool type to suffice for the task, namely the rasp. Or in my case, a few rasps and similar tools like floats.
I generally include four tools in this category; an Ariou cabinetmaker’s 10″ rasp (or its analog a Nicholson #50 patternmaker’s rasp),
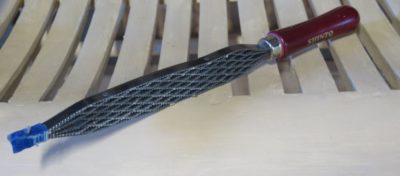
a Shinto rasp, and a pair of fine Iwasaki floats, both flat and half-round. In procedural order the processes requiring them are as follows. Sorry about there being no picture but I could not find one in my compewder. They’re there, I just cannot find them.
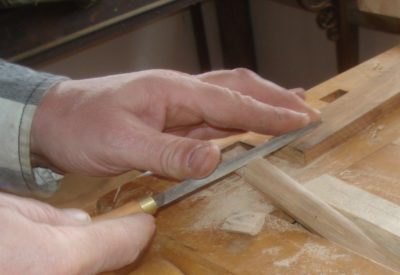
First is the touch up of the diminutive tenons for the rungs when the side units are assembled. This is necessary only when the tenons are cut too full and need to be nibbled down to fit the mortises. Generally I accomplish this task with either the Shinto rasp, if there a a fair bit to remove, or the flat Iwasaki float or small Ariou rasp if just a little.
Once the assembly of the cross elements begins I tend to concentrate on the front seat rail, letting the rear seat rail and the crest rail dimensions be established with tacking strips. For the front seat rail the rasp is critical for two distinct steps. First the curved surface of the end lap joints must be shaped to fit the underside of the serpentine leg element. Though most of this step is accomplished with a saw and chisel, the final fitting is fastest with the Shinto rasp.
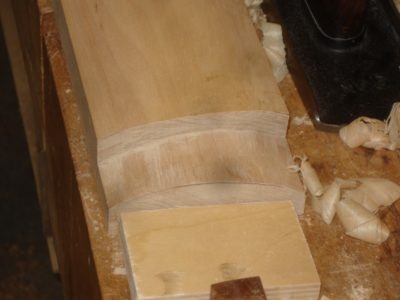
Then, once the stock is fitted and affixed in place I remove the most of the square shoulders of the excess with a block plane but the configuration of space and the element means that the heavy lifting for roughing the shape (and the embedded half-blind dovetailed seat slats) falls to the rasp.

Fitting the crest rail to the tops of the serpentine pieces is a mix of saw and Shinto rasp, but the actual sculpting of the crest rail shape is accomplished through a combination of spokeshaves and the Ariou rasp, followed up with the pair of Iawsakis to get a surface ready to paint.

The final place for rasp work is both a “mere detail” and an elegant hallmark of a Gragg chair, the rounded glue block underneath the front of the curved arm and the meta-volute at the bottom terminus of the arm. With the Ariou rasp I can usually cut these shapes into the square-ish stock in about 5-10 minutes.
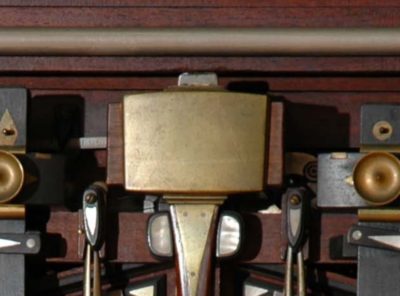
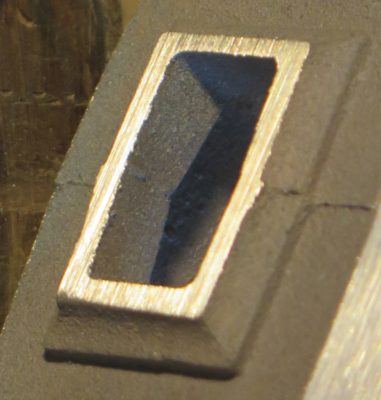
One of the challenges to replicating Henry O. Studley’s incomparable mallet is obtaining the surface texture when it is all done and finished. As someone who comes out of the foundry trade myself I can only shake my had in amazement at the shell he used in his mallet. There is no hint of who produced the brass casting, all I know is that is was provided by a virtuoso. Hmm, that sounds like a good title for a book about Studley. When I originally saw the mallet in person I thought that it was like many of the “finished” casting for the foundry where I worked; the pieces were cut off the sprue tree, ground and filed, then tossed into some sort of bead blaster to achieve a final surface.
However, once I got really up-close-and-personal I realized that was an unlikely proposition as the shadow of the parting line from the casting was still evident, about 1/3 up from the bottom. Abrasion blasting would have almost certainly removed that evidence. Thus I am left with the possibility that the shell casting used by Studley was essentially straight from the sand mold, at least in regards to the surface texture.

As nice as the new castings from Bill Martley are, they are not of the same quality as Studley’s (to be fair to Bill I have never seen contemporary sand castings of the quality evident in Studley’s menagerie) and the surfaces need to be worked extensively by hand to eventually get to a similar place, at least aesthetically.
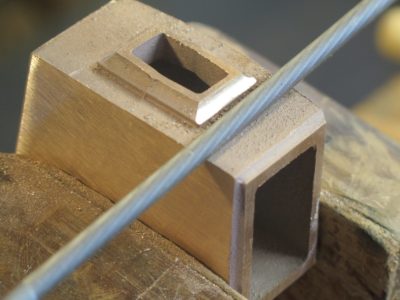
I already referred to establishing the cove profile with a 1/4″ chain saw file, and then cutting the flat edges of the same elements with barrette files I bought from Slav the File Pusher at Handworks last time.
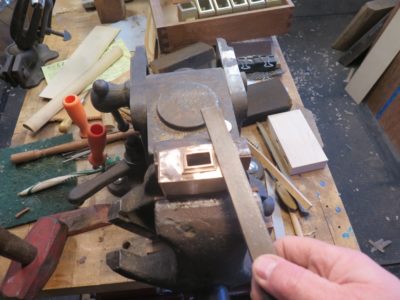

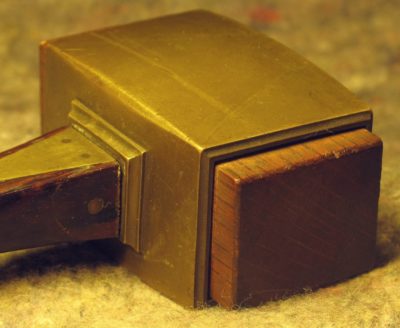
I then proceeded to work on the top and bottom of the mallet shell around the square collar, an always challenging proposition when trying to achieve uniformity on a surface that is not uninterrupted. The first goal is to get everything flat, working parallel to the sides of the rectilinear collar. I did this mostly with a small-ish mill file on which I had removed the teeth on one edge to as not to continue cutting where I did not want to cut.
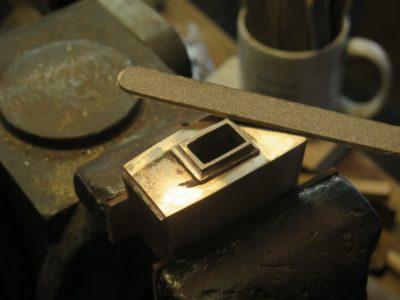
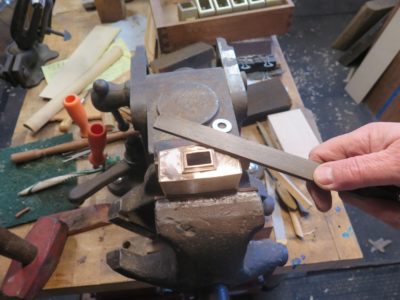
Once I got to flat I began to work with sandpaper sticks to begin reducing the tool marks left by the file. I literally used them flat, “rounding the corners” on the shell surface, working my way from 120 grit up to eventually arrive in the neighborhood of 600. The ultimate goal is to achieve a surface that has as little character as possible.
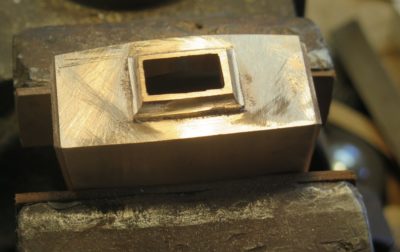
At that point the workpiece is ready for some additional contouring before the final surface treatment. The real design/detail genius of the Studley Mallet is that the primary corners are sharp at the faces of the mallet but quite rounded at the center point of the arc where two planes meet. I’m thinking that might be a seat of the pants exercise. I also began to work on the openings for the infill and handle.
Next time – working the surfaces of metals to “done.”
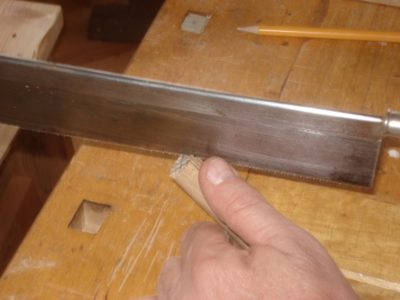
While not necessarily unique to making Gragg chairs a variety of detail saws are certainly part of several processes in the making of one.


Probably the most peculiar of these is cutting the curved dadoes in the rear seat rail to accept the bentwood seat/back slat elements. While I know that making the curved bottom configuration of the dado can be achieved in multiple ways perhaps my favorite is to use a Japanese veneer saw, which with its deeply curved cutting edge is very well suited for the task. One problem I have encountered recently is that I cannot seem to find source for the saw, so I will probably attempt to make some myself.
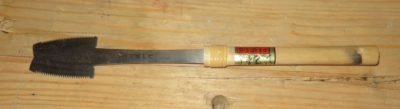
One option I have tried is to employ a Japanese mortising saw, with some success. The problem with this saw is the exceedingly long neck which causes some flopping around of the head. I’ll probably order another saw and move the handle up next to the head.

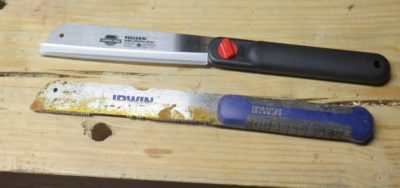
Without having the saw in the tool kit it is possible to cut the margins of the dado with a small Japanese detail saw and then excavate the curved bottom of the groove with a bevel-down bench chisel. Actually I find myself reaching for the Irwin and Shark saws far more often than I first expected. Clearly, this Irwin has had a tough life in my carpentry kit, I need to re-cut teeth on it.

Elsewhere on the chair there is the need to cut the shoulders of the half blind dovetails on both the front and rear seat rails,


and the tenons on the ends of the back slats to insert their tops into the underside of the crest rail, and to cut the tenons on the ends of the rungs. For these tasks pretty much any fine back saw will work, I go back and forth between my custom specced Bad Axe (now in their inventory), my treasured old Sears backsaw I bought new in about 1970, and my Japanese dovetail saw. My habit is to cut the half blind dovetails with the Japanese dovetail saw and all the teeny tenons with the Bad Axe.
Next time – rasps.
If I did not already own one I would be interested in bidding on this 4-foot (!) veneer saw at the upcoming May tool auction at Live Free or Die Tools. If you have case of the Roubos coming on, this might be the medication.

Live Free or Die Auction Preview (mjdtools.com)
Lot SC21-411
One of my great disappointments in the aftermath of publishing Virtuoso: The Tool Cabinet and Workbench of Henry O. Studley (an appropriate gift for nearly any human on any occasion) was the paucity of additional information to come my way. I figured there would be a flood of new information but there has been nothing new directly related to Studley. Perhaps I should concentrate on the “glass half full” mindset and congratulate myself for being a competent researcher working with other competent researchers, resulting in a book with all the information available on the subject.

There are those bright moments, though, such as the recent contact from reader DougM:
Hi Don,
I have an very old English cast iron joiners mallet that Studley probably got his inspiration from. Same exact style, but English oak handle and cast iron head. Didn’t know if you had seen one before? Doug
In response I asked for some photos and there are exciting.

When he sent the images Doug included the following note:
Came from England (Ebay.UK). Handle polished smooth by years of use. Originally black iron head, I polished. VERY top heavy, not for swinging/beating. Using by choking up or cupping head in hand, tapping more natural. Masking tape to tighten loose joints.

And,
Ebay seller was from east coast of England. It was slightly rough cast and pitted, not a fine finished casting. Edges were chipped and the wooden insert was well used. The handle is how I would date it, it’s old English oak and worn/polished smooth from use. Looks like 1870-1890’s. Owners name still stamped and legible, F. Stubbs.
Thanks Doug!

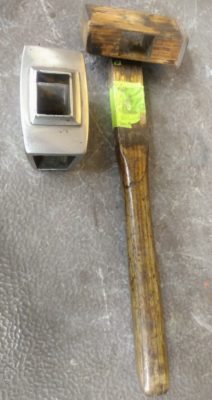
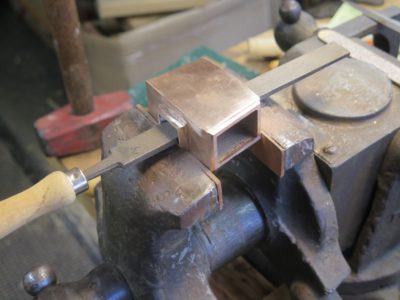
I’ve been working on the first set of Studleyesque infill mallet head shell castings from Bill Martley, getting an idea about how to get these from rough castings to finished tools comparable to the mallet ol’ Henry had. That is, of course, my favorite tool in the tool cabinet. Even though these castings are not the alloy I want to end with, this gunmetal bronze is simply a little too red for my needs, getting these prototypes to “finished” is a critical step in the creating mallets for sale.
I need to learn how, and how long, it will take for me to get from rough casting >>>> ready-to-sell, since that will determine the price for a finished item. I can pretty much promise it will not be competitive with Harbor Freight mallets, or even Crucible Tools. The$e mallet$ would be $everal multiple$ more pricey. And, if there is zero market for them, well, I will have quite an inventory of expensive gifts.
One of the most important aspects of the process is getting the cove detail just right on the handle collars and around the faces. Since I have a collection of chainsaw files of varying sizes I was able to find just the right tool for that task. I just lay the round chisel in the groove of the cove and gently move it along the groove, making sure to not rock the tool in use. That way I can get a clean, crisp surface.

The next step will be to establish the surface texture. Stay tuned.

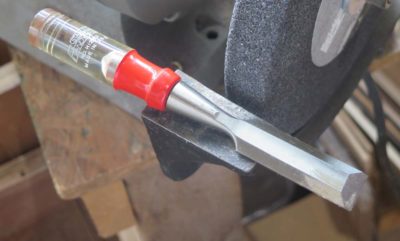
During my annual post-New Year’s tool tune up I am finally addressing a topic and a number of edge tools whose bevels are on the wrong side for my particular needs. In the parlance of tool making, the question is often, “Is the bevel (cannel) on the inside of the curved edge or on the outside?” The discussion even extends to edge tools that are not curved, such as plane irons being “bevel up” or “bevel down” or holding chisels while choppings joints.
Same question, different context.
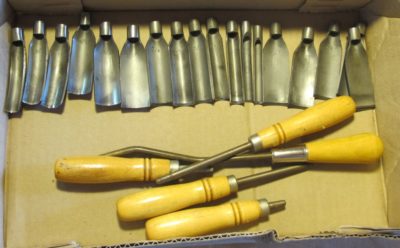
One of my favorite features of the interchangeable-component pattern-makers’ gouges is that the number of in-cannel and out-cannel edges is roughly equivalent. That is because the pattern-makers’ gouges are sculpting tools, not design-inducing tools. The latter is the case when using the profiles and sweeps of carving gouges to lay out the line and profile for most incised or raised detailing, such as foliage or something similar on the knee or leg of a rococo leg. In this instance the inner curve, determined by the size and sweep, combined with the out-cannel provide the replicatable incising lines to establish the outlines of design elements. The complete composition is established by holding the edge of the gouge(s) against the work piece and striking it with a mallet, working around the perimeter until it is complete.
NB-Pattern-makers’ gouges of the type illustrated above are not to be struck with a mallet, they are to be pushed, essentially free-hand.


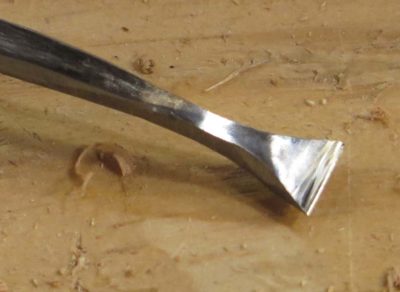
I’ve got two candidates at the front of the line that reflect my desire to reconfigure the bevel/cannel from one edge to the opposite edge. The first is a carver’s v-gouge and the other a hand-forged petite sculptor’s (?) adz. In both instances I needed/wanted to move the cannel from the outside to the inside. I’ll deal with each tool separately in the blog, beginning with the adz.
Stay tuned.
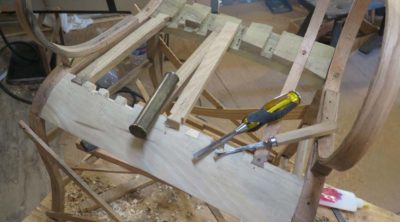
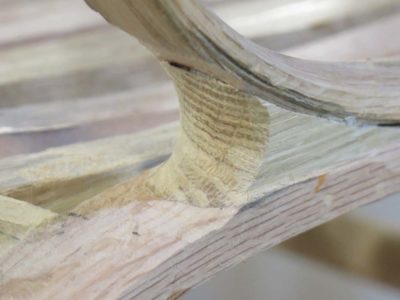
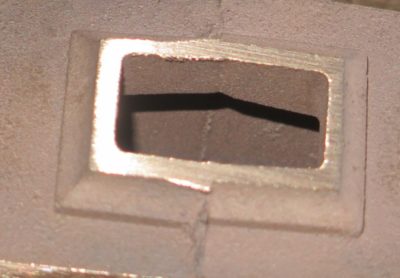
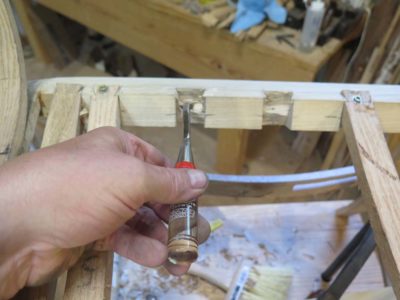
One of the more challenging aspects of building a Gragg chair is the need to chop 17 half-blind dovetails for the ends of the seat slats, eleven on the front seat rail and six on the rear seat rail. Unlike cutting half-blind dovetails in drawers or casework, the workpiece cannot be oriented to be most easy for the workman; these dovetails have to be cut after the chair frame is already assembled due to the fact as I have state before, making a Gragg chair is more akin to composing a sculpture in three dimensions than any other furniture-making exercise I have encountered. Because of this there is no opportunity to adjust the orientation of the workpiece to the tool and the maker, requiring some contorted tool work.


In my development of techniques for replicating Gragg’s work, reverse engineering as he left no account of his own processes, I found the need for a task-specific dovetailing chisel is requisite. I’ve tried working with fishtailed gouges, skew chisels, and probably a host of other tools lost in the fog of memory, but have settled on making my own tool which has now been in use for the past several chairs with excellent results. The key is to make the business end of the tool match precisely the pocket being excavated.
In general there are two primary approaches to the problem, one much more expensive that the other. The expensiver option is to take a 1/2″ curved fishtail gouge and regrind the tip configuration to match the angles of the pocket being excavated. This yields an excellent tool for the task. (Unfortunately, I think this tool fell into a crevice behind the workbench in the video studio and cannot be reclaimed unless I remove the siding on the exterior barn wall, an option I am loathe to even contemplate).
In my case, and probably in yours too, the problem was solved inexpensively by recycling a no-account cheep bench chisel from my scrap tool box. Yes, alas (?), I keep an inventory of scrap tools along with scrap metal along with scrap ivory along with scrap tortoiseshell along with scrap wood… Sometimes I think all our shops should just be call “the scrap yard.” Part of me understands my late father-in-law’s mindset (and my late father’s as well) that it is difficult to dispose of materials that do indeed have utility. Anyway, I took this old cheap Stanley bench chisel, probably available for a quarter at any tool swap or flea market, and ground away all the material I did not need for the final configuration. This was an exquisitely efficient expenditure of time as this one tool reduced my time for cutting the half-blind dovetails in, well, half.

Recent Comments