Many of you are, like me, familiar with, and probably partakers in, the “tailgating” tool flea markets that are fairly common around MWTCA meetings, tool auctions, and the like. I might only spend a minute or two per year buying clothes and shoes, but I can sink days into scrounging for tools. I carry the same mindset to almost every yard sale or thrift store I encounter, and often with more strategic buys in mind.
In fact, all of my workspaces are chock full of yard sale and thrift store resources. I’ve had a pretty good stretch of useful acquisitions lately.
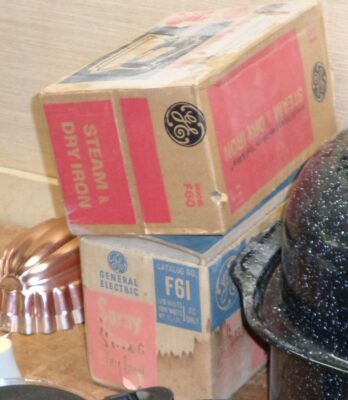
Here are some treasures from a recent event, a community yard sale just before winter got here. In a few minutes and for a few dollars, I came home with this booty.
My first treasure was this collection of assorted tacks, of which I bought six boxes for $1. I am always on the lookout for vintage fasteners, and this box is the type of assorted tacks that was common in hardware stores in the 1950s and 1960s. At some point when I get bored enough I will sort the contents of the boxes, ranging from 1/4″ in length to 1″.
Grinding shellac anyone? I don’t like coffee, never have. But coffee grinders, especially one for 50 cents? There’s always space for them as I use them to grind up shellac, resin beads, whatever.
What in the world can I do with cake and jello molds? Well, there is a lacquerwork technique I want to experiment with, using my epoxy fauxrushi. This technique involves draping strips or sheets of impregnated fabric over a mold, then demolding after hardening. The molds will have to be sized with whiting first, but they are a terrific testing opportunity for the idea. If my memory is intact this stack was $1.
Since I use heat for a lot of functions involving wax or glue, old timey electric irons are just the tool for a lot of applications. These were $2 a piece. In the original boxes no less.
Since I melt wax a lot, and even more in the near future as I delve again into lost wax metal casting, I’ve found that using coffee pots are darned near perfect for material handling. I can melt wax on a hot plate with these beauties, and then pour into whatever form or mold I’m using for whatever project I am creating. I got these four for a buck apiece.
Perhaps my biggest prize, both conceptually and physically, was this very large turkey roasting pan. What in the world do you need with a turkey roasting pan? (Mrs. Barn asked me the very same question). Well, when steaming the wax out of a ceramic investment mold, that is “Losing the wax” in lost-wax metal casting, you gotta invert the investment mold and steam out the wax. This roasting pan is just perfect for the largest investment shell I will ever do. I shelled out big bucks for this one, $4. And worth every penny.
Fifteen minutes, fourteen and a half dollars. Not a bad way to spend a little time and money on the way home from the post office.
PS – between the wedding, and Christmas, and family visits going in both directions, and preparing the Maryland house for new occupants, I don’t think I’ve spent a dozen hours in the shop doing any real work since the beginning of November. “If only I can get past this next thing,” I tell myself… But there is always another dozen things waiting in line.
While undertaking some recent reorganization of my basement workshop in Elderbarndottir’s former house (she got married in November and moved to her husband’s house) I came across this nostalgic and beat-up picture from early 1977, hiding behind one of the shelving units. This French secretaire was my first really high-profile/high-value furniture restoration project at Schindler & Son of the Palm Beaches, where I started working in late 1974. Unfortunately I did not take any detailed pictures of projects at this point of my career – had this happened once I was a museum conservator the project would have been documented with hundreds of photographic images to go along with the written reports. I probably took a picture or two of the interior, it was spectacular. Bat that was almost 50years ago and cannot recall that detail.
Somewhere I have a picture of a Riesener cabinet from the same client, but that picture has not turned up yet.
Prior to this I did a lot of run-of-the-mill restoration for “ordinary” antiques along with a boatload of custom finishing and refinishing; before Schindler’s I was a “scratch and dent man” at a couple of furniture stores.
This project arrived in pieces in the back of Ambassador So-and-so’s Mercedes station wagon. The secretaire bore the inventory stamp of the Chateau de Saint Cloud. It should come as no surprise that the culture from which the word bureaucrat is derived should be punctilious about household inventories, but there you have it.
Over a period of a couple weeks, I reassembled it and made repairs to the rosewood and tulipwood veneers, then finally a couple of days of shellac pad polishing. “Pop” Schindler came almost every day to watch and guide me, it was on this project that he introduced me to hot hide glue.
This was a seed for my fascination with exquisite European furniture, especially of the French variety (along with our company’s work at the Wrightsman estate in Palm Beach and their furniture collection), and was truly the acorn from which my fascination with Roubo sprouted. It was also the prompting for me to embark down the career path of conservation; I entered that stream in 1981 at Winterthur Museum while I was a student in college.
I took some time yesterday from our year-end festivities to chat with my longtime friend Brian Wilson on his “Now For Something Completely Different” show, where we engage in some high-altitude societal imaging and analysis.
If it is the sort of chatter you might find interesting between two radical rabble rousers, give it a listen.
For unto us a child is born, unto us a son is given: and the government shall be upon his shoulder: and his name shall be called Wonderful, Counsellor, The mighty God, The everlasting Father, The Prince of Peace.
The angel went to her and said, “Greetings, you who are highly favored! The Lord is with you.”Mary was greatly troubled at his words and wondered what kind of greeting this might be.But the angel said to her, “Do not be afraid, Mary; you have found favor with God.You will conceive and give birth to a son, and you are to call him Jesus.He will be great and will be called the Son of the Most High. The Lord God will give him the throne of his father David,and he will reign over Jacob’s descendants forever; his kingdom will never end.”
And they said, “Isn’t this the carpenter’s son? Isn’t his mother’s name Mary?”
And I heard a great voice out of heaven saying, Behold, the tabernacle of God is with men, and he will dwell with them, and they shall be his people, and God himself shall be with them, and be their God. And God shall wipe away all tears from their eyes; and there shall be no more death, neither sorrow, nor crying, neither shall there be any more pain: for the former things are passed away.
I pray for you to have a blessed Christmas with loved ones and that you are celebrating the Incarnation, through whom we can be reconciled with The Creator.
The Eagle Eyes amongst you will figure out what’s going on (sorry my template is plexiglass). My only question is, “Can I get this done in time for the mid-March birthday?”
Delphine Galou, that is, the magical contralto in my favorite performance of Handel’s Messiah. Here is my annual link to that version, and if this does not elevate your temporal senses, your sense of well-being, and your sense of The Divine you’d better check your pulse.
Collegium 1704, the Prague-based orchestra and chorale, is committed to performing baroque (and earlier) music being faithful to the original scores and instrumentation. Hence, there are some odd versions of instruments with which we are familiar.
If you watch the concert video closely, you might see what I think is a Virginia woodworking link to this ensemble’s accoutrements.
Smack-dab in the center of the orchestra is an instrument that looks suspiciously like a Taylor & Boody console pipe organ. T&B is a premier, internationally renowned pipe organ maker just over the mountain from us near Staunton, Virginia, on the way to Joel Salatin’s Polyface Farm, for those of you familiar with his work in food production practices (featured in The Omnivore’s Dilemma). I am acquainted with T&B’s head woodworker and have visited there a several times.
During one of the visits as a family they were just finishing up a magnificent organ for the chapel at Yale, with all presentation surfaces painted and marbleized with platinum leaf detailing. Spectacular. The gigantic instrument was to begin disassembly the following day, for transport to New Haven. The fit was so tricky they replicated precisely the balcony where it was to be installed in their fabrication shop and built the organ to fit that space. Exactly.
While touring and gawking we got to see one of their console pipe organs, basically the size of a roll-top desk and similar to this one. Elderbarndottir, being a pipe organist herself, asked if she could have one. “It only costs as much as a house, Dad.”
The workmanship was astounding, and the sound is almost incomprehensively sublime given the size of the entire unit. The inside is packed about like under-the-hood of a ’68 Mustang 428 Boss, barely even room for your hand to slither in for anything.
So try to spot and listen for the organ in this incomparable performance of Handel’s Messiah.
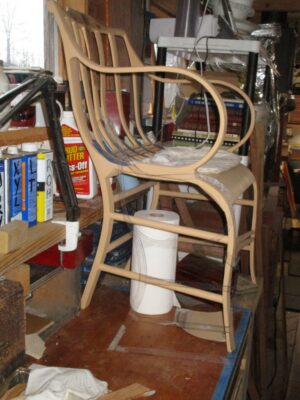
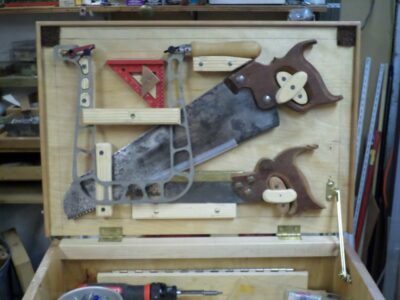
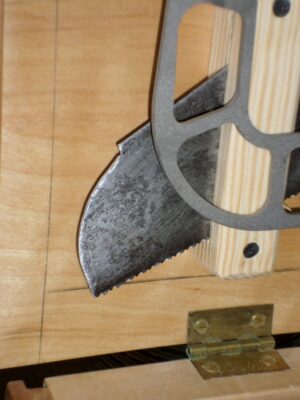
My first efforts for the new tool box addressed the empty canvas of the lid verso. As with the retrofitting of the large vintage tool chest for my 18thC tool demos (more about that much later) I decided the underside of the lid would be a good place for the saws that did not neatly fit elsewhere in the toolbox. So, I made some fittings and hung the saws there.
The first step in this was to trim the tip of the lovely little panel saw that was oversized by about a half inch. By rounding the top corner of the saw tip it fit the space diagonally just right.
The size and configuration of the exquisite Knew Concepts saw frame made it a problematic fit in the inner space, so it wound up being hung here as well. It was overlaid on the panel saw and my re-fashioned Tyzak dovetail saw was inserted in-between. The void in the center of the coping saw was just right for the DelVe square to hang right there.
I read recently that my old friend and Martin Donnelly auction companion Josh Clark is dispersing Tom Law’s inventory of saws. I did not know Tom well but I always tried to find a few minutes to chat with him during the PATINA annual tool extravaganza. He knew more about saws in his pinkie finger than almost any woodworkers know in their whole bodies and was an indefatigable rescuer and rehabilitator of old saws. In a way it does not surprise me that his inventory was roughly one thousand saws at the time of his death. It makes my “collection” of two dozen carpenter’s handsaws puny by any comparison.
All of the saws in my “collection” are or will be working saws, most that I have purchased at tool swaps and the like. I have an approach to selecting a vintage saw for use (or gifting) with the menu of features including the following.
Saws Are Like Pizza
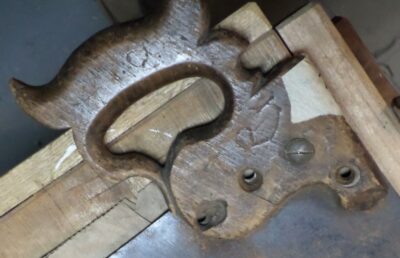
This is a near-perfect candidate for my own tool kit. The plate is heavy, the tip is nearly 3″ wide, indicating it has not been re-toothed, the surface rust is pretty minor (the pitting after cleaning will be minor), and the planarity is nearly perfect. The slight flattening and sharpening will be demonstrated in coming posts. Plus, it was only five bucks at a MWTCA shindig.
Like pizza a vintage saw plate better have lotsa meat. I like saw plates that have not been used or sharpened a lot, definitely not re-toothed. I like them to be not only thick in gauge but also as wide as possible. In other words, in “as new” configuration even if not in “as new” condition.
No Bad Skin Cancer
A little surface rust is fine, maybe even a little more than that, providing the overall strength/integrity of the plate is intact. It only takes me a minute to determine whether the surface can be polished enough to make the tool work smoothly.
Unlike Elected Officials, No Kinks
I know that real saw maestros can reclaim a badly bent saw plate, but I do not possess the skill nor the desire to do so. I don’t mind a teensy bit of bend in the plate, providing it is not literally creased, but a gentle level of un-planarity can be addressed easily and quickly. There are many videos on-line to show how this is done, the best one for me is Bob Rozaieski’s video.
He’s The One With A Full Set Of Teeth.
Many years ago I was trying to identify one of the colorful local fellows to Mrs. Barn, and I was getting nowhere with my attempt. Old guy. White beard. Glasses. Baseball cap. I was having no luck sparking her memory as that list describes 90% of the men in the region. Then I latched on to the descriptor that prompted her memory. “He’s the one with a full set of teeth.” Immediately she knew who I was talking about.
That also describes what I want when buying a vintage hand saw. All the teeth, in good condition. It’s okay if they need sharpening, but they all gotta be there and in good overall shape. Once you master saw sharpening it becomes quite pleasurable to do.
No Need for a Handle
The handle is of little importance to me. If it is in nice condition and a configuration I want that’s fine. The saw handle in this image was somehow married, and mutilated in the matchmaking, to the plate it was on when I got this saw (all the nut holes were wallowed out to somehow “fit” the holes in the plate). What was once a very nice handle has been ruined and ready for the kindling pile.
Making a saw handle is actually a lot of fun and can be a great act of creativity using a piece of wood you want and your own hand as the template.
If a saw meets these criteria, I’m good to go provided the price is right.
Here’s a sharpening tip I have used for the past several years.
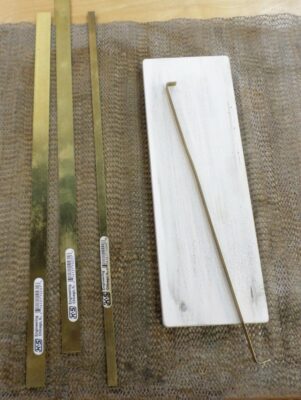
In order to get the back-bevel secondary angle consistent and effortless, many folks use the “ruler method” and rest the back side of the blade on a metal ruler to get the back bevel/micro secondary bevel. Since some of my machinists’ rules have different thickness, in addition to the preference for not using an actual rule since they can move during the process, I pulled out a thin brass strip from my supply box and cut and bent it to fit the stone in question.
By overbending the tips a smidge the metal strip is basically spring-loaded into place, thus the micro-bevel jig stays put during the final few strokes of sharpening.
The brass strips are available at almost any hardware or hobby store, usually for a dollar or two. Obviously you could use any thin strip of sheet metal as well, flashing would work just fine.
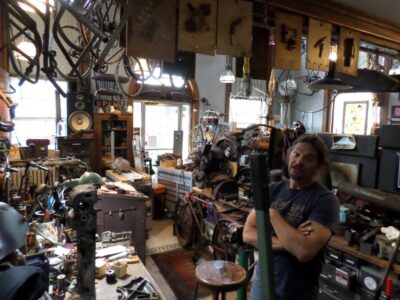
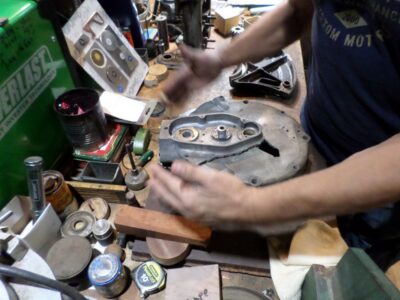
During our recent visit to Youngerbarndottir and Li’l T I arranged to travel a few dozen miles to visit my long-time friend “Jersey Jon” of American Pickers fame. Jon is one of the smartest and most creative people I have ever met, not only exceedingly talented but extraordinarily skilled at a whole host of activities. I am honored to be in his circle of friends and colleagues.
His reputation as perhaps the world’s leading expert on the history and restoration of pre-WWI motorbikes is well deserved. We spent a few hours rummaging around his old bank building as he described a never-ending menu of upcoming projects.
One mind-blowing project was his need to rebuild this crankcase of a very early motorbike engine that had blown itself to smithereens. As we noodled the process and outcome of the project, I was pleased to realize that the smelting furnace I gave him two years ago was likely to be integral to the solution to the problem of getting this ultra-vintage motor bike back on the road.
It could have been a much longer visit but he was on the countdown to leaving the next morning for a fortnight of Pickers filming.


Recent Comments