A couple weeks ago while clearing out some stuff from my basement workshop at my daughter’s house, I came across an experiment that is almost forty years old.
In the world of historical fine art one of the premier positions is held by “panel paintings,” or fine paintings composed on a solid wooden panel. Given the age and prominence of these artworks, and the fact that they are unbalanced construction on an inherently unstable base given the presence of a precisely constructed laminar gesso and paint layer on the front side of the solid wood panel, caring for these artworks takes a high place in the preservation hierarchy. Very early in my museum career I found this problem to be a fascinating one, and the data points of my career projects (when I was able to choose the projects to work on, which was most of the time) revealed that it was the quality of the problem that motivated me much of the time, not necessarily the notoriety of the artwork/furniture. That explains my final project, which was the stabilization of a pair of wooden flag poles that encompassed a peculiar approach to addressing the problem of split timbers.
Back to panel paintings.

(Photo by H.L. Stokes via Wikipedia)
To counteract the unbalanced construction on a dynamic foundation, many, perhaps even most, ancient panel paintings have been augmented with a framework applied to the back side to both balance out the construction somewhat, but also to mitigate the tendency of the wood panel to warp. Sometimes these added features, called “cradles,” are elegantly sophisticated. Others are sophisticated and deleterious to the panel as the “floating” spines bind in the “pass through” blocks that are glued to the back side of the panel, inflicting new fractures to the panel along with the distortions as the panel attempts to expand and contract while the bound spines hold it in fixed dimensions, essentially a fixed cross-grain construction. This problematic outcome caused the entire concept to be reexamined beginning about the time I was coming into the museum world and many panel paintings have been de-cradled.
Shortly after hearing a seminar presentation on the topic in 1982 I decided to construct a prototype integrating my understanding of what wood is and how it behaves with some out-of-the-box thinking. Given that many of the old cradles were actually damaging the panel paintings, clearly a different approach was needed. Believe me, the number of alternatives to traditional cradling were legion, and even the last panel paintings conference I attended included several novel and unrelated options.

So I made a full scale model to test some ideas I had rattling around my brain pan. For starters I selected a less than premier piece of wood, it was literally a 2 x 12 resawn, planed, and glued together with hot hide glue into a “panel” approximately 20″ x 30″.

I then fabricated a series of “pass through” blocks with rounded contact points for the floating spines, which were themselves fairly lightweight, with the entire system glued to the back side of the panel.

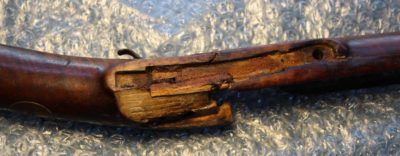
You can see the construction of the blocks from this one that had been broken somewhere along the line. I applied spray dry Teflon to both the rounded faces of the blocks and the floating spines, hoping that the shape and permanent dry lubrication would prevent the blocks and spines from binding together (Teflon being the slipperiest substance on earth).

After assembling the entire model and showing it to the paintings conservators at the museum (I was working at Winterthur Museum at the time) I set it aside and literally forgot about it for almost four decades. Presumably it has been just sitting in the basement for all those years, responding to changes in the unregulated environment of the space. Over the life of the panel there have been swings in humidity from 100% to maybe 25%, more than enough to impart hysteresis cycles a’plenty.

Much to my delight the assemblage has suffered no ill effects over the decades, so at least the concept proved sound. The original construction is still perfectly flat and there are no instances of long-grain fracture to the wood. Admittedly the panel is balanced in that both faces are raw wood open to the microclimate so there was very little impetus for severe warpage. Still, I would have expected some loss in planarity if there was a flaw in the concept. Nope, still dead flat.
Now that I have reclaimed the experiment I will create a simple paint scheme on the face to mimic the structure of a typical Renaissance panel painting and see how the experimental cradled panel responds over the years. I will leave it sitting out of the way in the barn essentially exposed to the elements except for rain. I’ll check back with it in, say, another 38 years to see how it did. I’ll be 103 then, but I just got back from celebrating my Mom’s 103rd so that might not be too crazy.
If it still looks good then I’ll let someone in the museum world know about it.
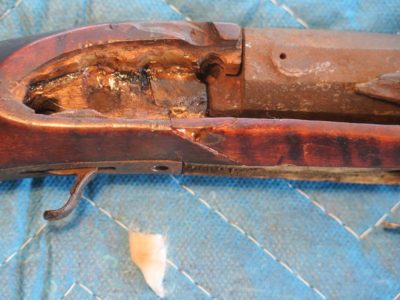
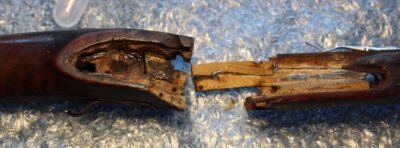
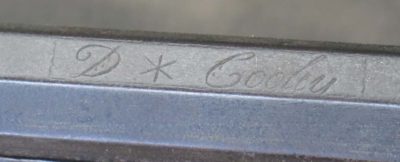
With the overall reassembly and configuration of the rifle stock accomplished it was time to dive in and rectify as many of the structural problems as I could. Given that the damage was 100% cross-grain breakage at the narrowest part of the curly maple structure, and the area had been repaired previously several times, my options were not the hifalutin’ elegance of conservation ideology. However, I still used that decision-making framework I developed decades ago as best I could.. Fortunately I understood the ultimate use of the rifle was as an exhibit item, not for re-enacting or use or anything similar. It was a historic document of the brilliance of David Cooley, the maker.

The original(?) inlet patch behind the metal plate of the hammer works was only partly intact, but that part was re-glued into the box. A new repair element was crafted, then grafted into the void of the previous material that had become pretty much pulverized. Combined with the infusion of the West epoxy the overall soundness of the structure was enhanced immeasurably. I reattached the shoulder to the hammerworks box with hot hide glue and the stock re-assembly was mostly complete.


There were two more areas of damage and loss adjacent to the trigger that needed compensation, again areas that had been worked over several times before. In the more severe case I needed to carved and fit a new piece to glue into the void. With some inpainting to match the adjacent area and a bit of pigmented hard wax (my Blend 31 wax with microlith pigments turns out to be a magnificent fill material) melted into any remaining voids and the project was essentially done. All I had to do at that point was reassemble all the parts into a whole artifact and return it t the client. Having paid attention to Tim’s disassembly I had no difficulty reassembling the rifle.
Again, I cannot find the images of this process ex poste. I hope I did not erase them from the SD card they were undoubtedly on. When I find them I will post them.
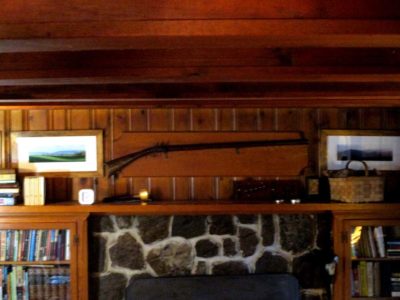
At the request of the client I hung the rifle over the mantle of the cabin for a final picture before I delivered it back to him

Once all the disassembly and glue surface cleaning was complete I set to the task of making the pieces into a whole thing. Not precisely a whole long rifle, as that would imply functionality, but at least a whole assembly of the parts.
My first step in this process was to determine if the pieces actually all fit back together again without any modifications. Temporarily re-installing the barrel I decided that indeed the major elements fit nicely back together.
Since the configuration and shape of the rifle precluded my ability to really clamp anything together I used foam pads and wedges to hold everything in the precisely correct position and wicked-in some dilute hot hide glue into the break, just to hold things in place for what was to come next.
After allowing the glue to set fully overnight, I was delighted to pick up the rifle gently and realize that it stayed together. With the proper shape established I then wicked-in slightly diluted West System epoxy with extra slow hardener to allow it to wet out the gluing surfaces and voids completely. I let this sit for a week before touching it again.
Stay tuned.
***Apologia – somewhere I think I have a few more pictures of this process, but I either put them in the wrong directory or they are on a wandering SD card and have not been uploaded to my compewder yet. If I find them I will post them.***
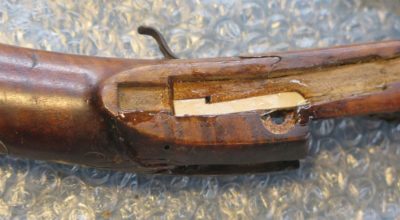
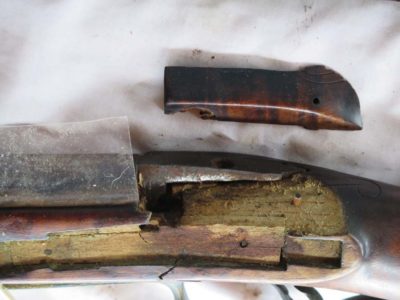
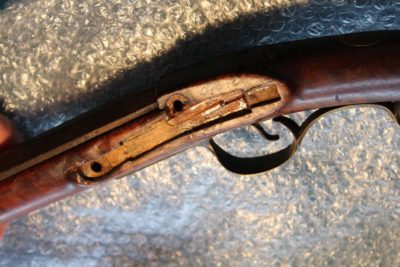
Once Tim got all the metal parts removed from the rifle I was able to take a good look at what was inside. It was pretty much what I expected, based on my observations from the outside. The narrowest part of the rifle stock is also the region of the greatest stress from the explosion and reaction of the gunpowder igniting and expulsion of the heavy lead bullet. And when the material used for said stock is curly or highly figured there is a lot of end grain/short grain structure, so failure is a given.

I could see immediately that the break was all the way through the narrow neck, and the only thing even holding it halfway was the inlet repair from days gone past (this picture was taken prior to the removal of the barrel). Even this repair was loose and shattered. At the very least, “the structural integrity was compromised,” as we say in our reports. As a matter of fact there were pieces already so loose that they were coming off n my bare hands.

There was no doubt that a complete disassembly was called for.
The initial “disassembly” was auto-started as one major piece came off without any help from me. It popped off when the barrel was detached in the initial disassembly.
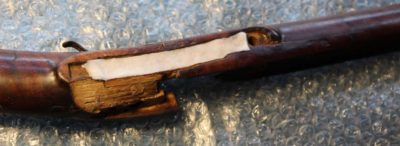
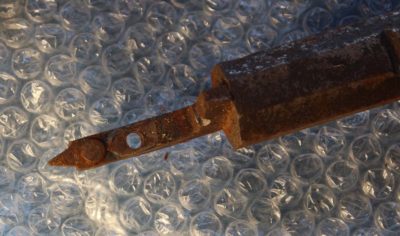
My first step was to remove the inset repair that was the last thing holding the rifle together. I poultice the area with water and 1% surfactant to soften the glue holding it all together.

No sooner was that accomplished than the entire thing came apart. I now had direct access to all the gluing margins (and the glued that had been slathered/poured on in a previous restoration campaign).
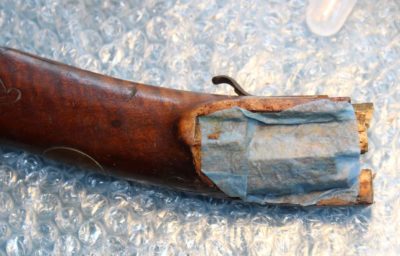
I poulticed and cleaned every surface I could get to, softening the glue and scraping it off with one of my home-made ivory tools, followed by swabbing with distilled water to get them squeaky clean.
I let eveything sit for a couple weeks to reach moisture equilibrium before beginning the reconstruction.
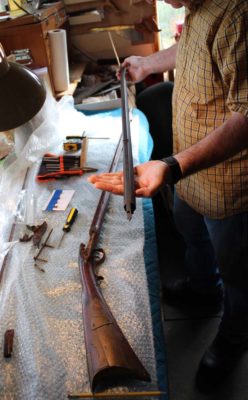
The process of taking apart the c.1815 David Cooley long rifle was one that I did not have the experience to undertake, so I called on my friend Tim who is both a rifle maker and a historian of the form and frontier life. I’d invited Tim for a “look see” when I had the rifle in my shop the first time several years ago, and he appeared to enjoy the experience. Since I was not confident of my understanding of how the long rifle was assembled in the first place, Tim was a natural call to make.
Much to my delight he was able to some in short order and set to work. All the while he was scoping it out, and then disassembling the piece, he was providing a running commentary and I was taking notes as best I could.
A few of his observations were:
*the workmanship was superb and typical of late 18th century gunsmithing even though this gun was more than a decade after the turn of the century

*the gun had a “swamped” barrel, meaning that it as thinned slightly halfway down the barrel to reduce weight, a feature of the very best firearms of the time
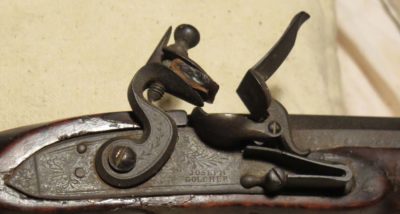
*the hammer-and-trigger mechanism was a manufactured English set, probably purchased for Cooley’s inventory and ready to be put to use on a future gun. Since the fitting of the hammer-and-trigger was crucial to the making of a gun, it would have been in-hand even before this gun was started.
*the barrel was also in-hand and may have actually been re-purposed from a previous gun or at least had been modified with a new tang welded on the butt end to fit the new stock

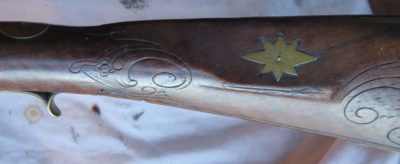
As the disassembly progressed I was very much impressed with the elegance and simplicity of the long rifle’s construction, and the fittings for anchoring the barrel to the stock were superbly made. Tim took advantage of the opportunity to study many of the gun’s finer features, such as the spring loaded patch box.
One last observation from Tim was that he thinks the gun is still loaded, with the charge impacted in the butt of the barrel.
Many thinks to Tim for helping me out with a task I would have not been comfortable. Watching him do his magic made me all the happier that he was available to help me out as there were steps I would have likely missed and damaged the rifle trying to disassemble it myself.
With the gun all apart I could examine the damage and set out on a path to make it as whole as possible.
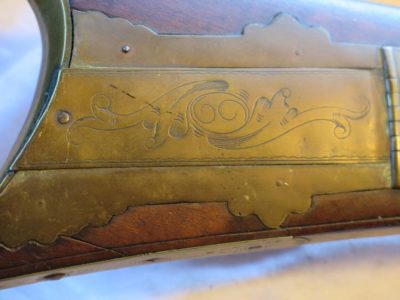
In looking back over the projects of last year I realize that I never recounted my revisiting the classic c.1810 western Pennsylvania long rifle, made by well-known gunsmith David Cooley. My previous effort was to simply stabilize it, but this time I got to dive in deep and repair it much more intensely. Once I got it apart it was clear it had been damaged and repaired several times.

Here are a few detailed images to remind you of the exquisite workmanship of the tool.


Over the coming posts you will get the tale of making it more intact, not enough to shoot but certainly enough to handle and exhibit safely. At issue was the through-and-through break running perpendicular to the length, right at the trigger mechanism.
Stay tuned.
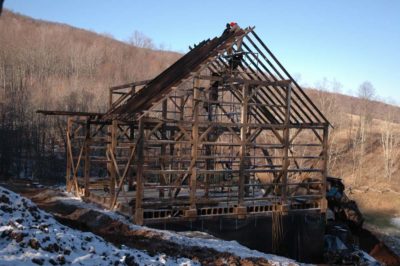
It’s been almost thirteen years since the skeleton of the barn was erected, nine years since it was outfitted with the first of more than a dozen workbenches, and over six years since the first blog post. Now safely ensconced in my 65th year, lately I’ve been contemplating the entire enterprise, reflecting on how blessed I have been and continue to be. Whether it is good news or bad news, after serious consideration I have no plans to change the fundamental structure of activity on the homestead for several more years, but at some point life in the mountains will simply become too physically taxing and the barn and cabin will be in my rear-view mirror. Until then, however, it is still full(?) speed ahead with a big smile on my face, albeit not necessarily in the exact same direction nor the exact same speed. I’m working just as hard as I did when I was 30, but the output is demonstrably less. My Mom is 102 and lucid so I’ve got to think about another forty years of engagement and productivity.
Here is a sketch of what future activities might look like. No telling if it is accurate.

Conservation Projects
Early on I maintained a fairly vibrant furniture and decorative arts conservation practice but have no plans to continue much of that except for specific projects and clients. Yes, I will continue to work with the private collection of tortoiseshell boxes that I’ve been working on for more than a decade. Recently I was approached to collaborate on a couple high profile on-site projects and if those move forward, fine. I love it but at this point I’ve got other things I want to do on the priority list. And I want to truly perfect my artificial tortoisehell. And I want to explore new uses of materials in furniture preservation. And invent new materials, or novel uses of existing materials. And, and, and…
Making Furniture
I make no claim as a furniture maker of any note, but I hope to concentrate on making more in the future. I would love to maintain a small output of Gragg chairs every year, and even modify them and take them in directions Samuel Gragg never went. I also have enough vintage mahogany for eight more Daniel Webster Desks, so perhaps there are some clients who might want one. Only time will tell. I’ve always had a hankering to make some furniture in the milieu of Charles Rennie Mackintosh or Alar Aalto, so maybe that becomes part of the equation. And I have these sketches for pieces representing a collision of Roubo and Krenov while they are sitting on the porch of a Japanese temple. And Mrs. Barn has a list of things she would like for the cabin. And exploring parquetry more intensely. And finally get pretty good at woodworking in general. And, and, and…

Metal Work
I’ve always had a interest in metalworking since my boyhood when I would spend time with my Dad in his shed, melting lead weights and doing a little brazing and welding. Many of those skills have grown fallow but I am trying to get them back and take them to new places. My love of tool making has been rearing its lovely head in recent times and I have every intention of bringing that focus closer to the bullseye. And part of that has to include getting my foundry back on-line. And tuning up all my machine tools like my machinists’ lathes and mill. And getting really good at brazing and silver soldering, maybe even welding. And, and, and…
Finishing Adventures
I remain committed to looking both backwards and forwards into the realm of finishing materials, ancient and super modern. I truly believe Mel’s Wax to be a transformative furniture care and preservation product for which I have not yet discovered the key to marketing. But I will keep at it because of my knowledge of its performance and my commitment to Mel’s vision for it. And as for beeswax and shellac wax? Finishing with them may be among the oldest and simplest methods, but they can be extremely difficult and I cannot pretend to have mastered them. And what about my fascination with urushi and its non-allergenic analogs and the beautiful things I want to make from them? And what about the fifty bazillion things I do not know about shellac?And, and and…

Writing
My plate of writing projects is full to overflowing, building on a strong foundation of completed works. Notwithstanding my current struggles with the manuscript for A Period Finisher’s Manual, due entirely to my having too much esoteric material to include in a reasonably consumable book (really, how much solvent thermodynamics does the typical woodworker need to know?), I enjoy every minute I am writing even when it is driving me crazy. I’d better because my collaborator Michele Pagan is one full book ahead of me in the Roubo Series. And there are two or three more volumes after that one. And some day I need to finish the almost-completed manuscript for A Furniture Conservation Primer created with a colleague while at the SI and thus will be necessarily distributed for free via the web site. And what about my treatise on the technology and preservation of ivory and tortoiseshell? And the dozen mystery/thriller novels I have already plotted out? And who knows how many short stories about the life of First Century craftsman Joshua BarJoseph? And, and, and…
Web
My first of almost 1,200 web posts went up six-and-a-half years ago, which I understand in the world of hobbyist blogging, where blogs come and go like the tides, puts me as some sort of Methuselah. But certainly not in the same class as The Accidental Woodworker, who has been blogging daily for even longer IIRC. Ralph, I tip my hat to you, sir.
I once thought the web site/blog would be a useful portal for soliloquies about my projects and things I’ve learned over a long and rewarding career, but now I am not so sure. A while back I decided to make a concerted effort to blog at least five times a week for a year, and I think I came pretty close. Surely this would increase my web traffic! Well, not so much. At the end of this effort my web traffic was 2% lower than when it began. Despite fairly consistent blogging my visitorship has dropped by almost half over the past four-plus years. So I just scratch my head. I’m not whining, but instead recognizing that the flock who is interested in my musings is shrinking, not growing. Oh well. This is not a good or bad thing, it is just a thing, helpful in me making decisions about priorities. I have no plans to really change anything about the blog, we’ll just wait and see where it goes. When I am not somewhere else, with someone else, or doing something else, I will blog.
Recently I was chatting with someone who informed me that web sites and blogs are now passe and the currency du jour is the unholy trio of Instagram, Facebook, and Twitter. Given that and my antipathy towards the latter two it is likely that I will undertake the former at some near date (yes, I know the relationship between Instagram and Stalkerbook) . Something inside me rebels at the notion of validating the post-literate world, however. Still, the economic treatise presented by Larry the Liquidator is not only dramatic but accurate. Even the Professional Refinisher’s Group is moving forward, transitioning from a moderated email forum to a private Facebook Group, which will leave me behind. But they will survive without me and I intend to maintain contact with that circle of fellowship regardless.
Trouble is, I am by temperament a bizarre mélange of buggy whip maker and hardline “emergent order” Hayekian. Hmmm. Not really sure how that works out.
Workshops
Integral to my vision for the barn was to have it be a place of learning. As the facility was coming together, whenever I spoke to any kind of woodworking gathering the verbal response was overwhelmingly enthusiastic. The reality that unfolded was anything but. I now realize that my vision was a faulty one and the enthusiasm was superficial. Quite bluntly, almost no one wants to come to such an isolated location where local amenities are practically nonexistent, to spend a few days engaging in subjects I want to teach. Fair enough, the barn is too remote and my topics are too arcane. Like I said before, this is not a good thing or a bad thing, but just an instructive thing to add to the equation.
As a result and in recognition of reality I plan to deemphasize workshops at the barn, perhaps even eliminating them altogether, notwithstanding that I created dedicated spaces for the undertaking. Should a small group of enthusiasts approach me with the request to teach them, I will do so. That is precisely what a quartet of guys have done for next June. And, I might do an occasional blockbuster-type workshop (a Gragg chair class would be such an example, if that ever occurs; I had thought a ripple molding machine class might be such an event, but with zero response…), or I might travel a bit to teach but otherwise that part of the portfolio is likely to close. Not definitely, but likely.
Videos
Hence my transition to teaching via video. If I cannot get folks to come here perhaps my best strategy is to go to them. I have a multitude of ideas (more than twenty full-length [>30 mins.]video concepts on the list) and a brilliant local collaborator to work with. I am committed to this path to the degree that I have the time, energy, and resources.
Further I have decided that making shorter, self-produced and thus less polished “shop technique videos” might be a useful undertaking to post on donsbarn.com, youtube or Vimeo. I will explore this avenue in the coming weeks and months.

The Homestead
With several buildings, several gardens, and a power system to maintain and improve there is never a shortage of things to do here on the homestead. I want to build/expand more garden capacity for Mrs. Barn to spend time doing the thing she loves best. And fruit and nut orchards. And I want to finish creating a rifle scope for shooters like me who have lost most of the vision in their dominant eye. And another hydro turbine downstream from the current one.
And, and, and that’s all I’ve got to say on the subject.
That is The State of the Barn Address, 2019. To quote one of Mel’s favorite songs, “The future’s so bright I gotta wear shades.” Yes it is. I am living the dream.

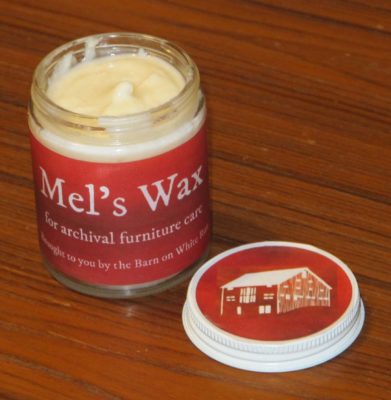
Wish me luck! After years of product development and clearing the decks at the Barn on White Run, and finding reliable suppliers for some of the esoteric materials involved (still crossing my fingers on that one), I am thrilled to announce that Mel’s Wax will be in the donsbarn.com Store in the coming days and could begin shipping on or about January 24, 2019.
This is a hand-made ultra high performance archival furniture maintenance product, fussy to formulate and manufacture. On a good day doing nothing else I can produce 40-50 jars. But rarely is there a day when I do nothing else.
More complete information on the creation, properties and utility of Mel’s Wax will be posted here and at a currently-under-development web site dedicated to it, which will go live as soon as I can get all the documents created for it. Eventually that web site will also include detailed video about using it and other related topics.
To give you a snapshot of this product I have posted below some testimonials and the text of the instructional brochure that will accompany each jar.
Mel’s Wax will be $49 for a 4 oz. jar, domestic shipping included. A little goes a very long way.
***THIS PRODUCT WILL NOT BE SHIPPED TO CALIFORNIA.***
Do not complain to me, complain to your state gubmint officials and the environmental trial lawyers they are attached to.

Here are some of the comments by product testers over the past couple of years.
I do know that [name deleted] has used it quite a bit and likes it. I used it on one commission piece and it worked really nice. It went from really soft to remarkably hard like magic.
———————————————————————————–
I cleaned the [artifact] and retouched where necessary then as a final layer applied a very thin layer of Mel’s Wax. She just came back one year later and [Mel’s Wax] helped substantially and though it needs cleaning again but does not have the hazy (ugly) look. My client was very happy! Thank you for giving me the tools and materials to think this through.
————————————————————————————
The pictures I will send you are of a small table that I first polished out with extra fine polishing compound and a wheel buffer. Then I applied [Mel’s Wax] to half of the top, buffed it by hand and compared the two halves. I see a difference between the waxed and un-waxed sides. The waxed side has more luster and gives the surface more depth. There is enough of a difference that would make me reach for the wax on a similar project.
————————————————————————————-
a really lovely 1889 German music box came into my life today and I used [Mel’s Wax] to clean and polish the original finish , which I suspect is shellac though I did not test it, the metal disc also had a treatment with [Mel’s Wax] and I really am happy with the performance of the wax. It’s very very thin and I like that immensely, it dried very quickly in my 75 degree shop with about 70 percent humidity, and buffed to very pleasing sheen, using a cotton tee shirt scrap
[Buffing, Streaking, and Smudging] is where Mel’s Wax excels. My test case is the dining table in this home. It appears to be only a wax finish on the original parts of the top and getting an even shine is difficult. In the past, [another product] was my go-to wax for this job. Mel’s Wax eclipsed [the other wax] in both ease of application and speed in buffing. Best of all, it buffed smudge and streak free–the buffing took a fraction of the time I usually spent buffing out the [other wax].
I found Mel’s Wax to be excellent for prophylactic waxing, especially over already waxed surfaces. I would say that I cut my application and buffing time in half from what I usually spent using [other products] and got streak-free finishes. I still have my arsenal of other waxes for either, jobs not worthy of Mel’s Wax, or jobs where Mel’s Wax isn’t an appropriate choice. I think it would be an excellent household wax as I don’t think it could be “over-used”.
*******************************************************************************************
The Mel’s Wax Instructional Brochure (will be included with every jar)
Mel’s Wax is a patented high-performance semi-liquid, easy-to-use furniture care product created by museum furniture conservators for their own professional use. Mel’s Wax is appropriate for priceless antiques, treasured family heirlooms, wooden objects d’art, and even architectural woodworking. Mel’s Wax does not need “elbow grease” for either application or buffing.
WARNING: DO NOT USE on food preparation surfaces or utensils. DO NOT USE on fragile or flaking furniture surfaces, or surfaces sensitive to mineral spirits or water.
DIRECTIONS FOR USE
1. Shake the jar of Mel’s Wax before using.
2. First perform this fast, simple test to make sure that Mel’s Wax will not harm the surface of your furniture.
Apply small dab of Mel’s Wax to an inconspicuous area with a clean, soft cloth or cotton swab, making sure that this area has the same finish and appearance as the rest the piece. Gently rub on Mel’s Wax, wait about 5 minutes, then wipe the area with a clean cotton swab or cosmetics pad. You may notice dirt and grime on the swab, but if the test area looks sound and a bit shiny, you can proceed.
3. Apply a small amount with a clean, soft, lint-free cloth in a well-ventilated area. A little goes a LONG way, less is better. After applying Mel’s Wax you should see an even, slightly glossy residue over the area being treated, indicating you have used enough Mel’s Wax. This gloss may diminish as the polish dries.
4. Wait until completely dry. Generally an hour is sufficient.
5. Gently buff the surface with a second, clean, soft, lint-free cloth. Thorough and gentle rubbing with the cloth is all that is necessary for the polish to produce its luster.
6. Store the sealed jar of Mel’s Wax in a cool place; Mel’s Wax contains natural and synthetic ingredients including petroleum distillate, but no preservatives or stabilizers. Do not let it freeze.
Your furniture is now protected and enhanced with Mel’s Wax and ready for storage, exhibit, or use.
ROUTINE CARE: For pieces treated with Mel’s Wax, ongoing care requires only periodic dusting with a clean, soft, lint-free cloth dampened with a few drops of distilled water. If the surface is dirty, put a few drops of a mild detergent in 8oz. of distilled water and use it to make a damp (not soaking wet) cleaning cloth. Then wipe using a second clean, soft, lint-free cloth dampened with distilled water alone, and finally wipe with a third, clean, dry, soft, lint-free cloth. For furniture in daily use you may have to re-apply Mel’s Wax every few months. If your furniture is not often handled or used, you may not need to re-apply Mel’s Wax for many years.
DISCLAIMER: Follow all directions above. Mel’s Wax is not a substitute for a furniture finish. It has been designed as a museum quality maintenance coating to preserve a wide variety of existing furniture finishes. It is not intended for high-stress surfaces like wooden food-preparation counters or utensils, or floors. If the surface still appears “parched” after buffing, the problem is likely with the artifact’s surface.
SAFETY/CAUTION: Mel’s Wax is a chemical product, not intended for human, animal, or plant consumption. Apply in a well ventilated area while wearing eye protection. Wear non-latex surgical-type disposable gloves when applying Mel’s Wax or wash your hands afterwards with soap and water. Keep out of reach of children. Dispose of any materials used for applying Mel’s Wax as you would any other household cleaning products.
What is “Mel’s Wax?”
This is an archival quality product which will protect the surface finish of your furniture, thereby preserving the finish while the furniture it remains in careful use. Mel’s Wax has proven to be an excellent product for furniture in typical domestic use. It provides a durable lustrous appearance, easily maintained with gentle dusting and cleaning.
Each ingredient of Mel’s Wax was selected after careful scientific review, and Mel’s Wax was formulated to enhance ease-of-use and reduce any harmful effects to artifacts that can be caused by many commercial furniture care products.
=========================================================
***THIS PRODUCT WILL NOT BE SHIPPED TO CALIFORNIA.***
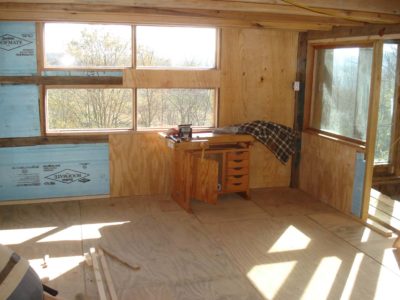
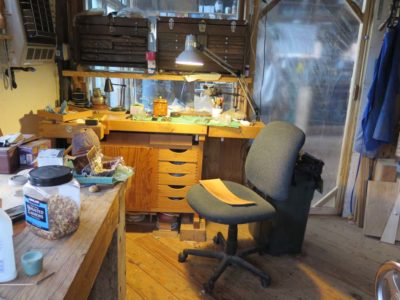
Since setting up my studio in the barn more than a half dozen years ago I have concentrated my small objects d’art conservation projects and related fine work on a tiny Sjoberg workbench in the corner underneath the propane wall furnace.


Over the past year I have increasingly gravitated a variety of work to the massive French Oak Roubo Project workbench I began five years ago and finally got it assembled this year and placed on the opposite wall underneath some windows.

In the past couple of months I’ve found the little Sjoberg to be too constraining and am working almost exclusively with the FORP bench. Yes, it was originally designed and built with heavy-duty furniture making in mind, but my comfort in using it this way is a revelation, and working in front north facing windows is spectacular.
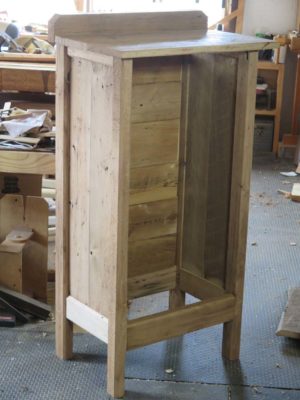
Back at home after GroopShop 2014 Bill continued to assemble, finish, and augment the folding portable workbench we had built as a demo for GroopShop.
After installing the folding diagonal leg braces he gave it a trial run and found it to be too light for his tastes. Plenty sturdy enough but too light to work with comfortably. So, he made a shelf to fit between the lower cross braces of the legs and serve as a storage space, clearing the space around the bench and adding mass to the overall unit. The shelf was made using the exact same technology as the top. Like the top it was amazingly light in relationship to its strength and utility.
One of the really cool features is that the shelf fits neatly in between the folded legs underneath the top. As you can see he even has room for a second shelf if ever one is needed.

After painting the leg units black, it was going to be used in a museum gallery after all, he set it up and found it to fulfill his needs precisely. I don’t think he ever found the need to install the vises, but the set-up for them remains in place and ready to go any time he needs it.
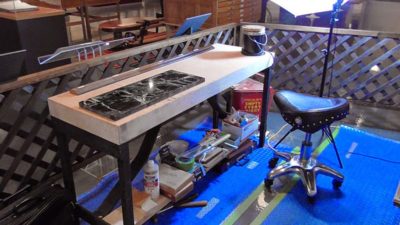


I believe he uses it regularly as a wonderful assembly table in his own shop, ready to be folded up and easily transported to a new on-site project where it is needed.
Sometimes improvement occurs as a flash of inspiration, sometimes through an incremental grind. This bench concept was a bit of both, and the improvements I made in this version carried over into the next folding workbench model, which I believe is workbench #20 or 21 in the series. I will be recounting the changes in great detail.
I do not have a workbench problem. I have a lot of workbenches. Big difference.

Recent Comments