Recently while working to impose order to the library of the Barn I came across a pile of articles needing scanning and formatting for posting to the web. “Tortoiseshell and Imitation Tortoiseshell” was my contribution to a 2002 conference that required travel to Amsterdam for the presentation itself, in complete disregard to one of my personal mottoes, “If I ain’t at home, I’m in the wrong place.”
The scanned article is now in the “Conservation” section of the Writings section of the web site. There are two versions, one about 4.5 megs and another about 1.5 megs. I’m still working through the idiosyncrasies of my scanner and compewder, figuring out what settings work best. If I can get this better I will upload that version later.
Recently I was making a presentation to a group and afterwards one o the attendees approached me and told me that he enjoyed my youtube video, As he described the video I was perplexed until I realized it was not my video, it was from The Getty Conservation Institute, a video of a presentation I made almost a decade ago.
I do not recall ever posting it here before, and if I did this already I apologize for the redundancy. I hope you laugh in all the right places,
I was mighty pleased with myself when the bench was finished. It was easy to move, easy to set up and take down, good and sturdy with great clamping. Clearly, I had solved all the problems which led me down this path in the first place. However, a little use of the bench showed me that reality was slightly less idyllic.
Unfortunately, its lightness (55 pounds) which was such an asset in my master plan for the “perfect portable bench” was also a big liability once the bench ceased being mobile and was set up as a work station. The bench was so light I couldn’t really work it hard without moving it or even knocking it over. I had to figure out some way of weighting the bench while in use. My “no loose parts” vision was about to bite the dust.
Fortunately, the solution was as simple as building two thin (approx. 1 1/8″) torsion boxes to serve as shelves resting on the crossbar of the end/leg units on either side of the folding bracket, and which could be attached to the underside of the benchtop when not in use. By putting all my tools and supplies on the shelves, the bench now had enough mass for my use. It still wasn’t heavy enough for general cabinetmaking, but it was more than adequate for restoration.
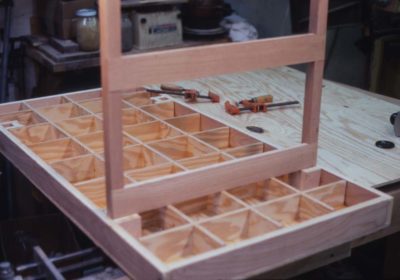
Then a second problem cropped up. The working height for flat-ish or small objects was great, but setting chairs or case pieces on the bench raised them too high. For these taller pieces I needed a lower work surface which would still fit my ideal of lightness and strength. I could have built a lower version of the bench, but instead tried something different. This time I fabricated a torsion box about the same size as the bench top which would fit on a pair of small, low trestle horses. These trestle horses were made from lighter than normal elements, for example the main components were 1″x 1″ and the crosspieces 3/8″ thick.
Some minor modifications to generally employed designs yielded another light, strong and stable unit. By making the top bar of the horses removable, each post of the trestle could then become a tenon. Constructing the torsion box in such a manner that the bottom side had openings to function as extensions to the mortises already incorporated into the grid fitting the tenons of the sawhorse posts, the pieces fit together as a small worktable suited perfectly for holding taller pieces at a more comfortable height. While this new unit was not as “neat” as the workbench, it solved the problem. It also provided more flexibility than simply building another, lower table/bench.
This saga does not end here as I continued working on newer iterations of the concept, but those episodes will be recounted in future Workbench Wednesdays in a few months.
Next week – A derelict salvaged from the trash heap that was transformed into a little jewel.
Building on what I learned from the initial prototype of the portable restoration workbench I charged ahead with a “final” version. I say “final” in quotes because this concept is one I have continued to tinker with even to this day, and a late entry in this series four or five months from now will focus on the most recent one.
For this first final version I used the same structural strategy for the top, modifying the stock weight being the only real modification. On this second iteration I used 3/8″ A/C plywood for both the faces and ribs of the torsion box top rather than 1/4″ and 3/4″ luan for the same purpose on the prototype. Making the box approximately 3″ thick and placing the ribs in a 6″ x 6″ grid achieved a satisfactory result with essentially no change in weight while yielding a stout structure. In fact, I could do some pretty serious joinery and carving on the bench, which I couldn’t do with the prototype.
I wanted a large-capacity vise on my bench, but there was no point in defeating my original purpose by building a lightweight bench and then installing a heavy vise on it. The vise(s) I built opens about 12″ and employs aluminum threadstock for the screws, tapped holes in the endpiece of the top, and 2″ x 3″ x 24″ wood jaws. The screws pass through same-sized holes in the movable jaw, and terminate in simple wooden handles passing through holes drilled in the ends.
One pretty dramatic change in this function was to switch from standard steel threadstock to 1-inch aluminum rod stock that I had cut at a local machine shop (I already had the aluminum rod stock in my scrap barrel). It’s been a long time since this project but I recall paying $25 for the job. All it took was to set up the pieces in the lathe and cut the threads with a single pass, along with a single groove above the threads for some retaining collars. I’m guessing it took ten minutes maximum, so $25 for a quarter hour of machine shop time sounds about right. It might have been $25 for each pair of screws, but either way it seemed pretty reasonable.
My procedure for incorporating the vise into the bench top involved drilling oversized holes in the internal grid but not the added fixed jaw, so I couldn’t assemble the box all at once. I cut my grid pieces and glued them to one face of the torsion box using 315 gram hot hide glue, which was the adhesive employed throughout the project. After laying out for the vise screws, I drilled holes through the fixed jaw (the torsion box end pieces) to tap-out and received the threaded screws. I was unsure whether holes the same size as the aluminum rod stock used for the vise screws would be large enough to allow the screws to go through the grid members, given the inevitable wobble in the screws. To be on the safe side, I drilled larger holes through the grid to a slightly longer distance the desired vise opening dimension. The vise screws would then pass through these openings as the vise was closed. After I was sure the vise was fully operational, I glued the second face on the grid and the top was complete.
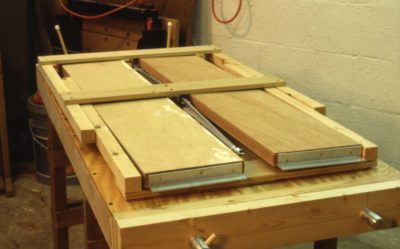
By fabricating simple leg end units with long folding diagonal braces, the problem of too much shimmying parallel to the long axis was overcome on the final bench. The leg units were fabricated from the clearest 2x construction lumber I could find, and the folding braces from 1/4″ x 1″ aluminum bar stock with 1″ x 1″ aluminum angle stock for the mounting brackets. The slightly heavier face plywood made it easy to screw all these elements to the underside.
The leg units were not installed symmetrical relative to the short axis, but rather were off-set by half the leg width so they could fold up next to each other rather than on top of each other. This way, the table could become a remarkably compact unit which needed absolutely no assembly or disassembly; it could just be folded up. Following final assembly I added a snap-on strap for carrying the bench like a large suitcase. By throwing the strap over my shoulder, I could easily carry the bench for long periods of time and maneuver it through pretty tight quarters.
The first pair of considerations when designing a conservation treatment plan for an artifact, in this case my own Gragg Chair, is to weigh the nature andneeds of the artifact versus the nature and needs needs of the user. Without comprehending the location of the artifact on the entropy time-line and achieving user buy-in no process can derive a balanced response to the damage being addressed. As a property rights absolutist I am fine with that; if you own a priceless treasure and choose to incinerate it in the front yard, so be it. Short of that, there is a wide range of locations for the fulcrum of this competing pair.
The process of understanding the nature and needs of the object can be fairly straightforward. What is it? What is its intended purpose? From what and how was it made? What is its condition? What action is needed for it to maintain its existence or function? All these questions are fairly straightforward as the artifact is, in essence, a static (or not so static) entity at a particular point on its entropy curve, or as my late friend and colleague Mel Wachowiak, Jr., used to say, “On it way back to dirt.”
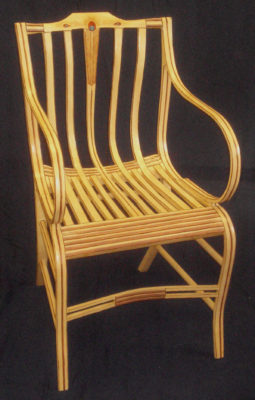
In the case of this chair the continued existence of it in its current form and condition was not really in doubt, only one or two of its functions. The chair could be left completely unattended and remain “as is” for decades or centuries as a thing, but one of the primary functions of this particular chair form and presentation, namely that it is a comfortable and beautiful thing, was compromised due to the breaks and attendant distortions of the arms. That damage, and its disruption of the chair’s “beauty” is a real and meaningful void in its current “function” and regaining that beauty is not a whimsical undertaking.
As for the nature and needs of the user there is far more variability in both theoretical and practical perspectives. In the case of a chair, the user may need for it to actually be functional as a structure that can support a grown adult for the chair’s intended purpose: to be a chair. Or, the user (owner) may prefer for it to be an antetype, prototype or example of the generic or specific chair form, or that it simply represent the form and historical attributes of this particular type of chair. If, for example, one of the legs were missing altogether but the user’s desire was to preserve the remaining fabric as-is, the fabrication of a plexiglass support in place of the missing leg would be entirely defensible.
This is not some bar stool, this is an aesthetically sophisticated and technically refined form, one that is both artistically notable and historically significant. Its current damage reveals — at the very least — a failure of its maker to anticipate the stresses that might be paced on it in “normal” use and his failure to accommodate those stresses in its structural design or manufacturing execution. (True enough, I did not anticipate the unauthorized use of the chair by a morbidly obese person and the damage that would result from his frenzied effort to extricate himself before I returned to the booth) From this context the user may choose to leave the static damage exactly as it is as a painful reminder of that failure.
In this object vs. user consideration, more than with the coming two pairs of contending concepts, balancing the needs of the chair with the preferences of the user results not at a single point of agreement or strategic objective (or one and only one “exact” way to proceed) but a continuum of options that can respond to both competing needs to some degree.
One of the projects that has been slowly percolating up the pile of “To Do” projects is the repair of my own Gragg chair, built several years ago and damaged while on display at a woodworking event when a corpulent fellow wedged himself in the chair (uninvited) and broke both of the curved arms when desperately extricating himself from it.
As I cogitate on the project of repairing the chair, even though it is my own piece and I can build another (actually I am beginning to build three more which will be recorded for a future video), I am approaching the problem as though it were a museum/historic piece and this is the execution of a conservation treatment from a formal/museum point of view.
In so doing I will be employing and implementing the decision-making model I devised almost thirty years ago, consisting of six separate questions, linked in opposing pairs. This model has served me without fail during my career in the museum, and for clients outside the museum. It has become such a part of my thinking that it almost does not register with me any more. I am hoping that as I work through this series I manage to include all the connections, but if I do not please let me know.
The strategic path for any particular conservation treatment depends on the answers to these six questions, and on balance the six answers makes that path clearer. In some cases the questions are not relevant and can be discarded, but they must be contemplated at least to the point of making that determination.
The first pair of questions is, What are the nature and needs of the object, and, What are the nature and needs of the user? While this pair is essentially a conversation between me, the advocate for the artifact, and me, the user, I hope it does not devolve into slapstick.
The second pair is, What are the technical limitations you are facing (particularly regarding the materials), and, What is the perfect, or least most desired, outcome?
And finally, What are the ethical guidelines for intervening with the object, and, What are the resources available for the project?
While the context of every object and circumstance is unique, and thus the balance of the answers can vary widely, nevertheless I find the exercise to be a powerful tool for plotting a route from Point A (where or how the object is currently) to Point B (where the object needs to go/be). In coming essays I will address each question (and answer) individually and in concert with its counterpoint question as I elucidate the chosen strategy for dealing with the project as a whole and individual procedures and choices within it. We may find ourselves in pretty deep weeds from time to time, but at least you will know how I approached the problem.
I’ll close this essay with the reminiscence of the first time I presented this decision-making model at a national professional meeting, I think in the late 1980s. In a somewhat unusual response from a “sophisticated” audience, I heard occasional hisses and boos during the presentation which directly challenged portions of the prevailing museum/conservation orthodoxy. Over the following three decades there came to be a sporadic and gradual acceptance of the model, and by the time I bolted for the boondocks this graphic was seen on the walls of museum and private conservation labs from coast to coast.
With the first split successfully re-integrated it was time to turn my attentions to bringing it all together. Since the previous damage(s) resulted in enough loss to the fracture margin the two pieces would not align perfectly, I needed to bring them into proximity using shaped cauls.
My first attempt used a plaster mold made along the outside of the larger piece. I simply wrapped the wood piece in shrink wrap and cast plaster, hoping to use the resulting piece as a clamping and aligning form. I just was not happy enough with the result.
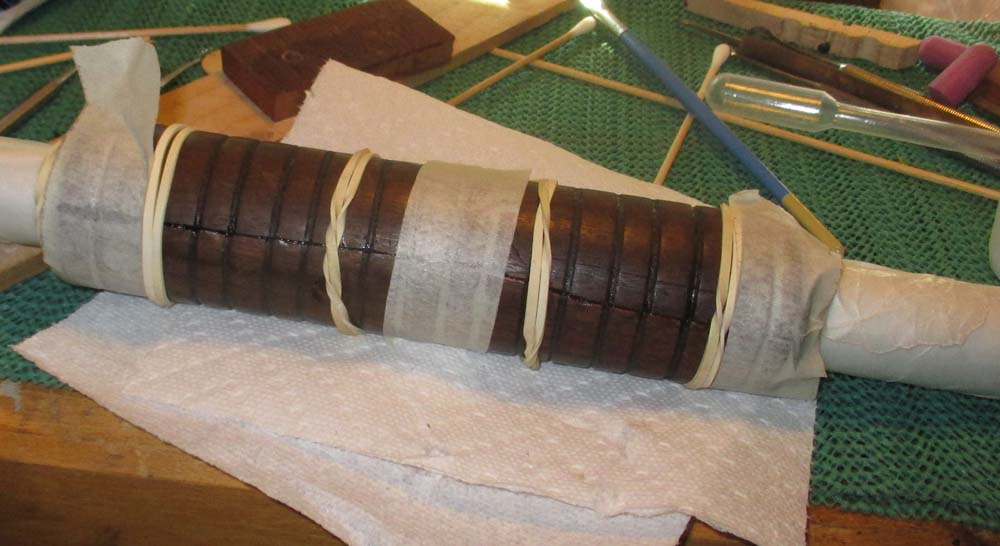
Instead I used the actual tubing from the gun, around which the pump action made the forestock slide back and forth along the tube. To make sure I had the right amount of clearance, and to provide the perfect clamping form, I wound the tube with three layers of waxed paper. This worked perfectly.
Putting the wrapped tube inside the larger of the two broken pieces, I brushed the West epoxy onto both gluing surfaces, the placed them in contact with each other.
Using rubber bands I gently moved the two pieces into the closest configuration possible, and when that was accomplished I used some small pieces of masking tape to hold everything firm, and let it sit overnight.
The next morning I mixed a small amount of epoxy and added some more to fill the voids in the break. The following day I smoothed off the excess epoxy with dental tools and needle files. The result was acceptable.
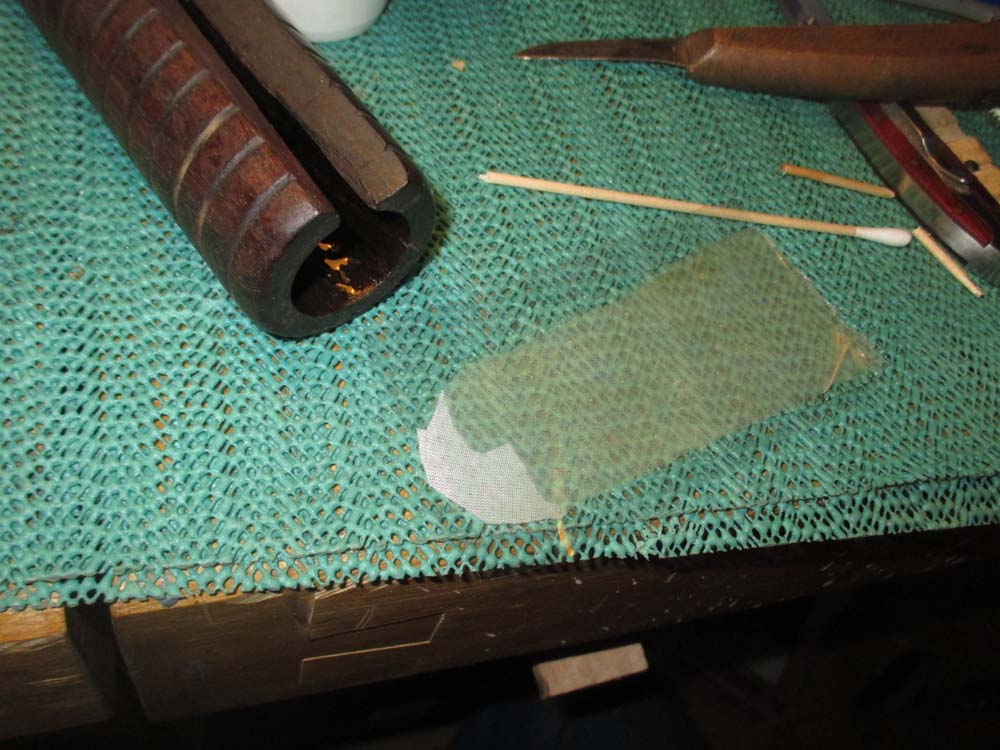
To add an additional level of robustness to the stock I prepared a piece of nylon sheer drapery to served as a “bandage” on the inside of the repaired split.
When it was ready to apply I brushed some epoxy on the inside wall of the forestock, then saturated the “bandage” while it was sitting on a piece of mylar then moved it into place.
With the small sheet of mylar and the epoxied bandage in place, I used a tube balloon, inflated in situ, to provide the necessary gentle pressure to make sure the epoxy saturated nylon sheer was in direct and intimate contact with the surface.
When I dismantled the glue set up the next morning I was delighted to see that it was successful. A minute with some fine sandpaper wrapped around a large dowel to smooth the inside surface and the structural repair was completed.
The salvaged forestock slid perfectly up and down the tube.
To be in concert with the restoration of the other parts of the shotgun, I lightly cleaned and sanded the outside of the re-unified forestock before applying a couple coats of Tru Oil finish.
I returned the repaired piece to Bob and he was delighted with the end result. He will complete the coatings homogenization.
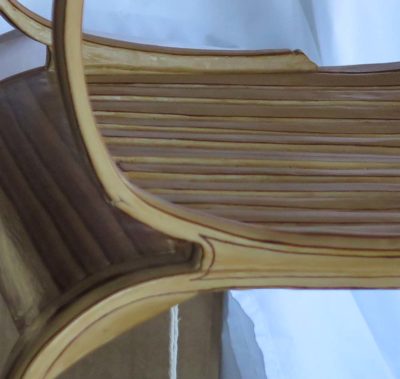
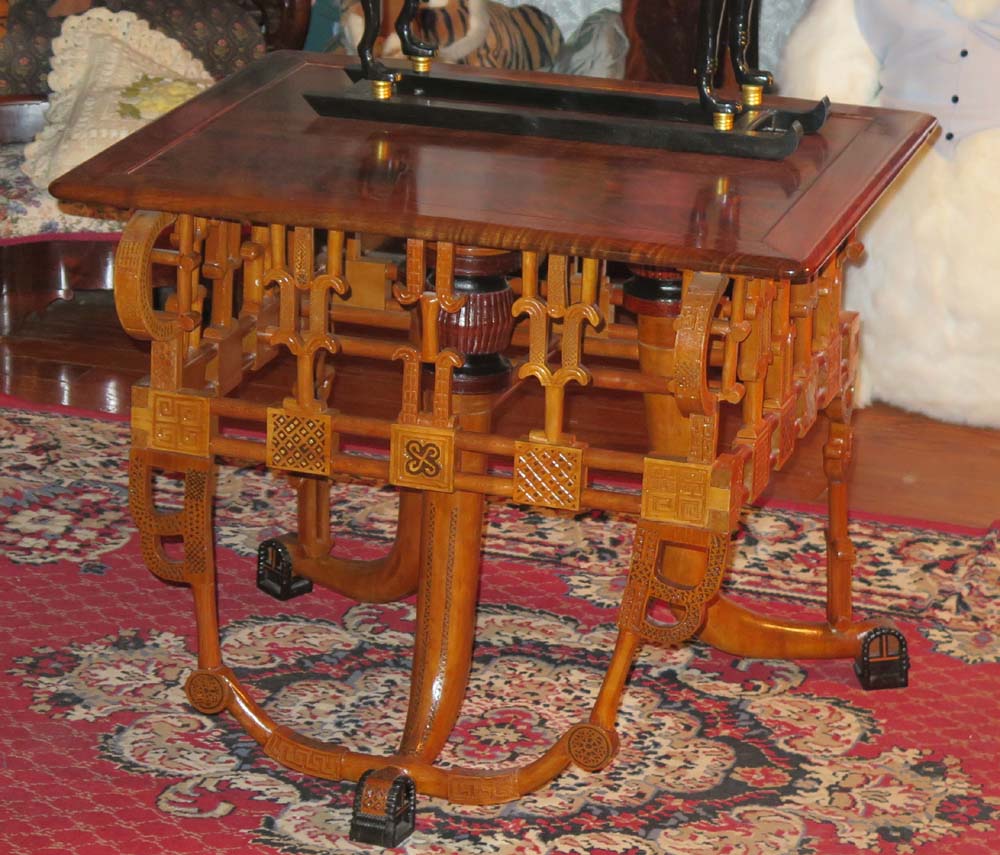
On my recent jaunt through The Heartland I stopped to visit my old friend RickP in northwest Arkansas, and got to see in person the amazing table Rick researched over a two decade stretch and constructed from around 2010-2013.
The original table, shown above, was excavated from the c. 800 B.C. archaeological site of Gordion, Turkey.
The table is a tour de force of design and fabrication, and one of the most astounding examples of contemporary woodworking I have encountered. While the design might be almost three thousand years old, the fabrication is obviously contemporary, as Rick is gladly still with us and approximately my vintage. The detailing on this table is simply eye-popping.
To me the most compelling overall design feature is the means by which the original builder three millenia ago figured out how to make a four legged table compatible with what was probably an uneven, perhaps even dirt, floor. What they did, both the original maker and Rick, I mean, was to combine two of the legs into one foot, in essence turning the four legged table, which would always be a problem on an uneven floor, into a three legged table, which would never be unsteady.
The original table was constructed of boxwood, if I recall correctly, while Rick used ancient kauri wood for the base and walnut for the top. In keeping with the flavor of the wood, Rick used kauri copal resin as the finish, employing a varnish component far more ancient than even the original table.
Rick just sent me a copy of the paper he presented at the American Institute for Conservation Annual Meeting two years ago, where I was part of a presentation at another session of that meeting even though our paths did not cross there. Rick’s paper will be available at some point at the archive for the papers from the Wooden Artifact Group of the AIC, and I hope in the meantime that Rick can someday get it into the more popular woodworking literary world.
I mean, who wouldn’t be fascinated by the prospect of replicating King Midas’ table? I know there are features of the table informing my future furniture-making designs.
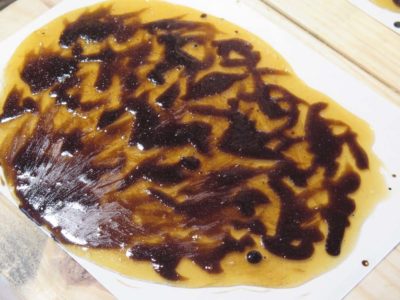
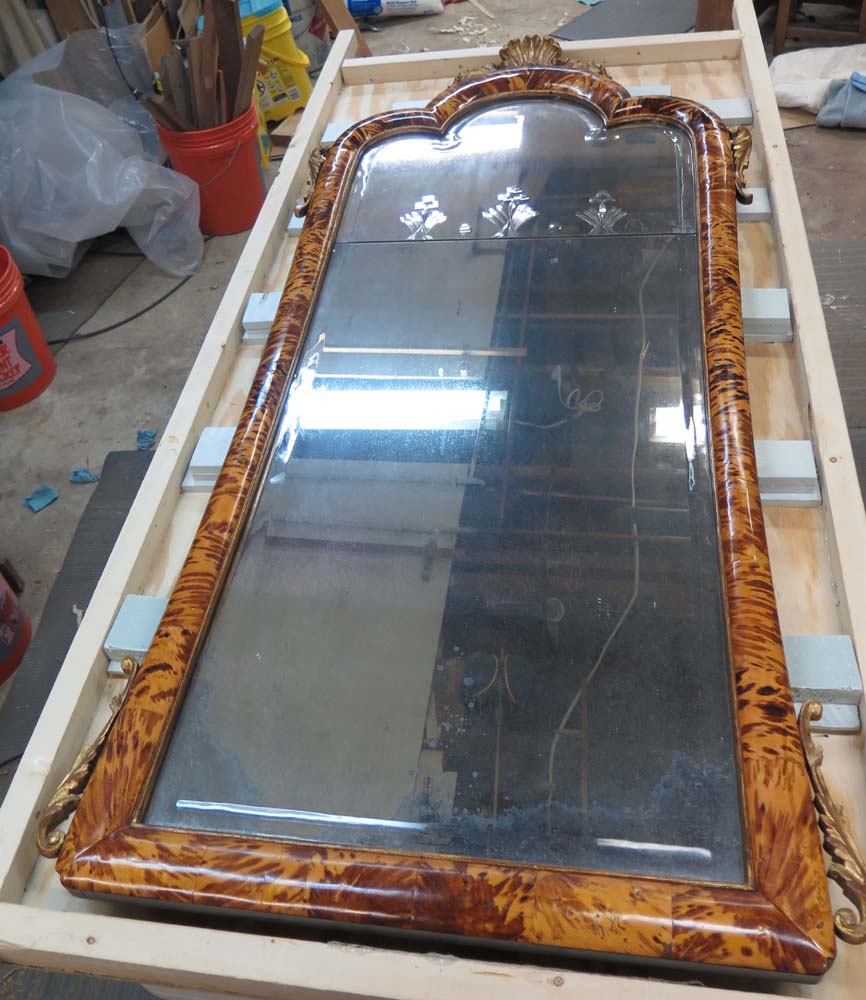
Immediately on my return from Cedar Rapids, I reloaded my duffel with clean clothes and headed off for week of work near Mordor on the Potomac. The purpose of the trip was completing the conservation of the second of the two tortoiseshell-veneer mirror frames. The process for conserving the second frame was conceptually similar to that employed for the first one a couple of months ago. The only substantive difference was that the areas of damage this time were larger but fewer and “cleaner”than for the first mirror.
As before, once the mirror was in the work space the first task was to systematically work my way around it to document the specific areas of interest (read: damage) for the treatment.
Once that was completed I proceeded to clean the surface in order to remove the accretions of oil, a traditional but ineffective, somewhat deleterious maintenance protocol and get it all ready for the next step. These depositions were dealt with easily through the damp wiping with naphtha on cosmetics pads from the pharmacy, almost instantly removing the molasses-like oil and dirt amalgam.
The incursion of oil underneath the lifted tortoiseshell veneers was resolved through gentle insertion of a toothpick or bamboo skewer to lift the affected area, then the insertion of blue shop paper towels and wicking them with naphtha, sometimes several times, to remove enough of the contaminating oil to render the glue margins acceptably clean.
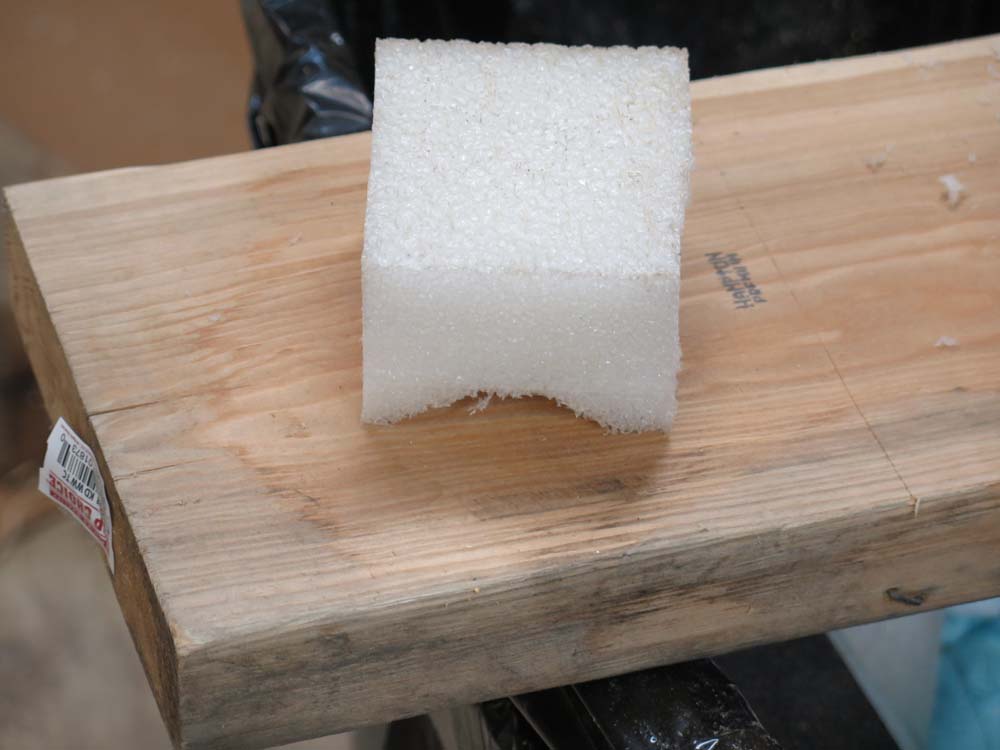
The lifted tortoiseshell was re-adhered to the frame substrate with 192 Special grade of hot animal hide glue from Milligan & Higgins, and pressed into proper configuration during gluing through the application of shaped polyethylene foam block cauls, with two pieces of food vacuum-pack wrapping membrane in between the tortoiseshell and the foam caul.
Once the glue was hard, I removed the cauls and separating membranes, cleaned off any wandering glue with distilled water on pads, then applied Mel’s Wax to the entire surface, which brought the mirror frame to life!
In a way, the most challenging part of the project was the transport of 300-year-old mirrors the few miles from the client’s home to my work space safely, and the handling of them at each end. To accomplish this I fabricated a custom tray/litter with XPS bumpers and supports below and above the engraved and mirrored glass, with the whole unit being suspended in air through the gentle application of winching straps.
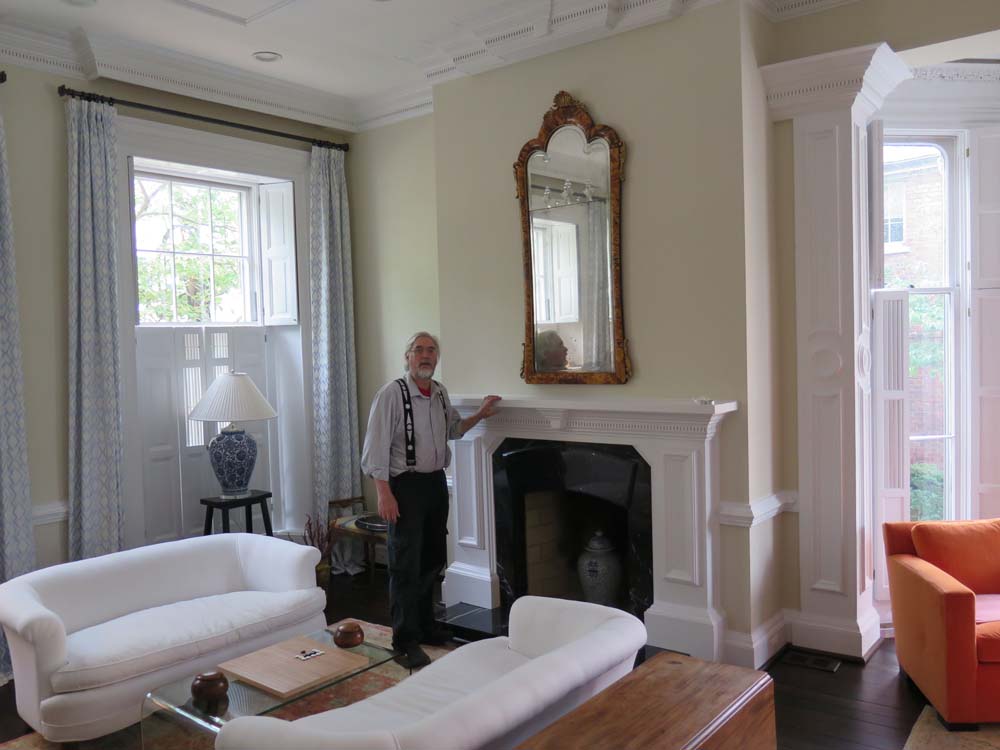
Safely completed and transported and re-hung in the client’s magnificent home, I joined the client in celebrating the project and the beauty reclaimed for the mirrors, and was delighted to be photographed alongside the second one.
The final steps for conserving the tortoiseshell mirror frame were to make sure all the excess glue was cleaned off and the surface was given a final gleaning and polishing with the incomparable Mel’s Wax.
As I mentioned earlier, the tortoiseshell veneer was very fragile in general, and the simple gentle tasks of cleaning and polishing caused three new areas to pop up, so I had to deal with them immediately as well, exactly as described int the previous post.
Mel’s Wax goes on effortlessly, and in the end yields a near-flawless archival protective surface. It goes on like sunscreen lotion, then goes dull as it dries, and buffs perfectly with almost anything. Paper towel, flannel, linen, cotton rags, anything.
As always, the very last thing was to strap the mirror to its litter, take it back to the client’s house, and hang it up. I must say, it does look pretty good.
I will work on the second mirror once the storm of Studley calms down.


Recent Comments