
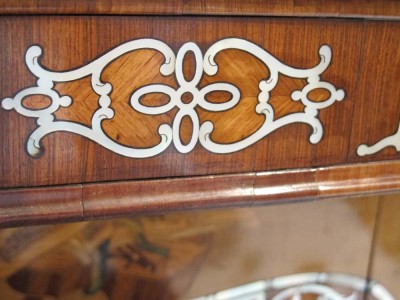
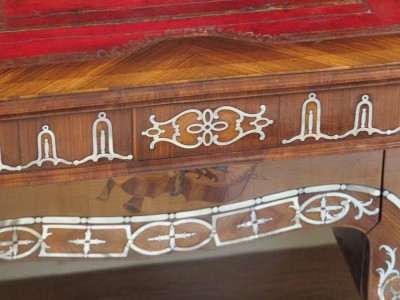
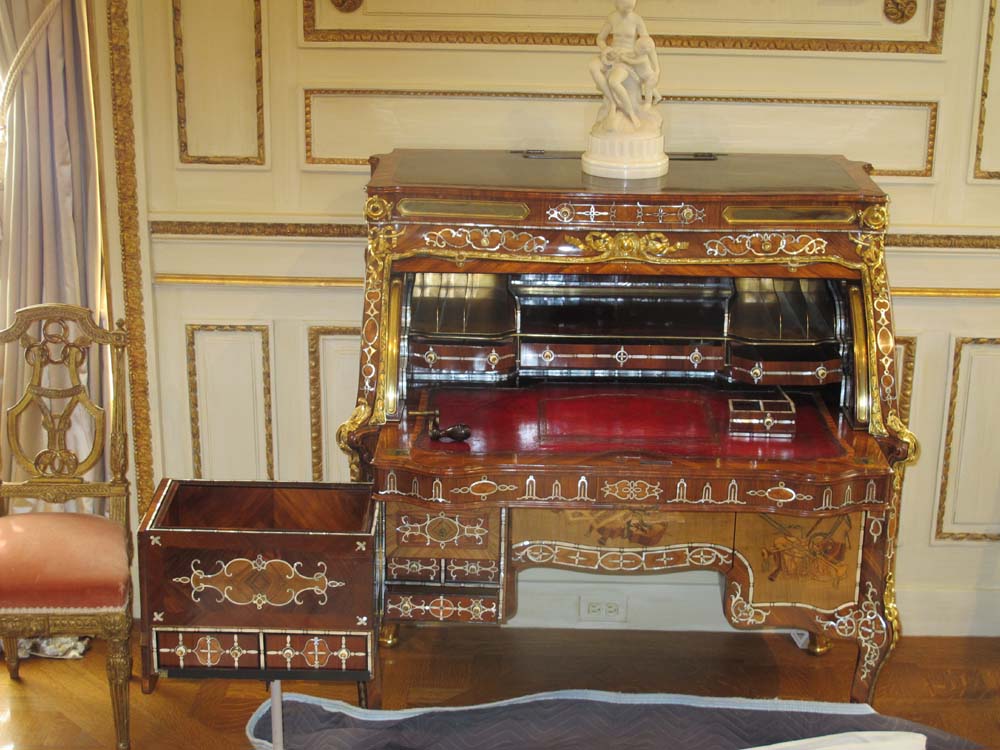
Recently I had the chance to work on a fairly snazzy roll-top writing desk, which needed a bit of conservation. It was built around 1770 by arguably the greatest furniture makers who ever lived, and is prominent in the collection of the elegant museum dedicated to European fine and decorative arts.
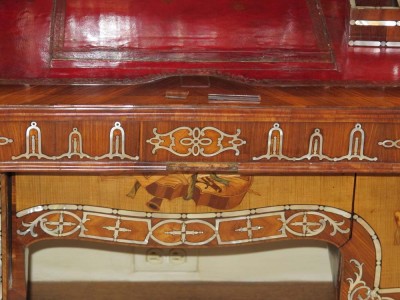
A short section of cross-grain molding had become detached, and part of my charge was to examine the desk from top to bottom to assess its overall condition. I did, and it is in fine shape.
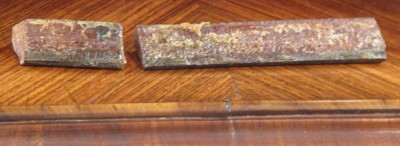
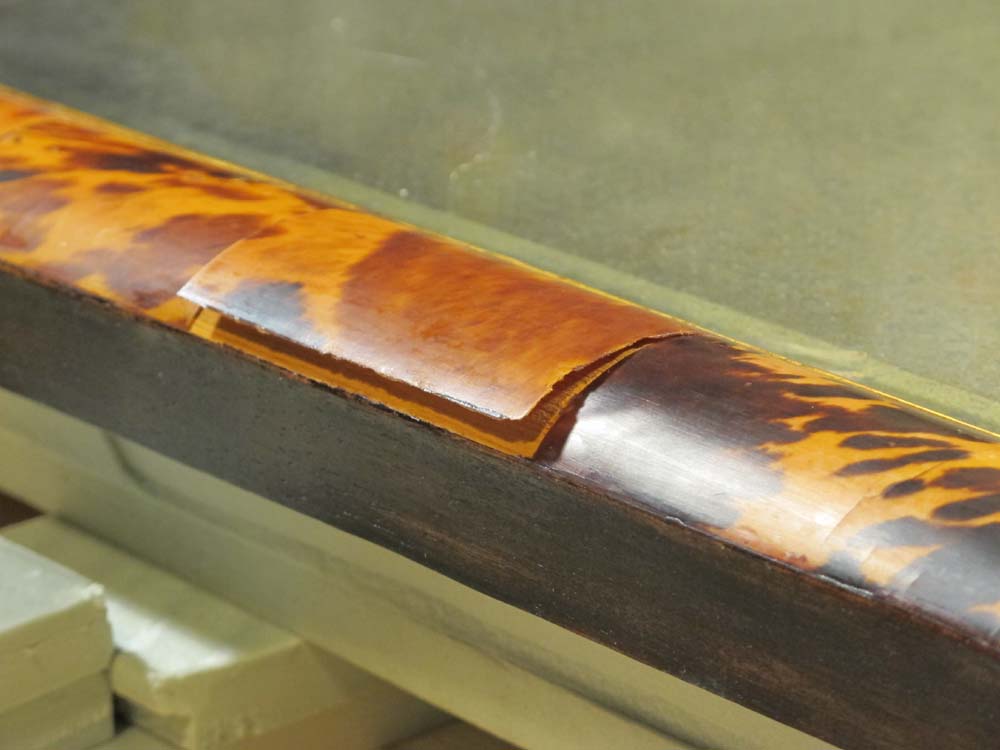
As was clear from the back of the moldings and the ground under them, this was not the first time these pieces had separated from the mother ship. I counted three distinct campaigns of glue, and there could have been many more.
The pieces fit their place nearly perfectly even dry, with only the tiniest bit of rocking due to the excess glue under them.

My strategy was to soften the extant glue and remove only a bit of it, so I poulticed the glue line on the desk with some blue paper towel, cut to fit the space precisely and moistened with water.
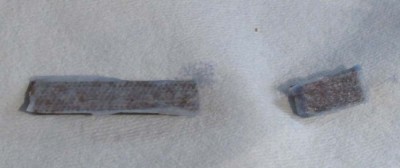
I did the same to the backs of the detached pieces.
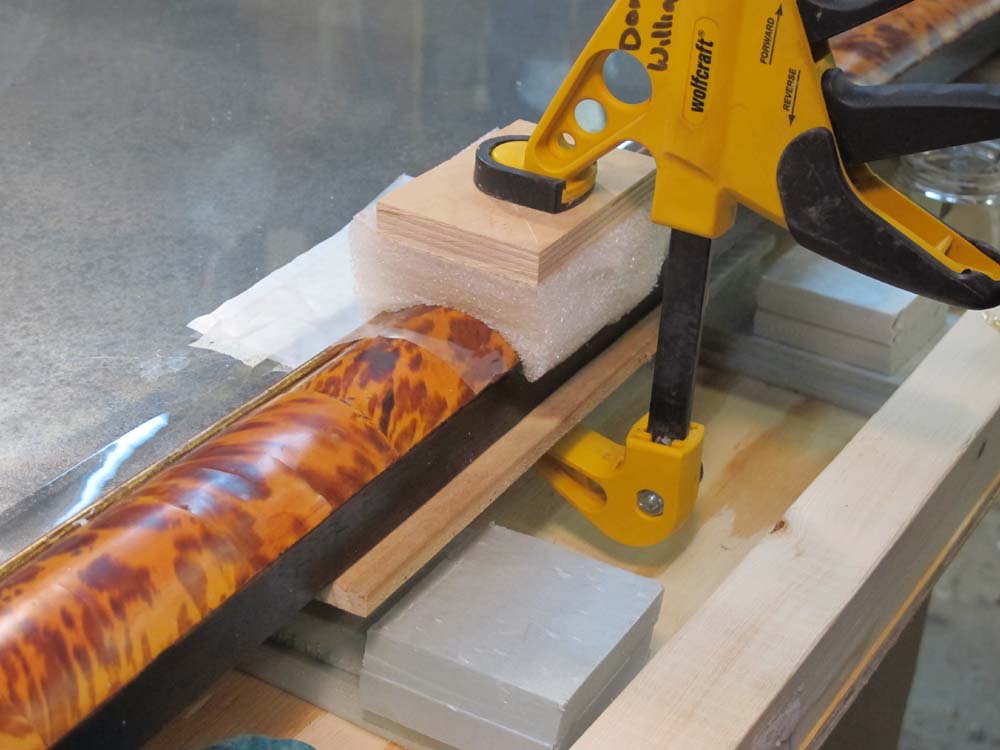
After a quarter hour or so the glue had softened and swelled to the point I wanted, and I removed the worst of the clumps and left the remainder in place. For adhesive I turned to my long time fave, Milligan and Higgins 192 Special grade hot animal hide glue. I had prepared this the days before the treatment, soaking it first in water overnight, then cooking it twice the day before I went. A little dab of that, a minute of holding them in place with my infertips to gel, and I was done.
I packed up and left, reflecting on the fact that the opportunity to care for furniture from the greatest menuisiers of all time is exactly the reason I started down this path 43 years ago.
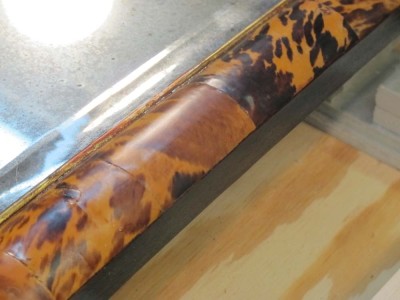
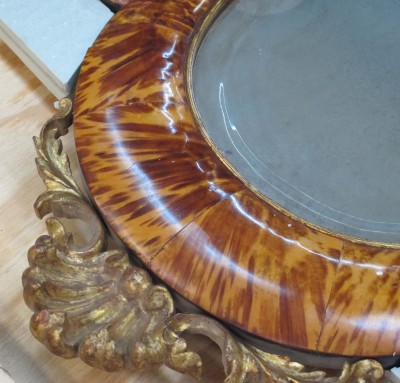
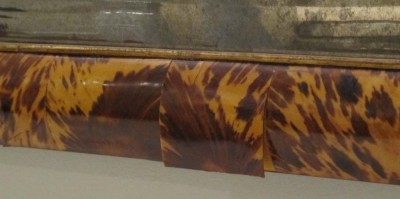
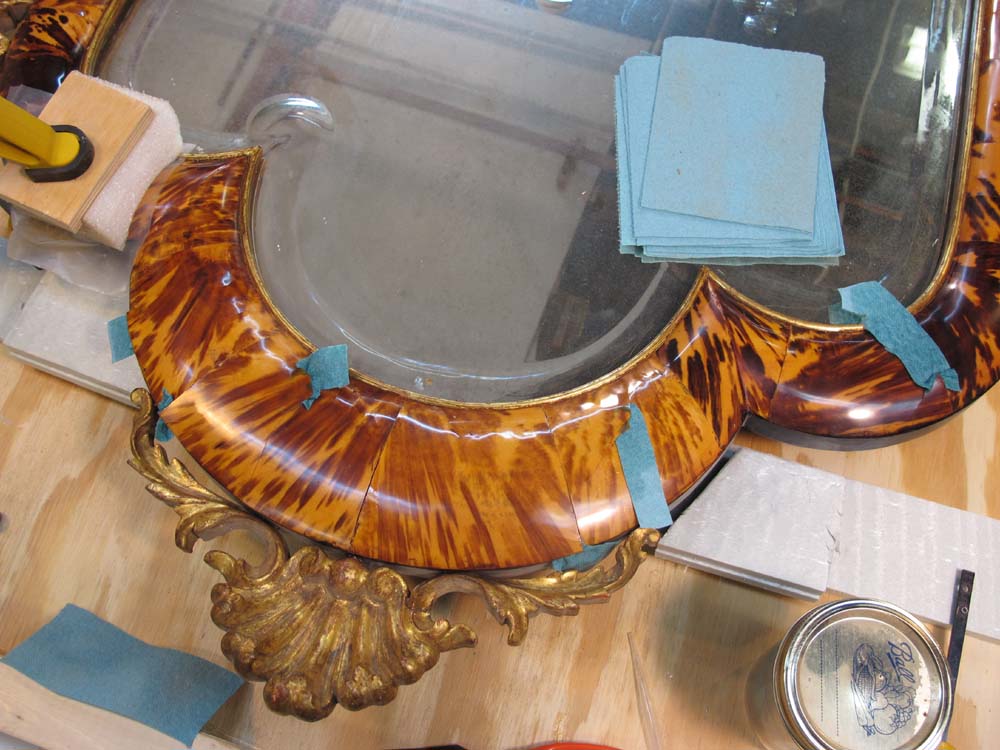
The tortoiseshell surface of the mirror frame was replete with areas of delaminated and detached (lifted) shell veneer, with even more numerous areas that were delaminated but not detached as they were still adhered at their margins.
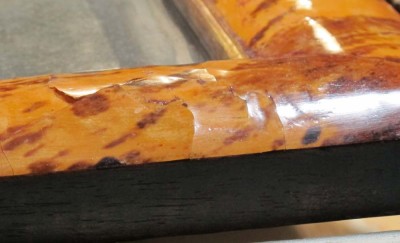
This was particularly prevalent at the seams of the shell pieces.

Nevertheless as most of these regions were stable I left them alone. They are not at imminent risk, so I can always return to them should the situation change.
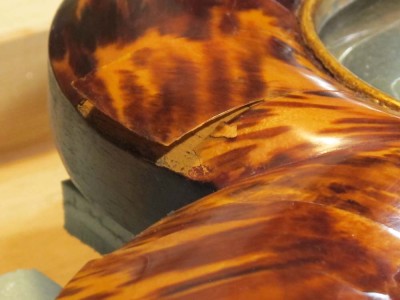
The main concern was those pieces flapping in the breeze, or in danger of becoming so. Those were the areas where I needed to introduce adhesive underneath them, then clamp them in place until it dried.
I chose Milligan and Higgins 192 Special hide glue for my adhesive; it has more than enough shear strength, and is much more tacky quicker than the standard hide glue (eliminating the need to add glycerine as a tackifying plasticizer). I soaked it overnight, 1 part glue to 2 parts distilled water, then cooked it twice on my coffee cup warmer before using it.
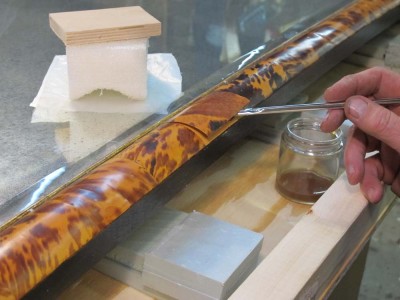
With my fingertips, or often with bamboo skewers and hors d’oeuvers toothpicks I gently lifted the edges of the tortoisehell and inserted my glue brush underneath, working it until there was excess glue present.
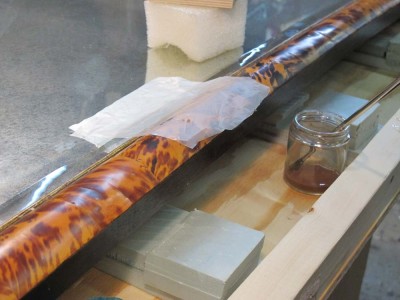
I then pressed down the shell by hand to swab off most of the excess glue, then laid down a piece of this plastic sheet (I really like food vacuum packing membrane for my gluing barriers; I bought several rolls on ebay for about fifty cents) followed by a shaped caul of polyethylene foam.
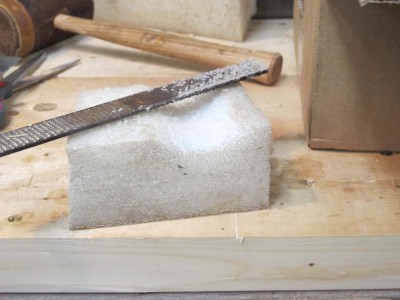
I made the cauls from scraps of foam left over form various projects, hollowed out with a few strokes of a convex rasp.
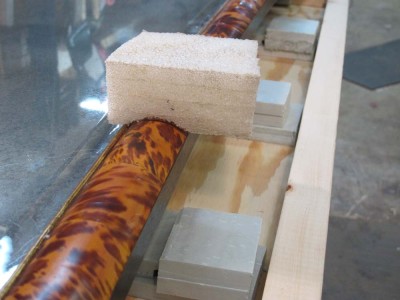
When in place, their concave shape provides admirable clamping pressure on the convex surface of the mirror frame.

I placed a foam caul over each section being glued, followed by a piece of plywood backing and a clamp. Extreme clamping pressure was not needed, only enough to hold the shell in contact with the substrate until the glued hardened. I left it over night and removed it in the morning.
I was fortunate to have success with every glue-down, not always a certainly when working on a contaminated surface and substrate.
Once I finished with documenting and photographing the mirror frame, with special attention given to the areas of fracture and delaminated tortoiseshell, I began the process of cleaning it.

Like a legion of its brethren, this mirror had undergone a longstanding and typical process of being oiled periodically in order to spruce-up the appearance. In this particular instance, I believe the oil used was olive oil. Unfortunately, this process also contaminates every presentation surface, and if there are any cracks through which the oil can wick, the gluing margins as well. Equally unfortunate is that oiling tortoiseshell provides at best a temporary luster, while producing a long-lasting gooey residue that adheres airborne particles to the surface.
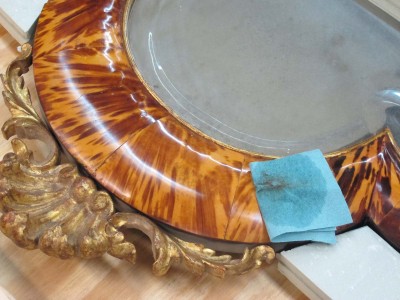
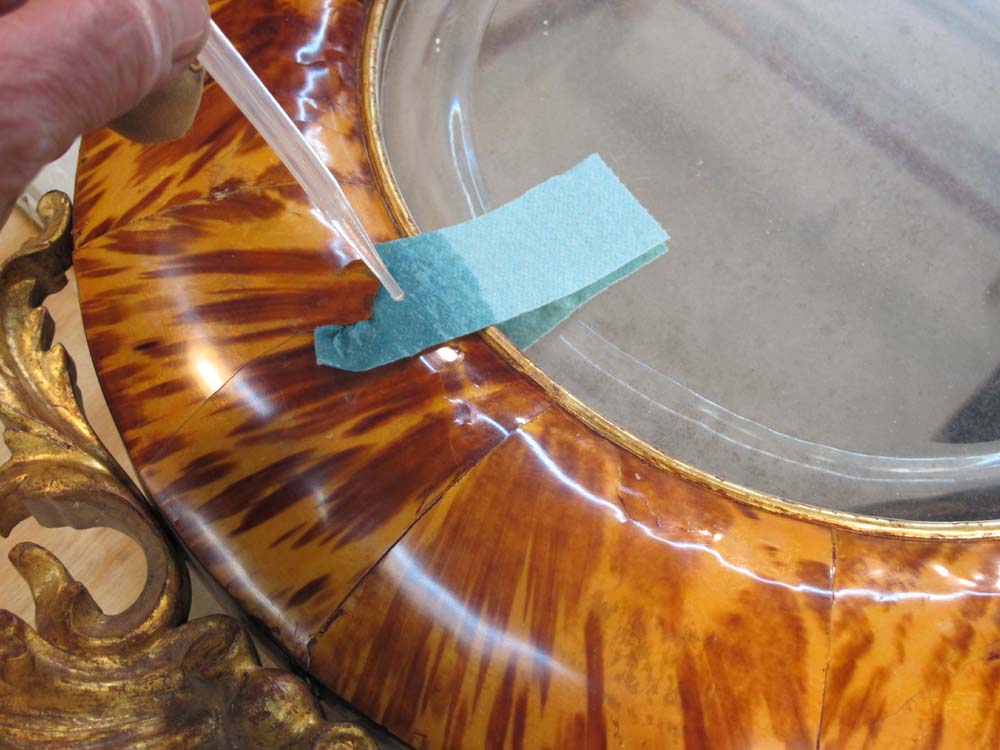
To address this I cleaned the entire surface of the mirror frame three times with naphtha on soft disposable shop towel pieces, until I was satisfied that the surfaces were clean. Somewhat more challenging was the incursion of the oil underneath the areas of lifted tortoiseshell. For these I not only needed to dissolve the oil but the transfer it to a spongy material in order to imbibe the oil into the sponge.

Once again I used the blue paper shop towels, cutting small pieces to gently slide into the openings of the fractured and lifted tortoiseshell with a thin spatula. Once in place, I used a dropper to wick naphtha into the paper sponge and let that wick up to the end, underneath the delaminated tortoiseshell, contacting, dissolving, and transferring the oil into the disposable sponge.

After a couple iterations of this, with two or three hours of contact each time, I let it dry thoroughly and tested one area and found it to be adequately cleaned in order to proceed.
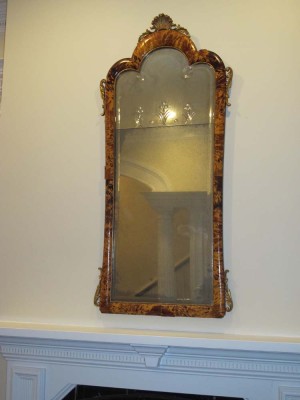
I’m currently working on the first of a pair of matching 5-1/2 foot tall mirrors which have suffered some pretty extensive delamination of the tortoiseshell veneer.
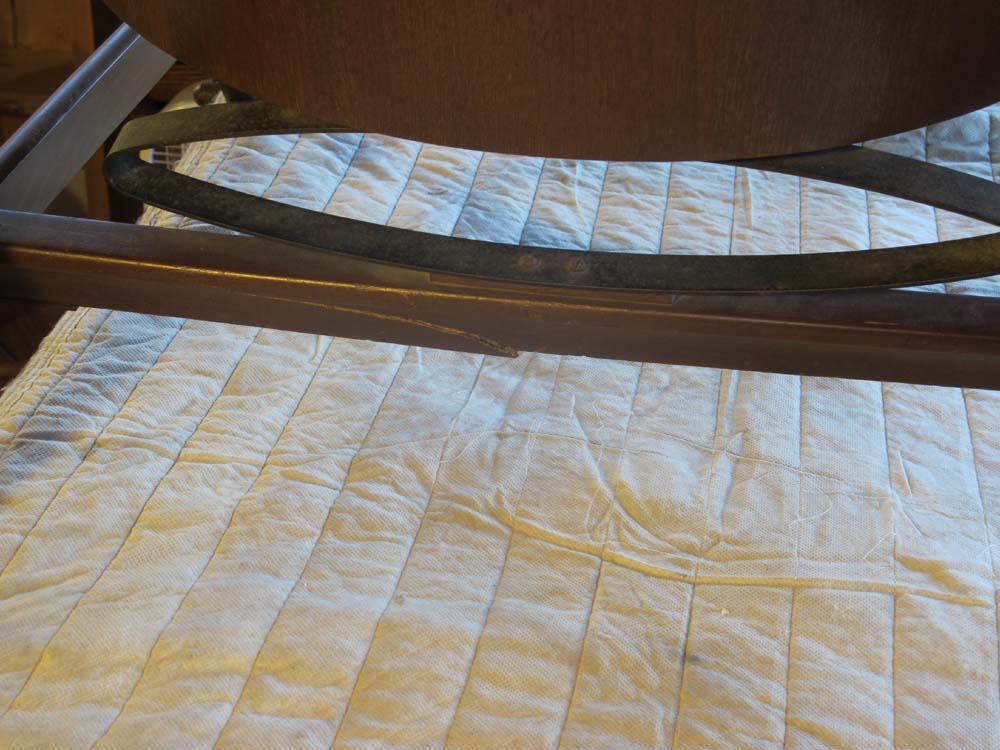
One of the most critical issues for artifacts like this is to get them safely from Point A (the client’s home) to Point B (my studio). For large planar artifacts like this I always construct a litter to which the artifact will be lashed so 1) I don’t have to handle the big clumsy thing any more than necessary, and 2) provide a safe housing for the artifact in transit.
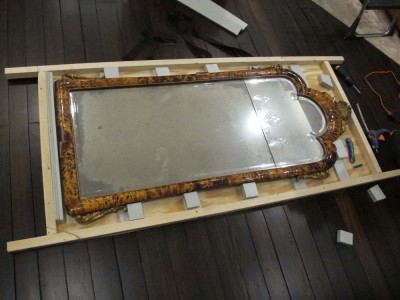
My long time woodworking pal Tom was able to help me get the mirror down off the wall and into the litter easily. The litter had clean foam pad/slats onto which the mirror was laid, and once in place blocking was glued to the slats to lock the mirror in place.
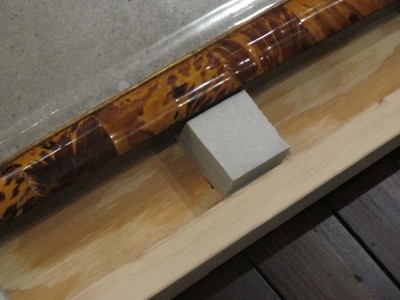
Once the blocks were set (I used hot melt glue) I added loose battens to the top of the mirror, directly in line with the slats underneath it. This allowed for gentle restraints without adding any undue stress to the 300-year old engraved glass.
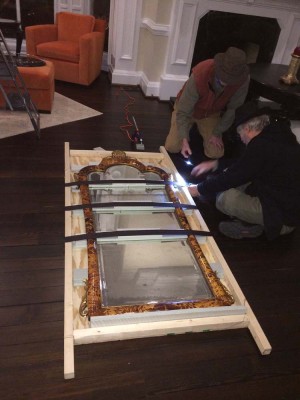
Using some upholstery webbing I had, I draped it over the battens and screwed it to the frame of the litter, snug but not tight.
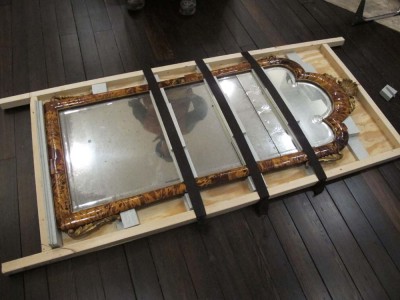
One the packing was complete, we went straight out the front door and into the rear of the van and a half hour later it was resting comfortably in my basement studio at my daughter’s house.
Stat tuned.
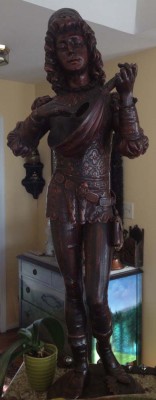
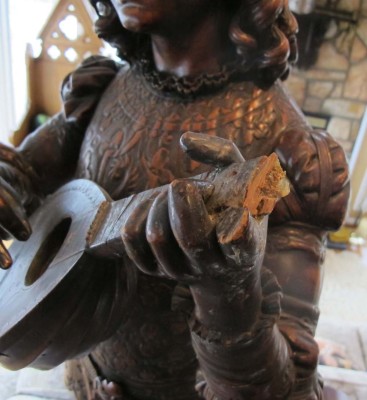
Another project new to the studio is this three-foot-tall carved wooden figure of St. Joseph. My task will be to sculpt a new arm, which means I will need to look at a lot of similar sculptures, then fabricate a new one to make the sculpture seem whole.
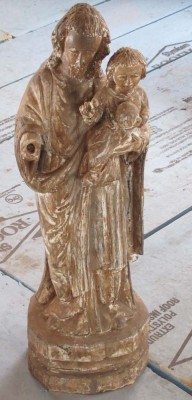
One thing I will probably do to make the task “read” more sensibly is to apply an easily removable whitewash over the entire surface so that I can concentrate more fully on the form. I will also try to discern a color scheme to see if there was polychrome or if it was simply painted to mimic plaster or marble.
Stay tuned.
As I mentioned recently I have been blessed with a rich buffet of challenging conservation projects. While not all of them are tortoiseshell, it does seem to be a recurring theme.
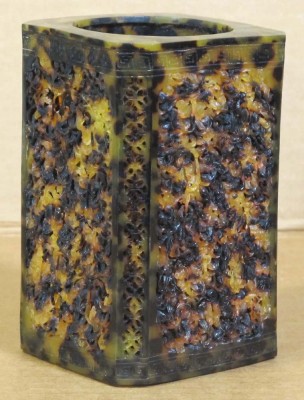
This project is a two-part carved tortoiseshell vessel (it has a inner, smooth cylinder to hold whatever it is supposed to hold) I believe to be a brush or writing implement holder, but I could be wrong on that. There are several sites on the outer carved shell that are missing some carving, and a number of other locales where the shell is fractured. It is a challenge to be sure.
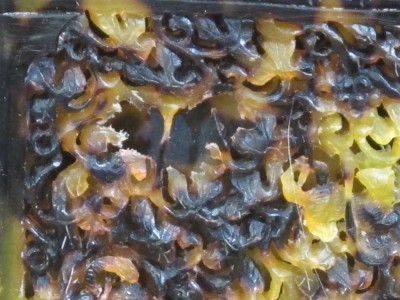
This place is missing the carving. It is roughly the size of the fingernail on my pinkie. Good thing I know how to do this stuff.
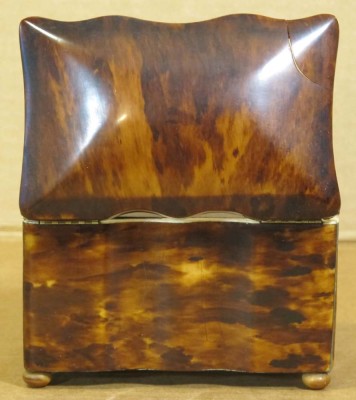
A second and perhaps even more challenging project is this molded tortoiseshell box with a split in the top. What makes this project so problematic is that the margins adjacent to the split are not aligned, so there is some fundamental material manipulation involved.
As the project moves forward I will be updating you on both what I am doing but why I am doing it. Amusing that a sheer nylon drapery is integral to both solutions.
After almost two years of diminished activities in decorative arts conservation, I am now ramping up for a fertile period of activities with many new projects on the menu, and some already underway. Otherwise I don’t have much to do except finish the reviewing of the Studley book proofs as they emerge, reviewing the edits of the Roubo on Furniture Making manuscript, fabricating the elements for the Studley exhibit, a multitude of chores around the homestead, another year’s worth of organizing in the barn, etc.
Last weekend I picked up a nearly life-sized wooden sculpture attributed to 19th century sculptor Valentino Besarel. The details of the treatment, including the strategic thinking behind my decisions, and the execution of those decisions, will be recounted as the project unfolds over the coming months.
There is some disassembly/reassembly, some structural compensation, some flexible fills, some sculpting of missing elements, some visual integration…
The final steps to the conservation of the chairs was the reassembly, which first required me to replace most of the screws that were in the chair when it arrived on my door step.

I’ve got a can of miscellaneous screws that accumulate over the years. You’ve probably got one too. I know the guy who worked on these chairs before had one too, because it looks like he just poured it out on the bench and used the first few dozen screws that were within reach with no effort to match screws to each other or to the tasks involved.
I tried to carefully match the screws to the tasks they were executing, and within that function, matched the screws to each other. It was not much of a problem really, as I am the kind of guy who, when he needs a screw or two, goes to the hardware store and buys a box of the size he needs. Because of that I have a pretty good hardware store shelf under the shop stairs.

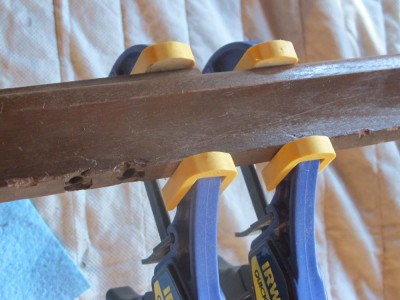
One of the problems I found in a handful of locations, and which I encounter with some regularity since I spend so much time working on old furniture, is the wallowed out screw hole, where the damage is such that any reasonable sized screw will be ineffectual. To solve that problem I use the following strategy.
First, I establish the depth of the screw hole, usually with a bamboo skewer, then cut a strip of 100% linen rag stationary paper so that the width of the strip of paper is equal to the depth of the existing hole. The I roll up the strip into a curl, so that it fits snugly into the wallowed out hole. I press the rolled fill into the hole, then wick dilute hide glue onto the rolled up paper fill so that it becomes pretty well saturated, then I set the piece aside overnight to let the glue penetrate and harden. When I return to the task the next day, I find that the proper sized screw fits and bites perfectly. If anything goes wrong, I just dampen the fill and gently remove it all with the pointed end of the skewer or a dental pick and start it all over again. It’s a high strength, high utility archival repair. What’s not to like about it?
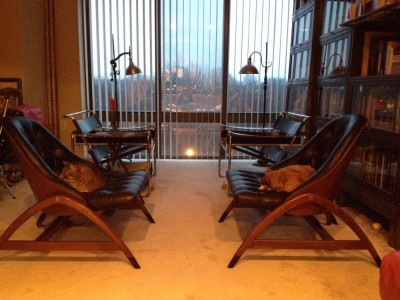
I returned the chairs to the client’s home where they were placed alongside her exquisite Breuer leather and chrome chairs, where they complete the living room ensemble with real class.

Before I did anything else, I had to consider carefully what the chair itself needed, in order to fulfill the user’s needs. Since I could not disassemble the chair without inflicting even more severe damage, this meant that I had to impose into the original fabric of the chair in situ and remove a substantial quantity of the original material, then augment that original element with new material unrelated to the original construction of the chair. Through consultation and discussion, both the client and I affirmed that route, so I dove in. (Both chairs were treated in essentially the same manner, which was a good move strategically. When disassembling the second chair I discovered that it too had broken in the exact same place, but the damage had not yet become manifest at a gross level.)
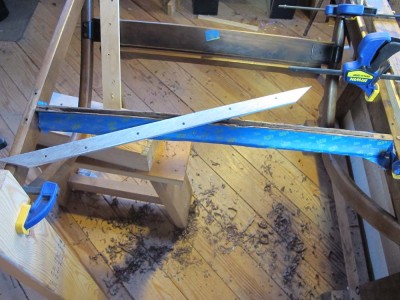
The first thing was to get the broken and displaced cross-member into the correct configuration, in short, put it back to the exact shape it was before the damage. So, I disassembled the buckboard spring assembly by detaching it from both the seat underside and the cross member and setting it aside until final reassembly. I introduced hot hide glue into the fracture and clamped the cross member so that it was straight, and allowed it to sit overnight. No, this was not a structural repair, it was rather a reclamation of the proper shape so that a structural compensation could take place.
I learned an important fact during this step, namely that the grain of the wood was really squirrely, much too figured for the stresses placed on it, and the wood was very brittle. This confirmed my proposal for the treatment process.

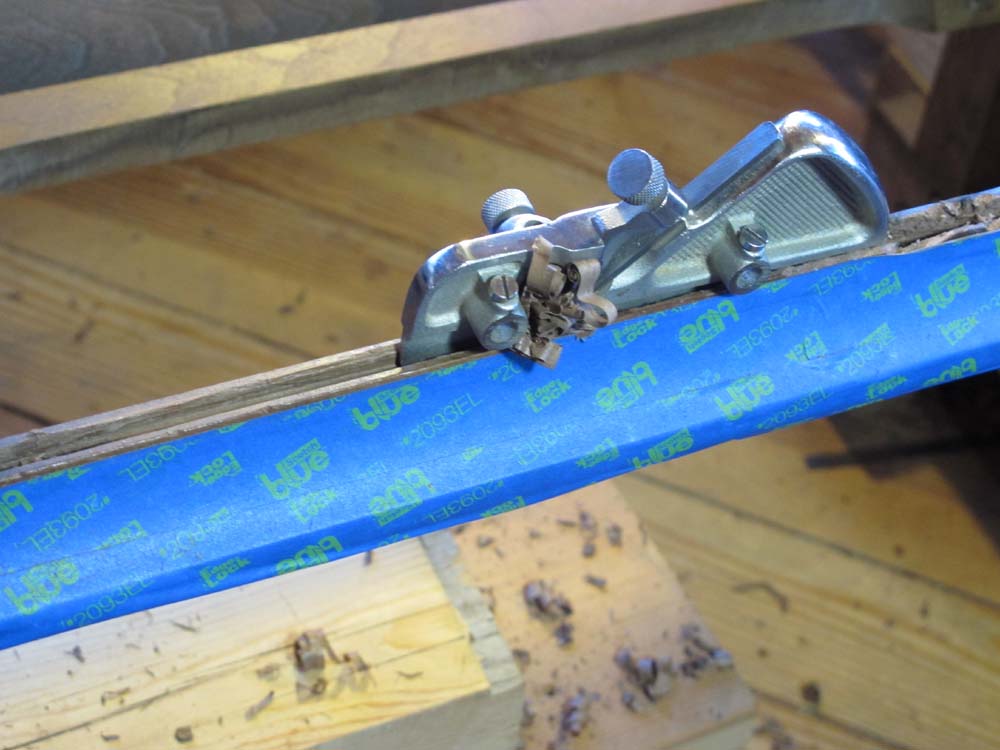
Since the cross member was not square in cross section, and since the wood was so brittle, I could not use a power router to excavate the opening for the new enhancement. Instead I placed the new aluminum barstock spine on the underside of the cross member and scribed a mark, which I made quite deep with a knife.

With my diminutive slotting plane I cut as deep and long of a ¼” wide furrow as possible, then switched to a ¼” pigsticker mortise chisel (it was just the best tool for the job) to finish the excavation.
I made sure to fit the excavation and the new spline to each other. Just before inserting the spline, I drilled several holes through it so that the bedding epoxy would go not only around it but through it, locking everything in place.
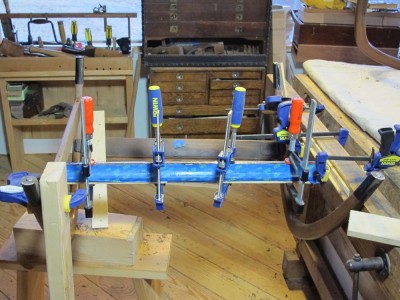
Using West System Epoxy with the slowest setting catalyst, I used a disposable paper cup to apply the epoxy on the spline and allowed it to flow down and around the new element, repeating as necessary until it was clearly full. Then I set up four clamps to hold everything in place and went down the hill to supper.

The next morning I saw that the results were exactly as I had hoped, and filed off the excess epoxy and smoothed out the underside, making no effort to disguise the presence of the new addition. Being on the underside it was not visible to the user unless she flipped it over to look at it, and knowing her as I do, she probably will show it off to her many friends in the artifacts world.
With that, the chairs were ready for reassembly, wherein I ran into some fairly typical problems — mismatched screws, and wallowed out screw holes.
Stay tuned.
Often when telling folks, woodworkers who replicate historic styles especially, that I have been a furniture and wooden artifacts conservator and restorer for more than four decades, they usually get dewey-eyed and exclaim something like, “Oh, it must be so great to work on furniture from the old days, when it was still good stuff.” True enough, I have worked on some old artifacts, the oldest wooden object was at least five or six centuries, but I often find the most challenging and inspiring projects and objects are more or less contemporary. Further, I recognize that my liking or disliking an artifact’s design does not make it good or bad. Still, I find some of the most fascinating furniture emerged from the minds of creative designers pushing the boundaries of design and fabrication. (Truth be told, a lot of the “great” furniture of centuries past was unimaginative replication, as social standing was much more involved with “keeping up with the [English or French] Jones'” than it was with good artistry or craftsmanship).
The 20th Century hosted the creative design genius of a multitude of awe-inspiring designers whose work I find much more engaging than their much older predecessors. Charles Rennie Mackintosh, the Greene brothers, Eileen Grey, Alvar Aalto, Peter Behrens, Charles Eames, Emile-Jacques Ruhlmann, Josef Hoffman, and Louis Marjorelle are but a few of the multitude of artists who made wood and surfaces express exuberant beauty.
It is noteworthy that many of the great modern designers were not artisans, and in fact some did not have a firm grasp on the details of how things were made. Thus, many times when the sketches were brought to reality the pieces of furniture they directed to be created had, um, shortcomings.
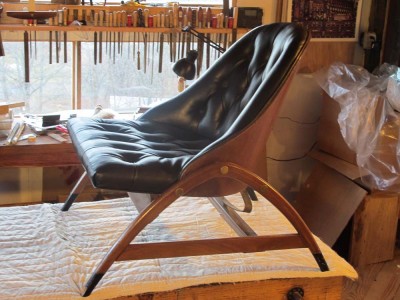
Such is the case with a pair of mid-century modern chairs I was asked to conserve recently. The client, a scholar of the arts, thought that these might have been prototypes from the mind of Milo Baughmann. It makes sense to me; they are reminiscent of some of Baughmann’s other work, and the construction details for the chairs were not the best resolution to the structural requirements for their use. Alternately, the chairs could be the product of the imagination for an acolyte of Charles Eames. Whatever the source, neither I nor the client have ever seen another example of this specific chair form (I like it so much I am trying to devise the making of some myself.).
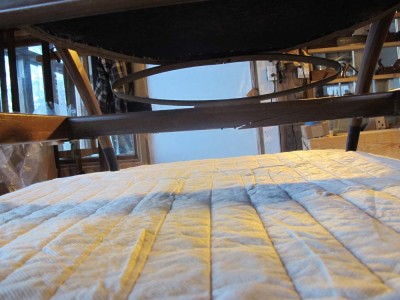
The main problem with these two rocking chairs, well, one in particular, was that the cross member that bears virtually the entire weight of the sitter was 1) too weak to resist the forces of sitting adequately (especially since it was both undersized and much more figured that is appropriate for the location and requirements of the element), and 2) integral to the structure of the chair which simply could not be dismantled for the offending piece to be replaced without inflicting catastrophic destruction on the chair.
Over the next three postings I will describe my decision-making for resolving the problem and returning the chairs to full service, the execution of that plan, and finally note about the reassembly and a solution to dealing with the problem of wallowed out screw holes.


Recent Comments