As with writing, video production can sometimes be just a grind, and as with writing I just have to become more disciplined in finishing things off. I’ve had all the raw Gragg Chair footage sitting in my compewder for more than a year and am only a fraction of the way through it for editing. It is still looking like the final project will be 12-15 episodes, each roughly an hour long.
Just do it, stoopid.
And, since I have no plans to offer workshops much at the barn given the level of student disinterest (the market is never inaccurate, even if you dislike the information it provides) I remain intrigued by the notion of collaborating with my local videographer to produce more videos, some full-length, though not as lengthy as Gragg, others considerably shorter. My congenial video studio on the fourth floor will not be getting any use until spring; we shot one video up there when it was about 20 degrees and I have no desire to replicate that session.
I’m also even considering getting a couple of GoPro type cameras and a quality sound recorder (almost nothing distracts me from a decent shop-based video more than poor sound quality if the on-board camera microphone is the sound portal) to shoot shop-based episodes rather than studio-based ones. Or perhaps I can make do with my standard 35mm cameras.
The list of topics that would interest me in this regard include everything from a small technique at the bench to complex projects beginning-to-end.
Just more stuff to think about.
One of the areas of interest that will absolutely play a greater role in my future time and energies is continuing my attempts to replicate the artistry of Oriental Urushi Lacquerwork, which I place near the pinnacle of the creative arts. My own diversion from the millennia-old techniques as practiced in the Far East is based in the fact that those techniques involve the use of varnishes and paints formulated from urushiol, the main component of the sap from the poison sumac tree cultivars they harvest.
To evade the outcome I would expect from using urushi given my sensitivity to poison ivy, poison oak, poison sumac, etc., I am employing various synthetic reactive polymers to achieve the same artistic ends. I will mostly be using the red-and-black “rubbed through” decorative techniques. Well, maybe some plain red or black surfaces, with the occasional enhancement of gold leaf or pearl fragments.
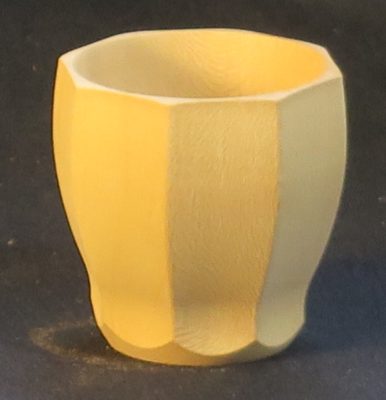
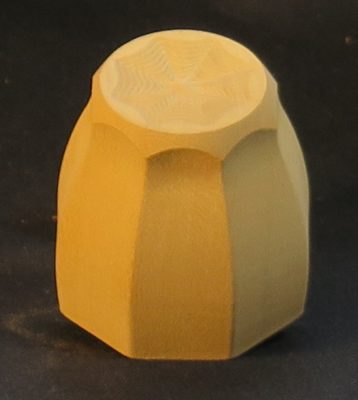
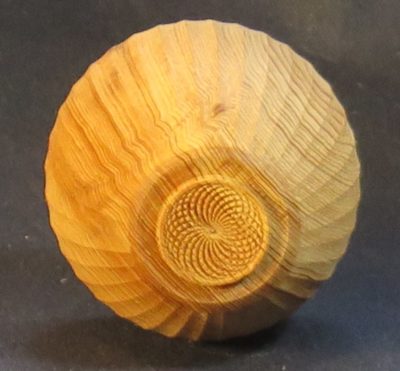
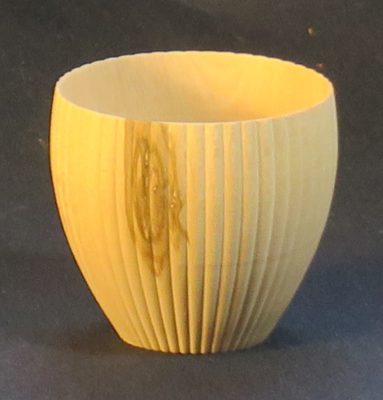
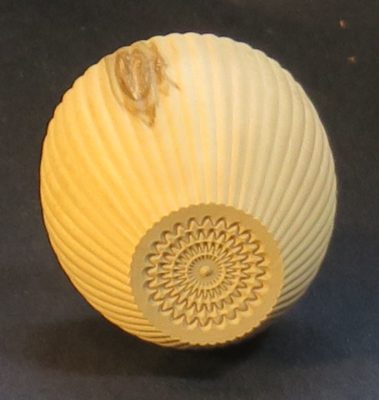
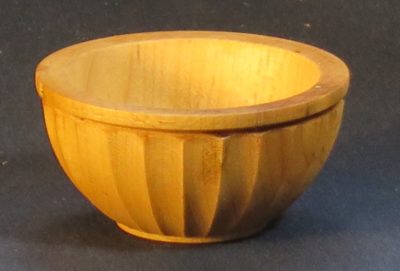
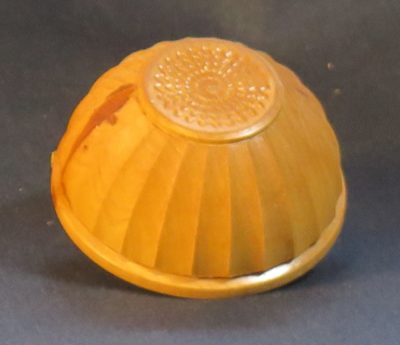
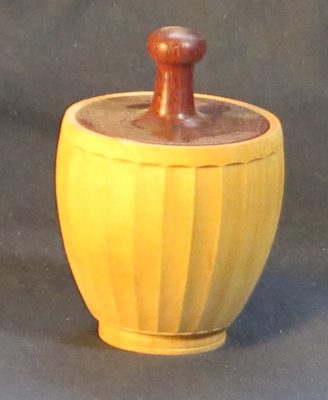
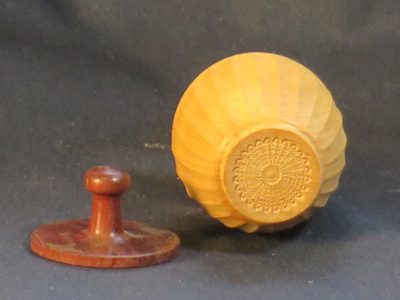
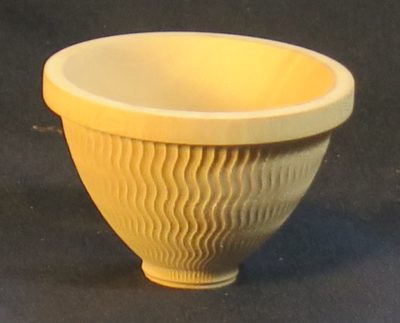
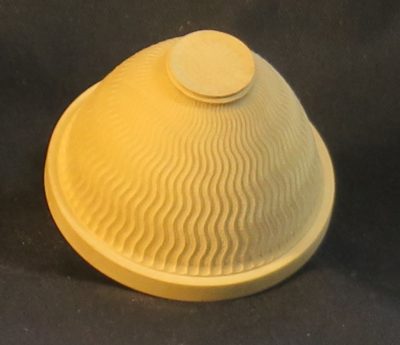
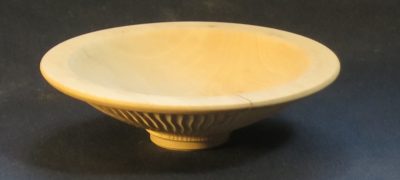
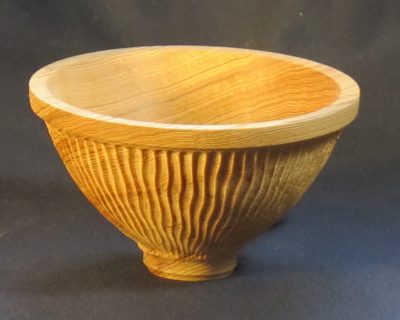
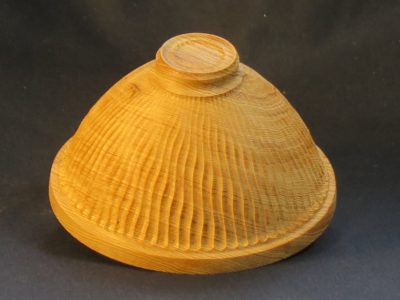
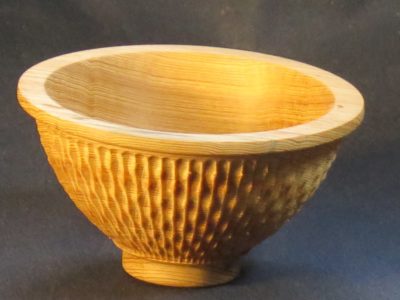
In order to have some workpieces to experiment with I asked my dear friend JohnH, whose friendship is a true jewel in my Treasure Chest of Life, to take some of my vintage and otherwise interesting wood pieces and use his Rose Engine Lathe to crank out some small bowls with decorative surface features to enhance my experiments. Little did I know he would present me with the following gallery of spectacular artworks. Now the pressure is really on as I have to do justice to his fabulous pieces.
Sit back and enjoy this remarkable gallery of sublime creations.

I enjoy precision shooting, a remarkable integration of vision, posture, physiology, skill, tool, and physics; atmospheric, combustion and gravitational trajectory. Our dad used to take us out into the swamps to throw some lead. My brother was a sniper-quality marksman back in the day and like me still loves to make loud noises and ventilate targets. I never did acquire the skill-set of game hunting, although the way things are going I may need to learn.

But I have been plagued by ever diminishing eyesight all of my adult life, to the point where my dominant (right) eye is little more than a hood ornament. For 99% of my day-to-day life the affliction is little more than a nuisance running in the background. Sure, I need to hold my head a peculiar way when executing some tasks at the bench, but it has become so ingrained that I do not even think about it much. It’s just the thorn in my flesh, and I have come to think of it as another opportunity for God to teach me something. I just wish I was not so thickheaded about learning lessons, whatever they are.
Sure, during my quarterly eye exams the doctors all say, “The eye looks great,” and do not always appreciate my response, “Not from my side, it doesn’t!” I am about to be fitted with a new contact lens in that eye which may help, a little. But without surgery to replace the defective polymer lens implant in that eye, which compounds the defective corneal transplant (twice in a row; another data point about which the doctors have zero interest), it really does not matter how much the contact lens can correct the acuity/sharpness since it will not remove the heavy-fog-like haze resultant from the defective lens implant. And, the surgeon is not at all anxious to intrude into that eye any more since I can still function. I guess twenty (!) surgeries-per-eye is their limit. Plus, the cavalier attitude about my glaucoma two ophthalmologists ago has already cost me roughly 1/2 of the vision in that eye on the perimeter of the vision field.
Like I said, a hood ornament.
All that to say that when it comes to long distance precision rifle shooting, I am up a creek without a paddle since that exercise has relied on my dominant right eye for more than fifty years.
Then along came a paddle.
Over the past few years, I have imagined, devised and designed a modified rifle scope that will allow me to still shoot right-handed with the rifle, but use my much better left eye as the steering mechanism for the tool. I have way too many hours of muscle memory/practice to try learning to shoot left-handed, especially with a bolt-action tool, although I did play hockey left-handed. But I was a defenseman, so I also skated backwards most of the time.
Now all I need to do is fabricate the parts in the machine shop, put the pieces together and try it out.
Which means I need to get the machine shop up to speed. That’s what this post is really all about. I’ve got the design. I’ve got the materials. I’ve got the precision machines, just sitting there.
Just do it, stoopid.
Hey, that’s a catchy phrase. Maybe I will register it. If the unit is a success, I will certainly not register the invention, I will simply write it up and release it to the world. I cannot be the only shooting enthusiast betrayed by a failing dominant eye.
I’m thinking much of this topic and most of these projects, with one or two exceptions, fall clearly into the “…and well beyond,” territory.
I’ve got plenty of workbenches scattered around the barn (16!), but I cannot seem to stop myself from planning on building even more. It is apparently one of my dysfunctional psychopathologies. Perhaps I was deprived of a workspace/bench when I was a toddler. In short, I may have to start recruiting more family and friends to take some behemoths off my hands.
At this point I have several ideas in the works, some innovative, some self indulgent, and almost none of them “necessary.”
First, I need to finish up my Ultimate Portable Workbench, which I have already been chronicling here.
Second, two years ago I built a bench-top planing board from cypress and I would like to replicate that project using a slab of vintage black walnut, which I would resaw and actually build two.
Third, I would dearly love to build a version of Renaissance Woodworker Shannon Rogers’ truly innovative “apartment” workbench, with its joinery tower and detachable planing beam. Simply genius, probably the most inventive workbench design in my lifetime.
Fourth, I’ve got a massive slab of ancient mahogany from the Cincinnati area lumber yard that Chris Schwarz obtained for me, it is roughly 4″ x 22″ x 7′. To go with this, I have some 6″ x 6″ ancient black walnut for legs. This would yield a truly remarkable Roubo bench, but then I already have a truly remarkable ancient wood Roubo bench in place. Sounds like a pure vanity/self-indulgence project for me. Maybe I should just sell the lumber to someone else who needs/wants a bench even more than I do. If this is you, let me know.
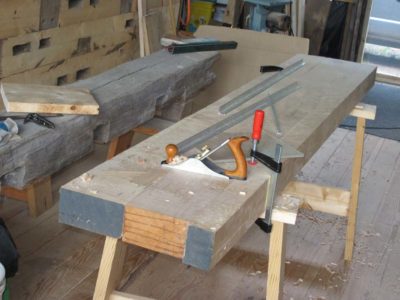
Fifth, I’ve got a slabbed-up hunk of birds-eye maple ready to be turned into a bench, with vintage oak 6″ x 6″ legs. Like the one in the previous paragraph, this would result in a truly eye-popping Roubo bench. But also like the previous one, I do not need it and should find someone else who really does.
Finally, I’ve got a pile of oak 10″ x 15″ timbers airing out in the yard next to the barn, and with a little chainsaw work they could be rendered into usable bench slabs. Maybe I can use them for chainsaw practice.
Oh, and I’ve got a stash of 7″ x 14″ Douglas Fir timbers from a building dismantling from around 1945 or so. They would also make superb bench tops and legs.
Since this list is already getting too long and I still have a large number of items yet to go, I decided to consolidate a half-dozen of my “winter projects (and well beyond)” into one with the identical theme for all the elements — making tools. I have no doubt there will be other additions as time goes on, but these are the ones already on my “to do” list.
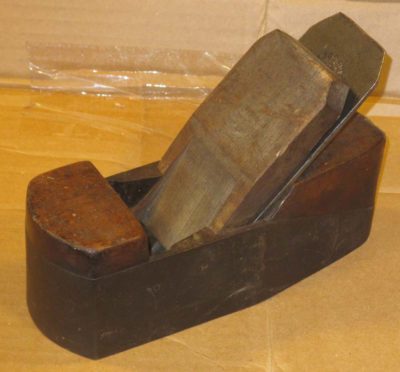
Copying (?) A Robert Towell (?) Infill Miter Plane
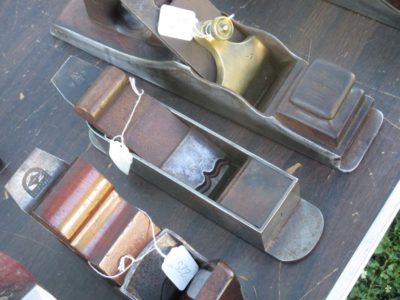
I do not own many truly “collectible” vintage tools, but this plane is one of them. Perhaps made by London planemaker Robert Towell in the early 1800s, I bought this very-little-used plane at Martin Donnelly’s several years ago from one of the tailgate vendors.
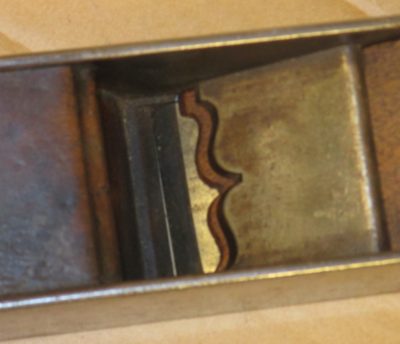
Though the characteristics of the plane are consistent with Towell’s work, he was apparently somewhat cavalier about stamping his planes and this one is unmarked. Had he stamped this one I would have certainly not been able to afford it. So, thanks to his oversight I was able to become the owner of this superb beauty at a 90% discount (!) off an identical plane with his stamp.
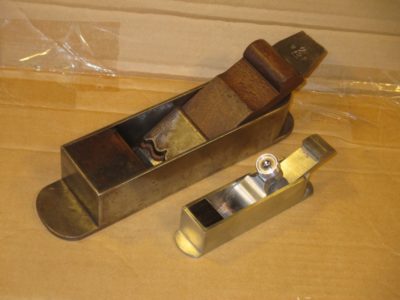
In addition to this full-sized Towell miter plane, I have one of Raney Nelson’s early planes, a miniature scale but similar form. I use it for trimming parquetry lozenges, one of a half-dozen planes I employ for that task (is that too many?). Maybe I need to purge that inventory a bit.
Nah, I’ll wait until I finish and fill my new standing tool cabinet. Check back with me then.
In the meantime, I’m thinking I need to make a third plane to complete this set, one halfway in between the sizes.
You (and I) might ask, “Don, do you really need it?”
And my reply would be, “Butt out of my bidnez.”
The project would give me a chance to invite over my new friend, an Amish blacksmith and newcomer to the county (heck, I’m a newcomer and we bought our cabin twenty years ago! I expect my soon-grandson will be a “newcomer” also, but his grandkids maybe not), who is very interested in this kind of tool making. It would also give me the opportunity to approach the local bladesmith/exotic dancer about fashioning a Damascus steel blade.
What, you think Austin TX is the only place with eccentric folks? We might not be San Fransicko but we do have a lot of competing drummers.
****************************************************
Triangle Squares for Parquetry
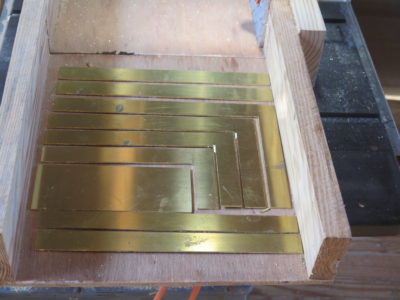
A couple years ago when I was making a set of Roubo-esque brass cabinetmakers’ squares I also wound up with a solid 30-60-90 triangle with a shoe on the short base that I have found exceedingly useful in the intervening period, especially for laying out Roubo bench dovetails and parquetry pinwheels.
As I am about to move even more into the work of parquetry I am thinking that I need a full set of 30-60-90 triangles; one with the shoe on the long base and one with the shoe on the hypotenuse.
In fact, I might need some additional ones as I move past my usual vocabulary of parquetry, including one dedicated to the 45-degree angle and another with a 22.5-degree feature, and perhaps even more. I guess I could use my EDC pocket Delve square for the 45, but a full dedicated brass set would really be nice.
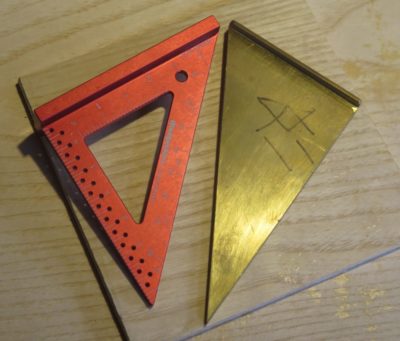
This is definitely one series of exercises drawing on the use of a micrometer caliper integrated with those 10th grade trigonometry sine-cosine-tangent tables I figured would NEVER come in handy.
*************************************************
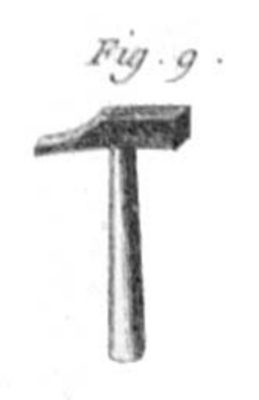
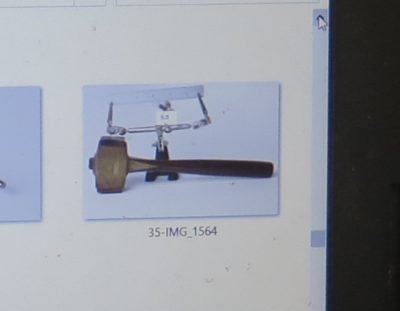
Japanese Joinery Hammer
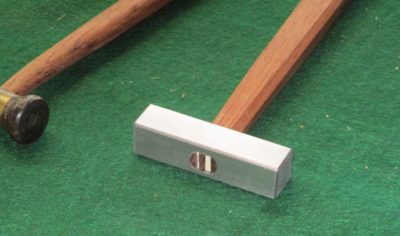
Two years ago as I was constructing my Japanese tool box I also made a small Japanese-style (sorta) hammer for doing delicate work like driving small nails and pins and adjusting planes. I recognized at the time the void in the kit of a beefier hammer for doing joinery. It will be nearly identical to the smaller one except for the scale, being made from 1″ square bar stock rather than the 1/2″ bar stock of the previous one.
***************************************************************
Custom Stamps and Branding Iron Tips
I’ve always wanted a set of stamps/branding irons for marking my new work with my sign, the barn logo, and the date. I would need three separate items, one to create an embossed presentation of my stylized initials, one for the simpler barn logo, and one would be a set of the letters “M, L, X, V, I” for the year/number stamp. Hey, if you are going to live in the past, go way back.
I know there are companies out there who do that for a reasonable outlay, but I’d like to give it a try myself. Actually, I might need two complete sets — small ones, for small objects, and large ones for larger objects such as Gragg chairs. Since I keep plenty of raw metal bar stock on hand that would suit my needs for that undertaking, I’m going to give it a try.
I hope to start these sometime in the next couple weeks, so there may be some posts about that in a month or so.
*******************************************************************
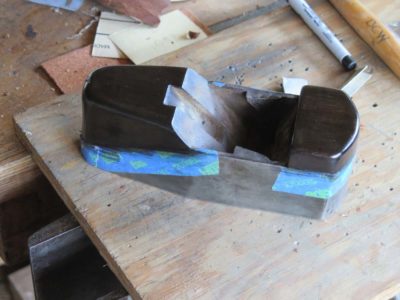
Finishing the Restoration of an Infill Smoother
Years ago, I bought an infill smoother and got part way through its restoration. This is the year to finish it with fitting a new iron (already in hand from Josh) and a new wedge. My only question at this point is, “How ‘over the top’ do I make the wedge?
**********************************************************************
Expanding My Selection of Tools from Roubo’s Veneering Tool Kit
During the creation of the English translation of Roubo’s L’Art du Menuisier I made a number of tools for completing some of the accompanying photo essays in the books. This did not satisfy my appetite for his tool kit but merely whetted my appetite. The tools I make from the oeuvre will not be for curiosity-only purposes, these will be tools I expect to use in the shop regularly. They worked in 1760, I expect they will work after the Zombie Apocalypse.
In some cases the tools will be even more of the iterations I already possess (bar clamps) and in other cases they will be new to my tool kit (veneerer’s hammer [as opposed to veneer hammer]), and some completely off the grid (oval cutter).
Last week I accidentally posted the title only of a blog post “Pushing the Boundaries of Graggsylvania.” This evening as I was working on a post for tomorrow I was bewildered that I could not find the post anywhere on today’s blog calendar. After some noodling around I found that the full blog post had been grafted on to the mistaken Title-only post of last week. So, if you want to read today’s blog with the earlier title, go here.
I hate compewders. They do what you instruct them to do even if that is not what you want them to do.
Now that I have the foundry set up on the first floor, I really have no excuse to not start metal casting. Well, except for the need to refabricate the large entryway, allowing me to roll out the smelting furnace from the interior space.
It might be just fine having a thousand degrees worth of hot indoors with a wooden floor above, but I would rather not test that hypothesis as a starting point. Perhaps if there is a streak of ultra-mild days upcoming (it’s been unseasonably warm thus far this winter) I can get that task done.
To be sure the first project on the slate for the foundry is to move forward with replicating the infill mallet from the Studley Tool Collection. Having that prototype in-hand would be a great excuse to revisit the collection itself, to compare my replica with the original. Obviously, Mister Stewart gets the first unit off the non-assembly line, should he want it.

Right behind the Studley mallet in the queue is my finger plane project, with its thus-far three models underway. I started working on these models 15 years ago if the date stamp on the images is correct. I do not need these tools from a utilitarian perspective, but I do need them from a creative one.
Once I get the foundry humming along as a routine activity there is no telling what I can imagine making.
I have on occasion penned a “State of the Barn” blog post but this year decided to lay out my short (and long) term goals as this series of “Winter Projects (and well beyond).” Looking over the list it reads more like a Soviet/DC Deep State 5-Year Plan. Oh well.
Who knew that I would evolve/devolve from a guy who fixed artifacts into a craftsman whose most important output would be words? Well, that might be my job description now. I need to follow the example of Chris Schwarz and become comfortable with killing my babies (words). It is a curious profile in psychology that I am much more comfortable with jettisoning people and relationships that become deleterious or irrelevant to me, while often I cling to ideas and words long after I should. Everyone has some versions of normalcy bias and preference bias and clearly these are mine.
I’d better get better at it, or my writing projects will just continue to spin further into unfruitfulness or inactivity. I’ve been wrestling with A Period Finisher’s Manual for almost a decade, or in other words, eight years too long. I have now begun to take my laptop compewder with me to the shop, to spend at least an hour or two on the project every day in order to knock it out so I can move along to the Roubo files Michele has already completed and sit mockingly in their respective directories (she is almost two books ahead of me, having already finished her side of The Roubo Lexicon and is currently speeding through Roubo on Garden Carpentry [which is way cool!]. She will soon be starting on Roubo on Windows, Doors, Stairs and Floors, our largest Roubo volume). Plus, I’ve got a lot of fiction outlined in my notebook, some mystery thrillers, some short stories and novellas about Joseph of Nazareth and Joshua Bar Joseph in their first Century workshop.
I am not an experienced writer and have not previously encountered the hurdle I am facing with APFM, namely that I have too much extraneous information and too many words on the subject. I have returned almost to Ground Zero in rebuilding the manuscript contents and organization. That was certainly not the situation with Roubo on Marquetry and Roubo on Furniture, where Roubo’s own words pretty much established the boundaries of the projects. And, on Virtuoso: The Tool Cabinet and Workbench of Henry O. Studley, even after years of diligent research my knowledge was frustratingly sparse and my willingness to go beyond it was almost nonexistent, a situation imposing its own discipline. I wrote that manuscript first draft in only six weeks for the main text with another two weeks for the photo captions.
Now I just gotta get down to the business of killing words and excising unnecessary rabbit trails. I would say, “Wish me luck,” but I do not need luck. I need ruthlessness. The new standard has to be not, “Does this amuse me?” but rather, “Does the typical reader need this?”
Some of the elements of this ongoing litany are monumental and strategic, others are more mundane and simply part of the shop wallpaper, so to speak. This is one of those times.
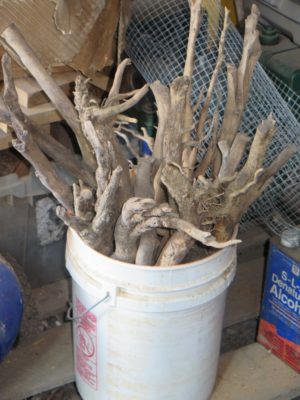
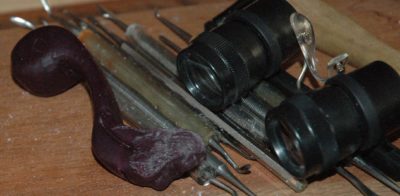
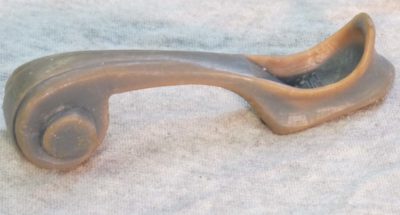
Many years ago, a friend was remodeling his garden and removing some pretty nice boxwood bushes. He made sure to save me a couple buckets full of trunks and branches, and they are awaiting my ministrations to turn them into handles and tools. As I embark on my tool cabinet there will certainly be times when this or that tool needs a new handle. Well, if not actually “needs” a new handle, would certainly be more comely with a new one.
It reminds me of the Monday maybe thirty (?) years ago when chatting with one of my co-workers. He was a weekend volunteer at a Maryland historic home for a War of Independence general or some such. I knew that the residence and grounds were undergoing some major renovation and restoration.
“I was thinking of you over the weekend,” he said,
“Really? Why?”
“We finally started to return the gardens to their 1790 configuration and are ripping out all the mid-19th century gardens. We yanked out about 100 boxwood trees and took them to the dump. Maybe I should’ve called you.”
“Yeah, you should’ve called me.”
“It wasn’t that big a deal, they were really small trees.”
“How big?”
“Oh, not so big. I don’t think any were taller than me, and the trunks were only about the size of my thigh at the base, some maybe a little bigger.” He was a little bit husky, so I would guess the century-and-a-half-old boxwood stumps were roughly 8-10 inches in diameter.
All hauled to the dump.
Stake. Heart.
I got over it. Sorta.
Sorry, I accidentally posted this headline last week with no content. Here is the content.
I find everything about the Gragg Chair to be compelling, from its aesthetic sinuous elegance and innovative form to the engineering brilliance and the craft challenge itself. But, could the same form and concepts be taken to different places? What else could be accomplished in the territory of Graggsylvania?
I intend to find out.
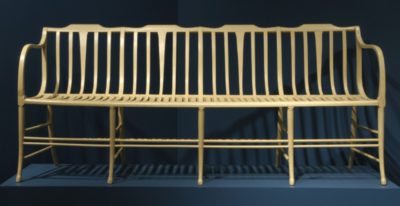
I am not the first person to ponder an exploration down this path, beginning with Samuel Gragg himself, who constructed this unsuccessful (to me eye, at least) settee. I fully intend to make a four-unit settee employing the fully steam bent structural integers rather that the partial one he employed. Actually, that might be a post-winter project as I would have to do it on the unheated fourth floor which I promise you is not someplace to be desired as a workspace once the chills set in, although that might just work for steam bending the parts. If I can clear space in my heated studio, however…
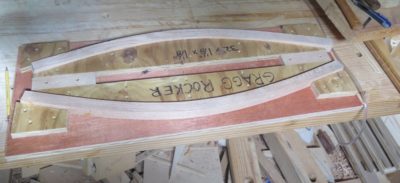
And how about a Gragg Rocker? I’ve mocked one up and have bent the rockers for it, now it only takes time and energy.
What’s next, Gragg porch chairs? Gragg footstools? Gragg plant stands? Gragg child’s chair (now that is really intriguing)? The options boggle the mind and fuel the imagination.

Recent Comments