Since my father-in-law died two days after my mom’s memorial service in January, we have been up to our eyeballs in alligators working to settle his estate and clean out his house. As Mrs. Barn and I noted last night, even after almost four months it is still a shock to not be making a phone call to him every evening at 7:30.
Fortunately my sister-in-law is the executor and point of contact for all the estate stuff, but we have been actively involved in the house-cleaning-out process, spending almost a month in total on the ground and getting dirty. It is a humungous task as my father-in-law was a child of the Depression who lived in the same house for sixty years in a SoCal suburb. So, there’s lots of stuff.
Much of my time over a couple of recent weeks has been to clean out the garage, which had a tunnel for the car but I called the rest the Wall of Voodoo. It was exhausting work as there were literally tons of junk to move out and stack for the disposal crew to remove, and to also sort through the Wall of Voodoo to separate the treasure from the trash. In addition to the hundreds of used spark plugs, the dozens of carburetors and alternators, there were tools. Lots of tools. Mounds of tools. He was a mechanical savant and a mechanical engineer, so the inventory of those implements was huge. Among the treasure were a few things that I was able to ship home to the barn. Here are a few of them.
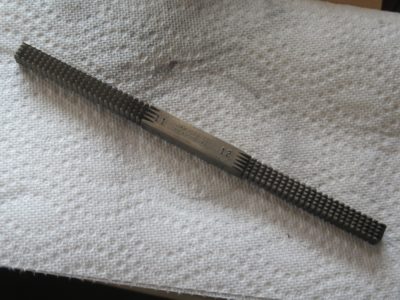
A tool I have always wanted was a square broach style thread file. Now I have one.
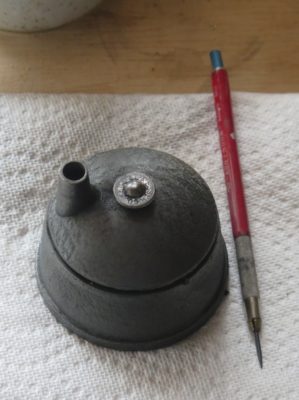
I’m so old that when I took drafting classes we had to sharpen our own wooden pencils with a knife and sandpaper. It was in the “advanced” classes where the students were using retracting-lead pencils with precision sharpeners that could put a needle sharp tip on the lead. Dick probably had this from when he went to engineering school back in the 50s. Since I have saved or acquired a half dozen of these pencils, I rejoiced at finding this sharpener in a box of paperwork.
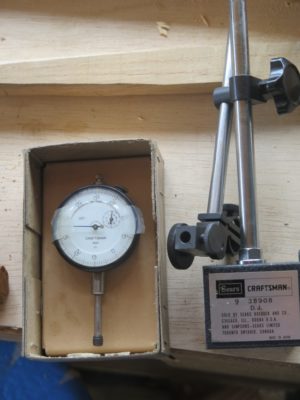
This is the year for bringing all my metalworking capacity on line, including pair of machinists’ lathes and a horizontal milling machine. To tune up these machines an indicator gauge in a requirement. Now I have another, so that each machine can have one permanently.
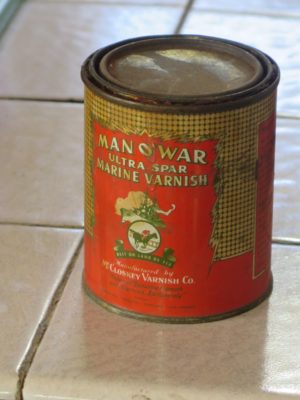
Though I did not bring this home, I was delighted to find this can of an old, revered varnish. The contents were still in perfect condition. I left this at the house in SoCal but may try to figure out how to get it home to my menagerie here.
And, there are still more treasures, some en route from West to East. I’ll report on them anon.
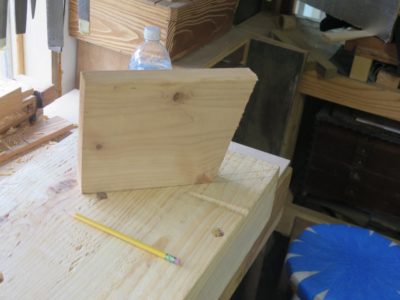
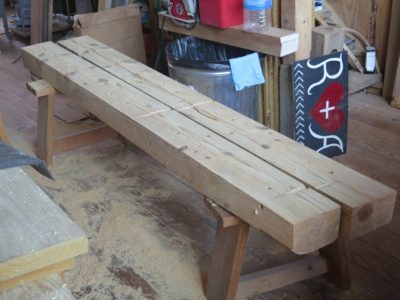
Given the “new growth” nature of the wood it took only short time to get the bench slab flat enough to move on to the staked legs.

For the leg material I was able to recycle the hunk from the edge of the original slab when I ripped that to the width I wanted. I made five leg blanks just in case.
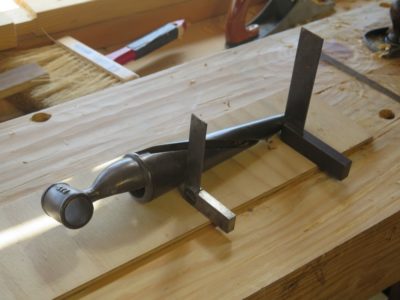

To guide my tapering of the ends I made a quick template based on my tapered spiral reamer, bought for a song at a tool flea market.
I laid out the holes for the legs by insetting them four inches from the side and end, then angled out at 12-degrees on the diagonal. I drilled 3/4″ holes all the way through from the underside, then reamed them with the spiral taper until the taper intersected with the top. In retrospect I should have made the angle a bit more, perhaps 16 or even 20 degrees, but I think this will suffice. If it does not, I will simply move the hole location and drill new holes.

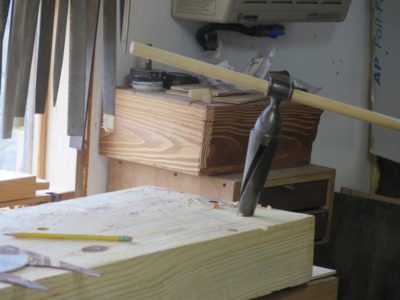
Once I had the leg ends tapered with a drawknife and block plane I just drove them home into the reamed holes with a small sledge. They seated with a crisp thunk. I tried several heights for the bench with a series of mock-ups, and once I determined which height worked best for me I measured the legs and cut them off.

Rolling the bench over and putting it in place this step was finished. Now it was time to begin tricking out the bench.
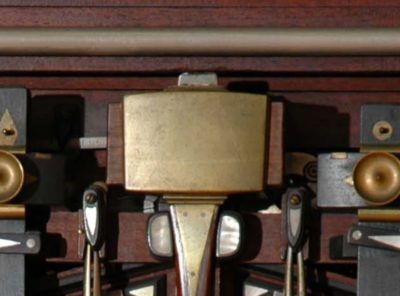
My first exposure to the existence of something called “a patternmaker’s vise” was in 1978 when I went to work in an actual pattern shop. Although I had been engaged in woodworking at increasingly sophisticated shops for several years by that point, the Emmert vise was unknown to me. My job at the pattern shop was a 7AM-3.30PM shift, which was a struggle for me since I am a night owl by nature and getting up to work on time was a challenge even though it was only a three minute bicycle ride to the foundry from my house. But, that work schedule allowed me to have plenty of afternoon and evening time in the shop I built behind the house.
I was so entranced by the Emmert that I checked into buying a new one from Kindt-Collins, the Cleveland based foundry supplier who was by that time the manufacturer of the original Emmert K1 vise. I cannot recall exactly whether the new one was priced at $1750, $2250, or $2750. All I knew was that there was no way I could afford any of those price points in 1978. I did obtain a pair of Emmerts right after Mrs. Barn and I married and went to Delaware for college in the beginning of 1982. The Philadelphia Navy Yard had recently closed their foundry so there was a huge stash of Emmerts just up the road at a Philly machinery salvage outfit, and I think I paid $200 for my pair.
At least one of mine has always been installed and the center of my workspace ever since. I cannot really imagine a workshop of mine not having one.
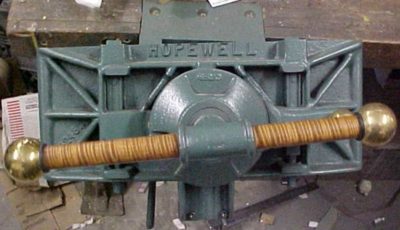
Last week my pal JohnR let me know that the Emmert vise may have been rebranded as “the Hopewell vise” and back in production. The information is at the following link. Maybe this is already known throughout the woodworking blogosphere and I have just been too wrapped up in my own activities, but here it is.
CS Machinery (mprime.com)
If you have always wanted a brand new, incomparable patternmaker’s vise this could be your chance. I have no connection to the new maker and have not encountered one of these vises, but I would love to know more myself.
As I once told an aficionado of workbenches, “If you have avoided using an Emmert before, do not start now because you will be black and blue from kicking yourself for not trying it earlier.”
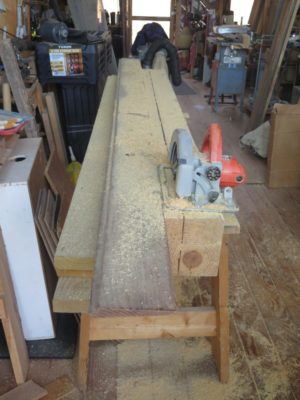

With my former planing beam cut almost all the way through using my trusty 10-inch circular saw I was left with sawing the last inch of thickness by hand. Grabbing my equally trusty ancient 3-1/2 t.p.i. handsaw I made short work of the separation, getting almost 1-1/2 inches of cut per stroke.

I then made a nuisance mistake by cutting off the wrong end of the timbers I was only going to make a six-foot bench). I should have cut of the end with the wainey edges, but instead I cut off the nice crisp end. So now I had to take a few minutes to plane flat the rounded edge and glue on a new piece in order to make it square.

That I accomplished by just sawing off and hand planing the excess.

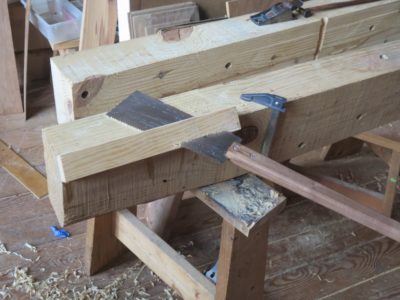
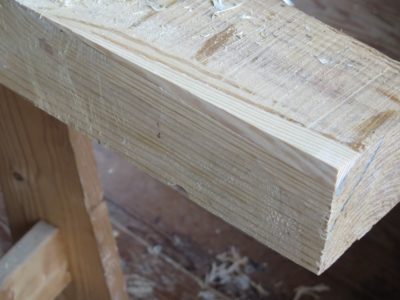
With the pieces separated I dove in with my scrub plane to get everything more or less planar by eye. The beam had a bit of wind in it which became exaggerated (doubled) by the splitting. Once the mating surfaces were flat-ish, or at least fitted each other nicely, I got out my fave toothing plane and got it mated for real, ready for the, er, mating. In this instance I used PVA, in part because I did not know the final environment for the bench but really because I had not prepared hot hide glue in advance and thus had none ready to go when I was determined to execute the glue-up.


It is really comforting and confirming when the squeeze-out is uniform through the length and breadth of the joint.
In recent years Mrs. Barn had been traveling to the West Coast several times a year to attend to her dad in his failing health. Normally she would not even carry any luggage beyond a small carry-on bag, so she left her laptop at home and just took her small Kindle. After making my prototype Kindle case last year I decided she needed a nice case to protect her smaller Kindle during her travels, so it was on my agenda for Christmas. I got it done just in time, but then we had to postpone our family Christmas for three months due to a variety of circumstances, not the least were my mother’s funeral, my father-in-law’s death and funeral, my son-in-law’s inadvertent exposure to someone with the ‘Rona, my daughter’s need for self-quarantining for work travel…

As with the first case I started by making my own veneer-core plywood using the abundant ash veneer from my stash using West System epoxy as the binder, under the dead weight of a stack of fire bricks. I am becoming even more smitten with this type of sheet good and may try to figure out how to make larger panels to employ in other projects. I have used Baltic birch plywood as my “go to” for years, and still rely on it a fair bit. But the veneer-core plywood is just something special. I guess I’m gong to have to make a large veneer press to make it happen.
I am not a tool collector.
To be sure I have a lot of tools, perhaps (probably) even to excess as there are many tools of which I have multiple representations. Some of this is a result of having tool sets in several different places, for example the workshop in the basement of my daughter’s house, the video studio up on the fourth floor of the barn, and my own workshop on the second floor, etc.

In addition I have a number of tools that are slight variations of each other; what other explanation is there for my inventory of more than a dozen toothing planes?
I recall vividly a conversation between Mrs. Barn and Robin Lee of Lee Valley Tools Tools during the set-up of a Handworks event, where the full panoply of the Veritas offerings was on proud display.
Mystified by the range of hand planes on display, she asked him, “How many planes do you really need?”
Robin’s reply was, “How many are there?”
Another reason (excuse?) for having too many tools is that I have upgraded a particular tool for a slightly better version of the same thing but failing to dispense with the previous one. That might explain my owning at least a half dozen shooting planes.
Yet another reason for having excess tools is my affinity for designing and making tools that would be, by definition, unique as my personal creations.
Nevertheless I can state unironically I am not a tool collector since I do not have any tools for the mere purpose of possessing them for whatever reason. I cannot think of a single tool in my possession that I would not use in the shop. Some do not get used frequently, nevertheless I own them for the purpose of working the materials in my milieu.


I do have a few tools that are of “collectible” stature, most notably a near-pristine c.1800 Robert Towell miter/shooting plane. I could afford it only because Towell was lackadaisical about stamping his work and even though this is almost certainly one of his it is not stamped. Thus, its purchase price was only 10% of what it would have been otherwise.

I also have a couple of small Art Nouveau-ish tools by contemporary jeweler/sculptor Chris Laarman’s that are simply lovely to my eye and hand.

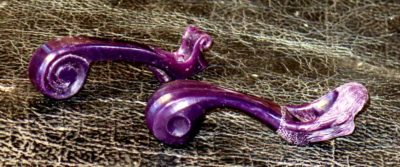
My set of “whale” luthier’s finger planes and a whimsical pair of “pig’s ear” user-made spokeshaves are a pleasure to all the relevant senses, including my sense of well-being and my sense of satisfaction and contentment in the shop.
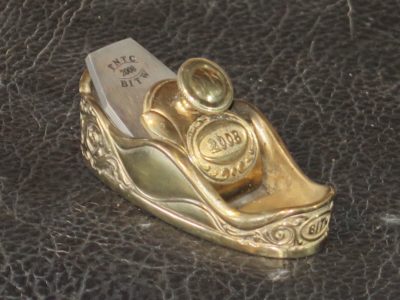
These tools are Objects of Inspiration as I live out and move forward with my own creativity. In particular I am orienting increasingly toward the world of tool making, not necessarily “wooden thing” making. In coming weeks, months, and years creative metalwork will become an ever greater emphasis of my own work especially in the world of “precious,” purely indulgent tool forms starting with these unfinished models for two finger planes that have been in the drawer since I first designed them fifteen years ago.

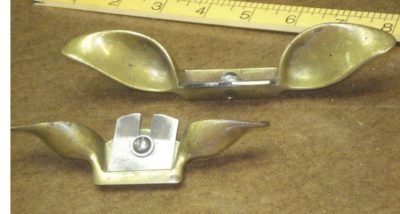
In my recent post about small high-quality brass spokeshaves I remarked that they were 1) indispensable for making Gragg chairs (and any other voluptuous forms), and 2) increasingly difficult to find. In response to that post I was contacted by Hayden Castagno, a Krenov school alumnus who has embarked on a new enterprise of making tools. After a bit of back-and-forth correspondence I became increasingly intrigued by his new miniature brass spokeshaves and purchased a set, full price.
Like me, Hayden is drawn not only to making things but making the tools used in making things. This theme will become even more prominent in my own work and this blog in the coming weeks and months. When I asked him about his creative process he replied, in truly Krenovian fashion:
To me, there is far more to toolmaking (or any craftsmanship, for that matter) than any romantic viewpoint would suggest, but it is in some sense a window to the depth that these topics contain.
I find a life force in wood. I am given energy by making a device that can—with the trust in experienced hands—pull out that life force to be used as a message. Wood offers itself when it is shown a combination of disciplined craftsmanship and good tools. For me, there is great satisfaction in making that good tool and forming a friendship with the craftsperson.
And,
My dad was a welding and manufacturing professor before he started a custom fabrication shop. I essentially grew up inside the shop, learning all the steps of design and manufacturing, and becoming skilled with machines. I was most attracted to what I learned about sculpting and bonding metals by hand. Amongst them, silver-brazing is the favorite.
One of the most impactful experiences that led to my interest in toolmaking was the time … [meeting] toolmakers like Ron Hock, Yeung Chan, and Kevin Glen Drake. That is also where I became aware of tools that aren’t made any more, or are difficult to find.
This leads to the more specific topic of how I recreated the miniature brass spokeshaves. I thought of casting, but I wanted to produce something more hand-made and unique: something of my own design. So, I cut three separate pieces from a sheet of brass and silver-braze the layers by hand. The shaping of the bottoms is done also by hand. I then use chemical polishing techniques to give the shaves the desired shine. Every step is performed by myself at the moment.
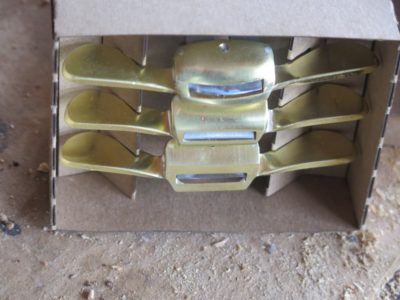
While I am not enticed by packaging I recognize that these are nicely packaged and presented, but even more important is that they are fully sharpened and ready to use right out of the box! Well, they do need to have the blades set-up, they are retracted into the body for shipping. There is a definite “feel” aspect to setting blades on such a tiny, simple tool. I learned this 45 years ago in the pattern shop where we used similar tools for both hogging off stock and feathering contours. My approach is to loosen the screw, press the blade in or out until I can feel the purchase, tighten the screw lightly enough so it does not fall out and then address the edge to the workpiece. If I have it where I want it I tighten down on the screw to lock the blade, if not I adjust it until it is. Given the low mass of the tool it is critical to get the set-up just right or you will get chatter out the wazoo and the spokeshave will literally jump out of your grip.
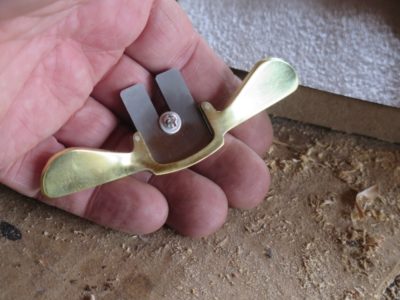
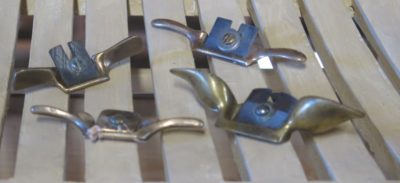
One difference with this tool is immediately apparent when picking it up and using it: it was made by someone who knows how the tool is used and it fits into the hands of a human being. The same cannot be said for some other tools of the same general category. Especially in the shape, configuration, angle, and size of the handles it is a keeper. Clearly this was designed by someone who actually used it.
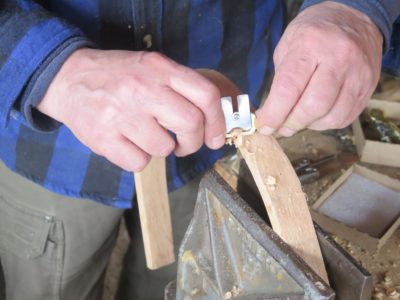
I gave all three a good test drive on a curved Gragg arm element and was so pleased I was sorry that I did not have a pile of them to work on right away. While they will not become my sole spokeshaves for a Gragg project, dispatching my “lamb’s ear” spokeshaves or the one I made in the foundry in 1978 are not in the cards, I can definitely say that they will be right alongside them to pick up and use at a moment’s notice.
My only “criticism” of the tools after a bit of use is that they are finished too crisply. The edges and the corners are a little too clean for me and I found that I was taking needle files to some of the places where my grip pressed hard enough to leave creased indentations on my fingertips. This is hardly a condemnation as I consider almost every tool that comes into the shop to be a kit and I modify them as needed. You, too may find that the tool needs some miniscule sculpting to fit your individual fingers as well. It is perhaps churlish to note that a semi-custom tool is “too well finished.”
If you are unable to find high-quality miniature brass spokeshaves for your work, Castagno’s just might be the perfect solution for you.
In closing let me say that Hayden’s spokeshaves reinforce my contention that we are living in the Golden Age of Tools. Never before have so many high-quality tools been available and affordable to earnest woodworkers, vocational or avocational.
I look forward to see what he has in his menu of future developments.

Image via DuckDuckGo.com
As my Year of Metalworking unfolds I am drawing on lessons from my far distant past. About forty years ago I started a stint working with Don Heller, Silver Objects Conservator at Winterthur Museum. A gruff, curmudgeonly fellow with a heart of gold, Don spent a lifetime as a traditional silversmith before coming to the museum. While most of his job was caring for the stupendous collection of silver artifacts in the museum, a much smaller component was teaching the graduate students of the University of Delaware Art Conservation Graduate Program (I was the first recipient of the undergraduate degree from the same program). Don was constantly vexed by a student or two who only wanted their projects to be, “shiny, not finished.” By this he meant that they wanted to short-cut the process instead of working systematically through the time honored practices of moving deliberately through the steps of getting from Point A to Finished. Instead they would simply make it “shiny” while leaving behind all the marks of the intervening processes, marks that needed to be removed in order for it to be “finished.”
I am once again reviving those lessons from Don in working the shell castings for the Studleyesque infill mallet heads. When they arrive the side surfaces have been cleaned of their cast texture, but that is just the starting point for me. (NB – My assessment of Studely’s original is that the surface is essentially straight from the sand mold, lightly cleaned. Whoever cast the shell was a genius.)

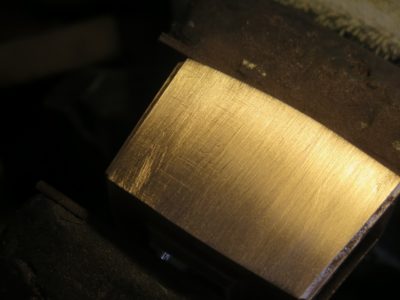
Harkening back to Don’s instructions I step through ever finer abrasive papers to get to the point I want. I do this by first using 80 grit working perpendicular to the pattern left by Bill Martley in his cleaning of the original casting. When I get to the point that none of the original “direction” from Bill is evident I can move to the next step with a finer abrasive.
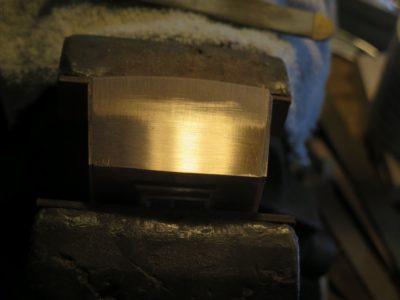
Then I switch to 150-grit paper, working perpendicular to my 80-grit pattern until all the 80-grit markings are eradicated.
Then 220-grit, perpendicular to the 150-grit until all the 150-grit tracks are gone.
Then 320-grit.
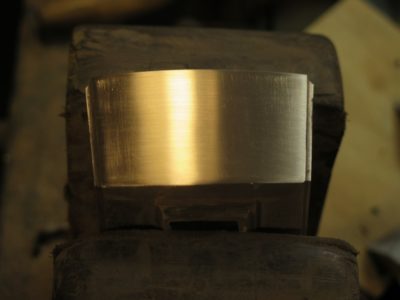
Then 400-grit.
Then 600-grit. And all the evidence of the previous steps has been eradicated, but that absence is proof of their being executed. Finished, not Shiny.
At this point the surface is ready for my final treatment of it.
In addition to the peculiar tools critical to building a Gragg chair there is a selection of ordinary hand tools that come to play in the exercise.
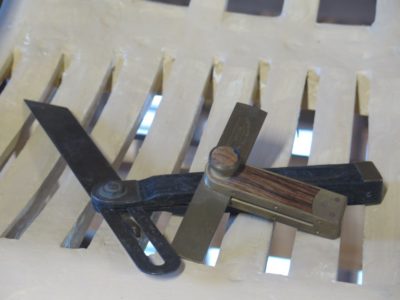
When beginning the actual assembly of the upright chair one of the challenges is to get all these parts balanced with the same splay angles, so bevel squares are the quickest solution. I keep a large one and a small one handy.

It seems that my mid-sized Japanese saw gets used all the time, for one thing or another.


While building a Gragg chair is not a precision undertaking there is still a fair bit of measuring and layout, so a 6-inch engineer’s scale is never far from reach. I generally use mine for laying out the half-blind dovetails for joining the seat slats to the seat rails. Concurrently a couple pair of dividers are just the tool needed for spacing those elements.

I keep a couple of 4-inch movable squares handy for general layout work, and they seem to get picked up quite a bit.
I use a block plane when finishing the front seat rail, in combination with the previously mentioned rasps and spokeshaves.
An eggbeater drill comes in mighty handy when pre-drilling holes for the screws that are used throughout the joinery, and when adding the steel pins in the mortise-and-tenon joints of the rungs.

When it comes time to countersink and finish off the joinery screws I use my brace and the requisite bits frequently during those stages of assembly. I use old fashioned slotted flat head screws in the final assembly so I make sure to have those screwdriver bits for the brace. Since there is a lot of assembly-and-disassembly in the early staged of the putting-together I find a battery powered drill the be irreplaceable for sinking and removing the deck screws I use for the task.


And, it’s always good to have a small hammer and a mallet, along with a handful of spring clamps.

Recent Comments