
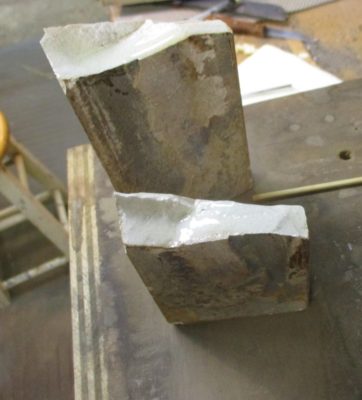
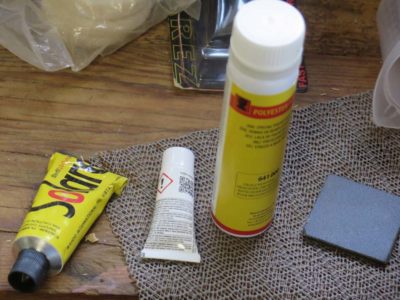
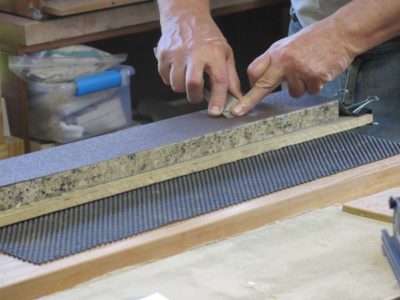
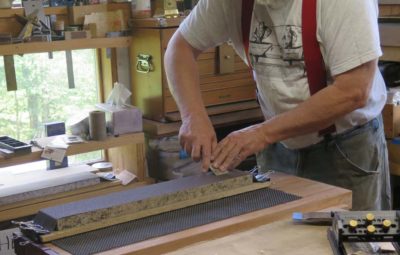
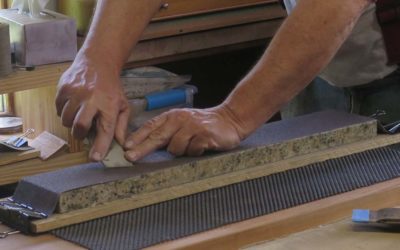
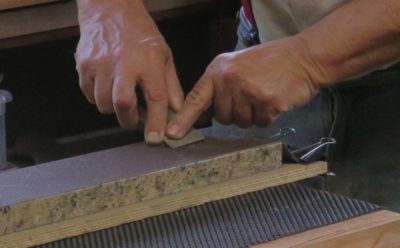
Among my inventory of sharpening implements is an old 8000-grit ceramic water stone that I bought perhaps 35 years ago. I recently dropped it on a concrete floor with the resulting carnage you might have predicted — it snapped in two. Rather than toss it out I tried to salvage it and put it back to work.
Based on the character of ceramic sharpening stones, namely that by nature they are comparatively porous, the foundation existed for adhering the two pieces back together. In fact, since ceramic stones tend to be fairly soft and friable (fracturable) when adhering pieces of these ceramics together you have to pay attention to the adhesive-adherend margin, making sure that the density and hardness of the adhesive is congenial to the density of the adherend. While I cannot modify the character of the cured adhesive film, I can use other methods to modify its performance.
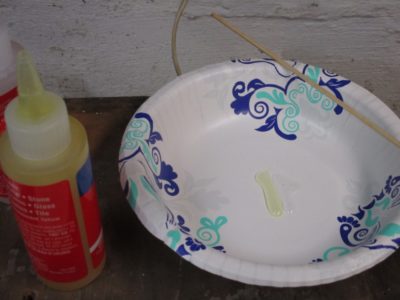
In this case I followed my longstanding practice of using dilute adhesive to size the gluing margin (the surface of the adherend), thus rendering something more hardened-sponge-like than a block of hard plastic in direct contact with the soft ceramic. The latter construct is much more likely to fail in somewhat short order as the harder, denser, and more cohesive adhesive breaks off some of the softer ceramic block, resulting in the failure. In this case I used an epoxy I had on hand.
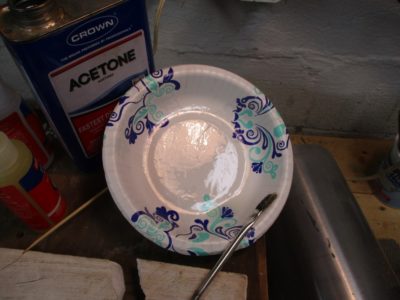
I mixed the two parts thoroughly, then diluted it immediately with with acetone to yield a watery solution. This was applied directly to the broken stone surface, and soaked in to yield a fairly parched-looking surface. This results in an adhesive/adherent region perhaps ten or twenty of fifty times wider than that accomplished by full-strength epoxy alone. After a few minutes I added another application of the dilute epoxy, then set it aside until the epoxy was almost tack-free.
The it was ready for a bead of the full strength epoxy, which I applied to the lower half of the joint to make sure none of the full-strength epoxy would squeeze out the top glue line to excess.
Once the gluing surfaces were coated with the epoxy I placed the two halves together and applied very gentle clamping pressure, mostly to hold the two halves in correct alignment rather than drawing them together. Their fit was wonderfully tight from the git-go. There was a tiny bit of epoxy squeeze out on the top line, and I wiped that off immediately with a paper towel sodden with acetone.
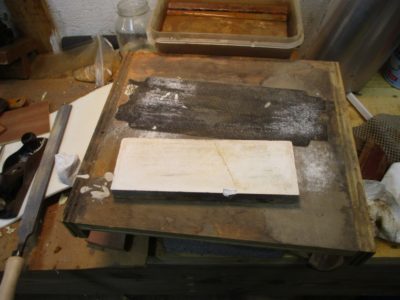

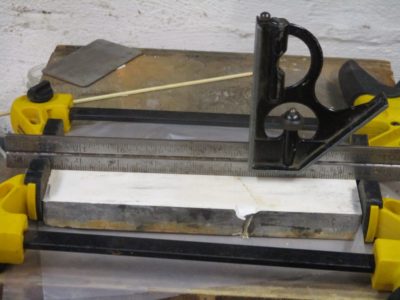
I let the assembly sit until the epoxy was fully hardened, then re-trued the surface, first with a sheetrock screen and then with sandpaper over a flat surface. Since it is an ultra-fine polishing stone it does not need much water; to make sure the epoxy is not challenged I simply wet it on the surface instead of soaking the stone in the water bath.
In use there is a little click as the steel is passed over the fracture line, but the stone still works just fine.
A few days ago blog reader (and the Lou Gehrig of the woodworking blogosphere) RalphB asked about my use of the pumice block to smooth the surface of my parquetry Kindle case. The use of pumice blocks is well documented in historical accounts, although explicit or specific details are often missing.
I use a pumice block from the plumbing section of the hardware store (I order them by the case). Normally they are used for deep cleaning of porcelain and enameled fixtures to remove mineral deposits and stains. They work equally well for evening out irregular wood surfaces such as those found when assembling parquetry or marquetry from sawn veneers, where regardless of the care in the initial veneer sawing a fair bit of irregularity is manifest.
I generally use a pumice block as the step following the toothing plane/Shinto rasp, moving the block in a circular fashion on the substrate, yielding a fairly smooth and even surface about what you might expect with 60 or 80 grit sandpaper. Following the pumice block with a card scraper and polissoir, the result is quite pleasing.
In my ongoing efforts to replicate Asian lacquerwork without the use of urushiol, the resinous sap from the poison sumac tree that is refined into the coating material, I have been trying a number of alternate options including epoxy, oil/resin varnish, shellac (of course!) and varieties of polyester coatings. The air flow through my studio is controllable and just about perfect for any non-spray finishing from a clean environment perspective. However, virtually all of the polyester products produce noxious fumes when the coating is reacting. Not enough to be hazardous to my health, but plenty stinky enough.
To deal with the problem I have dusted off my old favorite respirator, the 3M EZ Air that fit my head and face perfectly and is comfortable enough that I can wear it for hours. Naturally since it was such a satisfactory product it is no longer available on the market. The organic vapor cannisters are available so this will remain my “go to tool” for respiratory comfort when working on the polyesters,
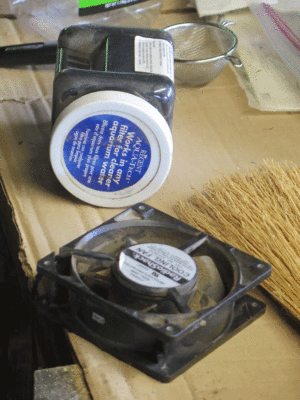
Though a satisfactory solution for ambient odors I also came up with another one for scrubbing the air inside a curing chamber. When I can, I place the newly coated object in a box along with an air scrubber I made just for those occasions. The unit starts as the jar containing activated charcoal flakes, normally used for aquarium filters.

I cut a hole in the lid and affixed a compewder fan and a screen, and drilled a series of small holes in the bottom of the PET jar.
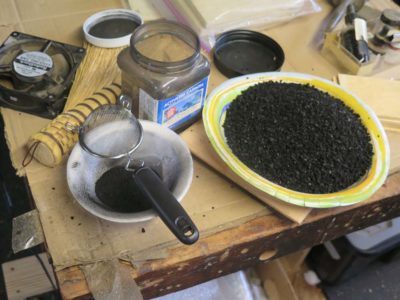
I sifted the activated charcoal to remove any powdered charcoal dust, something I do not want blowing around inside the drying chamber with a wet coating in the immediate vicinity.
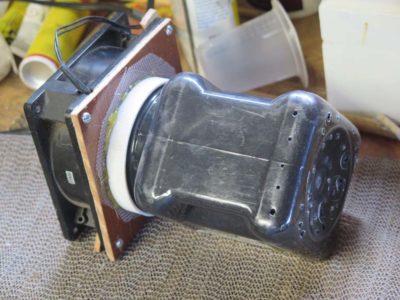
I placed the clean activated charcoal flakes back in the jar and closed up the whole system. Now I can coat the object the the polyester, flip a large cardboard box over onto it to enclose it, and turn on the scrubber. By sucking in the air gently and blowing it through the container of the activated charcoal (which adsorbs the organic molecules off-gassing from the polyester) it removes the odors and I cannot really even notice them while I am at work nearby. When the coating is cured I remove the object and the smell is negligible. I find that if I leave it all in over night there is barely any odor at all.
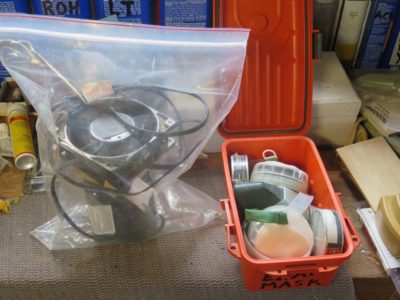
When the air scrubber or respirator are not in use I leave them in sealed containers to extend the working life of their filtering components, whether activated charcoal flakes or organic vapor scrubber cartridges. The fan scrubber goes into a gallon-sixed freezer bag and the respirator into a little sealed box.
When it comes to sharpening plane irons I am a sidewinder. I taught myself how to sharpen and this was the way that made the most sense to me as it exploits the natural kinesiology (the study of human motion) of the hand and arm. Straight-ahead sharpening fights the natural motions of the body as you have to constantly adjust the angles of the shoulder, elbow, wrist, and hand. Sidewinding takes advantage of the swinging motion of the arm. All you have to do is establish the bevel angle of the iron and everything else takes care of itself with minimal attention.
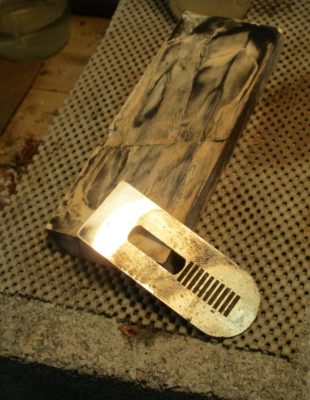
The pendulum motion of the swinging arm makes it almost effortless to shape a camber on a plane iron. This one was a new one for a Bailey #5.
My initial shaping of the bevel contour is done with a 60-grit belt on my 50-cent granite backsplash block. My first step is to gauge the bevel angle, which I determine by setting the iron bevel-down on the abrasive surface until the tip and the heel of the bevel are both in contact with it.
Then I start to introduce the curve on the bevel tip by rocking my body forward and backward, and swinging my arm in a pendulum fashion, moving the iron back and forth on the abrasive belt while maintaining the bevel angle. As I am doing this I rotate my hand to push down with my thumb and grind away the trailing corner on the push stroke and press down with my index finger on the opposite corner on the return trip. It really is almost effortless and idiot-proof. For this part of the process I usually wear cloth work gloves as the iron gets really hot, really fast.
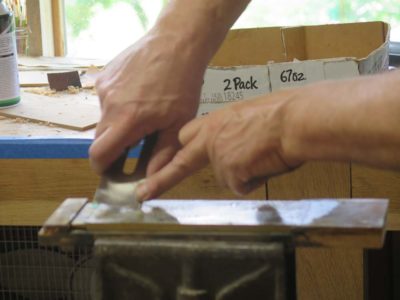
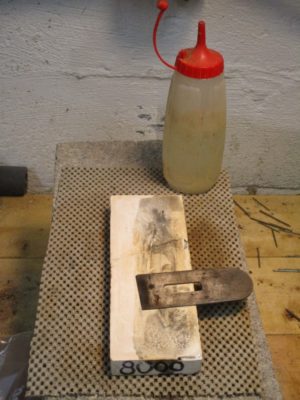
After I get the curved tip I want I move on to finish the iron on my 220 and 1200 diamond plates, then finish it off with the 8000 ceramic stone. Sorry for the fuzzy pic, it’s the curse of the “Automatic” setting on the camera. I use the exact same motion for the sharpening stones as I used for the rough shaping on the granite block.
Originally I titled this post “The 5-Minute Camber” but I timed myself as I created this one. I was off by 40%. It took me just over seven minutes to go from start to finish. Shoot, I took longer to do the photography. I’m trying to teach myself to make short “shop tip” videos, maybe this process would be a good candidate.
This summer has seen a frenzied pace on the homestead, with summer lawn and garden activities, family comings and goings, working on the book manuscript and photography, and now, the final sessions for recording the Gragg Chair video. Chris my videographer has been even more occupied than I given that last year he started a new, full-time job, he and his bride bought a new (to them) house with all the attendant time sunk into that as required, and just recently a brand new baby. All that to say it has been almost a year since we were able to get an intersection between our two calendars, and that intersection occurs tomorrow.
Combining my preparations for that with my ongoing Gragg Chair Challenge I’ve been spending a lot of time up in the attic studio workshop, just as we have been experiencing our summer heat wave with many consecutive days up in the mid 80s. The locals are griping about the heat whenever they get together to chat about anything. One implication of the warm sunny weather is that the attic workshop is crowned by almost 3000 square feet of uninsulated roof, the material of which is heavy corrugated asphalt panels. So, if the sun is shining the overhead ceiling becomes a high temperature radiating panel. My thermometer indicates that the static room temperature is often well over 100 degrees.

To mitigate this effect and make the space useable I have a three-foot low speed exhaust fan. When it is running and sucking cooler air from lower volumes of the barn, the space is a congenial working environment. Then, last week the motor burned out for the fan. Since that motor was one of a group of motors I rescued from a dumpster 25 years ago I was not overly distraught that I only got a dozen years of service from it. I immediately grabbed another, identical motor off the shelf and installed it. Only when I threw the switch did I discover that I had failed to confirm the motor’s rotation before the installation, and the fan was blowing outside in rather than sucking inside air out, the way an exhaust fan is supposed to be set up.
The happy ending to the story is that the fan running “backwards” renders the space even more comfortable than running properly! The robust flow of cooler, outside air flowing over me while working makes my time there even more joyful than I was expecting. I just might leave it that way.
Well, maybe a concrete block rather than an actual rock.
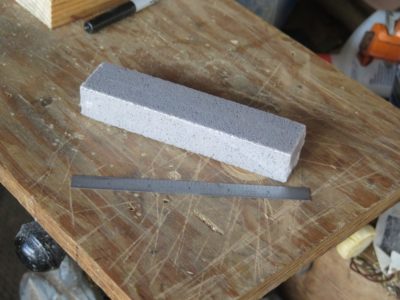
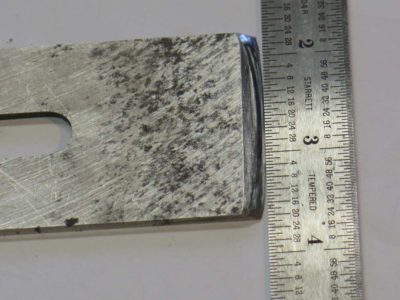
While recently at our daughter’s house I had a trimwork task that required a nice wide, razor-sharp chisel. Unfortunately the only wide chisel I had was this Stanley one I bought from Big Blue for some demo work, and the dentated beveled edge confirms that usage. (This picture was after a minute of working on it, so it was a lot worse when I started out) Were I back in the mountains I would have had no trouble rehabilitating the edge but at that house I only had a fairly fine sharpening stone. So, I remembered a legend from my early days in the trade, when Pop Schindler had to re-cut some joinery while on-site for a project and simply picked a screwdriver from the installation tool kit and sharpened it on the curb to make it into a chisel.
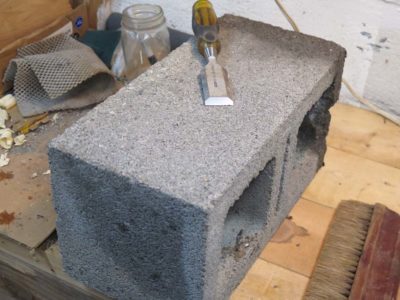
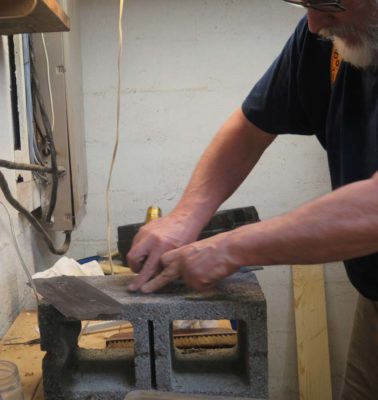
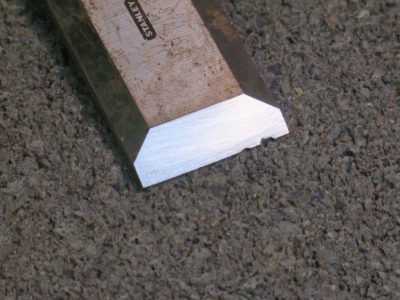
I had the advantage of starting with a chisel, albeit a really beat-up one. Instead of the curb I carried a concrete block into the basement workshop and started working on the edge.
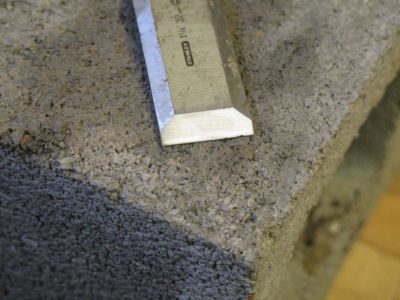
This picture was after about three minutes; after another three or four minutes with the concrete block I had re-established the bevel edge. I did take another few seconds to flatten the back. Like I said, it was a demolition chisel before this.
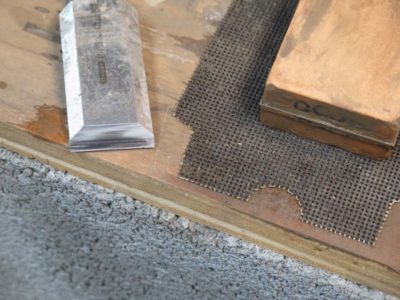
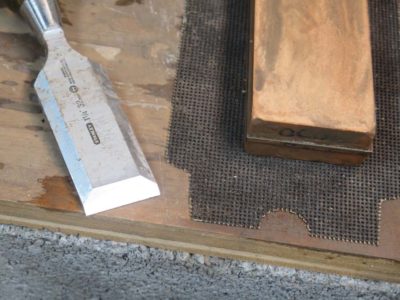
Another minute or two on the water stones and I was up the stairs to trim the door. The chisel notched the vintage cherry trim like it was a hot knife going through butter. My only hurdle was the contortions required to get the tool in the right place to work.
There are times when I am working on the book manuscript when I just have to get up and do something physical for a change of pace. Because of the peculiar way I write, editing and massaging-together is often more fatiguing than the original creation of the first draft so I need a diversion and relaxation.

Last week I spent an hour or so at the lathe trying to see how thin I could turn a bowl. This concept interests me as I begin my re-immersion in replicating Japanese lacquerwork, a creative theme that will be prominent in the studio and on the blog for the foreseeable future.
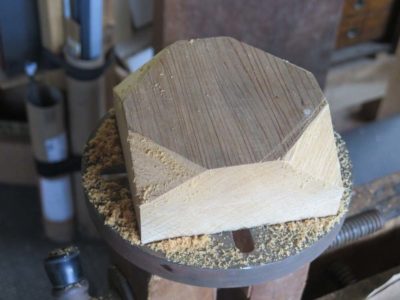
I had a block of c.1840 11/4 old growth cypress handy and gave that a try. I do not know why I had never turned the cypress before, it works like butter in the lathe. I left the face of the block square as I am trying to come up with a form that suits my fancy, and a square/turned bowl with a feather-thin edge is intriguing.
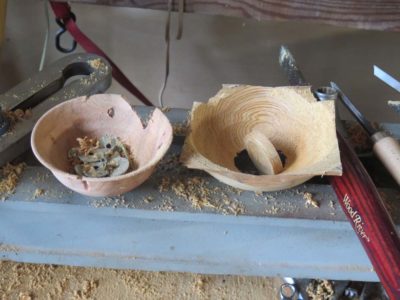
I found out that feathering the edge is not possible without reinforcing it somehow, probably by impregnating it with epoxy, or the edge will simply shatter as you work it. Ditto the base of the bowl where I did indeed find the edge of the envelope. I tried the a similar exercise with some figured plum stump I harvested 15 years ago. Same result.
Since failure is its own useful data point I now know I need to turn this form close to finished, then impregnate and finish up then. I will report back on those results.
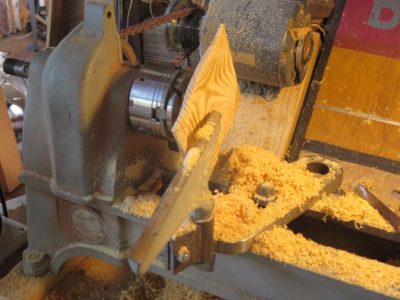
The next day I tried the exercise with a southern yellow pine scrap and also had encouraging results.

One of the peculiar and captivating phenomena of that attempt was the turning began to “sing” as the wall was thinned, sounding much like a crystal goblet when it is being played like a musical instrument.
Then, back to the Eames chair knockoff for more wordsmithing.

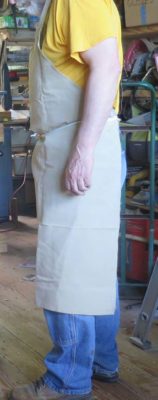
I am inclined to wear an apron while working in the shop, and my recent sessions working on the house while wearing my ancient Skiller’s vest (basically a wear-able tool box) have led me to reflect on shop aprons in general and the ones I had in particular. So, I took a couple hours to rectify my discontent with the aprons I had by making one to fit my own preferences.

Some of the shop aprons I have go back decades, and they look like it. Others are more recent, but all of them have shortcomings that led me to grouse about them silently almost every time I put one on. For starters, I like a shop apron that is really heavy weight. Second, I want the apron to have its hem well below my knees. Even more particular I want the apron to wrap all the way around the the back side of my leg. Admittedly it could be my physique that precludes this functionality (depending on your frame of mine I have either a “prosperous” or NFL linebacker- sized body).
These last two features, length and width, (or their absence) determine whether or not a shop apron is truly useful when I am working while sitting down.
The aprons I have encountered and own are so narrow that when I sit down to work at a low bench they creep up over the thigh and become little more than a wide loincloth, entirely insufficient for any apron-y task.

Recently I took an afternoon to begin making the apron I’ve always wanted but never found in the marketplace, at least not at a price I was willing to pay. I started with a large scrap of heavy linen canvas 20(?) years ago I had squirreled away “for just the right project,” and this apron was it. Using the apron I wore the most as a pattern, I laid out the new one to be of the same general ilk but almost a foot longer and more than a foot wider compared to the aprons I use normally .
I cut it out and folded over the edges about 1/4″ then hand sewed the edges. This took about two hours using a hefty needle and upholstery thread. Fortunately for me the linen was so heavily sized that it stayed put when I folded the edges over, making the sewing a snap.
Since I like my apron bibs “high and tight” I made the neck loop from some of the linen canvas scraps and sewed it in place to just barely have room for my head to go through it. With some linen tape I sewed on waist cords such that the apron tied in the front, another feature I demand.
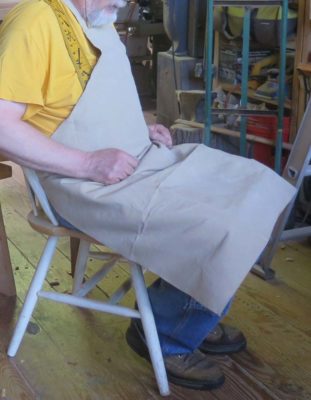
The added width was a particularly desirable feature as even when seated the apron covers my legs entirely.
Now I have an apron that meets my preferences, all I have to do is wear it for while to figure out exactly what pockets I need and where to put them. I’ll give this a month’s test drive then put on the pockets.
Stay tuned.
Between a lot of activities in the shop and around the homestead, I use a lot of disposable ear plugs for sound reduction. Recently I was getting ready to fire up some machine or the other and simply could not find my cannister of disposable ear plugs. No where. They had simply been beamed up by aliens or something. Admittedly I’ve been doing a lot of reorganizing and cleaning lately, but these are not something I would have put is an obscured location.
While not exactly desperate, I looked around to see what could be used as a sufficient substitute. Sure, I had cotton wadding in my finishing kit but that is not really an effective sound stopper, and yes I could use ear muff sound reducers which I also use regularly. Then something in my hardware store under the stairs caught my eye and the light went off. I tried it and quite simply it may have yielded the best ear plugs I have ever used.
Most earplugs do not fit my ears snugly, no matter how much I twist the rounded tips or shove them into my ears they always seem to fall out fairly soon after inserting. I have a little better luck if I turn them around the wrong way and insert the larger butt end of the plug, at least they stay put, but they still do not provide the hearing protection I used to get from the green hexagonal plugs from days gone by, the kind I have not been able to find for many years.
But these new ones? They fit my ears better than any others I have ever tried, and their sound reduction is at least as good.

So what were these new magic ear plugs? You can see in the picture. I took a coil of 1/2″ foam polypropylene caulking backer, snipped off a 3/4″ piece from the end, compressed it and stuck it in. Like I said the fit was the best ever and the sound reduction truly excellent. These are now my “go to” ear plugs, period.
And the missing cannister of ear plugs? In the locked gun cabinet, left there after my last practice session.
D’oh.
During (another) recent pre-martial-law episode of basement workshop archaeology at my daughter’s house I rediscovered a successful “proof of concept” prototype, a phrase I learned from my pal Ripplin’ John and have come to use with great regularity. I cannot even recall the particular project at this point, but only vaguely remember that I needed to do a lot of sanding in the winter, hence it would be inside. I needed a dust control scheme so efficient that Mrs. Barn would not even notice a speck of the dust upstairs, the basement steps ending/beginning immediately off the kitchen.
I had designed a downdraft table for dust control during upholstery stripping decades before and it worked wonderfully for the furniture conservation group I designed it for. In the intervening years downdraft sanding tables had become more common, but I did not have the space or need for one of these big units, 24″ x 36″ or thereabouts was all I needed. Pus, it had to be a benchtop unit given the restricted footprint of my basement workshop.
Being someone who rarely throws away anything that could theoretically become useful in the future I had almost everything I needed to build the unit. The only thing I needed to buy was a 24″ 48″ piece of pegboard from the home improvement center.
I had some nice scraps of 1/2″ tempered foam core sheet and made the box walls from them, sawing them on the table saw. I glued them together into the frame using hot melt glue. Double- or triple-wall carboard would have worked just as well. (One of the reasons I did not use wood walls was my desire for the unit to be ultra light weight; wood would have increased the weight several fold.)

I knew that my small unit, unlike the large downdraft tables, would need to have the air drawn from one end rather than from underneath so the internal air-flow volume had to be tapered, fattest at the end where the fitting was inserted to draw the air and very shallow at the other end. This tapered plenum provided a more equal air flow over (and through) the work surface of the unit, much like reduced/increased ducting controls the evenness of air pressure within air conditioning and heating systems. I found in practice the unit performed admirably in this regard.
The taper was achieved by gluing parallel strips of wood to the insides of the box fame, then stapling on a bottom of corrugated plastic sheet. Again, all it had to do was direct air and not support anything but itself.

For the working surface of the unit I simply cut and glued on a piece of pegboard, with only one cross rib in the center since the dimensions preluded any severe sagging given the pieces I was working on.
When I first set up my tiny basement workshop I purchased a larger-than-necessary cyclone collector, a machine that served me magnificently for all those years and remains the cornerstone of shop cleaning in the barn to this day. I cut a hole in the fat end of the plenum to insert the 3-inch hose fitting from the collector and the unit was done.

I am really glad I rediscovered this accessory and have kept it in my barn workshop since I do everything I can there to keep airborne dust to a minimum. I was recently using it to do some sanding and it still works great.
All it took those many years ago was a bunch of scrap materials and about an hour’s time to make. It was the perfect solution to the problem I had, and if you have an indoor space with the same constraints you might give it a try.

Recent Comments