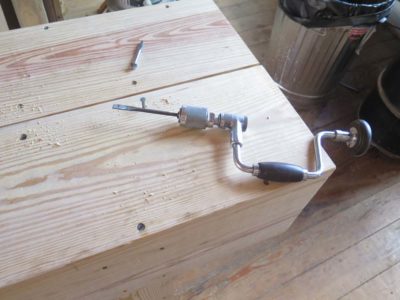
During (another) recent pre-martial-law episode of basement workshop archaeology at my daughter’s house I rediscovered a successful “proof of concept” prototype, a phrase I learned from my pal Ripplin’ John and have come to use with great regularity. I cannot even recall the particular project at this point, but only vaguely remember that I needed to do a lot of sanding in the winter, hence it would be inside. I needed a dust control scheme so efficient that Mrs. Barn would not even notice a speck of the dust upstairs, the basement steps ending/beginning immediately off the kitchen.
I had designed a downdraft table for dust control during upholstery stripping decades before and it worked wonderfully for the furniture conservation group I designed it for. In the intervening years downdraft sanding tables had become more common, but I did not have the space or need for one of these big units, 24″ x 36″ or thereabouts was all I needed. Pus, it had to be a benchtop unit given the restricted footprint of my basement workshop.
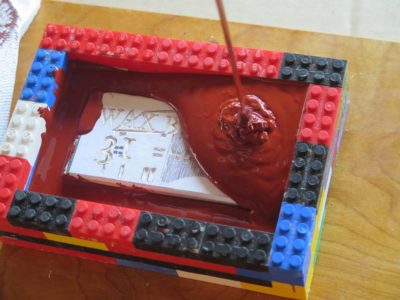
Being someone who rarely throws away anything that could theoretically become useful in the future I had almost everything I needed to build the unit. The only thing I needed to buy was a 24″ 48″ piece of pegboard from the home improvement center.
I had some nice scraps of 1/2″ tempered foam core sheet and made the box walls from them, sawing them on the table saw. I glued them together into the frame using hot melt glue. Double- or triple-wall carboard would have worked just as well. (One of the reasons I did not use wood walls was my desire for the unit to be ultra light weight; wood would have increased the weight several fold.)

I knew that my small unit, unlike the large downdraft tables, would need to have the air drawn from one end rather than from underneath so the internal air-flow volume had to be tapered, fattest at the end where the fitting was inserted to draw the air and very shallow at the other end. This tapered plenum provided a more equal air flow over (and through) the work surface of the unit, much like reduced/increased ducting controls the evenness of air pressure within air conditioning and heating systems. I found in practice the unit performed admirably in this regard.
The taper was achieved by gluing parallel strips of wood to the insides of the box fame, then stapling on a bottom of corrugated plastic sheet. Again, all it had to do was direct air and not support anything but itself.

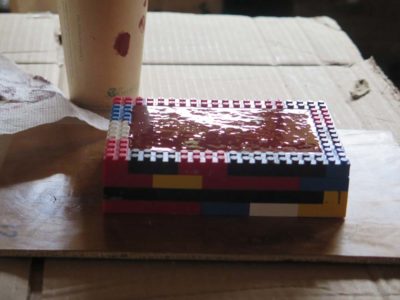
For the working surface of the unit I simply cut and glued on a piece of pegboard, with only one cross rib in the center since the dimensions preluded any severe sagging given the pieces I was working on.
When I first set up my tiny basement workshop I purchased a larger-than-necessary cyclone collector, a machine that served me magnificently for all those years and remains the cornerstone of shop cleaning in the barn to this day. I cut a hole in the fat end of the plenum to insert the 3-inch hose fitting from the collector and the unit was done.

I am really glad I rediscovered this accessory and have kept it in my barn workshop since I do everything I can there to keep airborne dust to a minimum. I was recently using it to do some sanding and it still works great.
All it took those many years ago was a bunch of scrap materials and about an hour’s time to make. It was the perfect solution to the problem I had, and if you have an indoor space with the same constraints you might give it a try.
This post is not exactly a “Workbench Wednesday” episode, but since it was an issue and solution that cropped up while building Tim’s Mondo Partner Nicholson Workbench I thought I would put it here.

Normally when I am building a Nicholson bench I slam it together with decking or sheetrock screws and a portable drill. I can usually get one built on a day that way. But with Tim’s bench, because of the setting for the final location of the bench, a restored 18th century log barn outfitted to be an 18th century workshop appropriate to the long-rifle making that Tim does, he wanted the presentation of the bench to reflect the 1780 Virginia frontier. Hence, no decking screws.
Instead I fell back on my old reliable supplier, Blacksmith Bolt and Rivet, who still provides excellent steel screws of the slotted-head woodscrew variety. The quality of these screws versus the usually crappy modern plated screws from the hardware stores makes them worth the effort to obtain and use. For starters, I generally find that about 1 in 25 of the modern hardware store screws actually rings off when I lean on them too much, and the metal is so soft that the heads get boogered up even more often during installation.
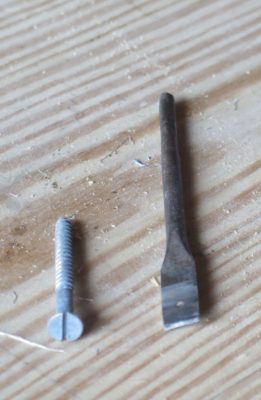
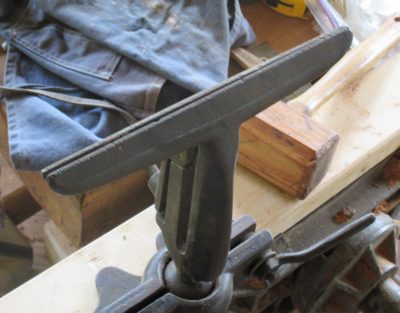
Using high quality slotted screws is not without drawbacks either. For starters the screwdriver tip has to fit the slot precisely in both width and length in order to get full efficiency in the driving. Plus, driving large screws by hand is a lot of work and in the case of Tim’s bench I was driving in over a hundred 2″ #14 screws.
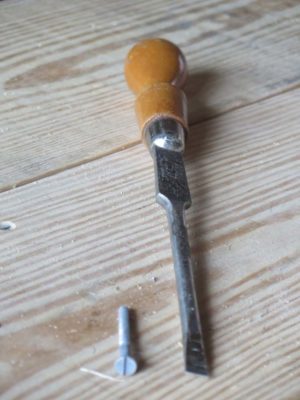
The screwdriver tips I had to fit into my brace were not a perfect fit to the slots of the screws I was using so I took fifteen minutes to make a new one that fit the #14 heads precisely.

I started with the oldest, raggediest 1/2″ wood bit in my collection, 1/2″ being the width of the #14 head. With my handy dandy Dremel-type tool (Craftsman, circa 1975 and still going strong) I took off the central tip of the bit.
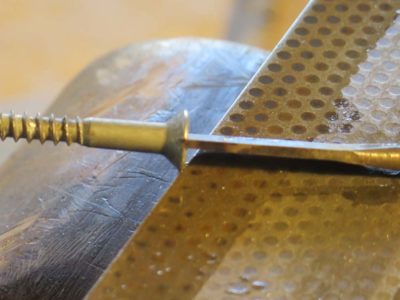
Using a grinding wheel followed by a coarse diamond plate I made the tip perfectly flat and the thickness of the bit to fit the slot exactly, so precise that it literally could be inserted into the slot by hand but still was snug enough to stay there.
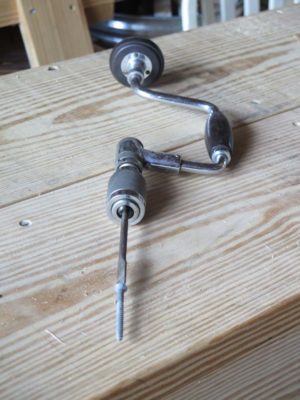
With this new precision wood screw bit I was able to drive the dozens of screws easily into the pre-drilled holes. All made possible by the fact that I did not throw away a decrepit drill bit.
For over 35 years I’ve been shopping at the same family-owned hardware store near our house in Maryland. In virtually every instance the experience has been a delight; they have one of just about everything, they know where it is, and they can explain how to use it. Besides, I can often get in and out quicker than I could find a parking space at the home improvement center. Sure, I pay a premium in slightly higher prices but that is a trade-off I will make every day and twice on Saturday.
What doe this have to do with the subject of today’s blog?
Well, the siblings that ran the store for most of my life had a vague idea about what I did for a living, but they mostly knew that I would buy stuff and use it for something other than the intended purpose. Like using powdered wallpaper adhesive to make a poultice to leech out a stain on some marble, for example. They were always entertained by my reports of how I used their products. They would often introduce me as “the guy who uses things for the wrong purpose.”
Recently I had a project wherein I needed to make a pile of bent aluminum flashing that was just smidge bigger than my mini-brake/shear could accommodate. Since it was aluminum I could have easily made it conform but I wanted the bend to be clean and quick.
As I was poking around for scrap parts to make a bending jig I actually bumped into the corner of my saw sharpening vise (it was a painfully memorable moment), and “Viola'” a light went off in the dark space between my ears.
I cut the aluminum roll into the pieces I needed with a square and a utility knife, and marked out the bending line.
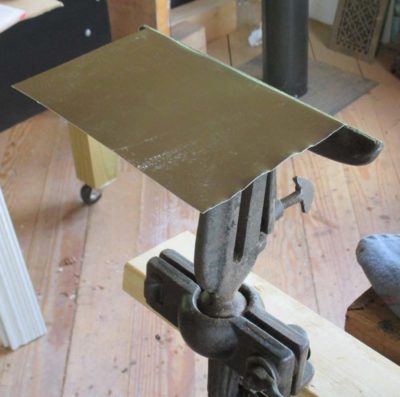
I placed the sheets in the vise with the bend line along the tip of the vise jaws and simply bent them with a scrap board.
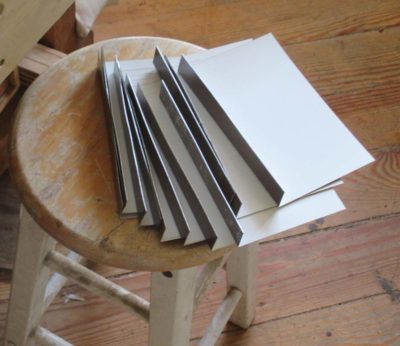
In about ten minutes I had the entire pile finished and ready for use.
I love it when a path to completion includes the route through the land of “for the not intended purpose.”
Late last fall while working on the cedar shingle siding for our daughter’s house my left knee began bothering me even more than usual, progressing to the point where four months ago I was almost unable to walk without a cane. (I damaged my knee in the summer of 1970 while trying out for football at my football- factory high school, a nonsensical undertaking since I was 5′-7″, 135 pounds at the time; it has ached ever since. But I was a punter, and even then was outkicking the first string varsity kicker. By a lot.) Mrs. Barn persuaded me to go to the doc, and that resulted in a month of bi-weekly physical therapy. The current probable culprit was a damaged meniscus and the PT and ongoing exercise regimen ever since has been helping, some days more than others. As long as I do not overdo things, like spending five hours rasslin’ the walk-behind bush hog on the hillside, all is tolerable.

The other day as I was doing my every-other-day hour-long exercise routine in the space I set up for that in the shop I got to thinking about warm-up exercises for shop work. Probably not too surprising I take a somewhat different approach than do many others. For example, it is almost holy writ among “real craftsmen” that you must end the day cleaning up the shop and putting all your tools and supplies away in order to have a fresh start for tomorrow.
For me and the way my temperament operates, this is pure bovine scatology. I hate cleaning up at the end of the work day, I am usually tired and it would only put me in a lousy frame of mind. I’m done at a particular stopping point and want to go down the hill for supper and some time in my reading chair. I’ll clean as need during the day, but at the end? Nah.
On the other hand I enjoy starting the day by cleaning up, sweeping, putting away, etc. I am not a morning person and work entirely alone so I find this time of productivity and meditation gets me into a good mood, energized and mentally organized for the activities of the day. That’s what I think of as my “warm up exercise” for the work day, both putting me in a good frame of mind and loosening up the aching old bones with the usually gentle movements of housekeeping.
But perhaps I am not a real craftsman, or at least you would not think of me as one since I am not enslaved to end-of-the-day cleaning up. I can live with that since I keep my own counsel and pretty much am generally not bound by what anyone thinks about anything. Just more proof my wiring is off.
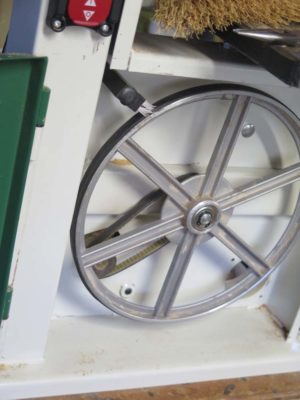
In addition to the earlier Rikon tune-up, consisting of a new lower tire, a new 1/4″ blade (although I am likely to supplant that with a 3/8″ blade) and tweaking the guides, I also recently re-installed the original rip fence augmented by a curved single-point resawing block. My own view of this setup is that a fixed rip fence is almost nonsensical on a bandsaw, given the almost inherent drift in the tool design. But, a band saw that is set up to rip and resaw well is a joy to behold.
Many, many articles and videos have been made about “truing” a bandsaw’s cut. Personally I find these a fool’s errand for the most part on a small-ish bandsaw if the end objective is to turn the bandsaw into a precision sawing machine. Sure, I stone both sides of the new blade when it is first running after being installed, to remove any distortion/excess at the weld joint. I also round the trailing edge of the blade with the stone while the blade is running. These two steps increase the performance considerably, but almost never result in a cut that is perfectly parallel to a fixed fence. One option in response to this, which I have used, demonstrated, and even included in a video, is to cant the fence to the degree of the run out.
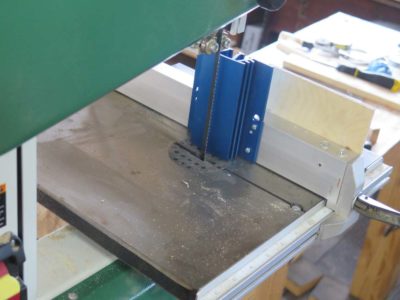
A single-point resawing block is a preferable solution, IMHO. Somewhere along the line I picked up a Kreg brand block and had it available to affix it to the original rip fence as illustrated.
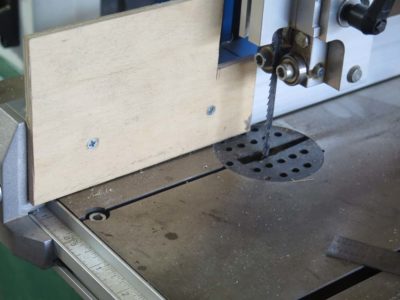
The beauty of the Rikon fence design is that I can have one side outfitted with a curved single point block and leave the other side with a half fence, which is also pretty usable (I have found that anything longer is useless on a band saw). I do not mind using both sides of the fence and thus cutting in two different orientations, one on the right side of the fence and one on the left side.
BTW, I notice that both Woodcraft and Highland have these little beauties on sale right now.


Part of my process of refining the raw “slum gum” unfiltered beeswax from the honey factory delivered in a case of roughly 6-inch thick slabs from the bottom of a five gallon bucket, involves a step wherein the coarsely filtered molten beeswax/hot water slurry (removing the bee bodies and gross debris) is poured through fine pasta strainer into a cake pan and allowed to cool undisturbed.
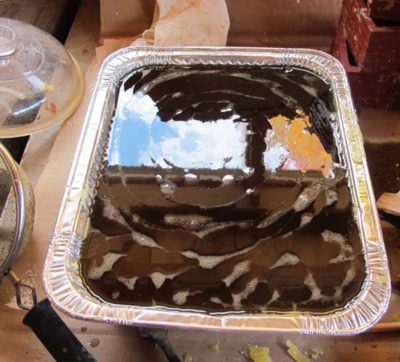

After cooling and decanting the water with any remaining water soluble adulterant, I am left with a big block of beeswax with a fairly uniform layer of sediment on the bottom face of the block. This needs to be removed before moving on to the next step of filtering.
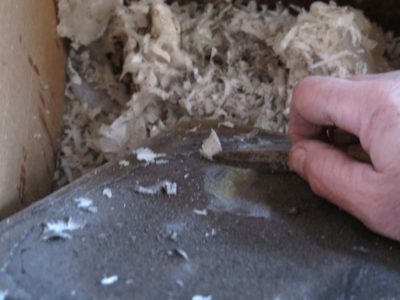
Normally I try to time the scraping off step for when the block of wax has cooled enough to be fairly solid, but still warm enough to be scraped easily with a large knife. There are times, however, when I do not get to this step soon enough and the block of wax with its accretions hardens fully. And with enough cold, it can get pretty hard. Scraping this is not impossible but it is some hard work when I am doing several of them at once.

Recently I had a great idea while rummaging through my “Giant Files” drawer and pulled out this little curved Surform tool. I found that for a fully hardened block, even one that is chilled and rock hard, it removes the precipitant easily and quickly.
That smack is the sound of my pam striking my forehead. Usually in just a minute or less the block is ready to be put aside for the next melt during which time it will be getting its final filtering from me before moving into Mrs. Barn’s domain and one final filtering before casting into blocks.
I love it when caprice like this happens.
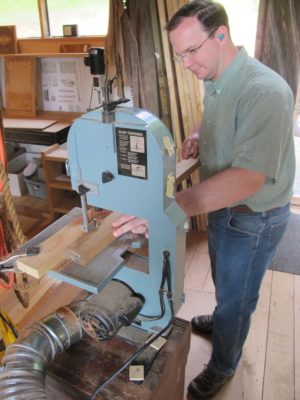
Recently I was corresponding with a reader who asked my opinion about bench top bandsaws, a preferred option for him because his career led to frequent moves. I answered him that I have two benchtop bandsaws I use frequently, one a 9-inch Delta bandsaw that must be close to forty years old by now, and a 10-in Rikon I bought about fifteen years ago from either Highland or Woodcraft, I honestly cannot remember. Each bandsaw has a critical role to play in my work, the Delta is my tool for sawing veneers for parquetry and the Rikon for pretty much everything else of modest size. (I also have a free standing Delta 14″ and a Taiwanese 14″ with a riser block for resawing.)
In the back-and-forth of our correspondence once I understood his situation I recommended he look into the Rikon.
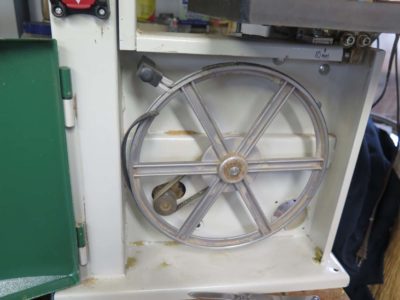
Some not-too-long-ago maintenance on the machine confirmed my overall impression formed several years ago that it is a superb tool. Last year during a workshop the saw broke a tire, and after setting it aside for the 9-inch Delta for the remaining days a new tire was on-hand and eventually I replaced the broken one.

Swapping out the tire was the easiest time for that task ever. After removing the retaining ring on the axel of the wheel and cleaning off the detritus of the tire I started the new tire at one point on the wheel then placed that section of the wheel in my Emmert metalwork vise and was able to install the new tire in approximately one minute.
Since I had the wheel off I gave the lower section a through cleaning then did the same to the upper section including scraping the upper tire with a boxwood carving tool with a knife edge to remove the accreted crust but not cut into the tire, then put on a new blade and readjusted all the guides so that it ran perfectly. Unlike my other bandsaws I have found that the factory originals work just fine.
I know that in the coming decades this might be my only power machine (along with a drill press), and I am confident that the little Rikon will serve me well. Even now I cannot think of any recent project that it could not have completed. Perhaps not quite as fast as some ther machinery, but it would get the job done. I keep a variety of blades on hand to use whatever suits the task best, and find that a 3/8″ blade suits me 95% of the time.
I’ve have recently added a nice standard feature enhancing the machine’s utility immensely.
Stay tuned.
One of the very useful tools for me is a desiccation chamber for drying out wet things, like uncured tordonshell, a fresh plaster casting, wet wood, or something similar. I achieve such a chamber by using either a Gamma pet food container or a five-gallon pail with a Gamma retrofit sealing lid. I load the chamber with desiccated silica gel and it is ready to do its work. Put something damp in there, tighten down the lid, and the moisture gets sucked out of whatever it is you are trying to dry.
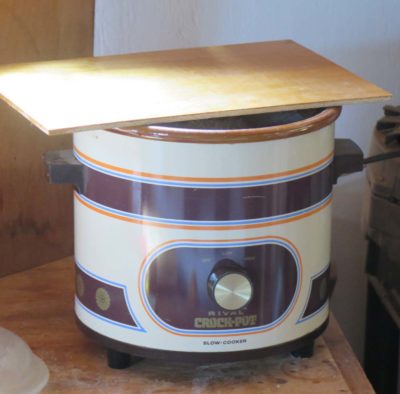
But the silica gel eventually gets damp itself, or at least adsorbs all the water being removed from the object in question. Fortunately silica get can be re-conditioned an unlimited number of times. My regimen for drying it out fully involves one of two routes typically. For much of the year I simply place a mass of the crystals into a slow-cooker and turn it up. In about 12-24 hours of cooking there the gel achieves a moisture content such that a sealed container holding it after cooling is at about 2-3% RH.
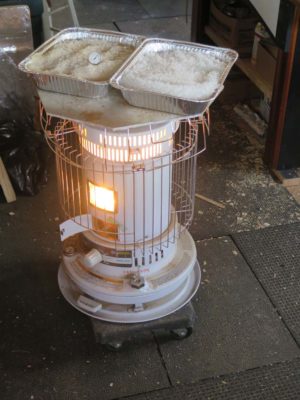
Another option for me in the winter is that I can dry out the gel in pans on top of kerosene heater I sometimes use to jump start the heat in the morning, or leave it on when the temperature is chilly but not yet frigid. I keep a plate of aluminum on top of the heater to increase the heating efficiency by integrating a large radiant plate, and this often serves as a tray for heating things in the winter. As with the slow cooker the total cooking time is somewhere between 12-24 hours, with the same 2-3% RH end point.
In either case, the slow cooker or the kerosene heater, I cover the batch overnight when I turn off the heat source, to prevent it from adsorbing moisture from the night air.
Silica gel can also be conditioned to a specific RH buffer but that is another topic.
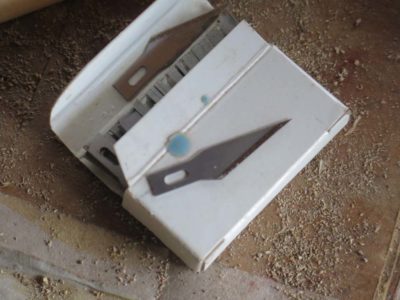
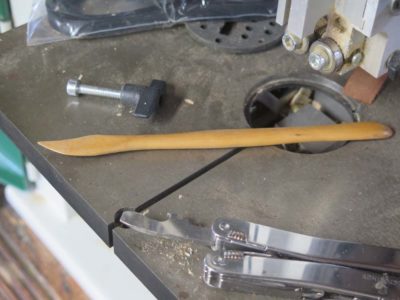
Recently I was sitting down ready to incise the pattern into the block that would become the pattern for the mold for making my soon-to-be-available Blend 31 block wax. It was at that moment that I realized I had put the handles for my detail knives someplace for some reason I could not remember. It was not that I had misplaced one of my handles, I could not find any of them, suggesting I had collected them for some purpose that I could no recall. Fortunately they will be found as soon as my task is completed.
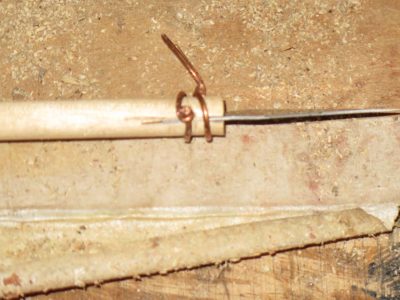
In the mean time, I needed a handle for the knife blades I needed to use. So I made one.
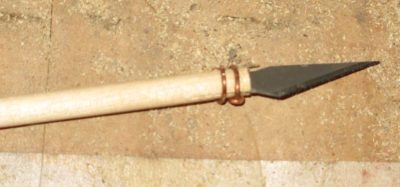
Taking a piece of dowel stock from inventory I sawed a small slot with a fine Japanese back saw, inserted the blade into that and bound it with twisted copper wire, much in the same manner as quill brushes. It worked just fine for the carving of the mat board that was the detailed surface of the block pattern.
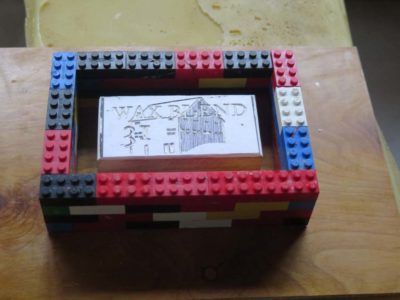
An hour later I had the design incised into the surface and the block was ready for making the rubber mold.
And sure enough, the box with my micro tools was found right after this was finished. Sigh.
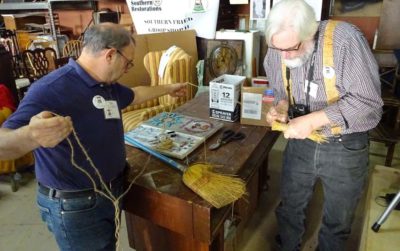
At the recent gathering of the Professional Refinisher’s Group one of the presenters was addressing a topic that would have fit seamlessly with the use of polissoirs. When I asked the host for his, I was informed it could not be found. I canvassed the group and none was to be found. Even I had not brought one with me! While I normally travel with my rolling Store for some reason this time I did not.
But with a little thrashing around and some yeoman’s help from TomD we made one that worked enough or the task.
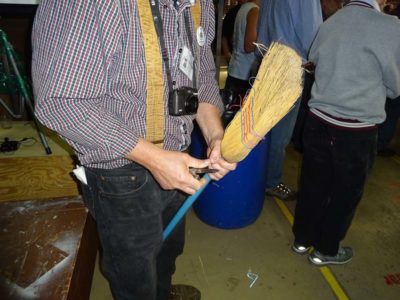
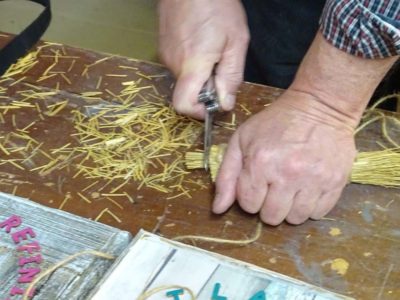
The starting point was the old shop broom, a roll of twine, and my dull Victorinox multi-tool knife (dull because I had cut some wire and had not sharpened it. My bad.)
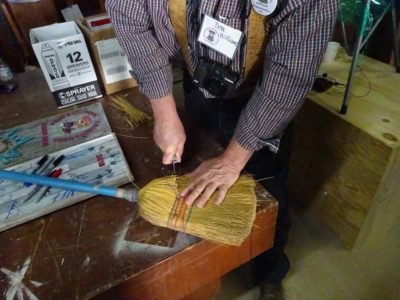

After cutting of some broom fibers we set about trying to find the string necessary. We could not find anything really robust, what we found was some soft twine similar to macrame yarn. So we used what we could find. (I think the broom went back to hang on its nail, ready to go to work albeit a little less effectively).
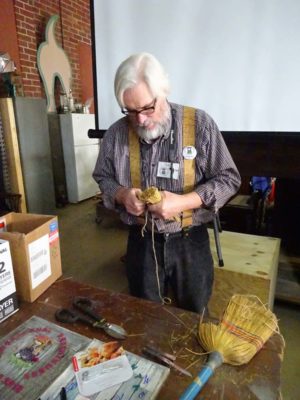
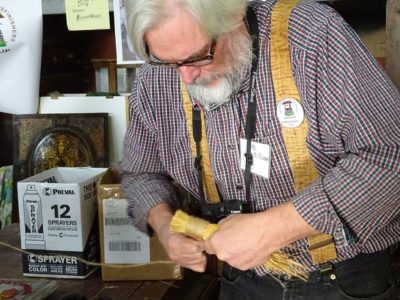
Working carefully, and celebrating the fact that my broken arm from two years ago has recovered almost all of its dexterity and strength, I started putting it together. My biggest challenge was trying to work right up to the limit of the tensile strength of our soft twine. Normally I use heavyweight waxed linen cord, which I literally cannot break by hand, resulting in a polissoir so tight it has a sharp sound when rapped against a hard surface. This undertaking did not yield such a result, but the polissoir was tight enough to serve well enough for the task at hand.
I trimmed one end and we put it to work.
I’ll know to never travel anywhere without a polissoir in the future. Note to self: when packing for a trip, it’s glaucoma meds, toothbrush, and a polissoir.

Recent Comments