While many artisans are content to work alone, as I am almost all of the time (an mp3 player loaded with podcast lectures and such is about all the social interaction I need during my work day), there are those magical interludes of fellowship around the workbench with a like-minded soul. Such is the case with my pal Tom, whom I first met by chance at a flea market ten years ago (he was selling, I was thinking about buying). That led to hundreds of Wednesday nights in his first-rate shop where a multitude of tools were sharpened or made, mountains of shavings were made then swept out into the yard, and on occasion, the world’s problems were solved.
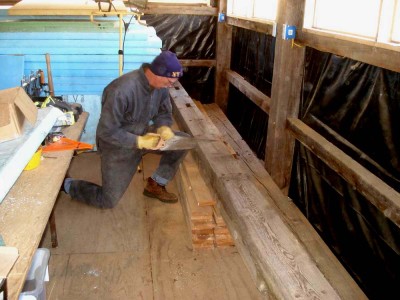
Tom even accompanied me frequently on working weekends to the barn, where what we were working on WAS the barn.
Tom visited recently, and is often the case, he tossed out an offhand comment that was a thunderbolt.
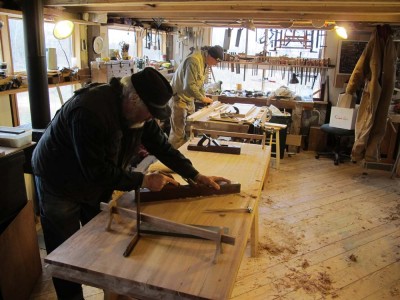
While he was making some tapered octagonal legs for a dressing table I had been wrestling with my HO Studley workbench top replica for the upcoming exhibit of the workbench and the accompanying tool cabinet. The grain of the bench surface, African “mahogany,” was just being, in the words of my ever foul-mouthed 98 year old mom, “A real stinker.”
Rob in Lawrence KS had offered his helpful observations, namely that I could use a high angled smoother tuned to a fever pitch. When I mentioned this to Tom with the regretful statement that I did not own such a tool, and that I was going to set things up to make one for myself, he casually remarked that there was a simple way of making a high angled smoother that might serve my purpose. When I tried it, I had to smack my forehead. Hard. The solution was both brilliantly insightful and mindlessly simple and best of all, easy. Coordinated problem solving like this is what woodworking fellowship is all about.
The solution? why, flipping the blade, of course!

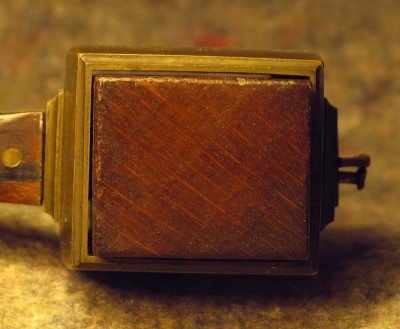
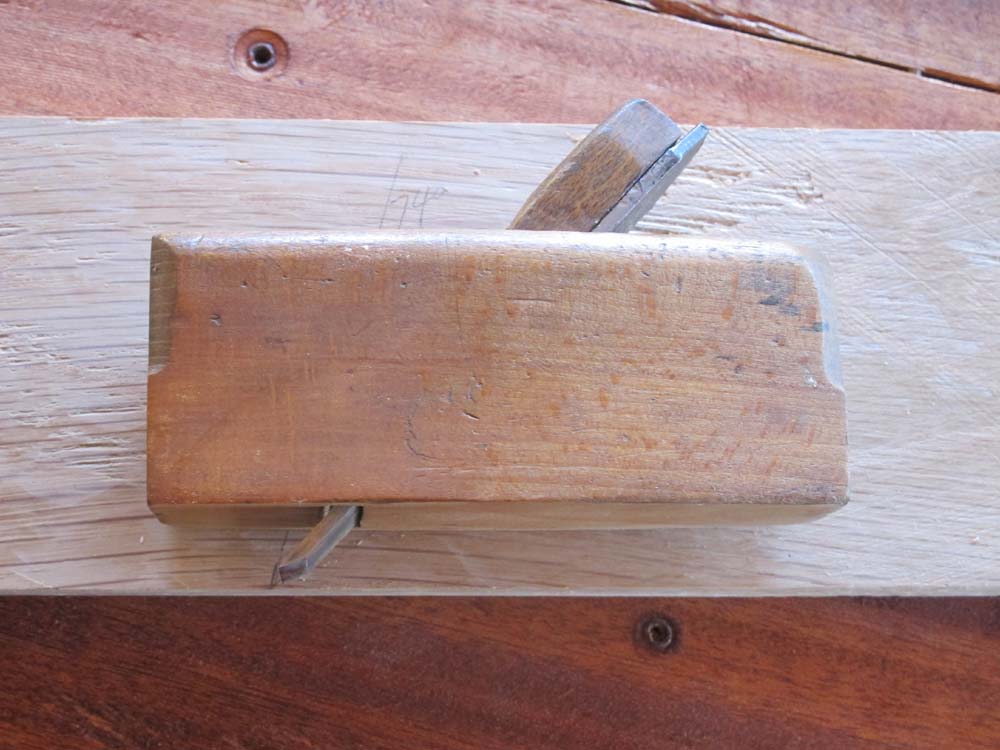
I first tried it on a tiny coffin smoother that I had, which was set up to cut at 49 degrees, but when the blade was flipped the new cutting angle was a bit too steep at 74 degrees. Yeah, a bit too steep.
I then looked through my collection of bench planes to see which of them might be a good candidate for this modification. I had a nice little coffin plane with a very shallow angle on the blade bevel. It is set up to cut at about 45 degrees, and simply by flipping the blade over I got a 62-degree cutting angle. Not the perfect setup, but way better than I had before.
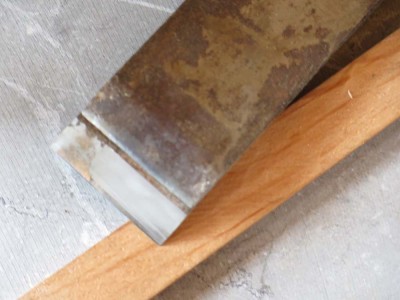

The new orientation turns the plane from a double iron bevel-down tool into essentially a single iron bevel-up plane. Yes indeed, I transformed one of my bench planes into a pretty nice high angle smoother in less than 30 seconds. For zero dollars.
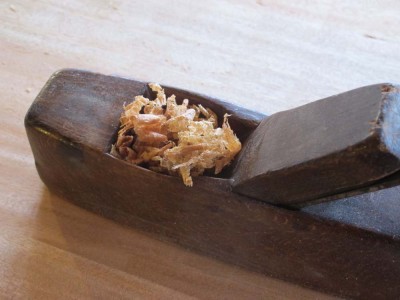
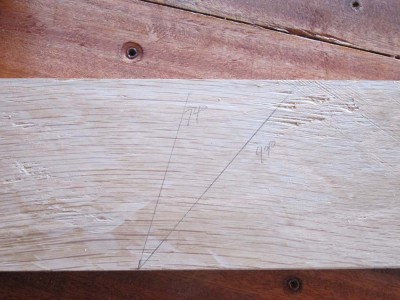
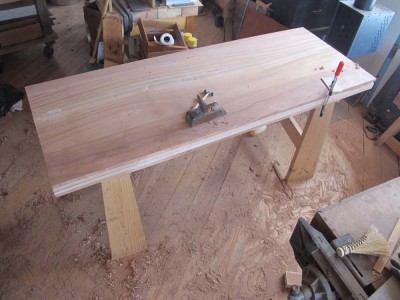
A couple minutes to touch up the blade on my 12000 water stone and the tool began its work. It wasn’t pulling off long, gossamer wisps, but did I mention I was planing African “mahogany,” a/k/a braided broom straw?
The result in the lower right corner of the image speaks for itself. Following the smoothing with a bit of scraping yielded an outcome that was acceptable, especially since after the exhibit I will be surfacing the bench top with a toothing plane. I remain committed to avoiding African “mahogany” in perpetuity, but for this one problem the result is in the right direction.
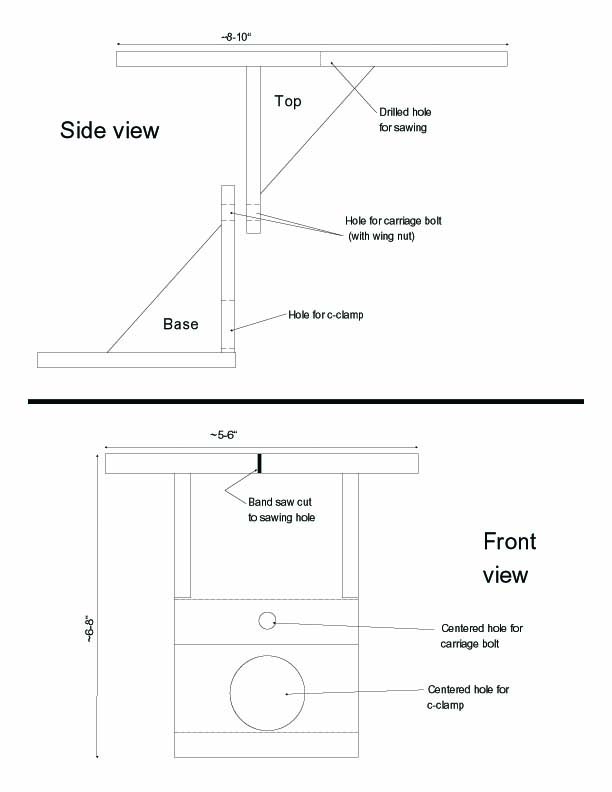
My friend BillF asked me to post the image and plan of the tilting saw bench I use for cutting marquetry with a jeweler’s fret saw.
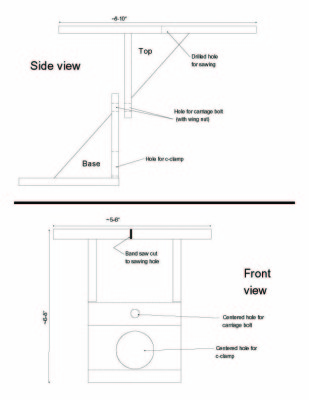
Okay Bill, here they are. I’ll see if we can get the PDF of the plan on the Writings page.
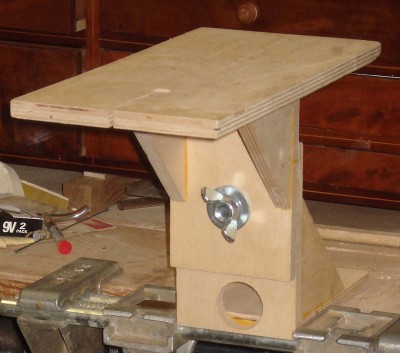
I think I first saw this tool in a c.1900 book on fretwork, and have since seen it many other places and books. I made a passel of these at one time, and have used and gifted them for years.
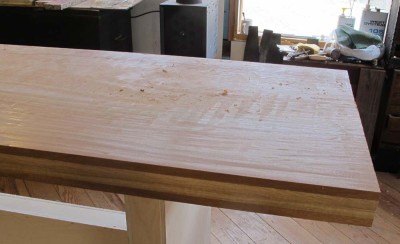
The slab for the Studley work bench top is all glued up and trimmed to size, and slid off my workbench onto a pair of horses for further ministrations, and just in time as I need my bench space to finish up a large group of sample boards for a luncheon presentation I am making soon for an architectural/decorative arts finishes assembly.
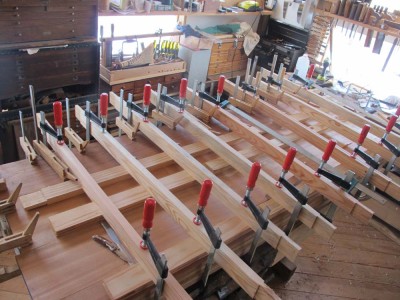
I have a lot of clamps, but not enough for me to affix the final top lamina of the bench in one step, so I first glued on the first half, then a day later the second half.
The slab is a beast, and I would estimate its weight at about 175 pounds. My version is about 1/8″ thicker than Studley’s, giving me a little bit of room for planing and finishing. The edges will be installed once the wheel-handled vises are attached for the exhibit, which will turn the top into a 500-pound behemoth.
From this point on I will be planing and finishing the top. Due to the time and budgetary constraints on my side, I selected something called African “mahogany” as my face laminae over the white oak core. As I mentioned earlier, it looks beautifully similar to the true mahogany that Studley used for his tool cabinet and work bench, but works like a composite that would be the result of making “wood” out of straw and donkey dung. It is the nastiest stuff I have ever worked, and I can state with a fair degree of confidence that this will be the first and last project to employ this “wood.”
Planing it is a challenge. I touched it with my “go to” low angle smoother and got horrific tear out. That took me back on my heels. Hmmm. So, I switched to my favorite toothing plane, and got tear out with the toothing plane as well! I mean, I have never had tear out with that toother. I backed off the blade a bit and had some success, and today I will touch up the toothing blade and proceed, but it will be slow even though the surface needs very little work.
The next challenge is to resharpen my smoother to use after the toother, or conversely just tooth it overall and go straight to the scraper for the final surface.
Sty tuned.
Cosmologists assert that the four phenomena holding the Universe together are 1) strong inter atomic forces, 2) weak inter atomic forces, 3) gravity, and 4) magnetism. Which shows how little they know, as somehow they overlooked 5) duct tape, and 6) shellac.
What has this got to do with The Barn?
Well, nothing actually, but it does lead me to another fundamental phenomenon of the Universe, namely inertia: a body at rest tends to stay at rest, and a body in motion tends to stay in motion. For the purposes of this post Chris Schwarz and Joe McGlynn fall into the latter camp, I in the former. These two guys seem to be the very definition of peripatetic. I am, shall we say, more contemplative. Yeah, that’s the word, contemplative. (“Lazy” was so much less mellifluous).
One of the things I really like about my studio in the barn is a dedicated sharpening station, and thanks to the inspiration of plane makers Konrad Sauer, Raney Nelson, and Ron Brese, and inventive scrounging genius Mike Siemsen I have long recognized the utility and hence have desired an elegant lapping plate for that work station. Recently I was at the building recycling center and saw a stack of granite splash boards, probably from a kitchen where the users finally came to their senses and had the granite ripped out in favor of some nice butcher block wood slab counters.
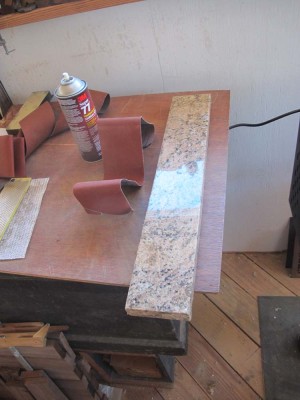
Anyway, I selected two pieces that fit my needs, and they were a whole fifty-cents apiece. They are 4-inches wide and 24-inches long, which makes them a perfect fit for 4×24 sanding belts for a portable belt sander. yes, I do own one; I have found no better way to sharpen lawnmower blades.
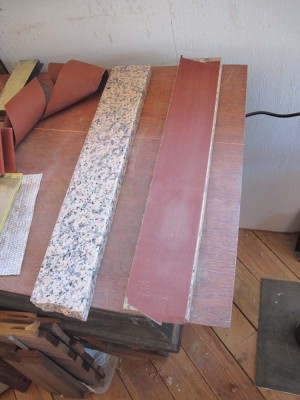
Using the polished granite surface as my base, and spray adhesive as the binder, I first tore the sanding belt once crosswise, then applied it to the granite. Voilay! An instant lapping plate. Given my two pieces of back splash, I can mount four different grits of sanding belt simultaneously, so regardless of the delicacy of the task I am ready to roll. Or lap, as the case may be.
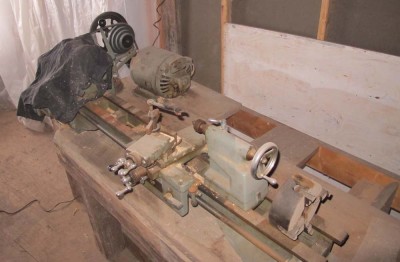
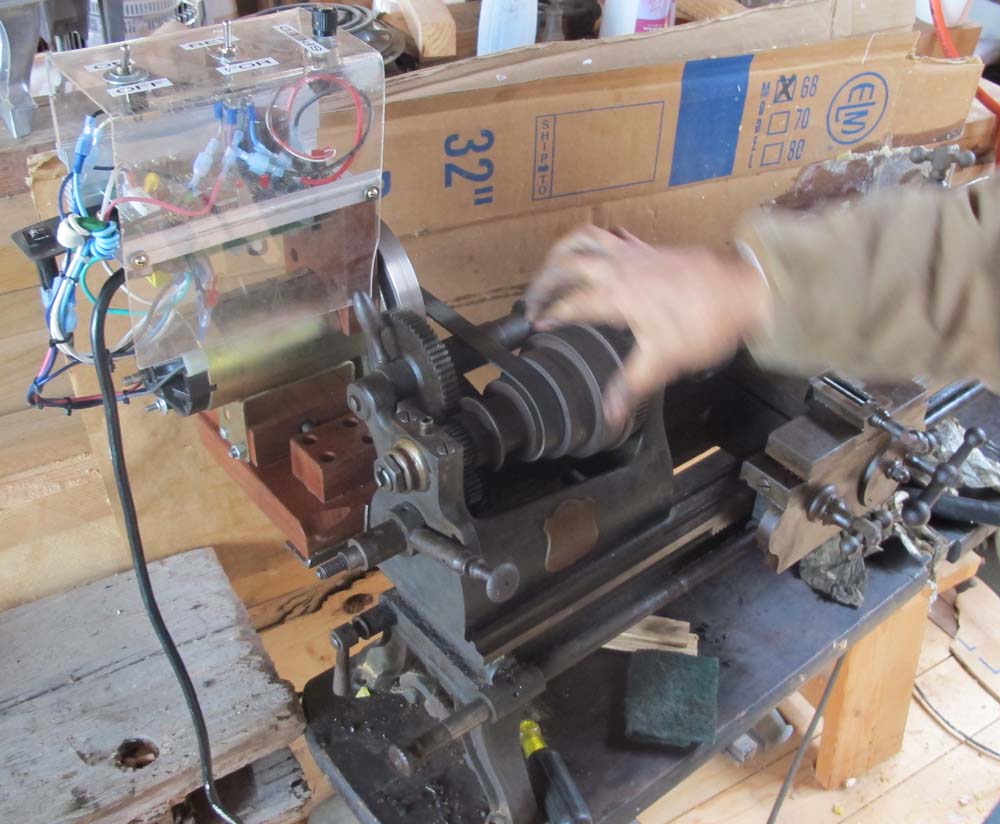
Not too long ago I wrote about the new antique lathe now residing on the main floor of the barn. My friend Jersey Jon took it on himself to get the beautiful unit tuned and running. It is good to have friends like that.

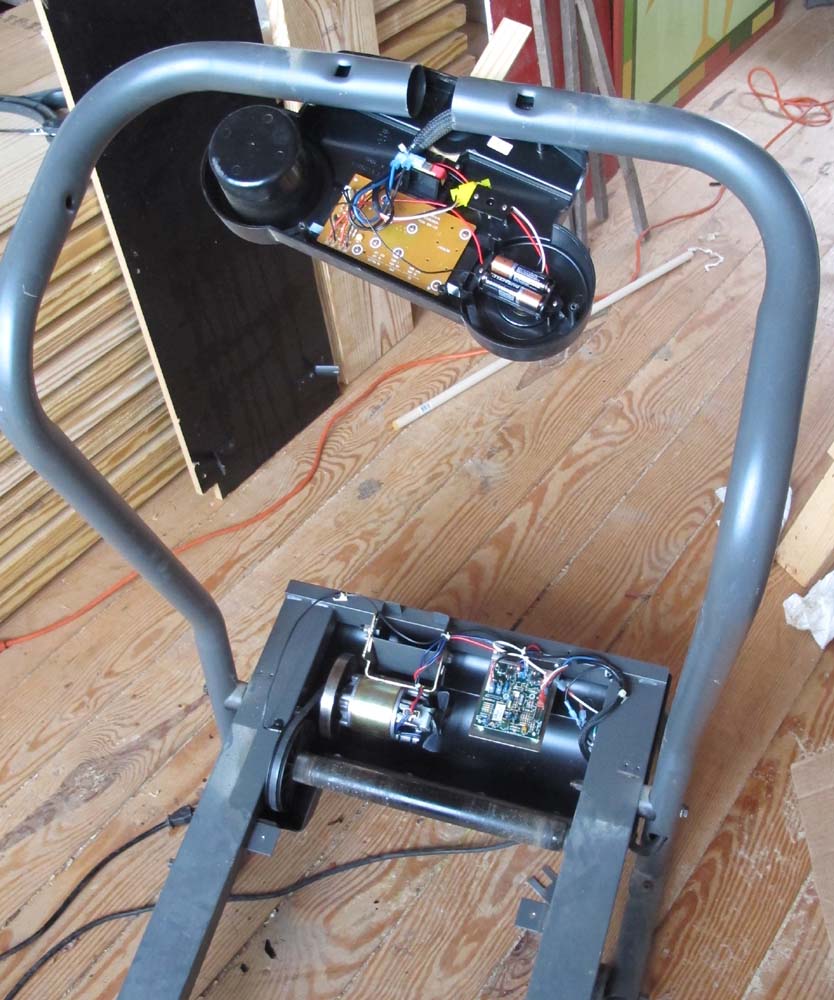
One of the things that Jon stressed was the value in using a new power source for the old lathe, and it is a sermon I have taken to heart. It causes reflection on the fundamentals: to power many kinds of machines, like lathes and milling machines, for example, you need a lot of torque and the ability to alter the speed of the cutting tool. Hmmm, where to get a simple system of high torque variable speed power source. Why clothes racks, a/k/a treadmills, of course.
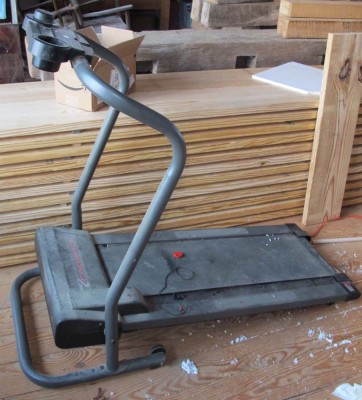
Last month I was downtown at the electronics store and walked by the thrift store for the animal shelter and there it was — an aged treadmill on the porch of the thrift shop. I asked, and they had no way of knowing whether or not it worked but they wanted it gone. I made that happen with a small donation.
Back in the shop I also had no way to know if it worked until I made a new key to replace the broken one for the unit, put new batteries in the control panel, and made sure that the breaker switch was set properly. I got all that done today and turned it on. Yes indeed, the thing works!

What prompted the precise timing on this was spending a couple of days working down in the machine room/foundry, trying to impose some semblance of order there, as it has been sitting essentially untouched for more than a year. I’ve got this wonderful Atlas machinist’s lathe, but the drive mechanism has this monstrously huge 3/4 HP motor (literally much larger than a basketball and about 50-60 lbs) and a whole set of pulleys and such that were such a pain to work with.
Depending on my schedule, I hope to swap out the old drive system for the new one by the end of the month (it is not the highest priority at the moment…). I dismantled and removed the old one this afternoon, so I have passed the tipping point. I suspect I may start scouring yard sales and thrift stores for more such clothes racks.
Stay tuned.
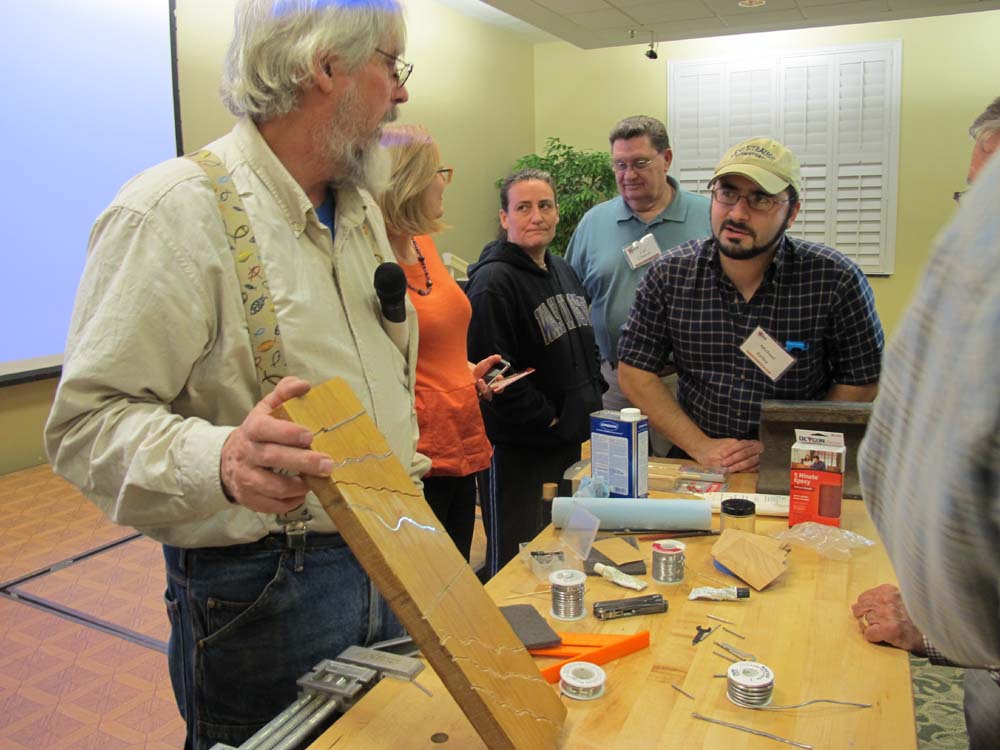
Last week I finished writing my latest article for Popular Woodworking, titled, I think, “Decorative Wire Inlay.” Tomorrow morning I will finish the photography for it, then move on to the next projects in the shop, the list of which is formidable.

I demonstrated the techniques of decorative wire inlay in my presentation to the Washington Woodworker’s Guild last autumn.
This was the final opportunity I had to examine the H.O. Studley ensemble prior to submitting the manuscript. The next time I encounter Studley in person will be after the book is out, and I show up to pack it for shipment to the exhibit. With that in mind I showed up for a full week of final exams, complete with many pages of notes and hints of things to check out. Armed with my measuring tools, lights, camera, notebooks, microscopes, and laptop I set to work.
I had three days to myself with the chest before Chris and Narayan showed up on Wednesday night for the final “formal” photography and video sessions. Highest on my “Things To Do” list was to examine as closely as possible the tools I believed were the product of Studley himself. Sure, I already had thousands of photos in my camera and dozens of pages of notes, but are these ever really enough? Did I overlook anything?
Sure enough, even at this late date after two dozen days of examination prior to this episode, I discovered some jaw dropping stuff.
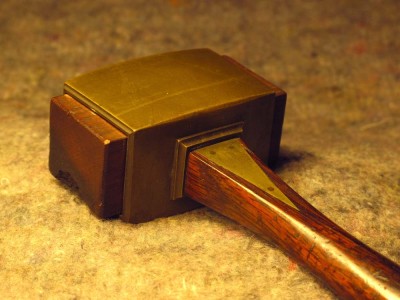
For example, the head of the mallet is a single piece of sand cast brass. A. Single. Piece. Folks, that is just showing off.
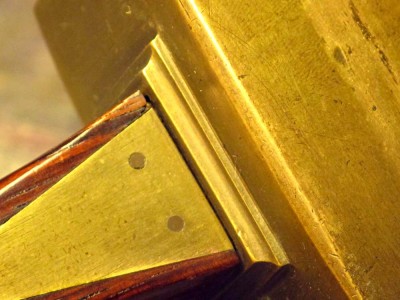
The moldings on the faces and around the collars are integral to the casting, not pieces brazed on. Being from the patternmaking/metalcasting trades myself I know how he did it, and that makes it all the more spectacular.
One of my goals for this final trip and this coming winter was to document tools enough that I could replicate them and have those replicas in the exhibit “The Tool Cabinet and Workbench of Henry O. Studley.” I had already mapped out the strategy, workspace, materials, and a series of blogs on the subject of cutting, brazing, finishing, and assembling this magnificent tool.
I still have that plan, although now all I have to do is change my strategy, workspace, materials, and the concept of the blog.
Henry, Henry, Henry, what am I going to do with you?
Among my recollections and acknowledgements from the recent MJD auction is to thank again Martin Donnelly himself for encouraging me to spread the Studley Exhibit gospel among the attendees. From the auctioneer’s podium at the initiation of activities, he announced the exhibit, pointed me out by name, and encouraged attendees to speak with me about it.

Martin also welcomed the stack of announcement post cards I’d brought with me, and they were right next to the sign-in station the whole weekend. (If you would like some to share and help promote the exhibit, just drop me a line via this web site’s “Contact” function and I will try to get you what you need.)
Like I said in a previous post, there are an awful lot of great folks in the tool world, and Martin Donnelly is certainly royalty in that world.
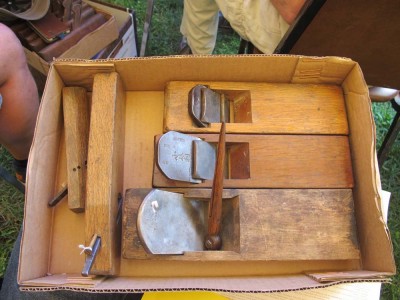
After having been shut out for the first 4/5ths of the auction I managed to snatch two lots late on Saturday morning. I’ve already mentioned the Lamson machinist’s lathe I got but I also garnered this nice lot of Japanese planes and a really neat bamboo divider. The largest plane had never been used, but the others were well polished, both wood and cutting edge, by multitudes of handlings. I can’t wait to get them all up and running and integrated into my activities in The Barn.
As always you leave events like this with a mixture of aggravation at not getting what you wanted and exhilaration at getting some things you didn’t expect.

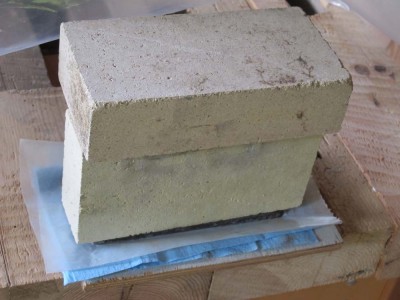
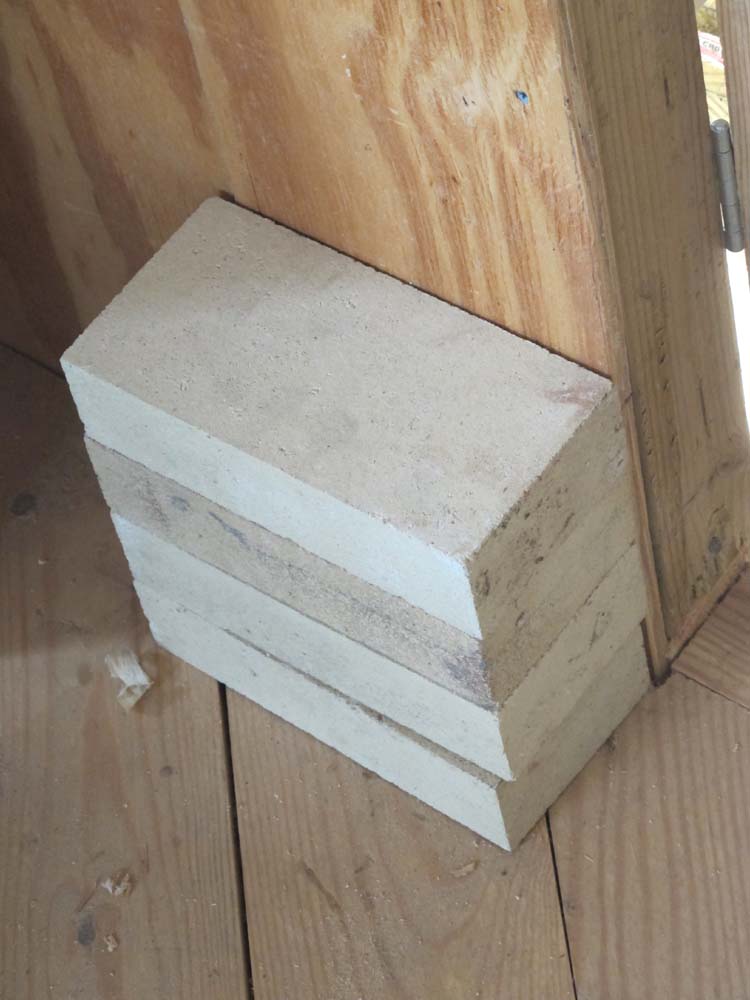
A recent visitor to the shop noticed a stack of bricks next to the door.
“What’s with them?” he asked.
Actually I find nice clean bricks to be useful in a multitude of ways in the shop, but perhaps none is more valuable than acting simply as a clean, dense, dead weight when I need to glue something but don’t need any more clamping power than to simply hold something in place while the adhesive dried.
Here is a small irregularly shaped piece of broken iron that I am epoxying back together. There is no real way to clamp it even if I wanted to, so simply aligning it on a sand bag and letting the brick hold it steady and all is well.
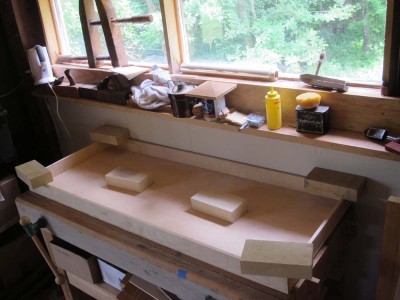
Or, when assembling a large-ish panel, they do the trick wonderfully; just hold everything steady for a while.
Bricks also are a source of nearly identical spacers and I use a brick or several at least one time a week. An old friend actually glued felt on the sides of bricks and used them as weights ween on finished surfaces.
A final use that warms me, literally, is to sit a pair of bricks on top of the kerosene heater in the winter. They get hot and radiate heat wonderfully into the space, increasing the output efficiency of the system.
I’m partial to firebricks myself and am still using the pile I bought twenty years ago.

Recently my friend Bill wrote me to ask if I had any thoughts about portable workstations, as he was about to embark on a project requiring him to work in the gallery of a museum.

photo courtesy of Joshua Klein
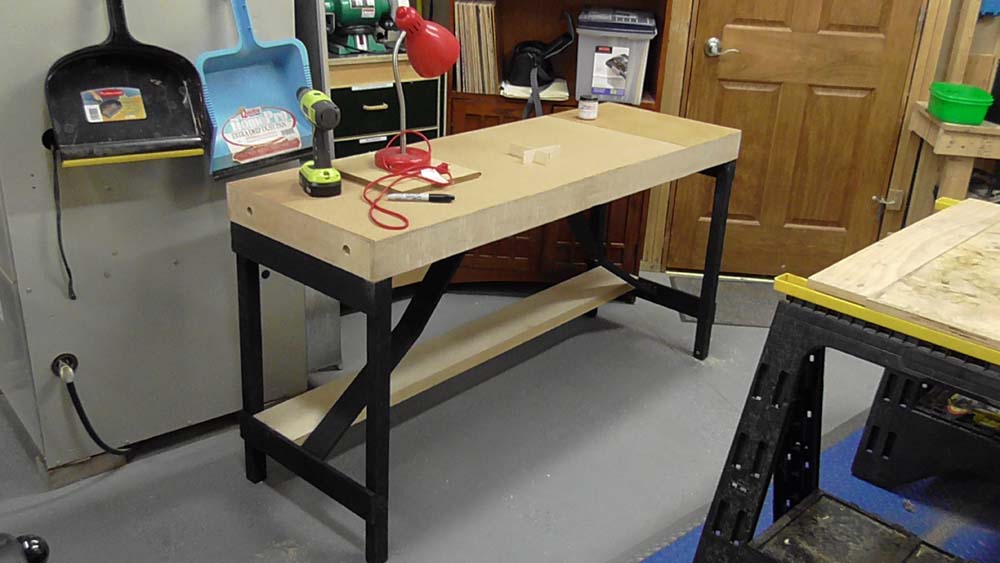
I was able to help him, and in fact together we built a new bench for him to serve his purposes. I enjoyed it so much I built myself yet another one and am documenting it in great detail here.
Note: Like the “Parquetry Tutorial” this entire series of blog posts will be edited and packaged for download as a complete PDF once I have finished it. WordPress is being obstreperous about the spacing of this post, but it will be corrected in the PDF.
Working as a furniture conservator requires me to frequently work “on-site”, that is, I go to the furniture rather than bring it to my studio. There are many reasons for this; the legal liability of transporting very valuable objects, the cost of renting a truck and hiring someone to help out (I usually work alone), the ability to call it quits at the end of the workday, etc. Regardless of the reason, I often found myself working in unfamiliar, and usually unequipped, surroundings.
Thus, several times a year I would move lock, stock and workbench to a new location. Loading and carting big sawhorses, plywood sheets and cardboard boxes full of supplies to the new site is a truly odious activity. Over the years of scraped knuckles and bashed shins carrying sawhorses and plywood up or down three flights of tight, winding stairs, I vowed to find a better way of setting up a temporary work station. Obtaining the perfect portable workbench was my original goal, but by the time I finished it turned out to be just one of several aspects to my quest.
In the end, that process of finding a “better way” resulted in the design and fabrication of a new workbench to make the task of working in a portable studio more manageable and productive. Through several generations of prototypes over twenty years I have it now refined to the point where I am not sure what more there is to improve.
What did I want?
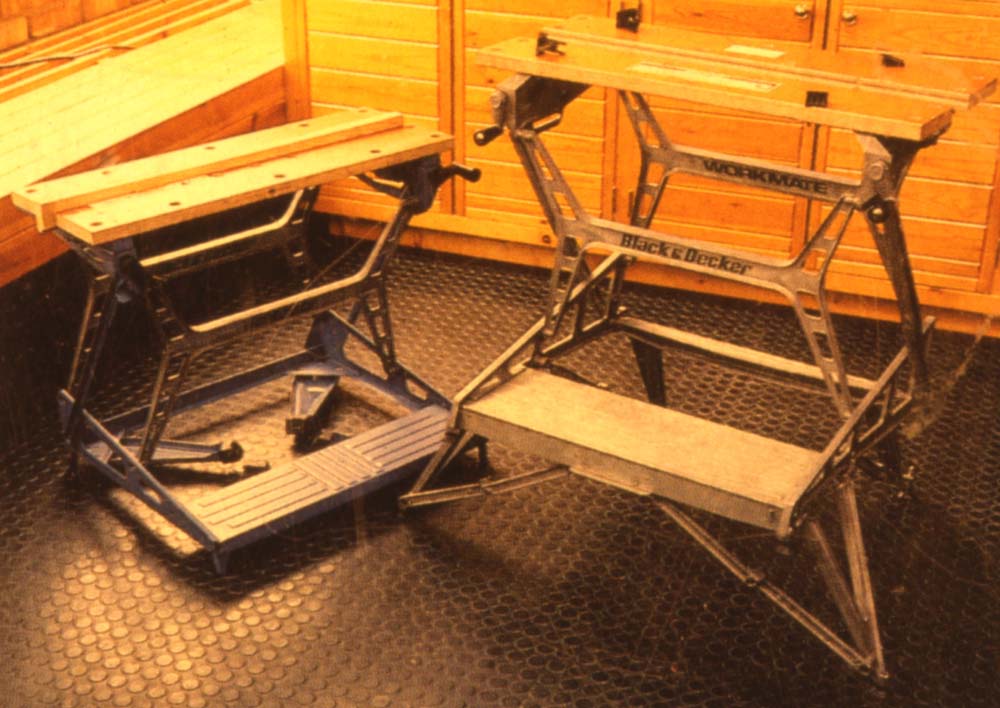
The only thing I was sure of was that my sawhorse and plywood routine had to go. But what arrangement was to take its place? My first step was to acquire a suitable workbench. Being a lazy fellow, my first actions were to look around at the market to see if any of the available “portable” workbenches were suitable. I discovered only two real options; a small version of the European-style butcher-block-top bench, or a Workmate. I looked at a couple of the former, and own one of the latter.
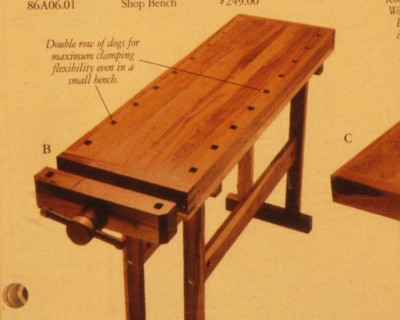
I found the portable Eurobenches to be too small and unsteady for my use (and quite frankly, too “cheezy”). In addition, they still weighed-in at over 100 lbs., simply too heavy.

I tried my Workmate on a couple of projects, but it wasn’t exactly what I really wanted because it was too top-heavy and the work surface was too small. My search for a manufactured bench to suit my needs wasn’t exhaustive, but nevertheless, in the end I decided to design and build my own portable workbench.
The process of attempting to procure a new portable workbench began with the question of exactly what I wanted out of the bench, regardless of its source. When I decided to make my own, I had only to review those requirements and build to fit them. But back to the original question; what were my specifications for the bench? The answer was simple; 1) the top had to be perfectly flat and at least 2’x4′ (any smaller and I might as well stick to my Workmate), 2) it had to have an integral large capacity vise sturdy enough to take a modest beating, 3) the bench had to be very light, compact, and easy to set up and take down because I didn’t want to have to assemble a kit each time I moved, and 4) it couldn’t cost a fortune in time or money to acquire. It was also important to remember that the bench wouldn’t have to stand up to immense weight or stress, since the pounding necessary during general joinery is rarely required in a conservation project. Any heavy work dictated by a particular treatment would still have to be done at home.
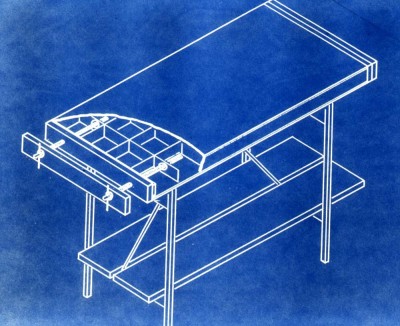
The bench I ended up with was not an example of exquisite handworked joinery, but it did require precise machine woodworking .
In the next episode I will begin to walk you though the step-by-step process of making one for yourself.


Recent Comments