The purpose of the trip was to gather information in support of writing VIRTUOSO: The Tool Cabinet and Workbench of Henry O. Studley, but the schedule of the trip was dependent on pretty much one thing – the availability of Peter Hardwick, whose family owned and preserved the Studley ensemble for over seven decades. Although we had communicated by phone and email several times, including two fairly formal phone interviews, I was anxious to meet him in person. My admiration is such that the book will be dedicated in part to Pete in recognition of his family’s stewardship of this national treasure.
I had hoped to visit Peter on my first research trip last February, but somehow we never managed to make the connection. That made the anticipation for this meeting all the greater.
So I departed Greater Boston for our afternoon and evening of fellowship. Bless the good people of New England; there seems to be a near-universal disdain for road signs. Originally I thought it was just a New Hampshire thing, but it is pretty clear to a newcomer to New England that if you do not know where you are going nor how to get there, they would just as soon have you stay home. Pete and I arranged to meet at the local Post Office, otherwise I might still be wandering around the countryside or at the bottom of a pond somewhere.
The story of the Hardwick family’s interactions with H.O. Studley, and eventual acquisition and stewardship of the tool cabinet and workbench is captiviating, but the lacunae in the family traditions makes the tale ever more puzzling. Some of the story is the stuff of historic melodrama (Studley was a prisoner-of-war in Texas during the second war of secession), with a dash of television mysteries (a murder is featured prominently in the ensemble’s history), some fairly mundane details (it hung on the wall of Peter’s great uncle’s office for years), and some of the circumstances are downright head-scratching (read the book). I intend to tell as much of the story as Pete allows, but my desire to celebrate and respect the Hardwick family is paramount.
For hours Pete and his lovely wife and I talked while snacking at the dining table, walking around the homestead (we have some very strong similar interests in this regard), and later over dinner. We actually spent more time talking about Pete’s love of hot rods and antique cars and the world at large than we did of Mr. Studley’s heritage. By the end of the evening I felt as though we were long-lost friends.
I am planning a return visit next autumn with my wife. I am certain she will enjoy the Hardwick’s companionship as much as I did.
The second and third days of the whirlwind tour were a testament to the diminutive size of New England. Having driven to and from south Texas a month before (35 hours of driving each way), it was a bit of a shock to get from one place to another in an hour or two.

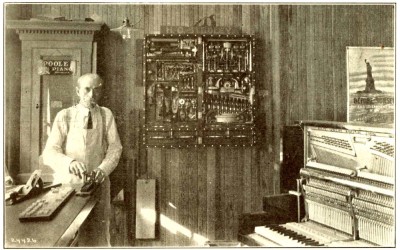
I began this leg by going from southern Rhode Island to the northern end of Cape Cod, a drive I guessed would take four hours. I forget that the maps in the highway atlas are not all the same scale. An hour and a half after shoving off I pulled into the driveway of PhilipH, whose elegant new workshop houses a fairly traditional furniture-maker’s bench with a piano-maker’s face vise in the typical left side position.
Again, Philip’s vise was of the similar form and function – integrated casting, sliding drawer platen, 9-1/4” wheel, ~16″ opening distance — yet retained some unique features. The enigma of these vises grows the more I learn. There were a couple of numerical markings on the vise, but nothing else to provide clues as to who/where/when it was manufactured.
A couple of hours and about three dozen photographs later we wrapped up our work for the day, and following a delightful hike through a nature preserve we returned for dinner.
The next morning I left with the intent of a short visit with Peter Follansbee at Plimouth Plantation. I spent an enjoyable hour with Peter, and the subject of the Lie-Nielson tool confab that day at the Connecticut Valley School of Woodworking came up. Being from non-New England I assumed it would be too far to get there. Peter assured me that my path would take me within an hour of CVSW, so off I went. I’m really glad I did.
At the tool event I had a chance to chat with Matt Bickford, and an enriching almost-hour of chatting with tool-history-researcher extraordinaire Jeff Burks (who took this picture of me with the Lie-Nielson folks), a frequent contributor to Chris Schwarz’ blog. Jeff has a keen interest in the development of the woodworking vise, and is turning his razor-sharp eyes and mind to the peculiarities of the piano makers’ vise. I can hardly wait to see what he will turn up.
Departing CVSW I made it back to the I-495 loop around Boston for the evening rush hour, but still made it to long time friend BruceH’s house north of the city in time for dinner and delightful fellowship with Bruce and his lovely wife Renee. Bruce is a superb furniture restorer from whom I have learned much over the two decades of our friendship. His elegant, compact shop is under the house, and he has made his living there for almost three decades.
I have just completed a whirlwind trek around the alien planet called Gnu Ongland or something like that, in a quest to gather more information about the life and tools of Henry O. Studley as I get myself primed for completing the manuscript for VIRTUOSO, my book about Studley’s tool cabinet, his tools, and his workbench. As you may know, I have become what some folks would call “obsessed” with the style of workbench vise found on Studley’s bench. I am not obsessed, I am merely hyper-interested.
My first in-person encounter with this style of vise – I now know is referred to as a “piano-maker’s wheel handled vise” — was when I entered into the presence of the Studley ensemble for the first time three autumns ago. Admittedly I knew little about this tool form, and have been trying to resolve that shortcoming in the intervening years. Since then I have learned of almost twenty examples of this vise, many of which have a provenance founded in the piano-maker’s trade. For the rest, I simply do not know of the history for the vises.
This trip was primarily to examine and photograph a half dozen of these vises, the genesis of which is, at this point, mostly unknown. An earlier trip last winter was for the same purpose. One of the truly intriguing elements of this quest is that these vises are all “of a type” yet no two are identical to each other. None have any maker’s marks, although a few have some inventory (?) numbers stamped on them.
There are clearly two general types of wheel-handled piano vises; end vises and face vises. While they appear alike on the surface, they are different underneath. With each one slightly different than all the others, a number of questions arise. Who made them, and why are they similar yet unique in more than incidental ways?
It is clear that these were a well-known type, of similar form, yet they were made by numerous different patternmakers, foundries and machine shops.
Over the coming series of blog posts I will be recounting the examples of the vises I have found thus far, in part to “think out loud” about them, in part to get out the word that I would like to learn more and learn of additional examples and histories.
Stay tuned.
I recently returned from almost a week getting the barn and the cabin ready for winter habitations, inasmuch as this will be the first winter in which we actually habitate them.
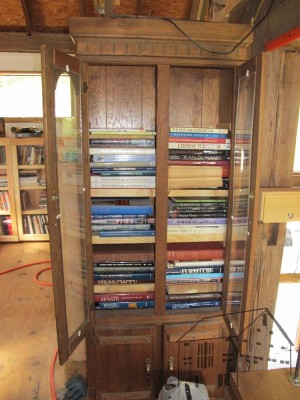
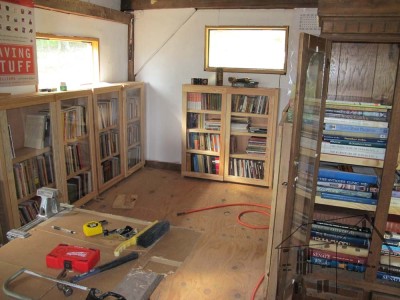
One of the big tasks was to make progress in the library, completing more of the uber-low-tech bookcases to house the thousands of books that need to reside there, along with re-purposing other cabinets like this one used for oversized books.
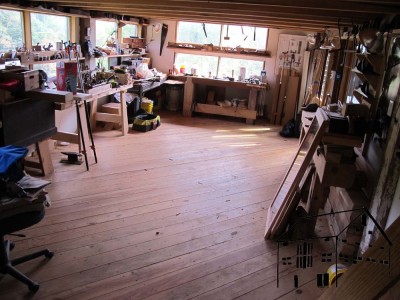
My activities took me through my studio frequently, and I could not help but notice the gaping void in the middle of the space. I created that void for something special, which has not come to full fruition yet.
But, my day is coming.
PS Here is the latest picture of the library. The big honking slab of working table in the middle of the floor is actually a 30” x 2” x 16-foot piece of eastern white pine that is probably 150 years old. When I get the time I will make a trestle refectory table out of it for visitors to use for reading, writing, or dining. Since the books will all be behind glazing, eating there is okay.
I am not especially proud of condition of the basement (first floor) of The Barn. Perhaps I am unique, but over the seven years of construction on the project has led to a state of near total entropy in the lowest space. At first it became a repository for a lot of building supplies because it was convenient. Then it became the holding bay for all those scraps that “might be needed real soon,” finally it just sat there, full of construction detritus preventing the space from being better used simply because cleaning it out just never percolated to the top of the priority list.
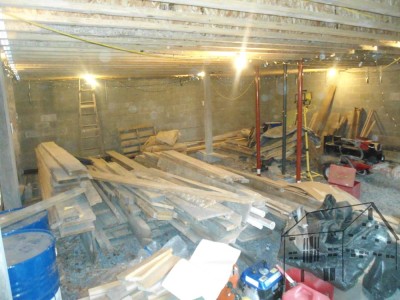
Once we decided some months ago to permanently relocate to the Fortress of Solitude in the mountains, I knew I needed to address the state of chaos reigning in the basement, if for no other reason than I needed to install a more potent heating system than a single kerosene heater for my workshop space. Fortunately my pal Tony had acquired for me a superb used cast iron and ceramic wood stove, but I did not want to put it in my shop, I wanted to put it under my shop. Hence the need to clean out the basement underneath so there would be space for the stove to sit and gently radiate the heat up into the work space.
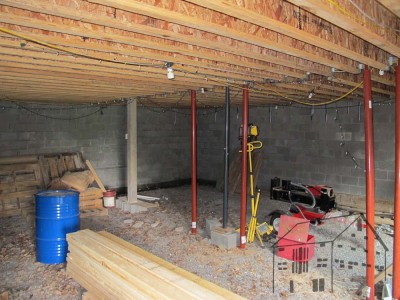
With Tony’s assistance I arranged to hire two sturdy lads, Chris and Jamie, for a day to get the basement cleaned out and ready for further configuration. What I had been delaying for several years, they accomplished in five hours! The basement was emptied of all the debris, and the good stuff was hauled down the hill and stacked neatly in the lower log barn.
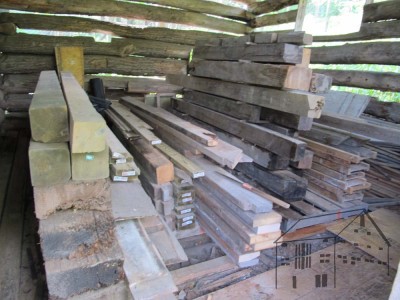
Here are the two great discoveries I made (well, maybe three.) One, there was a great pile of what could best be described a waste wood. To deal with this we had a vigorous burn pile roaring through the day and the following day, with still a pile more to go. Since this was mostly coniferous wood it was inappropriate for burning in the wood stove for heat this winter. Second, there actually was a whole lot of useful material still in the piles, just needing sorting and stacking, to be processed further. All that material I needed to finish the battens on the siding of the barn is now stacked neatly , awaiting my attack with a circular saw and a fence. Also, I found some really spectacular materials underneath the piles of debris!
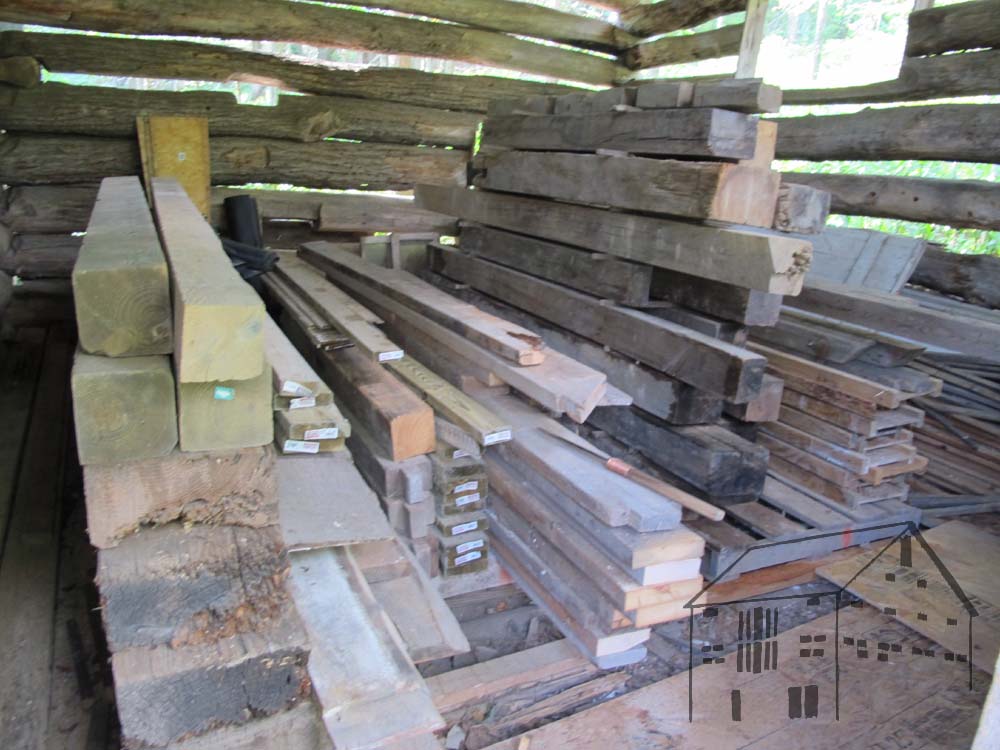
Since the barn is now configured differently than it was originally, there are several large timbers now available for some other purposes. Most notable among them are several full dimensioned 6x6s from select grade southern yellow pine. They are so dense it is almost like picking up a slab of concrete. These will almost certainly become part of a workbench at some point in the future. Combined with other stacks of SYP and white oak timbers I had already stacked in the lower barn I am pretty well set. Until the next pile becomes available…
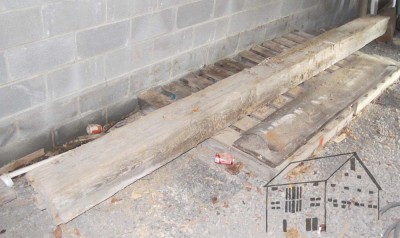
The real treasure at the bottom of the pile was a vintage hand-worked southern yellow pine 13-foot 8×10. I had been wanting a new, longer planing beam and I think I have found my material for that. The beam was so huge that Chris and Jamie were unable to lift it from its perch on pallets. That will require a bigger crew than just the three of us. But it certainly was like a surprise gift under the Christmas tree.
Of course the most important thing to learn (again) that eager, younger, stronger backs are a bargain for us almost-60-ers.

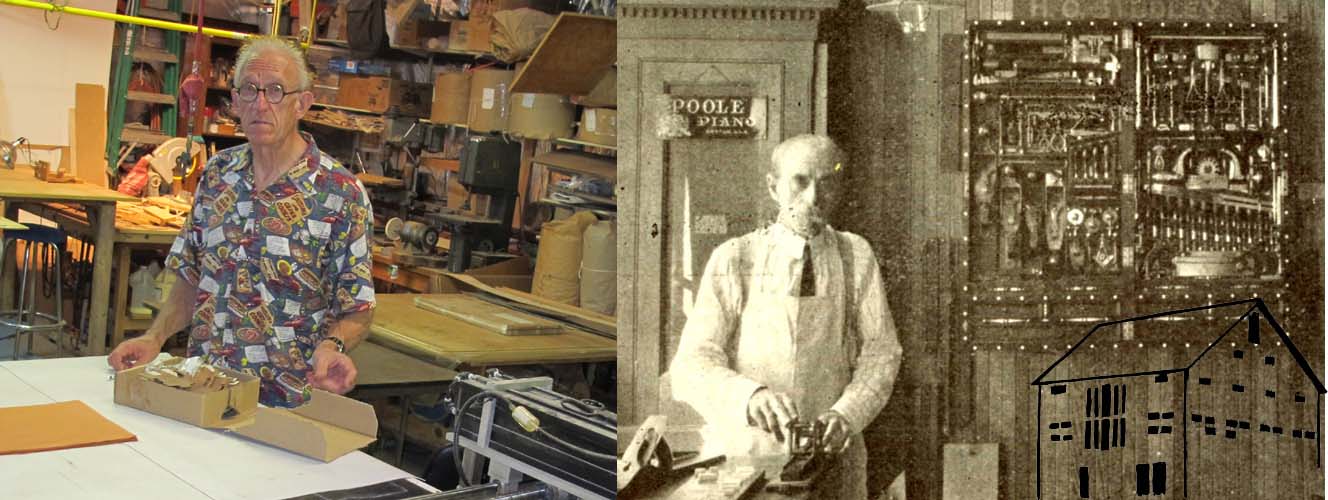
Spider Johnson and H.O. Studley, two cool cats posing in their studios, a century apart.
I am blessed with a wide circle of interesting and engaging acquaintances including artists and artisans, political operatives and those who are generally opposed to them (uh oh, that might be me), vinophiles and connoisseurs of fine tobacco products and those who are abstemious (hmmm, me again), global travelers and those who hate to travel (ditto), thoughtful theologians and scientistic existentialists.
While I was on my recent 4,000 mile trip driving to and from south Texas — and what can be more lovely than the weather in south Texas in the middle of August? — I had the good fortune to cross paths with several of this company.

Spider searching his palette of wood veneers hanging like textile samples. It make sit easy and quick for him to find just the piece he needs.

I found this pile of marquetry scraps to be visually captivating
Musician and artist Spider Johnson is a friend of many years, but also a contributor to my upcoming book from Lost Art Press, Virtuoso: The Tool Cabinet and Workbench of Henry O. Studley. Spider’s artistry is in the form of marquetry murals, and we spent a long time in his studio in the rural central Texas hill country, talking about creativity, techniques, projects, craft technology, and his collaborations with Silas Kopf. Afterwards we sat down to eat barbecue ribs, broiled asparagus, and okra salad.
Maybe there isn’t much better than Texas in August.
Actually I love the idea of Texas. What’s not to like about a place where you can spot a business like “Al’s Guns and Barbecue” along the side of the highway? (Truth be told, I think something called “Alcohol, Tobacco, Firearms and Explosives” should be a chain of convenience stores, not a goobermint bureaucracy) Take out the nutty collectivist politics of Houston, Austin, and San Antonio and add a dash of Alpine climes and Texas just might be Paradise. Perhaps I should buy a piece of land there for after the secession…
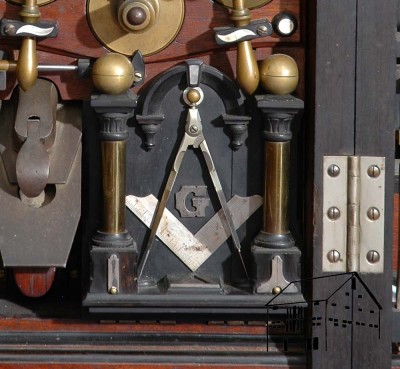
Many useful exchanges of information and inspiration ensued, but eventually we got down to the business purpose of the visit, namely discussing Spider’s contribution to the book in the form of an essay on the Masonic symbolism employed by Studley in the tool cabinet. For a long time we browsed through probably hundreds of images from my (and Narayan’s) many trips to study and photograph the Studley Toolchest over the past three years. Spider interjected a number of questions to guide me in my examination this coming October, which is our last scheduled visit before I start knitting together the vignettes I have already penned along with lots more writing of the manuscript in earnest after Christmas. Like everything else I am learning about Studley, this both clarified and obscured the portrait of him, and I find Henry O. Studley to be ever more enigmatic as my research progresses.
It is good to have friends like Spider. I just wish they were not scattered so far about.
I just got back from a grueling trip to southernmost Texas and back. Given my disinclination to subject myself to the romantic advances of blue-gloved airport goons I drove the 4,000+ miles from the Mid-Atlantic to McAllen TX and back.

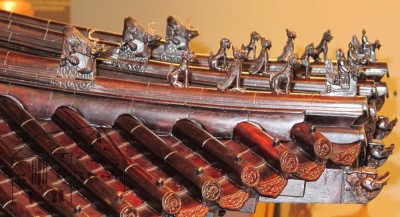
The purpose of the trip was to revisit the International Museum of Arts and Sciences and dismantle and pack a Smithsonian exhibit that has been under my care for several years, a 1/5 scale model of the 10,000 Springs Pavilion in Beijing’s Forbidden City. You can see more information about the original structure here, and the recent exhibit here . (make sure to watch the videos of us moving the giant framework and roof)
As had been the case in each of the exhibit’s previous venues, several volunteers came along at their own expense to make it happen. Long-time friends Rick, Bill, and John joined me again and we worked together like a well-oiled machine, getting the job done in about 60 man-hours.
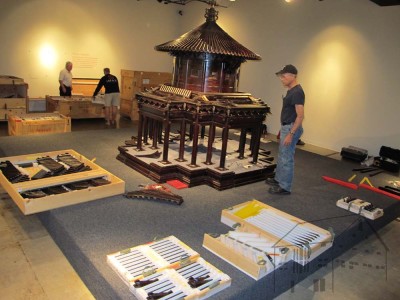
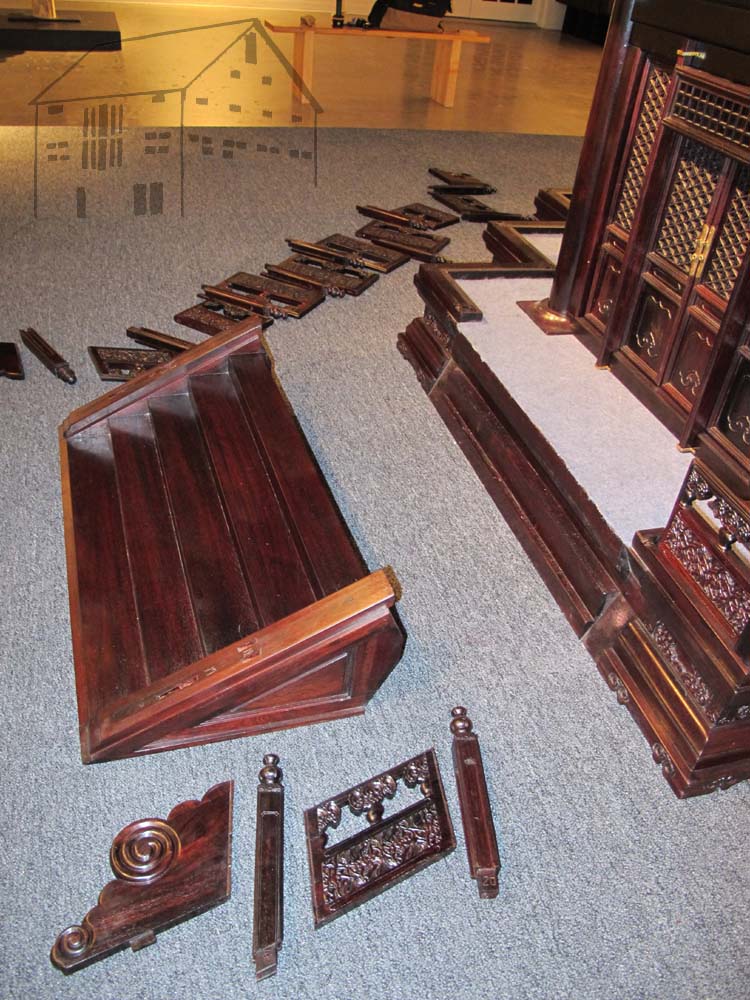
The Pavilion model is an amazing contemporary artifact fabricated from thousands of carved and joined pieces of Red Sandalwood that have been assembled into about 800 pieces.

The artistry is breathtaking, and the ~2,500 pound mass of the item is really impressive. I have been asked to continue stewardship of this exhibit even though I retired from the Smithsonian last December, in great part due to the fact that I am about the only person aside from the original makers who knows how it all goes together. Plus, I genuinely enjoy working with my colleagues from the Office of Smithsonian Affiliations. This particular 3-D puzzle came with no instructions other than the Chinese figures carved into or written on it. Over the years my team and I have deciphered it well enough to make it happen (with the spectacular help of a maitre-de from a Queens NY Chinese restaurant who translated some of the scrawled pictograms) so the list of folks who could even do the job is pretty small.
First comes the really easy part, removing the railings and stairs.

Then comes the doors and window grilles, all carved from solid Red Sandalwood.
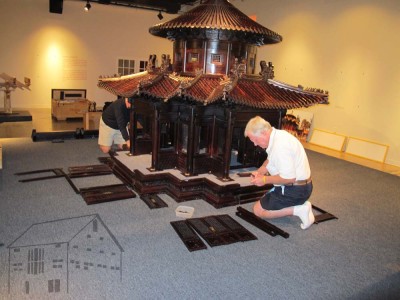
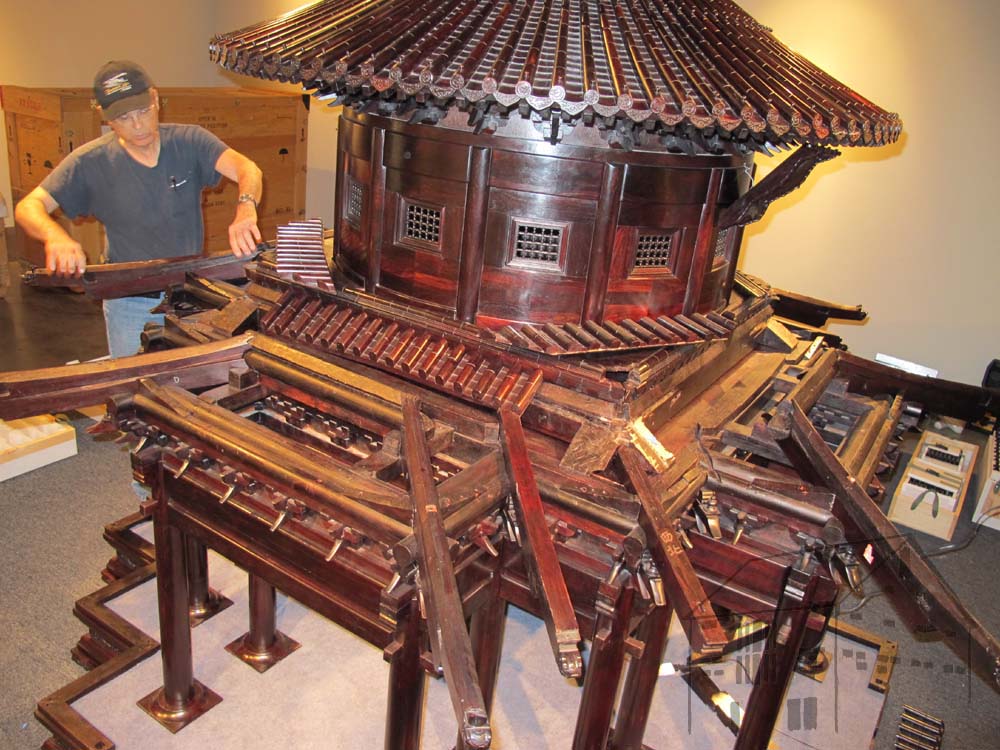
The lower roof sections are tricky as they weigh a lot and are tenuously interlocked. If one fell on your foot you would have at least several broken bones for sure.
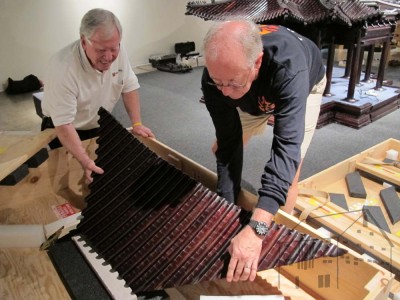
Taking them out safely, and placing them in the fitted cases requires teamwork and steady choreography.


One of the highlights is the ceremonial removal of the elaborately carved two-part finial on top. This piece was John’s turn.
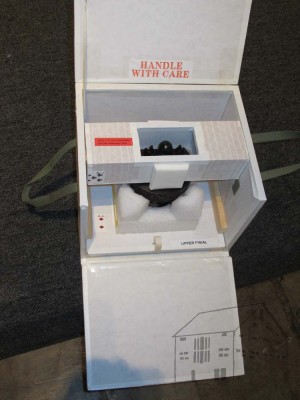
Each piece goes into its own fitted compartment.

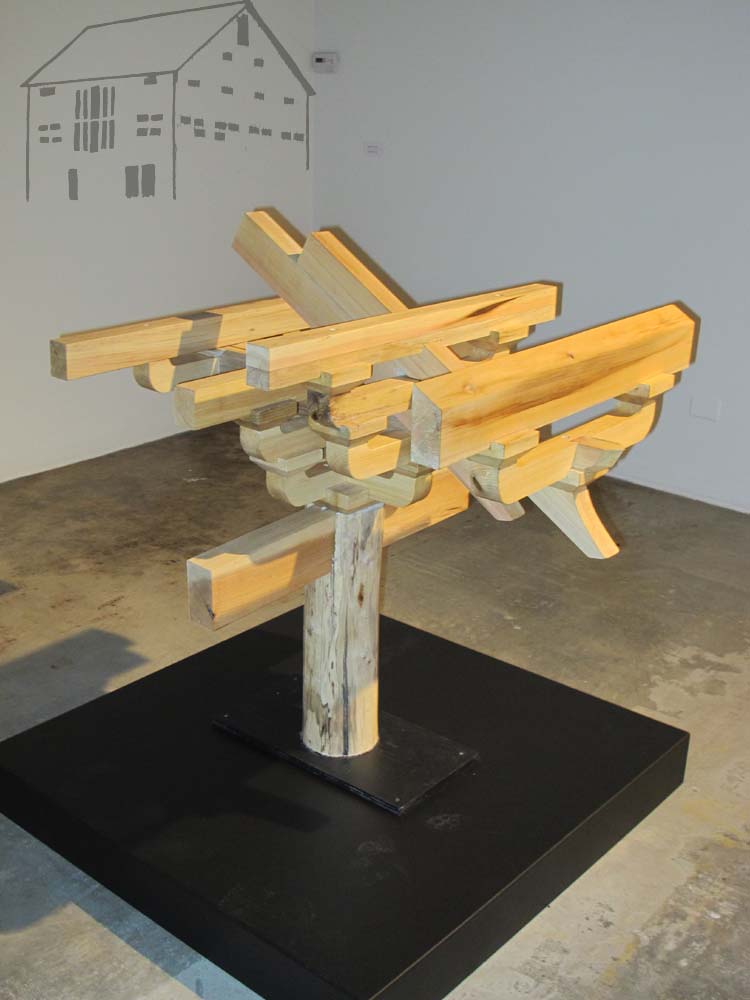
My own contribution to the exhibit was this 5-foot-tall, 1/2 scale model of the construction of the post/beam/roof assembly. It has been very well received, as the scale of the pavilion is so small the visitors have difficulty figuring out how it all goes together.
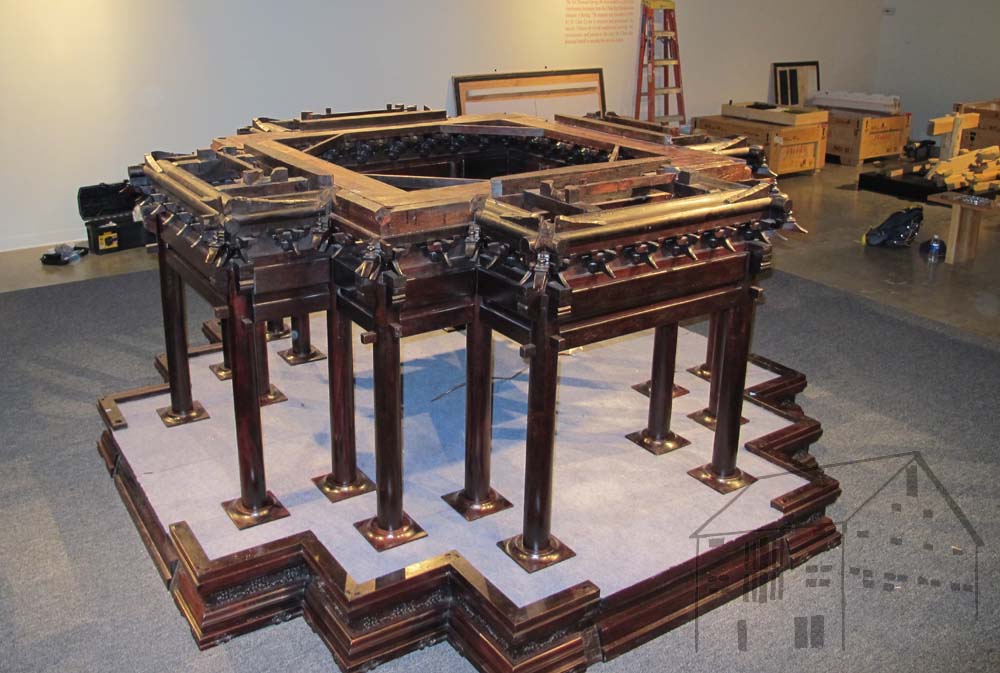
As the pavilion comes apart one piece at a time, the eventual skeleton of the magnificent artifact becomes almost forlorn.
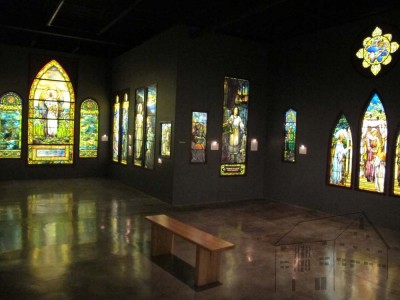
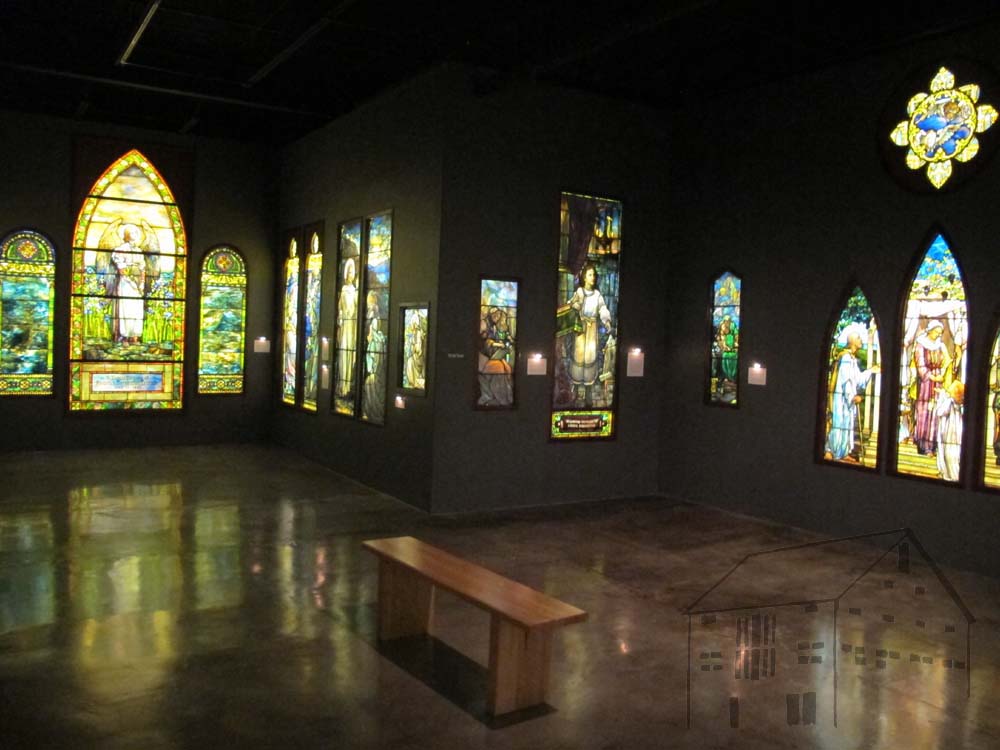
A highlight of the IMAS that I finally had time to enjoy was the adjacent gallery, where a spectacular exhibit of Tiffany stained glass resides. I sat for several minutes in the silent darkness, imbibing the masterpieces there. If you are in the neighborhood of south Texas, make plans to go and enjoy them yourself.
The Pavilion exhibit is not currently scheduled for another venue, but if one comes up I will be sure to let you know.
There is more stuff about the pavilion exhibitions here
http://www.blog-affiliations.org/?p=2548
http://www.si.edu/mci/pavilion/pavilion.html
While in Georgia last month I overheard a conversation suggesting the benefits of having small wax blocks with logos to give as premiums to students or as gifts to friends, or to even provide as commercial products. I decided to do that for myself, and will describe the process here.
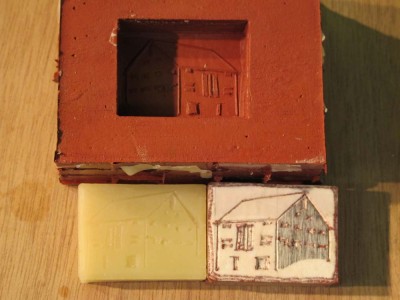
My objective was to produce a small wax block with The Barn logo incised in the surface.
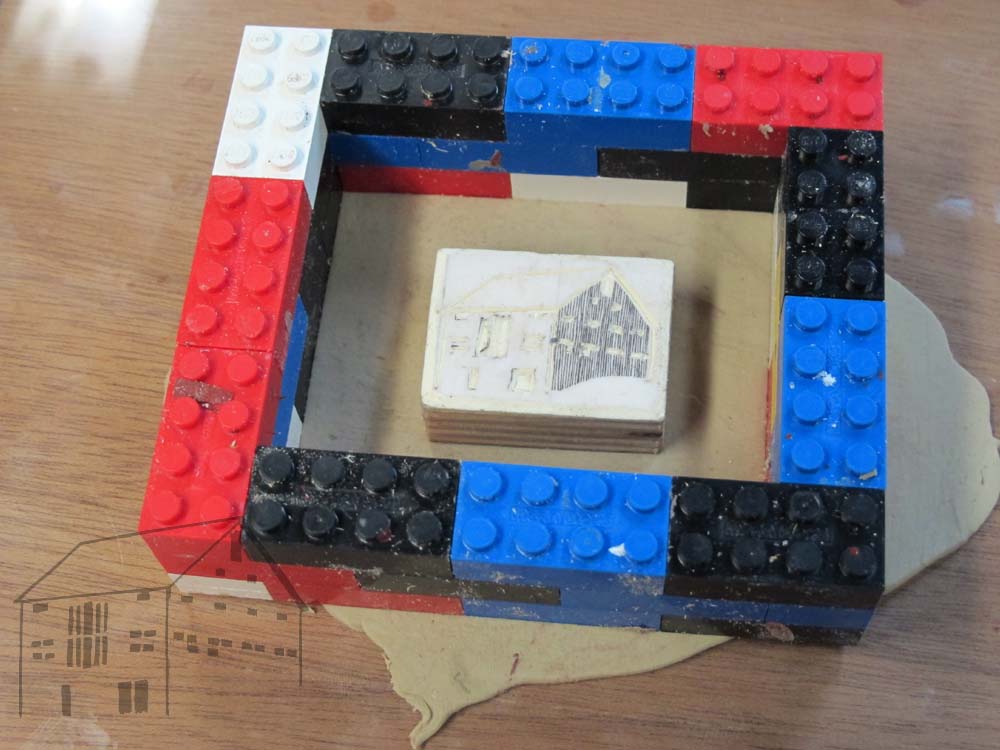
My first step was to print out a version of the logo that was the right size for my needs. I glued this to a piece of 1/8” mat board. Once the glue was dry for this I cut it to the exact size I needed, which I then glued to a piece of ½” Baltic birch plywood.
Using a scalpel knife I incised the logo through the printout and down into the mat board. Once this was finished I immersed the entire block into molten beeswax, mostly as a means of smoothing out any raggedness of the incised lines. I wiped off all the excess wax.

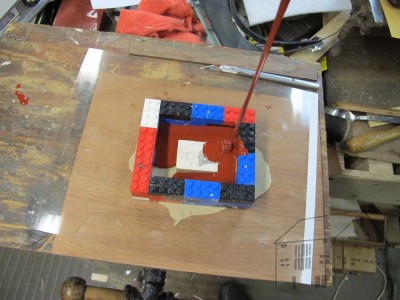
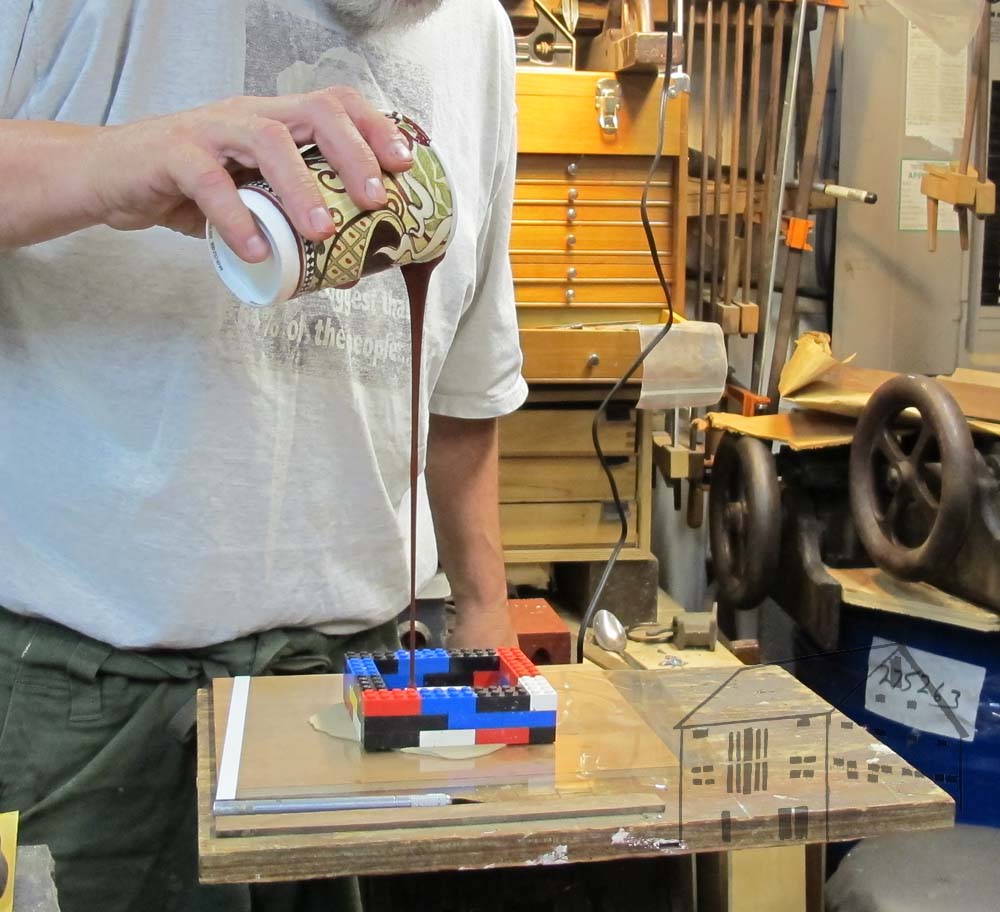
I prepared a bed of plasticine sculpture clay and pressed the block down on it, detailed side up. Then I construct a Lego-type flask around the block with at least 3/8” margins on all five sides.
NOTE: do NOT use plastilina or any sulfurous sculpting clay. It is a fine product but the sulfur-containing chemistry is not good for what comes next.
Fill a paper cup with the appropriate amount of silicone RTV (Room Temperature Vulcanizing [crosslinking]) molding rubber with its catalyst, and stir them thoroughly. These are mixed by weight and vary from product to product; be precise. There are many different grades of silicone RTV, and they will be the subject of another blog on casting molten pewter. For this project I simply used some I had sitting on the shelf. Admittedly, I do a fair bit of this for my artifact conservation projects so my shelf may be outfitted differently than yours.

After mixing the silicone RTV and catalyst I raised the cup and poured a thin stream of the liquid rubber into the flask, starting with the corner away from the pattern block and allowing the rubber to flow over the pattern like lava from a volcano. This technique reduces to almost zero the problems of bubbles in the surface of the finished mold. Let the mold cure and disassemble the entire construct, gently removing the block from the silicone rubber mold. It does not need any separating agent.
Melt some wax and pour it into the rubber mold. Allow it to cool and then gently pop the wax block out. You are done.
Using this method you can create a single piece mold for casting a wide selection of materials ranging from epoxy, plaster, wax, hot-melt glue…
One of the myriad headaches of relocating slowly from a home of 29 years is that the contents of the former home do not accrue to the future home evenly. As a result I often find myself in one place or the other reaching for a tool or supply for a necessary task, only to realize that the thing I need is 216.7 miles away. Such was the case last night when I needed to cast some epoxy replacement pieces for a project upcoming next week.
Normally when I am casting epoxy pieces replicating wood I dust the rubber mold with pigment, then add more pigment to the epoxy as I am mixing it then pour the pigmented epoxy into the pigment mold. You guessed it, all my powdered pigments have already been moved to The Barn. Grrr.
Calling around this morning I found that the nearest powdered pigments were an hour away. What to do, what to do?
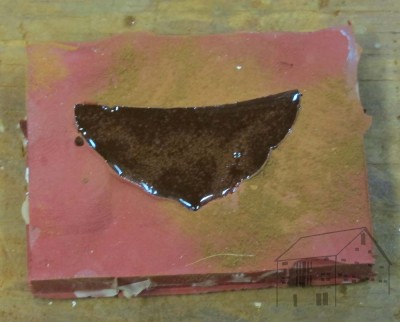
Well, consider that pigments are simply highly specific dirt. The pigment I needed was burnt umber. Where could I find some reddish brown dirt? Hmmm.

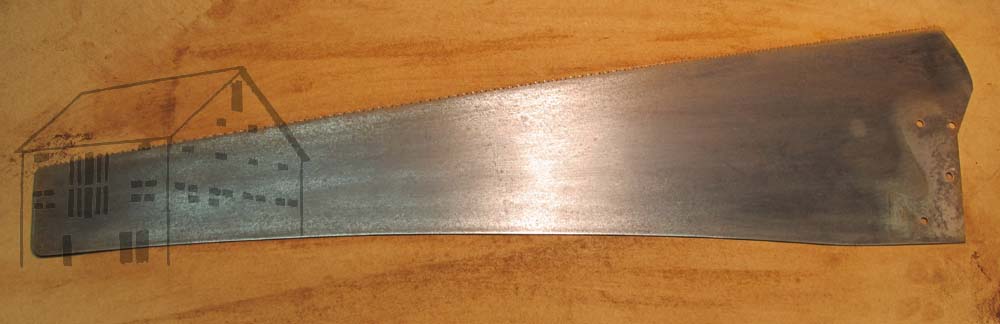
As I was pondering this question while puttering in the shop, I looked at some newly acquired vintage hand saws from the flea market, one of which was pretty uniformly encrusted with rust. Coincidentally, rust falls somewhere between burnt umber and red ochre. Perfect!
In a few minutes with a piece of sandpaper I had all the beautiful pigment I needed. Perfect color, perfect texture, uniformity. Free and already in hand.
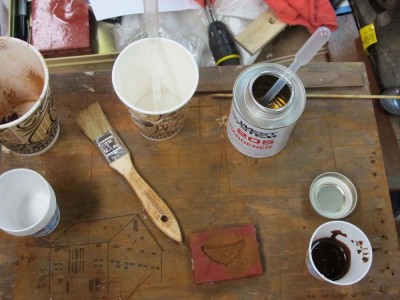
So, I took some of the powdered iron oxide (rust), sprinkled it into both the mold and the epoxy, and did the deed. It turned out exactly the way I needed it to be.

Plus I got to move down the path to restoring some old saws.

Materials science is our friend. Learn it. Love it. Live it.
One of the truly invigorating aspects of the recent gathering of FORPXI (Fellowship of Roubo Plate XI) was the unambiguous pursuit of excellence by all the participants. That example of diligence and facility was a compelling wordless exhortation to me, and will remain a powerful force in my memory.
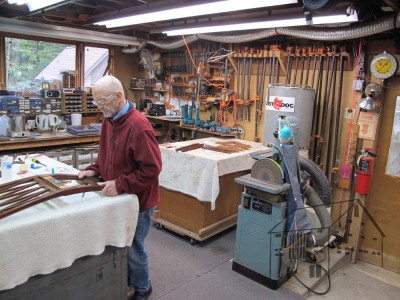
Perhaps no vignette of the week was more engaging than the experience of visiting Ron Brese’s home and shop, about a half hour away. On Monday evening we went there for a pizza gathering hosted by Ron and Jameel Abraham, who comes as close the fitting the adjective “menuisier” as anyone I know.
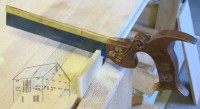
One of Ron Brese’s planes. Image used by permission.
After eating, the dinner party withdrew to Ron’s modest workshop, modest except that it possesses state-of-the-art facilities for the manufacture of sublime hand planes. We ogled and pawed the accoutrements there, of course asking permission first. At one point Ron brought out his collection of contemporary backsaws, basically similar models of dovetail saws from all the hand-tool makers we encounter at Lie-Nielson, Badaxe, Gramercy, Wenzloff, Eccentric, etc. Ron let us examine and give each a test drive. There was not a dud in the bunch, I would be delighted to use each or any of them.

A back saw by Andrew Lunn of Eccentric Toolworks. His saw is of such a quality as to be different in kind from my own efforts thus far. Image used by permission.
Now, I have observed many kinds of craftsmen. (I distinguish these “doers” from the “observers” or aficionados who would rather experience artistry vicariously. As someone who appreciates merely contemplating elegant systems, including constructs of words and ideas, believe me I am not being demeaning here) First are those who simply want to make stuff, regardless of the technology required. For these “Git ‘Er Done-ers” nothing is more important than having some task completed. Even if they are not using the right tool for the job. Second are those whom I call the “Toolistas” whose greatest pleasure is in the making of the devices that are in turn used to make stuff. I observe these folks in the show-and-tell segment of woodworking gatherings wherein they wax ecstatic about the latest elegant jig they built, or the newest machine they acquired, or similar.
At its best this latter impulse is manifest in the making of exquisite tools themselves. Fortunately for us the “Toolista” community has enriched us in the access we have to perhaps some of the finest tools ever made. As I told Charles Brock when he interviewed me in Barnesville, we are living in the golden age of woodworking and toolmaking.
I’ve made a lot of tools, (in my work as a conservator there were countless instances where a tool I needed simply did not exist except in my mind, so I made it to accomplish the task required — I straddle the “Git ‘Er Done vs. Toolista” divide fairly evenly) including several dovetail saws. Examining closely the saws in Ron’s collection was a humbling experience. Before then while I recognized the limits of my saw-making vision and abilities, in the moment of seeing and using the examples from these Hall of Fame makers I had a whole new perspective on my own puerile efforts. In correspondence with one of those saw makers afterwards, I wrote:
 “While I have an interest in making tools, I have yet to go much beyond the most crude skills. Seeing and using your saw reminded me of that, so damn you for condemning my own work in absentia, and thank you for setting the standard for all of us to aim for. Well done!”
The inspiration of elegant tools such of these is a powerful motivating force for me as it provides focus and a destination towards which I will move. In the coming days and weeks I will be using them to guide my transformation of a saw I have owned for thirty years but never been happy with. There is nothing “wrong” with this tool except that I do not like it, and I will be remaking it to my own preferences. I see this project as another step in the journey from where I am to where I want to be.
Stay tuned.


Recent Comments