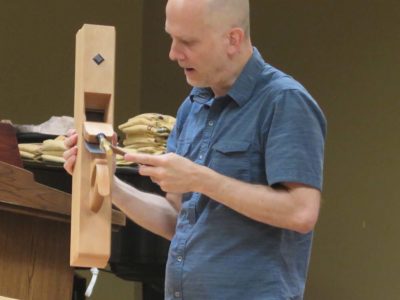
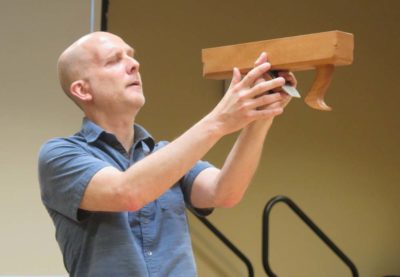
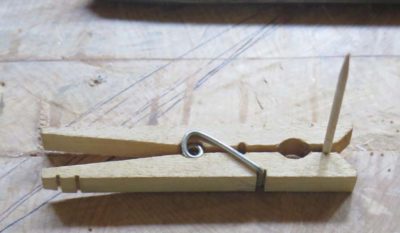
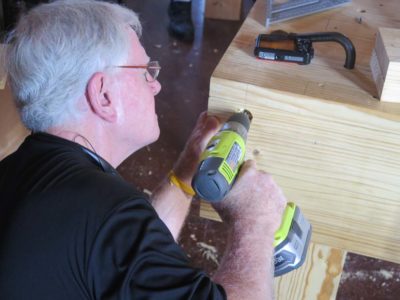
When making traditional-ish workbenches one of the considerations is making the holes for the holdfasts. I might have said “To holdfast or not, that is the question,” but in my experience a woodworking traditionalist either decides to incorporate holdfasts from the start or comes around to using them eventually.
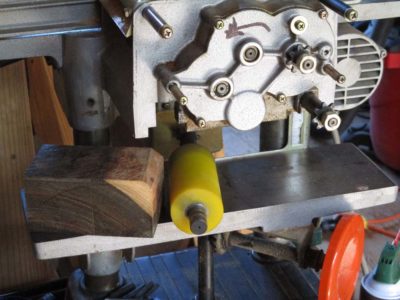
As a general rule the hole for the holdfast is a smidge bigger than the shaft of the tool so that when the top is pounded to induce flexing tension the holdfast grabs the bench top firmly. As a practical matter virtually all of the holdfasts I know are available now use either a 3/4″ or 1″ hole. Getting the holes perpendicular to the bench top on two axes can be a nuisance some times, and in the past I have made a couple of drilling jigs on the drill press. However, over time both of these versions became wallowed out and somewhat less than fully helpful.
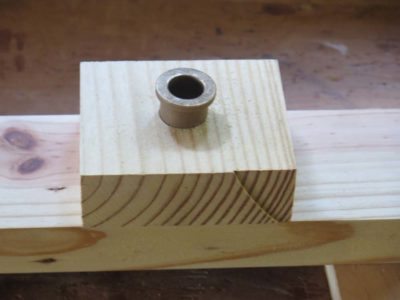
After returning from Arkansas where my older jigs got a serious workout I set to making another more robust and precision jig for fitting the Gramercy Tools holdfasts that I am so fond of. My main modifications for this were to lift its base up off the workpiece with plywood feet to provide exit for the chips, and bronze bushing sleeves fitted to the 3/4″ drill bit.
I drilled the hole for the O.D. of the bushings, then epoxied them in place. Finito.
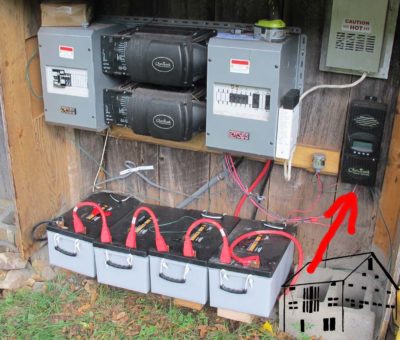
Among the few public observers to whom I pay attention, Nassim Nicholas Taleb has a place at the table if for no other reason than his monumentally insightful book The Black Swan: The Impact of the Highly Improbable. Now, change gears to the old insight from the military logistics and supply realm, “Two is one, and one is none,” an exhortation on the value of redundancy for important operating systems and supplies. Well, that particular old black swan bit me in the nether regions recently as I found that I’d better start with a bigger number for electricity supply.
Since becoming my own Power Company for The Barn there have always been hiccups; a connection or section of water line breaks, storm debris clogs the hydro system intake or turbine nozzle, even a nearby lightning ground blowing the fuses on the solar array. In these cases the interruption of one or the other power source is not an activity-stopping hurdle, although it can be a bit of a nuisance and interruption to address.
In essence my system is a hybrid of the microhydrolectric turbine generating power 24/7 through much of the year, along with the array of six 235-watt solar panels cranking out juice whenever it is daylight and they are not buried under snow. When you are your own public utility, maintenance is never far from the “To Do” list.
My two electron sources are tied together in a complex control system designed and installed by Rich at Nooutage.com and my friend BillR, a retired electrical engineer with a robotics specialty. For the past half dozen years or so it has been humming along, providing all of what I need in the barn for general usage. Even in the dead of winter, when I have the hydro system mothballed during the coldest weather, the solar panels keep the batteries charged and I can operate pretty much normally if I am the least bit attentive. If I know I need to use a lot of electricity with a machine or a heating coil (processing beeswax in cookers, for example) I know I need to wait for a nice sunny day.
When I have a particular need for ultra high wattage consumption, like my smelting furnace of kiln, I have to fire up the smaller (3500w) of my two Coleman Suburu generators for that isolated need.
Flash forward to three weeks ago as we were spending a day in the studio recording another session for the Gragg Chair video. I had checked the system the night before as I do routinely, and it was working fine. Batteries were topped off, solar panels pounding out watts, hydro puttering along. (On a normal day each of the production components produce somewhere in the neighborhood of 5kwH, higher on a sunny summer day). Just as I was coming to the end of a session of steam bending some chair parts the room went dark. Quickly I hustled down the hill — I do not run any longer since breaking my hip three years ago — and saw that the system had shut itself down for no apparent reason. It booted back up manually, but still the work for the recording session was lost.
I was leaving town the next morning for a week so I put off conducting the investigation of the hiccup until I got back.
what it should look like
what it did look like
On returning I was able to confirm that the solar panels were contributing zero to the system performance. It. Jjust. Went. To. Sleep. The hydro turbine was still working as it should so the overall system function was adequate, but several days of chasing down the solar inactivity proved fruitless, despite numerous emails and phone calls with BillR, who assigned me several detailed troubleshooting tasks, and literally hours on hold with the tekkies at the solar control module manufacturer.
In the end the tekkies told me there was some sort of hardware failure and I needed to disconnect the solar control unit and send it to them for their ministrations. So I did.
As all of this was unfolding, the hydro turbine suddenly (literally overnight) developed the growling rumble of worn out bearings. I took it off-line as soon as I noticed this, dealing with two $15 bearings is one thing but letting them run to destruction might have damaged the $2k turbine and that was not high on my list of risks to take. After speaking to the turbine manufacturer I decided to remove the turbine core and ship it back to him for new bearings. Replacing the bearings myself was not really an option as I do not possess some of the specialized tools required for the job, although I will have to address that shortcoming in the future.
Quick as a bunny I was without any power system input to the barn and things ground to a halt, including cancelling/rescheduling the Boullework Marquetry workshop that was slated for this weekend.
For now all I can do is wait on the turbine manufacturer to return the turbine core with then new bearings and hear back from the solar control module manufacturer for a report on that unit, and contact the local electrician to come and wire in my gas generator to the system.
I clearly need for “2 is 1” to become “3 is 2,” or maybe even “4 is 3.”
Stay tuned.
In a true Black Swan event both my redundant power sources failed at the same time. Maybe I should have called Nassim Taleb first.
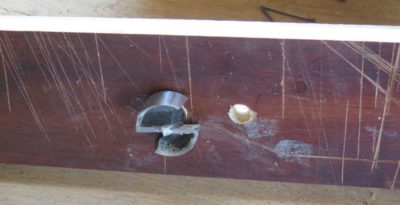
A couple years ago my little Makita Model 2004 combination 4″-jointer/ 4″-planer threw a bearing block on one end of a drive roller for the 4-inch planer. It is the drive system, not the cutterhead, so it turns slowly but with very high torque. The machine was so old and obscure that at the time I acquired it a few years earlier I could not find any information on the machine or its parts. So, the little beauty stayed unused in the intervening months.
I’ve come to have a use for it on an upcoming project and decided to fix it the old fashioned way by fabricating a bearing block from a hunk of lignum vitae wood, soak it in boiling oil, then reinstall the drive unit for the planer.
As you can see, the block almost literally disintegrated (I could not even find all the debris from the wreckage). With the shards of the previous bearing block as a guide I set about making something to render the machine functional.
Making a new bearing block is my goal for the week.
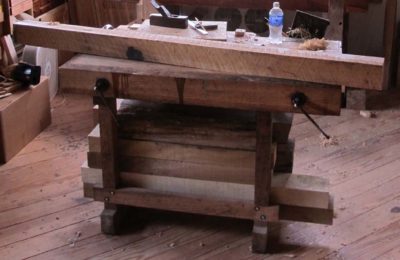
This is the first in an occasional series on the dozen-plus workbenches I have. These are presented roughly in the order in which they entered my orbit. — DCW
================================================
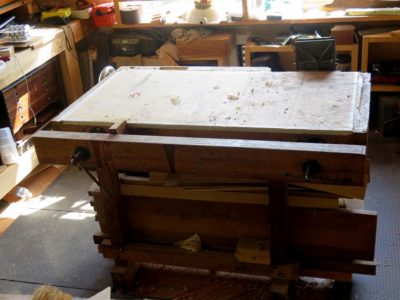
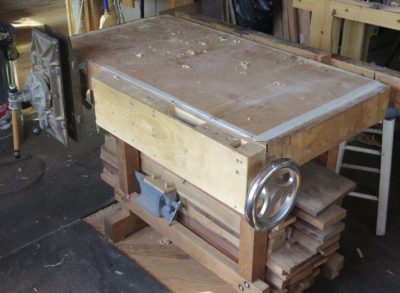
1984 was a monumental year for us, as we finished up our time in college (my third try was a charm), both got jobs we wanted (in the same town!) and bought a little house just outside the Mordor Beltway on 3.7 acres to expand (the house, not the property). Though I still had one more year of evening classes to graduate life was beginning to settle down from the maelstrom of a heavy college load and workto pay for college occurring simultaneously (I refused to borrow money for college). I was a poor role model for my daughters’ friends, I took 14 years to get through college.
By late 1986 it was time to fashion a workbench for the small work space (10′ x 22′ x 6′-3″) I had carved out in the basement for household and furniture conservation projects for private clients who wanted to throw money at me. We wanted to get ahead as much financially as we could before our family started. Oops, too late. Daughter #1 arrived that autumn. Nevertheless it was time for my first real purpose built custom-made-to-my-specs workbench. Until then I’d had “make do” with whatever I could scrounge together.
The process of bench design weighed several competing and complimentary considerations. The manner in which I resolved and fulfilled them resulted in a workbench that is my third child.
First, I had very limited space, especially when you consider the amount of machinery I had stuffed into the space. A unisaw, a 12″ radial arm saw, a 14″ combination planer joiner, standing drill press, large air compressor, etc., were all taking up residence there, along with a full-sized explosion proof solvent cabinet for my finishing and conservation supplies. There was no way I could afford the luxury of an 8-foot patternmaker’s bench with an accompanying assembly table, which is what I’d had in the foundry, nor an 8-foot Euro bench like the row of them in the conservation studio at Winterthur and the Smithsonian, or the English wall bench from the Dominy shop. I would be lucky to get four feet of bench in my basement workshop. In the end the bench’s overall dimensions are 48″ long, 33″ deep, and 35 inches high.
Second, I was not going to be making much furniture in the basement, or anywhere else for that matter. As it turned out the few pieces I did make in the coming years were assembled either on the front porch or out in the 15×25 barn-ish shed we had for the lawn equipment. It wasn’t so much of a footprint issue as it was headroom.
Third, I was very much enamored, and still am, with the concept of the torsion box structure for workbenches and table tops. I’d seen Ian Kirby’s version and really liked it. Not the MDF part, but certainly the design simplicity for his workbenches. I had not become persuaded by the planarity of the sides for many years yet.
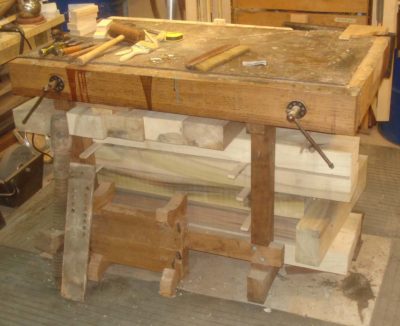
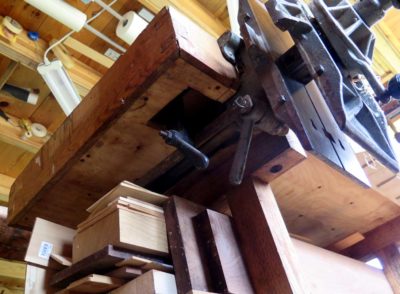
Fourth, an Emmert K-1 vise had become part of my work vocabulary in my years at the pattern shop, and I had subsequently purchased a couple of fine vintage ones and was going to design the bench around them, or at least one of them.
Fifth, though I was not a chair maker and would never really become one I was attracted to the expanse of large twin screw face vise often found in their shops.
Finally, I was not the aficionado of hand-work that I have become so keeping hand work to a minimum was desired.
I purchased a pile of 12/4 and 8/4 white oak and a couple sheets of 3/4″ birch plywood and got to work. Unfortunately I have zero pictures of the building process, all these come from much later.
Up until this time my “workbench” was a salvaged 36″ wide solid core door sitting on a pair of sawhorses, which makes for a lousy workbench but a great assembly table.
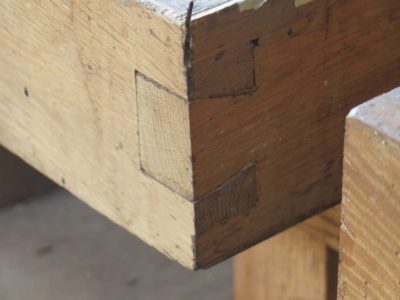
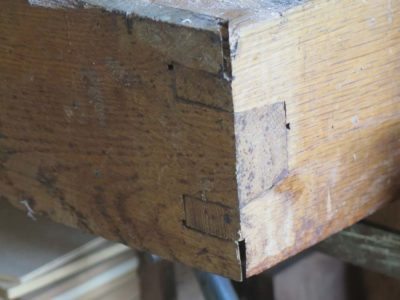
Cutting the 3/4″ plywood on the table saw I constructed the 24x48x5 torsion box bench top, fitting it into a rabeted perimeter of 8/4 oak dovetailed at the corners.
These were my first man-sized dovetails and the inexperience shows, especially in the corners where I laid out and cut the joint adequately but inverted the angles. Think of a dovetail joint where the tails do not spread but rather taper at the same angle and you get the idea. It’s not terribly made, but it’s not proper either. It remains a constant reminder to be more careful and make sure I am envisioning things correctly. I am neither proud nor dishonored by these corners, they were an honest representation of my joinery skills 32 years ago, and emphasize the different skill sets of a conservator and a furniture maker. I have improved in the intervening years.
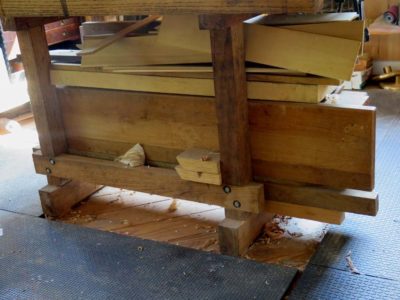
This top went over a simple trestle-and-stretcher base that was half-lapped on the radial arm saw and bolted together. To attach the top to the base I drilled and screwed threaded brass inserts into the top and drilled the corresponding holes in the trestle top crosspieces, bolting them together. The general assembly scheme has worked for the intervening years without a fuss. Every now and then I crank down on the bolts when anything loosens up, but the unit has remained remarkably trouble-free.
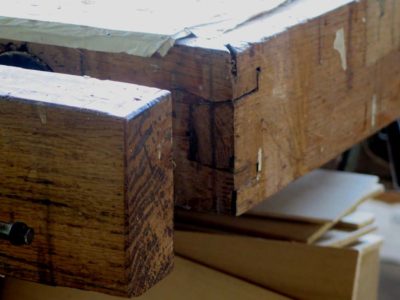
It was in installing the Emmert that I realized a couple of mistakes that I could have corrected, one a nuisance and the other a fundamental problem I will eventually correct. For starters the 5″ thick torsion box was way too thick for the Emmert configuration and I had to cut through the torsion box skin and ribs in order to make it all fit and work. Fortunately this did not weaken the top appreciably.
But another miscalculation has required compensation ever since I built it. Rather than fit the Emmert between the trestles I designed it to be outboard of the trestle at that end, rendering the whole thing unbalanced and susceptible to tipping when under load. I’d thought that the weight of the 12/4 & 8/4 oak trestle structure would be enough, but I was wrong. I really should have made the trestle longer to allow the vise to be installed in between the two ends. I finally settled on something resembling a solution when I turned the bench base into a lumber storage unit. The addition of several hundred pounds of counterweight does the trick, but a third trestle (or moving the current one) outboard of the Emmert would be even trickier.
On the long side opposite the Emmert I added a full-length twin screw face vise using hardware I think I bought from the bargain bin at WSJenks, a famed DC hardware store. The movable jaw is 2-1/2″ x 5″ x 48″ in white oak with 32″ between the screws (zero flex), and it is a fixture that is used pretty much constantly.
Years later I made a wagon-wheel vise for the side with and aligned with the inner jaw of the Emmert, a project I chronicled in a Popular Woodworking article. It is a useful addition, but since I have so many other options for the same function it does not get used much these days.
While not without flaws and limitations, this bench has remained my “go to” work station for more than three decades, and is only now grudgingly giving up its status as my one and only workbench. It still gets my time and energies every day.
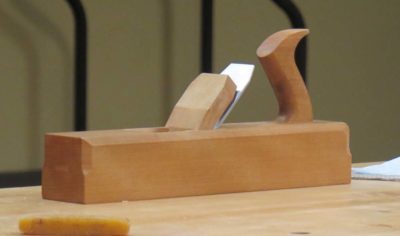
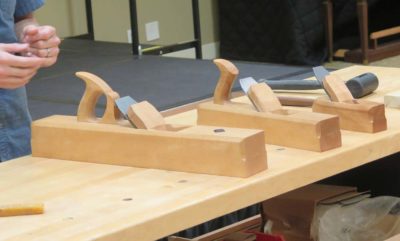
A recent foray to Mordor coincided with the monthly gathering of the venerable Washington Woodworkers Guild, whose fellowship I have enjoyed for more than three decades and at which I have presented numerous times. The meeting included a terrific recitation on and demonstration by music-professor-slash-toolmaker Steve Voigt of the double-iron English-style wooden planes he makes, and he brought his line of planes to show and use.
Steve has been cultivating interest in possibly making toothing planes and had asked me to bring a selection from my collection once he learned I was coming. I was delighted to oblige. Prior to the meeting, after he had set up his stuff, he spent a fair bit of time examining, studying, and measuring my planes, occasionally asking me about my preferences for this plane or that feature.
With the soft-spoken straightforwardness that he is known for Steve walked though the process he uses to design and construct his planes, which he has been making professionally now for closing in on a decade. In setting them up to work he prefers the cap iron to be as close to the cutting edge as possible, and he does most of the adjusting by eye (oh, to have eyes that can do that. It must be wonderful!)
His jack plane was set up as a heavy cutting fore plane and soon enough he had a good pile of stout shavings on the floor. One of the things he shows is the effect of a perfectly set-up double iron in the smoothing plane, wherein the gossamer shavings shoot straight up the throat and actually up his arm with very little curling or puckering. It is mighty impressive, and unfortunately I was so engrossed I forgot to take pictures.
Steve concluded with a demonstration in answer to a question he probably gets every time he is talking to a woodworker; how do you sharpen? He is a hollow-ground, oil stone and free-handed micro-bevel guy, and the results speak for themselves.
I find Voigt planes to be elegant and high-performance, and own one myself (so far).
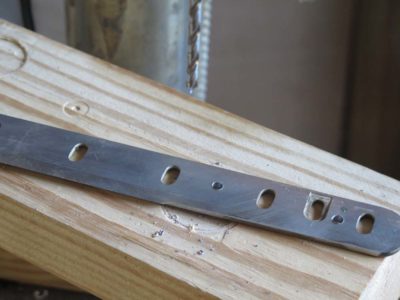
My long-held interest in replicating Japanese urushi lacquerwork with synthetic materials (to avoid using the refined poison sumac sap that comprises urushiol) led me to lurking at Maki Fushimi’s youtube channel. His narration-free tutorials are spellbinding to me and I am an enthusiastic cheerleader for them. I recall visiting my pal Dave and telling him about the videos so he pulled them up and sent them from his iPad to the television. Two hours later the ladies had to drag us away to dinner.
As I began my own work to mimic urushi lacquer, I found that Maestro Fushimi demonstrated the tool set employed by a lacquer worker, including the use and making of brushes and spatulas to apply the molasses-like varnish. I must have watched this pair of videos on making spatulas a half-dozen times, and was drawn to the knife he was using for the task. I determined to get one. Then I checked the price. Nyet.
Instead I turned to my collection of spare parts to see if there was any readily available tool steel for such a project. There was, old planer knives to be more specific. I ground the tip of one end to resemble the shape of the knife in the videos, then set about to make it as much like Maki’s as possible, at least functionally, with just what I hand on hand. With the planer knife already having an established bevel edge sharpening it would be a piece of cake.
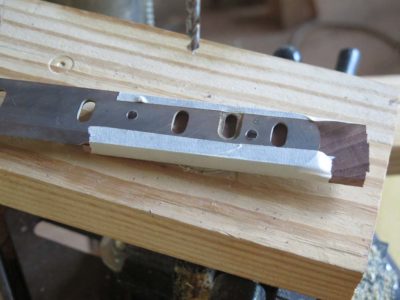
I marked and drilled the holes for the rivets and the handle cheeks.
I grabbed some walnut for the scrap box and quickly made some cheek blanks suitable for the handle. By taping the cheek blanks to the drilled blade I located all the holes in exactly the right place.
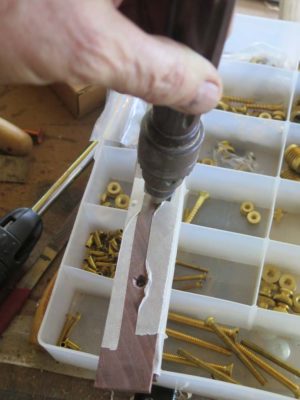
Using a hand-held countersink I worked the rivet holes just enough for the rivets to fit (the longest ones I had in my rivet box were a bit too short). I was so eager to test the concept I did not take the time to fabricate custom rivets, a topic I will blog about soon.
And then I hammered the rivets into their holes.
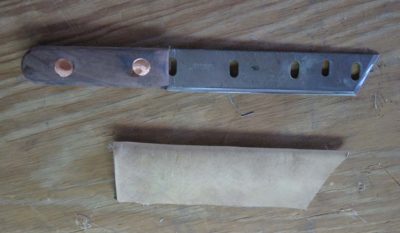
I worked the shape of the handle, sharpened the two edges and made a sheath, and it was done. I was using it just this afternoon and love it. At some point in the not too distant future I might make another one, only nicer.
In order to assist the students in saw sharpening I stumbled across another application of Clothespin Magic.
One of the key components of saw sharpening is to keep the orientation of the file consistent for each tooth. When you are using a comparatively tiny file, as we were on the dovetail saws, it can be a bit tricky to keep the rake angle the same for every tooth. A method that I find very helpful, short of using one of the specialized handles made for this purpose by Lee Valley or Blackburn, is to use a clothespin to hold a toothpick as a guide stick.
Sometimes I want a guide affixed to the tip of a file, and sometimes to the base. Making the accessory is the same either way, but setting them up is different.
For either version first file a groove across one of the clothespin jaws and on the second jaw file a groove running front-to-back, 90-degrees to the other one. For the tip guide this second groove is the one that is clipped to the end of the tiny file. You now have a set-up to hold a toothpick and the file tip in perfect conformation. Glue the toothpick to the cross groove. The tool is ready to put to work.
For the base version of the guide you simply revere the orientation of the toothpick; rather than gluing it perpendicular to the clothespin you glue it to continue the long axis.
This configuration is particularly helpful for new saw sharpeners, or those new to this scale of sharpening and teeth-cutting. By keeping the toothpick at the correct angle for each filing stroke, you end up with teeth that have an identical rake.
Doggone, is there nothing that clothespins cannot do?
We recently had our second day of video work on the Make A Gragg Chair video.
We spent some time on the Special Feature portion of the production and the remainder fashioning the riven wood into thin slats for bending.
Then I steam bent some pieces.
The only dark cloud to the day, and it was a considerable one, was that the barn power system failed just as I was nearing the end of a long and complex steam bending process, causing us to lose an afternoon’s work. That system failure has turned into a headache of the first order as the solar system quit working for as yet undetermined causes despite many, many hours of trouble shooting. Then, two days ago the hydro turbine developed the familiar grumble of bearing failure requiring its shipment back to the manufacturer for repair as I do not own the requisite tools. If my hair had not already turned white…
Black swans, my friends, black swans. But more about that later. Sigh.
The next video session will actually be precedent in the final edited video as I walk through the process of creating the bending forms from the patterns I made. I have not yet decided whether to make the patterns available with the video, although it does sorta make sense to do so. I am also trying to keep my sense of the time required to build a chair in hope that I can create a week-long workshop for that project.
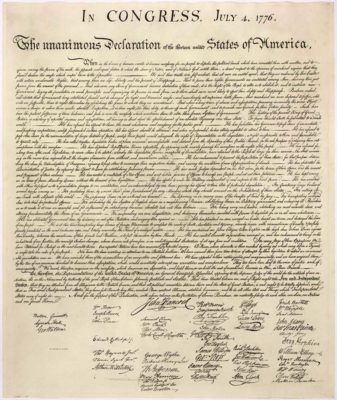
This post is presented annually on this date – DCW
As we consider the world around us it is worth reflecting seriously on the document encapsulating the ideas that founded the greatest nation ever known to man (the US Constitution WAS NOT the founding document for the nation, I believe it merely established the rules for its governance [admittedly now generally unknown and ignored] which is not the same thing). I pray you will read and reflect on the ideas expressed by men who pledged their lives, their fortunes, and their sacred honor to pursue the path of liberty. Reading it is much like reading the Minor Prophets of the Old Testament; more up-to-date regarding the human condition than tomorrow’s headlines.
The unanimous Declaration of the thirteen united States of America,
When in the Course of human events, it becomes necessary for one people to dissolve the political bands which have connected them with another, and to assume among the powers of the earth, the separate and equal station to which the Laws of Nature and of Nature’s God entitle them, a decent respect to the opinions of mankind requires that they should declare the causes which impel them to the separation.
We hold these truths to be self-evident, that all men are created equal, that they are endowed by their Creator with certain unalienable Rights, that among these are Life, Liberty and the pursuit of Happiness.–That to secure these rights, Governments are instituted among Men, deriving their just powers from the consent of the governed, –That whenever any Form of Government becomes destructive of these ends, it is the Right of the People to alter or to abolish it, and to institute new Government, laying its foundation on such principles and organizing its powers in such form, as to them shall seem most likely to effect their Safety and Happiness. Prudence, indeed, will dictate that Governments long established should not be changed for light and transient causes; and accordingly all experience hath shewn, that mankind are more disposed to suffer, while evils are sufferable, than to right themselves by abolishing the forms to which they are accustomed. But when a long train of abuses and usurpations, pursuing invariably the same Object evinces a design to reduce them under absolute Despotism, it is their right, it is their duty, to throw off such Government, and to provide new Guards for their future security.–Such has been the patient sufferance of these Colonies; and such is now the necessity which constrains them to alter their former Systems of Government. The history of the present King of Great Britain is a history of repeated injuries and usurpations, all having in direct object the establishment of an absolute Tyranny over these States. To prove this, let Facts be submitted to a candid world.
He has refused his Assent to Laws, the most wholesome and necessary for the public good. He has forbidden his Governors to pass Laws of immediate and pressing importance, unless suspended in their operation till his Assent should be obtained; and when so suspended, he has utterly neglected to attend to them. He has refused to pass other Laws for the accommodation of large districts of people, unless those people would relinquish the right of Representation in the Legislature, a right inestimable to them and formidable to tyrants only. He has called together legislative bodies at places unusual, uncomfortable, and distant from the depository of their public Records, for the sole purpose of fatiguing them into compliance with his measures. He has dissolved Representative Houses repeatedly, for opposing with manly firmness his invasions on the rights of the people. He has refused for a long time, after such dissolutions, to cause others to be elected; whereby the Legislative powers, incapable of Annihilation, have returned to the People at large for their exercise; the State remaining in the mean time exposed to all the dangers of invasion from without, and convulsions within. He has endeavoured to prevent the population of these States; for that purpose obstructing the Laws for Naturalization of Foreigners; refusing to pass others to encourage their migrations hither, and raising the conditions of new Appropriations of Lands. He has obstructed the Administration of Justice, by refusing his Assent to Laws for establishing Judiciary powers. He has made Judges dependent on his Will alone, for the tenure of their offices, and the amount and payment of their salaries. He has erected a multitude of New Offices, and sent hither swarms of Officers to harrass our people, and eat out their substance. He has kept among us, in times of peace, Standing Armies without the Consent of our legislatures. He has affected to render the Military independent of and superior to the Civil power. He has combined with others to subject us to a jurisdiction foreign to our constitution, and unacknowledged by our laws; giving his Assent to their Acts of pretended Legislation: For Quartering large bodies of armed troops among us: For protecting them, by a mock Trial, from punishment for any Murders which they should commit on the Inhabitants of these States: For cutting off our Trade with all parts of the world: For imposing Taxes on us without our Consent: For depriving us in many cases, of the benefits of Trial by Jury: For transporting us beyond Seas to be tried for pretended offences For abolishing the free System of English Laws in a neighbouring Province, establishing therein an Arbitrary government, and enlarging its Boundaries so as to render it at once an example and fit instrument for introducing the same absolute rule into these Colonies: For taking away our Charters, abolishing our most valuable Laws, and altering fundamentally the Forms of our Governments: For suspending our own Legislatures, and declaring themselves invested with power to legislate for us in all cases whatsoever. He has abdicated Government here, by declaring us out of his Protection and waging War against us. He has plundered our seas, ravaged our Coasts, burnt our towns, and destroyed the lives of our people. He is at this time transporting large Armies of foreign Mercenaries to compleat the works of death, desolation and tyranny, already begun with circumstances of Cruelty & perfidy scarcely paralleled in the most barbarous ages, and totally unworthy the Head of a civilized nation. He has constrained our fellow Citizens taken Captive on the high Seas to bear Arms against their Country, to become the executioners of their friends and Brethren, or to fall themselves by their Hands. He has excited domestic insurrections amongst us, and has endeavoured to bring on the inhabitants of our frontiers, the merciless Indian Savages, whose known rule of warfare, is an undistinguished destruction of all ages, sexes and conditions.
In every stage of these Oppressions We have Petitioned for Redress in the most humble terms: Our repeated Petitions have been answered only by repeated injury. A Prince whose character is thus marked by every act which may define a Tyrant, is unfit to be the ruler of a free people.
Nor have We been wanting in attentions to our Brittish brethren. We have warned them from time to time of attempts by their legislature to extend an unwarrantable jurisdiction over us. We have reminded them of the circumstances of our emigration and settlement here. We have appealed to their native justice and magnanimity, and we have conjured them by the ties of our common kindred to disavow these usurpations, which, would inevitably interrupt our connections and correspondence. They too have been deaf to the voice of justice and of consanguinity. We must, therefore, acquiesce in the necessity, which denounces our Separation, and hold them, as we hold the rest of mankind, Enemies in War, in Peace Friends.
We, therefore, the Representatives of the united States of America, in General Congress, Assembled, appealing to the Supreme Judge of the world for the rectitude of our intentions, do, in the Name, and by Authority of the good People of these Colonies, solemnly publish and declare, That these United Colonies are, and of Right ought to be Free and Independent States; that they are Absolved from all Allegiance to the British Crown, and that all political connection between them and the State of Great Britain, is and ought to be totally dissolved; and that as Free and Independent States, they have full Power to levy War, conclude Peace, contract Alliances, establish Commerce, and to do all other Acts and Things which Independent States may of right do. And for the support of this Declaration, with a firm reliance on the protection of divine Providence, we mutually pledge to each other our Lives, our Fortunes and our sacred Honor.
The 56 signatures on the Declaration appear in the positions indicated:
Column 1 Georgia:
Button Gwinnett
Lyman Hall
George Walton
Column 2 North Carolina:
William Hooper
Joseph Hewes
John Penn South Carolina:
Edward Rutledge
Thomas Heyward, Jr.
Thomas Lynch, Jr.
Arthur Middleton
Column 3 Massachusetts:
John Hancock Maryland:
Samuel Chase
William Paca
Thomas Stone
Charles Carroll of Carrollton Virginia:
George Wythe
Richard Henry Lee
Thomas Jefferson
Benjamin Harrison
Thomas Nelson, Jr.
Francis Lightfoot Lee
Carter Braxton
Column 4 Pennsylvania:
Robert Morris
Benjamin Rush
Benjamin Franklin
John Morton
George Clymer
James Smith
George Taylor
James Wilson
George Ross Delaware:
Caesar Rodney
George Read
Thomas McKean
Column 5 New York:
William Floyd
Philip Livingston
Francis Lewis
Lewis Morris New Jersey:
Richard Stockton
John Witherspoon
Francis Hopkinson
John Hart
Abraham Clark
Column 6 New Hampshire:
Josiah Bartlett
William Whipple Massachusetts:
Samuel Adams
John Adams
Robert Treat Paine
Elbridge Gerry Rhode Island:
Stephen Hopkins
William Ellery Connecticut:
Roger Sherman
Samuel Huntington
William Williams
Oliver Wolcott New Hampshire:
Matthew Thornton
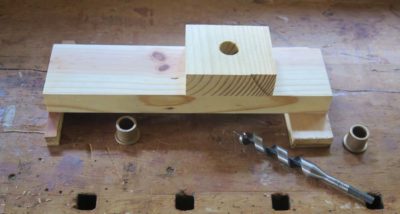
During the Hand Tool Woodworking workshop one of the things that gave some folks trouble was drilling the 1-3/8″ holes in the aprons for the twin 1-1/2″ screws that would be installed once the holes were tapped. At issue was getting the holes not only in the correct place, which was not much of a problem, but drilling them parallel to each other and exactly perpendicular to the apron. There is an art, or a least a practiced technique, to drilling clean holes with a large Forstner bit and a hand drill.
I decided to try building a jig that could suffice for the problem. The challenge was that the 1-3/8″ cutting head was affixed to a 5/8″ shaft. My jig design reflected that reality. I set a piece of scrap 3/4″ plywood on a pair of feet to make sure there was room for the drill bit cutting head to fit and also a place for any chips to go. The first thought was to drill a 5/8″ hole and just feed the bit shaft through it from beneath, but on second thought I drilled and 7/8″ hole to hold a 5/8″ I.D. bronze sleeve bushing. The bushing was roughed up on the outside and tapped into the hole slathered with Devcon epoxy.
The limitation of the system is that the hole can only be as deep as the shaft protrudes above the jig plate. Given that most of the time I’m hand drilling through two layers of 2x stock on the front apron the depth of the hole from using the drilling jig is deep enough (and straight) that completing it free-hand is adequate to accomplish parallel holes fully through the apron.


Recent Comments