Over the weekend, I edited the full Woodworking in America 2015 site, which will go live later this week (registration is scheduled to open at the end of the month).
I’ve already released the names of all of this year’s expert instructors; below you’ll find one session title and description from almost every one of them (in no particular order).
Don Williams
Keynote Address (at Saturday morning breakfast)
The Studley Tool Cabinet. Get a behind the scenes and inside-the-cabinet look at one of the most iconic tool collections in woodworking. Don and his team had unprecedented access as they worked on the book “Virtuoso: The Tool Cabinet and Workbench of Henry O. Studley.” You’ll hear his stories (it was an amazing journey to even discover where it was), see hundreds of gorgeous pictures by Narayan Nayar of the chest and its contents, and learn what Don has been able to discover about the man behind this stunning piece of work.
Tom Fidgen
The Kerfing Plane & Resawing by Hand. Resawing by hand is a skill every hand-tool woodworker should know – and there are several ways to go about it. Tom Fidgen shares techniques and tools that lead to success: a kerfing plane (that he developed) and the traditional frame-saw approach. With his expert instruction, you’ll soon be sawing wafer-thin pieces suitable for veneer or just cutting thick panels down to perfect size.
Jarrod Stone Dahl
Shrink Boxes. A “shrink box” is an ancient type of container that predates cooperage. The box body is hollowed from green timber, and after cutting a rebate (rabbet) in the base, a dry bottom piece is added. When the green body shrinks, it binds around the dry base. In this session, after sharing the history and photos of surviving period boxes he’s studied, Jarrod Stone Dahl will show you how to make this fun and fascinating historical form. While the technique is simple, you’ll find it offers great freedom with design and decoration.
Christopher Schwarz
Building Staked Furniture: Reviving an almost-forgotten furniture form. For hundreds of years, when you needed a chair, stool, desk or table you built it using a “staked” furniture joint – essentially a conical mortise-and-tenon joint that is back-wedged. With the rise of machinery and the professional furniture-making class, this joint has disappeared – except in some chair joints. In this session, Chris will teach you all about the mechanics of this joint and how to hugely simplify the geometry involved using only your eyeball and a square – no math. And you’ll get to see how this joint can be used for a wide variety of projects.
W. Patrick Edwards
Protein Glues Explained. W. Patrick Edwards, maker of Old Brown Glue, knows his adhesives. And in this modern word of PVA and two-part epoxies, he still swears by traditional protein glue. Patrick will share his more than 40 years of professional experience working with bone, hide, fish, horse and rabbit-skin glues, and teach you why and when they remain an excellent choice, along with how to use them.
Roy Underhill
Combination Planes. The 1884 Stanley No. 45 “Combination Plane” and 1897 No. 55 “Universal Plane” were developed to replace an entire rack of wooden moulding, rabbet and dado planes. And they sure do look cool – like a woodworker’s steampunk Swiss Army Plane – but do they work? Roy Underhill puts these fancy (and sometimes fussy) planes through their paces and shows you the benefits and shortfalls of each
Phil Lowe
Inlay & Bandings. Phil Lowe shares traditional and contemporary techniques for making and installing inlay and bandings (commonly found on Federal furniture, among other styles). From scratchstocks to routers, you’ll discover myriad approaches for adding signature decorative details to your work.
Alfred Sharp
Design Inspiration for & from Period Work. In this session, Alf Sharp discusses “historical awareness” – part an investigation of the original sources and inspirations for the 17th- through 19th-century furniture styles and pieces that remain popular today – particularly with woodworkers! You’ll be surprised and inspired yourself – whether you’re a furniture designer or build period reproductions (or both!).
Marc Adams
Doors & Drawers. Marc Adams takes the fear out of making and fitting doors and drawers – essential components in so many fine furniture builds. You’ll learn techniques to guarantee success, as well as options for door hinges and drawer runners, and how to fit and install both. With Marc’s approaches, you’ll soon be building doors and drawers like a pro.
Vic Tesolin
Minimalist Woodworking. As the title suggests, “Minimalist Woodworking” is the idea that you don’t need hundreds of square feet of space or thousands of dollars worth of gear. What you do need is the desire to make something with your own two hands. You might be surprised at what you can accomplish with about 50 square feet and some hand tools. Vic Tesolin talks about his own small shop and how he has made it efficient – despite it’s 170-square-foot size, and gives you solid ideas about how to make the most of your tool budget and space – no matter how small they may be.
Jeff Miller
Bent Laminations. If you’ve seen Jeff Miller’s award-winning work, you know the man knows his curves – they’re a prominent feature of his signature Arch Table and rocking chair. In this session, Jeff shows you how he creates the curves in his work using bent laminations, including a discussion of stock selection and prep, various tool approaches, myriad considerations when making bending forms, what glues to use and why, and how to go about it. You’ll learn what you need to know to begin incorporating laminated curves in your own work.
Mark Harrell
Demystifying the Traditional Backsaw. When is a vintage handsaw worth saving and how do you bring it back to life? Mark Harrell gives you the answers, start to finish. He’ll teach you how to identify good candidates for restoration, then lead you through the process from disassembly to cleaning to handle work to reassembly and retensioning to truing up the saw and sharpening it. Plus, Mark shares the “continuum of a toothline,” to help you learn what saw gets sharpened how, and why.
David Marks
Gilding Vessels. The gilding processes David Marks introduces in this session can be applied to any surface that will accept paint. First he’ll discuss surface preparation and show you examples of projects in various stages. Then, you’ll see how to apply “gilder’s size” to the surface and the techniques for applying genuine silver leaf. In addition, you’ll learn how to apply copper leaf and dutch metal (composition gold) to your work to create dramatic patterns and effects.
Mike Siemsen
Workholding: With & Without a Vise. Mike Siemsen knows workholding – heck, he’s built a bench using 5-gallon buckets as a bench on which to build it. In this session, he’ll show you how to hold your work solidly on almost any surface. Sure, he’ll show you how to make typical woodworking vises such as a face vise and end vise work even better, but he’ll also give you solutions for when those vises don’t work. Or for when you have no vises. Plus, he’ll share strategies for holding round and curved work.
Scott Meek
3D Shapes with Rasps. Scott Meek wields rasps on an almost-daily basis as he shapes his sculptural wooden bench planes, and as a result, he’s a master at using the tool. With just a few tools, he can quickly create sinuous and fluid shapes that will blow your mind. In this session, he discusses tool selection and shows you the different uses for various rasps – then he shares his “secrets” by showing you how he uses them. With Scott’s instruction and a little time at the bench, you’ll soon be creating perfect sinuous shapes in your own work.
Deneb Puchalski
Joinery Planes. Joinery planes are some of the easiest hand tools to use – once you get them sharp and set up. In this session, Deneb Puchalski shows you how to get a keen edge on the cutters for rabbets, skew-rabbets, plows, routers, dado planes and their nickers. Some of these irons are odd shaped – such as the router’s L-shaped cutter – but can be sharpened easily once you know a few tricks. You’ll also learn to deal with grinding and honing skewed blades, which must be sharpened perfectly or they won’t work. And once the irons are sharp, using the tools is a snap. Deneb shows you how – and shows what these powerful planes can do in your shop.
Will Neptune
Carved Elements for Period Furniture. Eighteenth-century furniture often relies on carved embellishments to articulate form and lead the viewer’s eye around the object. Common designs were developed to be carved efficiently and carving still requires a systematic approach. In this session, Will Neptune will present several designs, and share strategies for designing patterns that relate the gouge sweep to the work, to help you make a set of parts that match. You’ll learn about several common carvings, from pattern making and layout through the carving process. You’ll also discover how simpler carvings, including a shell on a cabriole leg and waterleaf on a Duncan Phyfe leg are a good way to learn the basic steps, and how those basics can be developed to handle more challenging forms including ball-and-claw feet and an acanthus leaf.
Nick Lieurance
Cool Kitchen Cabinet Hardware. If you want to build your own kitchen cabinets but are overwhelmed by such a large project and the array of choices and decisions, this session will help. Nick Lieurance, online education manager for Popular Woodworking, spent 12 years building and designing custom cabinetry. To start, he’ll share with you his expert tips for online research tools, appliance specs and dimensions…and then get to the fun part: deciding from among the array of cool kitchen cabinet hardware (drawer slides, hinges, organizational hardware and more — all the cool new innovations!).
James Hamilton
Make Your Own Woodworking Machines. Who needs expensive woodworking machinery? This session takes jig making to a whole new level! James Hamilton (a.k.a. Stumpy Nubs) will show you how to make clever and precise woodworking machinery, tools and jigs in your own shop. From homemade band saws to unique sliding router tables, his designs are about innovation as much as saving money. Jim’s philosophy is, why buy it when you can make it yourself – and often make it even better. You’ll learn some of the secrets to designing accurate jigs and how homemade tools can open up a whole new world of woodworking in your shop!
Donna Hill
Advanced SketchUp. If you know the basics of the three-dimensional modeling program SketchUp but want to expand your knowledge to complex shapes and tricky joinery, in this session, you’ll learn how. Donna Hill, the project illustrator for Popular Woodworking Magazine, shows you how to create flowing curves, dovetails, moulding details and more.
Dave Jeske
Care, Feeding & Use of Marking Knives. The first tool ever offered by Dave Jeske of Blue Spruce Toolworks was a marking knife, on which he founded his successful tool-making business. In this session, Dave disusses the differences among various forms of marking knives (spear point, single bevel, striking knife and more), how to sharpen them and how to keep them performing like new. Plus, you’ll learn tips and tricks for wielding a marking knife like a master.
Kevin Drake
How the Body Turns. In this session, Kevin Glen Drake, founder of Glen-Drake Toolworks, will drill down on how the body functions behind the lathe, why “catches” and other common problems happen and – most important – how to overcome them. Kevin’s favorite turning tool is the skew chisel, and he’ll explain the subtle differences between flat skews, round skews and oval skews during this session. Kevin believes that understanding how tools work is the key to using them successfully, so you will leave this session with much to think about.
Megan Fitzpatrick
How to Make a Magazine – And How You Can Help. In this session, Megan discusses the changing world of publishing (and Popular Woodworking), and how we strive to make print and eMedia work together to create solid woodworking content “across channels.” Plus, she shares with you how to we decide what goes into every issue, what it’s like to work with us on an article, video or online education – and how you can be a part of it.
— Megan Fitzpatrick
Saturday I will be heading down to the Virginia Tidewater Chapter of the Society of American Period Furniture Makers. My topic(s) for the day will revolve around my ongoing curiosity about historic finishes, including a trial run of a session on making a new finish look old. This will also be the theme of my demonstrations at the SAPFM mid-year meeting in Knoxville in June.
Hope to see you there.
Here’s the announcement on the Saturday shindig.
==========================================
We are looking forward to a great SAPFM Tidewater chapter meeting on March 14th at Somerton Ridge Hardwoods, near Suffolk. The Highlights are:
DON WILLIAMS –The authority on period furniture finishes.
WILLIAM DUFFIELD — Presenting his “Bench top bench” –( you’ll all want to make one)
CHRIS VICKERS — Hardwood lumber inventory and specials — ALSO Lunch!
So that Chris, our host, can make plans for our BBQ lunch, he needs to know how many people will be attending. So please respond ASAP, if you haven’t, so we can give him a head count. Also, Chris has 2 Specials available and needs to know how many might be interested—4/4 curly maple packs,100-200 bf @ $3.70/ bf; and African Mahogany in 100-150 bf bundles — $4.85 for 4/4 and $5.00 for 8/4. Let us know of your interest in these as well.
Please arrive between 8:30 and 8:45 as we will start promptly at 9:00 am.
THE AGENDA
9:00 Welcome and housekeeping notes
9:15 Finishes used in the period
9:45 Level of build and gloss desired in the period on different types of pieces
10:30 Break
10:45 How period finishes were applied on different surfaces (brushed/padded/rubbed?)
11:15 New discoveries about period use of waxes — applied under or over finishes? How applied?
12:00 BBQ Lunch
1:00 The Bench top bench –it’s evolution and improvements — how to build
2:30 How to recreate a 200 year old looking finish today?
3:00 DEMO of same
4:00 Tour Somerton Ridges Hardwood inventory
4:30 – 5:30 Lumber and finishing supply sales
This will be a great learning opportunity for us all!! We are looking forward to seeing everyone there,
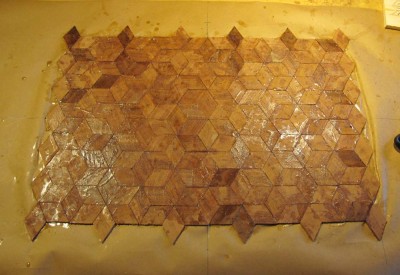
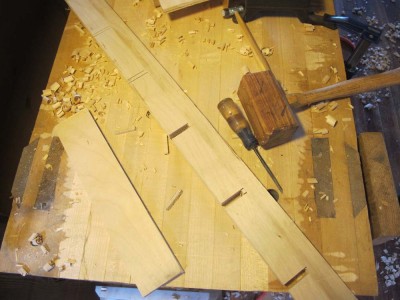
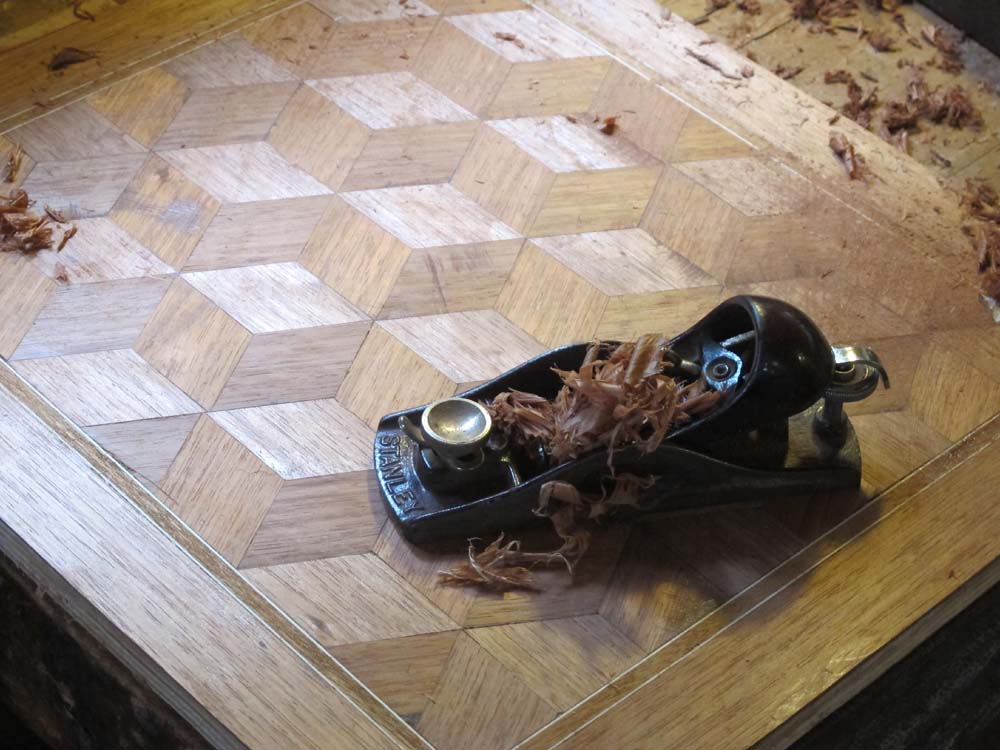
With the applied parquetry solidly glued down and stable, the final steps revolve around getting that surface flat and smooth. This is necessary since we started out with sawn veneers, which by definition will have some variations in thickness.
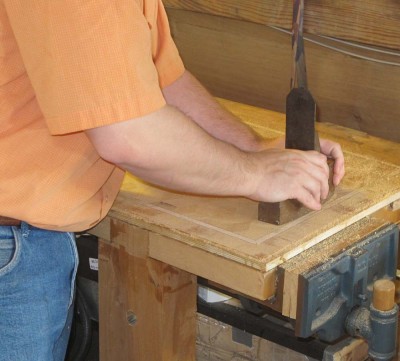
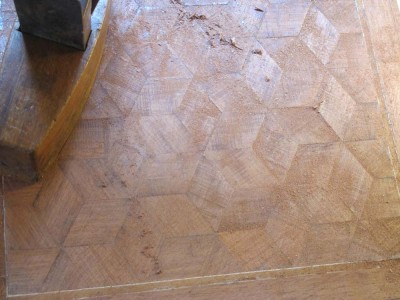
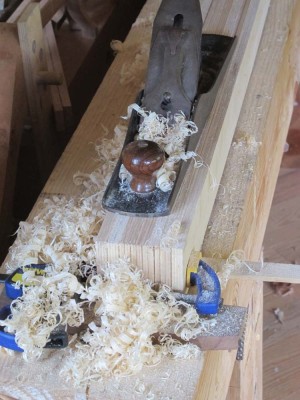
Since the grain directions run in multiple directions, the tool of preference for gross flattening in smoothing has been for over 200 years a toothing plane. A modern option includes a so-called “Japanese” rasp which is comprised of numerous hacksaw blades configured into a surfacing tool. Using this approach, the rough and irregular surface can be rendered into a flat but not perfectly smooth surface.

Following the toother or rasp comes the card scraper, either hand-held or handled, or even a finely tuned smoothing plane (I actually find my low-angled Stanley block plane to wrok perfectly for this) to yield a flat, smooth surface ready for whatever finishing regime you choose.

And, you are done!
In closing I want to thank Rob Young of the Kansas City Woodworker’s Guild for requesting and encouraging me to compile this series of blog posts to help explain the steps we were executing during the workshop I taught there. Thanks Rob!
Over the next couple of weeks I will be combining this long series of blog posts into a single tutorial which I will post in the “Writings” section of the web site, and will announce that addition to the archive here.
This morning Chris Schwarz emailed me the complete set of page proofs from VIRTUOSO: The Tool Cabinet and Workbench of Henry O. Studley for my review. I am nearly lightheaded with delight.
Forgive me while I crawl into my easy chair and spend the evening ogling the book with a red pen in hand.
I am earnestly trying to wrap up some frayed threads in the blog posts, and this one and two more will complete the tutorial on simple parquetry, which I will combine, edit, and post as a downloadable document.
===================================================
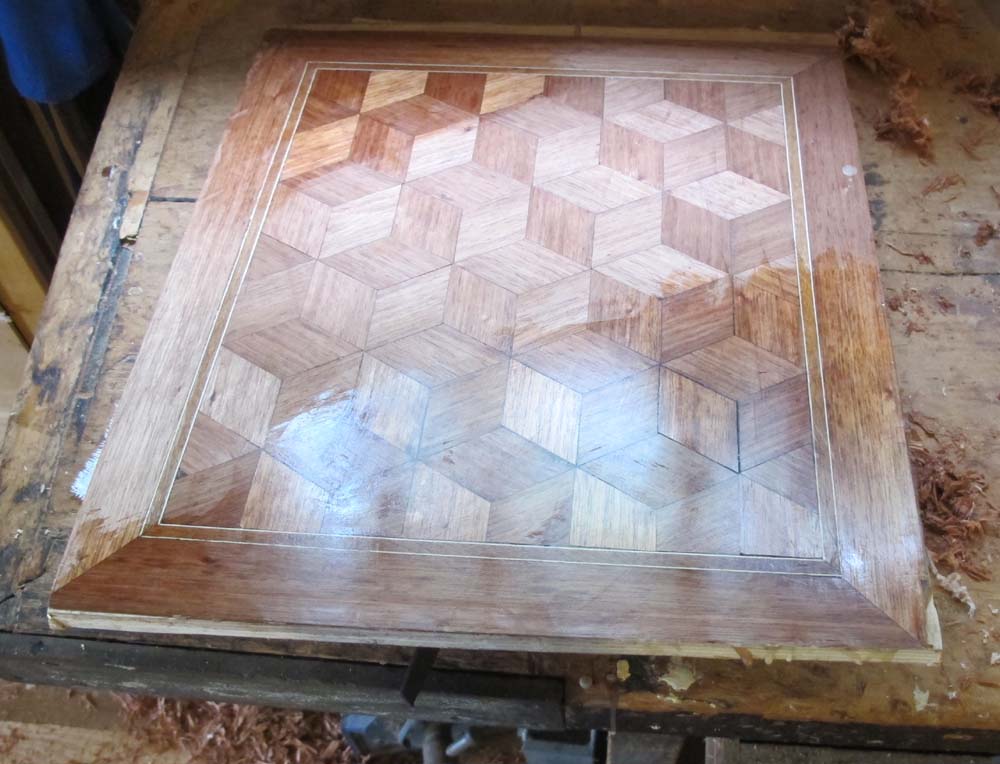
Once the parquetry composition has been assembled such that the area completed is larger than the field of the composition as it will be presented on the panel, the time has come to trim it to the exact size you want. But before that, you have to decide exactly how large you want the central field of the parquetry panel. I tend to work my way in from the edges of the panel as determined by the sizes and proportions of the furniture on which it will reside, then subtract a symmetrical border and a symmetrical banding.
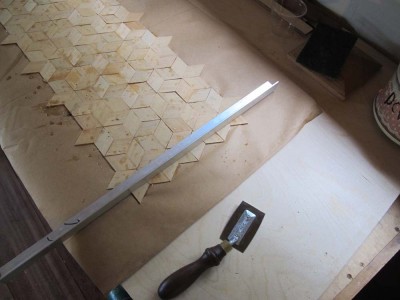
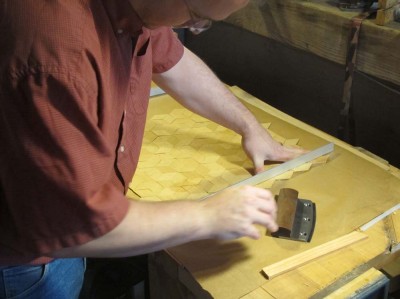
Once I have done that, I simply re-establish the center lines of the parquetry assemblage and precisely mark out its perimeter, and saw it with any of the veneer saws mentioned earlier. The desired end result is a rectangular and symmetrical composition. Once I have the field trimmed to the proper size, I re-mount the unit on a second, larger sheet of kraft paper using hot glue. It need be adhered only at the perimeter.
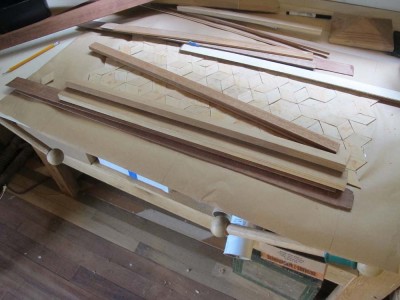
I tend to make my own banding, frequently making a simple stack of veneer faces with slightly thicker centers, assembled and glued between two cauls until they are set. Then I just rip of as many pieces of banding as the assembled block can yield.
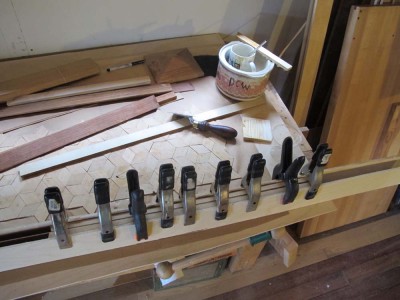

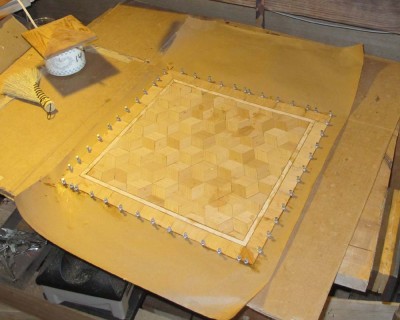
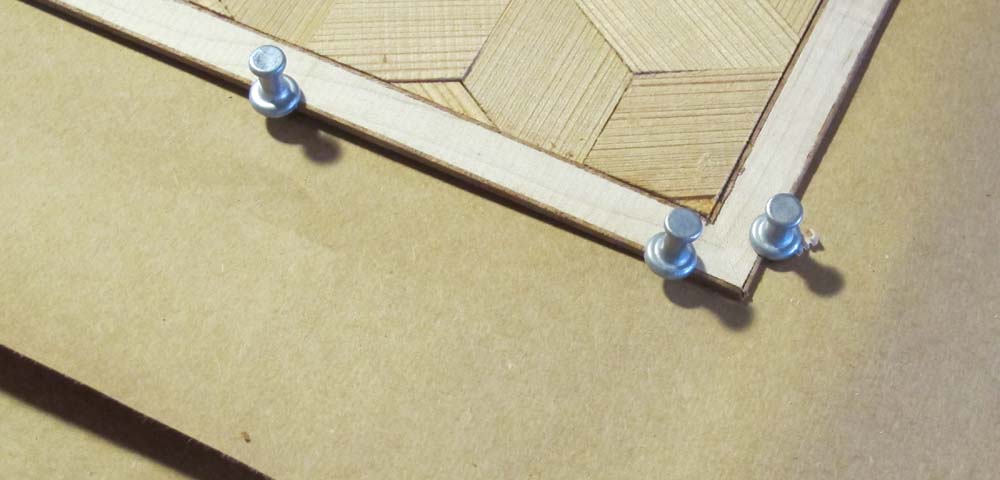
Once the banding is available, I cut them then trim the ends with a plane and miter shooting jig. Once the first piece is ready to apply, I place the entire composition on a large board with a corked surface. Then just like Roubo, I glue the banding down on top of this second piece of kraft paper, tight against the cut edge of the field, and “clamp” it in place with push pins, similar to those illustrated by Roubo. By the time I get all the way around the perimeter of the field, cutting then trimming each of the banding pieces, the piece is ready to set aside for a bit.
For the outer border, I tend to use a simple approach, often employing some of the original veneer stock in either the long-grain or cross grain orientation.
Once the banding is set I remove the pins then hammer veneer the borders in place, and the assembling of the parquetry panel is complete.
Up next – Gluing Down the Parquetry
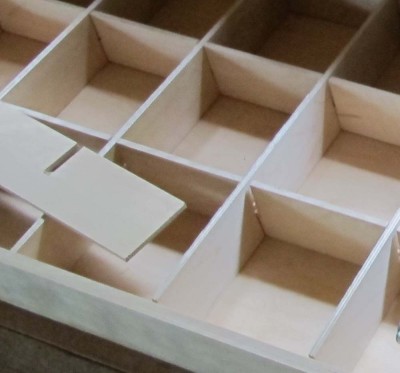
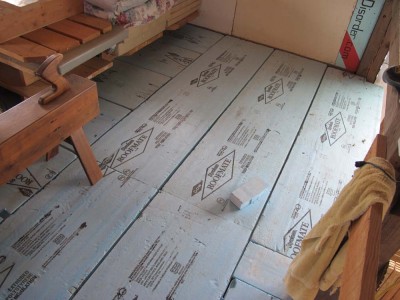
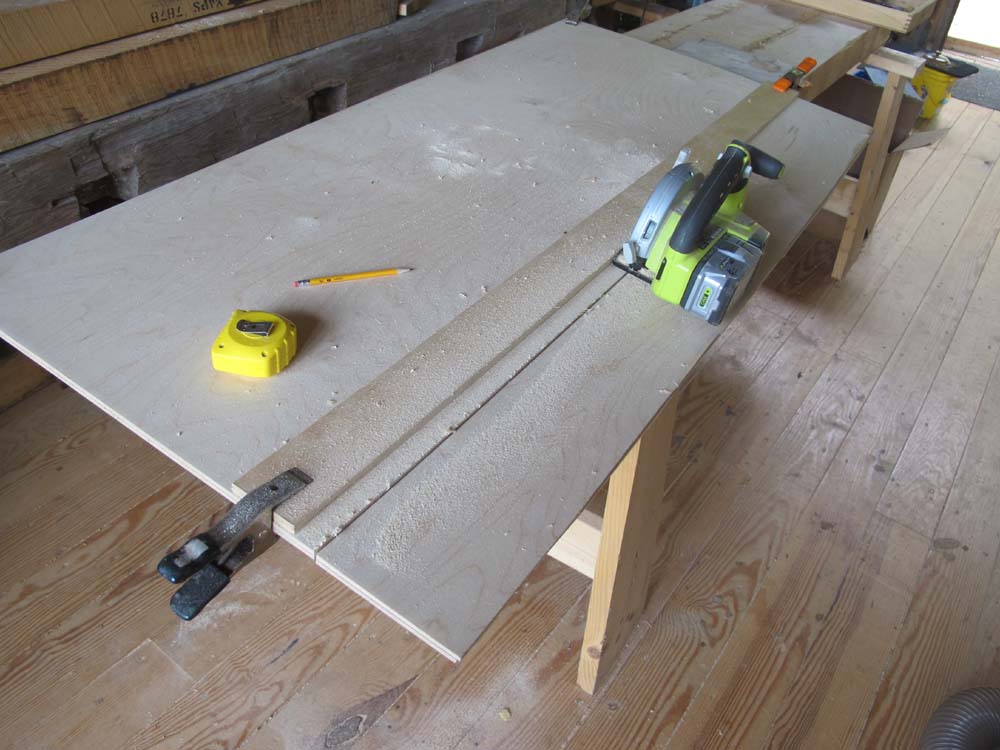
The core of the folding portable workbench functionality — light weight combined with high stiffness — calls for the “slab” to be in reality, a slab-like torsion box. To combine these two seemingly irreconcilable features, I constructed the torsion box from 1/4″ baltic birch plywood faces and grid, with 1/2″ baltic birch plywood perimeter.
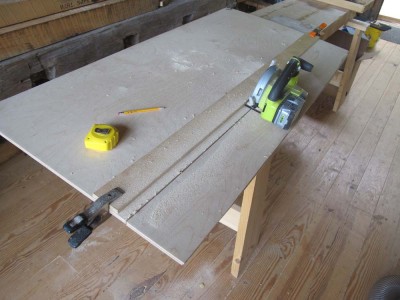
Using a power saw and a clamped-on rip fence I cut the 1/4″ faces to size, then cut the 1/4″ grid web elements and the 1/2″ perimeter exactly the same width so they would establish a planar surface when assembled. Once these strips were cut I clamped them together and planed them to be perfectly identical. The ultimate strength of the bench depends on it.
For the grid itself, I simply divided the spaces inside the torsion box into the units I desired, then cut sough of the grid web elements to that number. For example, since the torsion box top is 20″ x 60″ I used a roughly 5″ increment for the grid, meaning that I needed three long web elements and 11 short elements.
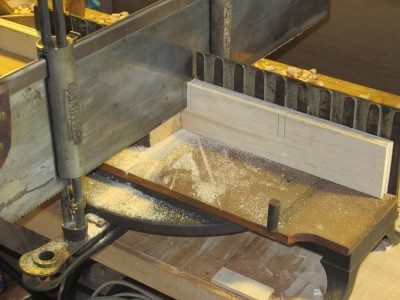
Laying out the grid to this number of units, I took the three long elements and clamped them together and marked out the spacing for the half-lap/slots that would allow for the perpendicular elements to cross over each other, then did the same thing for the eleven short elements.
Since the “joinery” at the cross-point need not be joinery at all — the two elements simply need to fit past each other, as the true strength of the beam (torsion box bench top) is established only by the character of the glue line of the web element to the faces of the box — I used my recently acquired miter box and a 1/4″ chisel to quickly chop rough openings for the intersection.
Up next – laying out the screw holes for the vise and assembling the grid.
Many times I’ve been in weather that was blustery enough to blow the hat off my head. But today was the first time I have ever experienced that my spectacles were blown off my face. This weather has been the most schizophrenic I have seen. Tropical sunshine one minute, white-out the next. It makes for a dynamic view out the window, that is for sure.
So far I’ve talked about two-and-a-half of the three legs of the stool I am sitting on in order to cope with a cold shop: 1) Isolation (reducing the drafts and minimizing the heated volume), 2) Insulation (via fixed thermal windows and a cocoon of R-43 XPS panels) and 3.1) Generation (of heat with a kerosene heater). Today I want to close out this blog arc with the 3.2) Generation of heat with a wood/coal stove section.

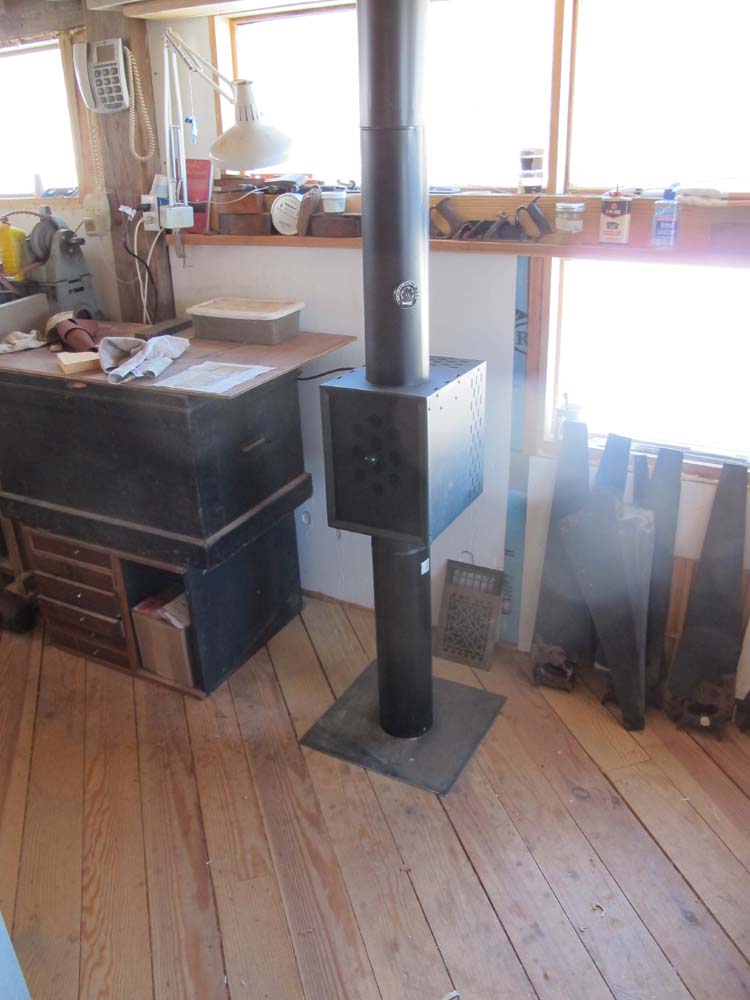
My cast iron heat stove is a Coalbrookdale Severn unit, a 500-pound British product that is no longer being manufactured. I mentioned this in an earlier blog about heating with coal. There is a lot of chat about this stove on-line, and there seems to be widely divergent opinions about it — its owners either love it or hate it, no one is ambivalent. My pal Tony scored this one for me during a renovation project he was doing, where the client wanted this stove removed and the preceding fireplace rehabilitated. Tony’s crew installed this in my barn basement last winter. I decided to put it there for several reasons.
First, I did not want to sacrifice floor space in my main shop to the wood stove, which if used perfectly safely and some amount of fuel storage would have consumed more than 10% of the available shop space. So, it was just a preferential space expression on my part. Second, having an open flame heat source in the middle of a woodworking shop was something my insurance company was hesitant about. On that point keeping it in the concrete block basement with a packed gravel floor made sense. Another reason is that the space in the basement is not to be an unused space, in fact it will be my machine shop. Nothing is colder than handling tons of freezing cold iron, so having the main heart source down there is a big plus. Finally, heating that space will keep the floor in my shop warmed, so I won’t be standing on a cold floor all the time.
Using the stove, especially for coal, is a bit tricky. The firebox is really small, so if I am burning wood I need to tromp down stairs every 90 minutes or so to put more wood in. I am still trying to get the hang of using coal. There must be a special technique for igniting anthracite, of which I have some inventory, but once it gets going it goes gangbusters.
Still, I was wrestling with the fact that the heat distribution from the stove was pretty much passive, and would take almost all day to get the studio warm enough. I didn’t want a complicated, dynamic distribution system that would need a lot of gadgeteering and monitoring/maintenance, but I definitely needed to find a better way to get the heat from the firebox into the studio a lot quicker.
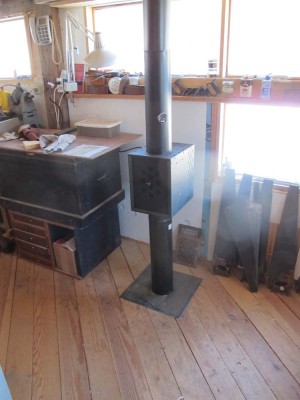
I recently acquired and installed an accessory to enhance the wood/coal stove dramatically, namely this heat recovery unit that fits in line with the stove pipe. It has been thus far a remarkable addition to the heating system for the shop. Once the stove gets heated up, the thermostatically controlled fan in the heat recovery unit kicks in and it starts gently blowing hot air into the shop space, and if I keep the fire in the stove going, it keeps the shop warm enough that I generally peel off my vest in short order.
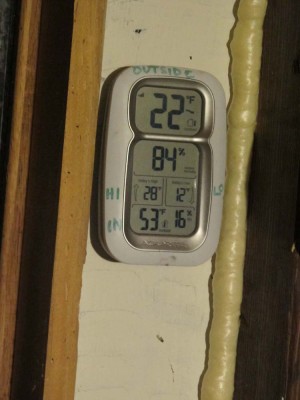
So, my typical shop day heating cycle begins with me lighting the kerosene heater when I first get there, then trekking downstairs to start building up the heat in the cast iron stove, then back up to the studio to start working. Before I know it, the fan for the heat reclaimer comes on and I soon turn off the kerosene heater as the temperature climbs quickly to about 60 degrees, which suits me just fine. With a little fire maintenance throughout the day I am entirely comfortable working in the studio. Once I get the real hang of the coal fire, I can probably cut down on the fire maintenance to once in the morning and once at night.
Now that I’ve got the space envelope dealt with via isolation and insulation — i.e. keeping the outside out and the inside in, a concept I invented — let me turn to how I deal with the third point of the triangle, namely generating heat. As a facilities designer once told me, “If your envelope is tight enough you can heat the space with a light bulb.” Well, mine isn’t, and besides, in the Age of the Nanny State incandescent bulbs are apparently part of some crazy scam having to do with Gaia Apocalypse. You just can’t make this stuff up sometimes.
Anyhow, I had long been skeptical, at best, about kerosene heaters in a tightly enclosed space. After talking to my friend Dennis, whose hardware store I have patronized since the days when his dad was in charge, I decided to take a chance and give it a try. They do have the distinct advantage of being relatively inexpensive to purchase, especially if you buy them in late March like I did, and before the current anti-energy regime in Mordor on the Potomac they were cheap to run (this witless cabal promised to raise fuel prices to the moon, and they did their best to keep that promise!). But I was concerned about the stench of them in a closed shop, and their ultimate safety from fire and toxic fumes.
As I have learned in the past months these concerns, while not irrelevant, are not of the level I had thought.
Regarding the odor of the kerosene heaters, I learned that all kerosenes are not alike. Some are stinkier than others, and even if they are K-1, I can tell the difference between local kerosenes. I naturally purchase mine from the better supplier. Second, it is really important to keep a clean wick in the burner. If you notice the smell of burning kerosene when you first come into a heated space, you need to think seriously about swapping the old wick for a new one. I plan to make it a routine to swap out mine at the end of the winter every year. And third, I make sure not to hit the “Off” lever on my heater until after I take it out into the unheated (and better ventilated) part of the barn. This is because the wick is on a spring loaded rack, and it snaps off in an instant when you hit “Off.” This means that the hot wick frame will volatilize some of the kerosene on the wick and introduce a tiny bit of the kerosene vapor into the air. It’s not a hazard, but it does stink.
As for fire risks, they seem to be pretty small as almost all modern kerosene heaters have automatic cut-offs when the units are jostled hard or even if they were knocked over.

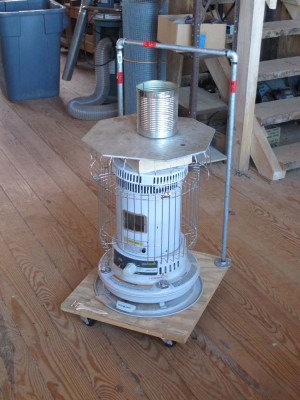
In use I employ a few enhancements for my heater which in my observation increases dramatically it utility and efficiency. These allow a single 18,000 BTU heater to keep a 3000 cubic foot space comfortably usable, but not quite to the level of cozy.
First, I removed the carrying handle from the unit and placed it instead on its own rolling cart, complete with a handle made from hardware store pipe. This allows me to move the heater without having to pick it up or handle it directly. Second, and perhaps the most important thing, I placed a couple of fire bricks directly on top of the combustion chamber. The bricks heat up and then radiate the heat into the space rather than working solely by convection. I feel that this increases dramatically the efficiency of the heater. Yes I know it does not “create” more BTUs, it just captures them and distributes them differently, and in my experience, better.
I add even more thermal mass with an octagonal shelf of 1/4″ aluminum diamond plate resting on the top grill. This not only increases the heated mass and thus the radiant heat distribution, but it beneficially disrupts the convection coming up through the combustion chamber and distributes it more widely by diverting the hot air around the shelf, pushing it out into the room. Besides, it’s nice to have a warm shelf for the glue pot to sit on, and sometimes my tea kettle for tea (or hot chocolate if Mrs. Barn isn’t watching).
So, how well does it work? I think pretty darned well. There are times when I am only in the shop for a while, or first thing in the day before the cast iron stove gets cranking, and the kerosene heater raises the temperature in the shop 15, 20, or even 25 degrees. That is not bad. I find that in the dead of winter I use about 1/10 of a gallon of fuel per hour with the kerosene heater, which for me works out to about $20/week. From where I sit, making a cold shop usable space for $20/week is a great deal.
My final concern was health, but once I thought about it I realized that the primary byproducts of kerosene combustion are soot and water vapor. I don’t mind the water vapor at all, and as long as I use premium kerosene and have a clean wick, it’s not a problem. Still, I keep a carbon monoxide monitor hanging on the wall a few feet away, generally a good idea whenever you are using open-combustion heat source in an interior space.
In short, I am exceedingly pleased with how my kerosene heaters perform (I actually have two, but only use one in the studio with the other out in the main barn space for whenever I need localized heat for something). I’m even thinking of getting a much smaller one to keep in the bathroom which isn’t heated, the use of the unheated bathroom bringing back memories of using the open air privy in the dead of winter when my dad was pastoring a tiny country church in Minnesota. Now THAT was cold!
Up next, supercharging my cast iron stove.
PS As I head up the hill to the barn, it is snowing sideways. Literally sideways. We are expecting several inches of snow and 50 mph winds today. It is good to have heat!
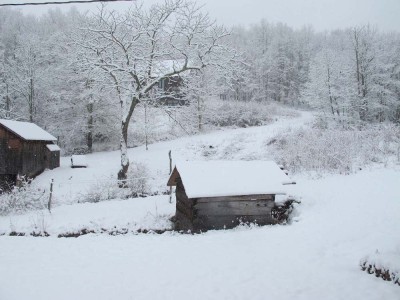
The scene outside on Monday gave me a moment to reflect on the fact that we have made it to the halfway point of our first winter on the homestead. No, the Virginia Highlands are not the arctic climes challenging woodworkers Joshua Klein in Maine, Derek Olsen in Wisconsin, much less Dan or Jonathan in Alaska, but it does get cold here. Certainly, much colder than our past three decades living just south of DC. Here the temperatures, snowfall, and blustery winds are much more in tune with upstate New York, and my pal Mike and I frequently compare notes on the subject; we get pretty much the exact same weather, just three days apart. Near and sub-zero temperatures and wind chills are common. I don’t care where you are from, -7 degrees with 40 mph winds like we had three weeks ago is cold.
In part I have learned about the coping with cold, but more realistically I have been reminded of dealing with it. Sure, I grew up in Minnesota, but 1) it was southern Minnesota, the tropical part, and 2) I left there 48 years ago. This short series of blogs will recount those things I’ve learned or remembered about working in the shop in winter, and making it less wintery than it would be otherwise.
The three things that are definitely true for my barn in the mountains, and presumably your shop in whatever cold place you are, is that you need to 1) Isolate, 2) Insulate, and 3) Generate (heat, that is).
1) Isolation
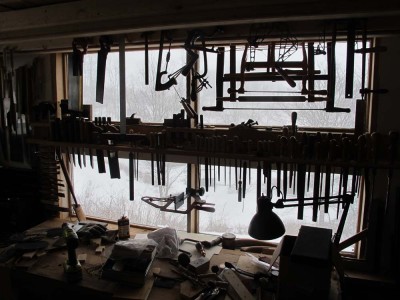
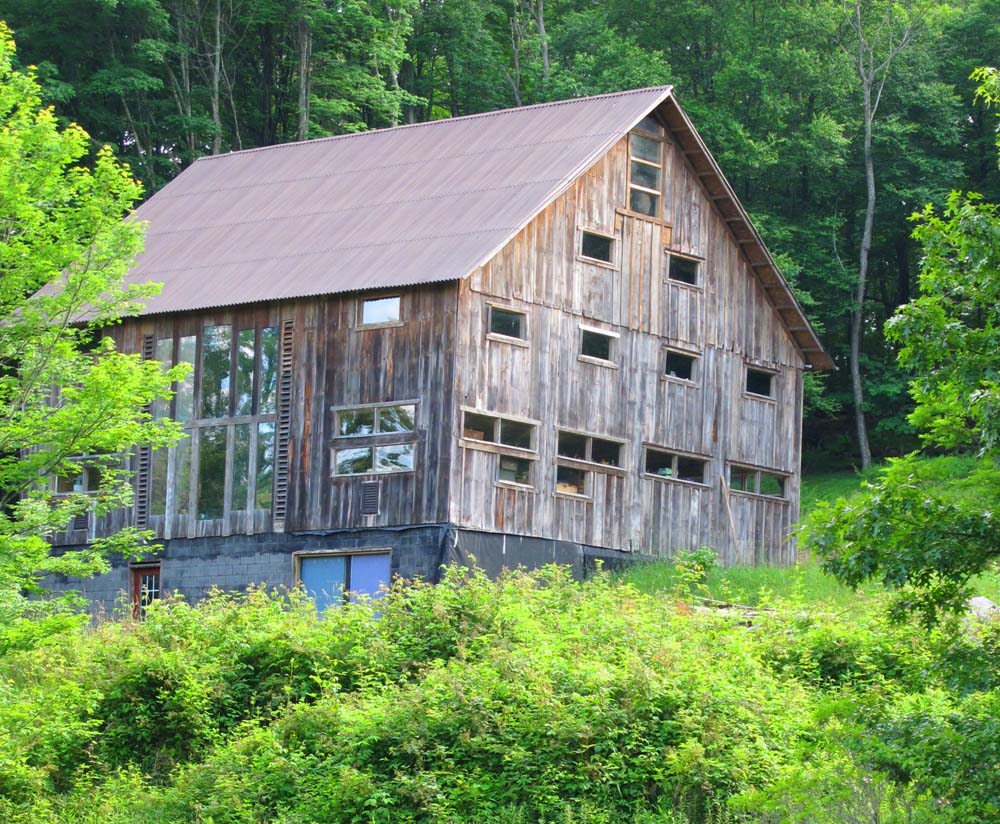
One of the first decisions I reached when configuring the barn over the past many years is that there was no way I would, or could, heat all of it or even much of it. Instead I isolated my own primary studio space, the continuous row of windows on the north end of the barn, was the only space to be fully heated. Even though the outer skin of the barn is 1×12 vertical siding with battens, that was applied over a continuous inner wind barrier.

The windows are all fixed panel thermal units I bought from a building salvage outfit in Toledo, and I spent considerable time tightening all the corners of the room and around the windows. It took a lot of time and several tubes of caulk and cans of foam insulation, but it was definitely worth it.

One of the great (?) things about living in the Allegheny Highlands is that the winds howl with regularity, so any leaks are pretty readily located. On windy days I checked around all the likely locations for air loss, and closed them up.
Another thing I’m thinking about adding to the isolation scheme is to hang extra-long transparent shower curtains about ¾ down the length of the studio, reducing the overall volume that needs to be heated. Once I do that and finish making the fitted thermal doors to the studio it should be plenty cozy.
Insulation
The basement of the barn is insulated from the ground by some R-30 polyisocyanurate foam panels on the outside of the concrete block walls, and several years ago I had the good fortune to come along a construction site where they were throwing out a mountain of R-43 XPS panels from an industrial scale renovation. Naturally, I made several trips with my truck and trailer to scarf up all I could. Now all the walls of my studio are fully insulated with this material (coincidentally perfectly sized to fit into the space left by 4×4 framing), so they are in good shape.
In preparation for winter, I take another stash of the same insulation panels and lay them snugly on the floor of the balcony immediately above my studio, so in effect the walls and ceiling are all insulated with R-43 panels. I’ll probably think about leaving it in place and simply laying ½” plywood on top as the new floor.
The other insulation well worth mentioning is that sheath of insulation I wear. Come wintertime, I routinely wear finely woven inexpensive thermal underwear bottoms from the Vermont Country Store, or flannel lined khakis I got from Cabelas. On top I wear a long sleeved t-shirt, a heavyweight flannel shirt, and sometimes an insulated vest, along with a warm cap. One good thing about losing 100 pounds is that your long-johns are not crowding.
That’s it for Isolation and Insulation. Up next: Generation 1 (Kerosene heaters).


Recent Comments