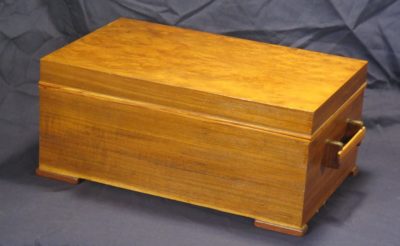
Recently my brother visited and dropped off a box I made for all the cards our parents received on their 50th wedding anniversary in 1993 (my older brother and his wife celebrated their 50th a couple weeks go and Mrs. Barn and I celebrated our 40th anniversary recently).
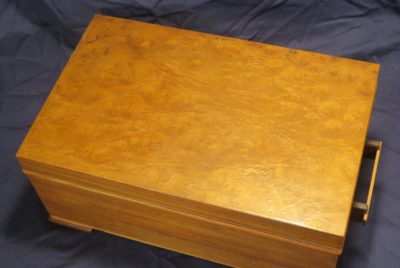
My memories of the project are a bit hazy, but I am pretty sure the core substrate is 1/2″ baltic birch plywood with walnut veneer for the sides and an unidentified figured veneer for the top.
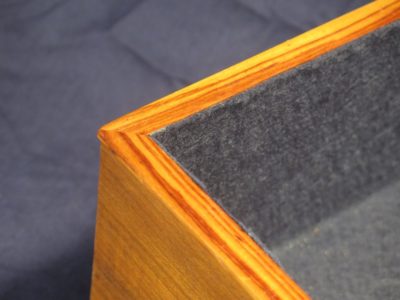
The trim woods were tulipwood (dalbergia) and macassar ebony. It’s had a few bumps and bruises over the years but my mom had it displayed prominently in her bedroom during her final years. In retrospect I still find it a beautiful reflection of a loving marriage that ended with my dad’s death only a month before their 60th anniversary. Every time I cast my eyes on it I will celebrate their years together, and ours as well.
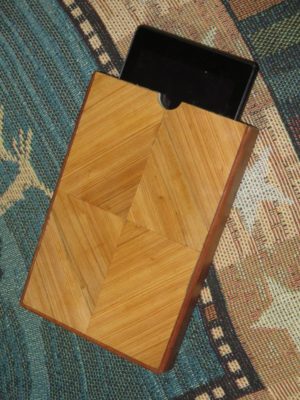
Given the nature of the smaller Kindle case I was making for Mrs. Barn’s 5×7 Kindle, as opposed to my earlier book style case for my own 8×10 Kindle, the assembly and finishing took a different path. Her smaller Kindle led me to create a “calling card case” style container into which the Kindle would be inserted, rather than the bookcase for my larger Kindle, into which the Kindle would be closed within folding panels.

This meant that the process for completing the assembly was entirely different as the interior had to be finished before the case was assembled, rather than after assembly with my case. Making sure the two halves of the case fit precisely I then glued the interior felt lining in place, leaving the case gluing margins clear. However, before I glued in the felt I glued a piece of thin polypropylene foam to the wood panels to assure a gentle pressure on the Kindle once it was slid in to prevent it from falling out due to too loose a fit. Dry fitting the pieces together with the Kindle in place to make sure I had the spacing correct, I then was able to glue the two halves together with PVA making sure to not have excess glue squeezing out into the interior space.
A little trimming and sanding followed by shellac and wax, the case was ready for Christmas and use as she travelled back and forth to the West Coast. Given the unfolding circumstances ex poste, namely the death of her dad in mid-January and our own family Christmas taking place in late February, the case may never be used for its intended purpose of frequent coast-to-coast travel. Nevertheless it was a pleasant and instructive exercise.

The design of the new Kindle case for Mrs. Barn’s smaller Kindle was a bit tricky as my idea was to create a version of a Victorian card case, in which the Kindle would reside. This meant that the tolerances for fitting it were closer than with mine, although that is a snug fit, but this one needed to slide in and out of one end of the case without being too loose or too tight. Armed with my home made plywood panels and a precise tracing of the Kindle I set to getting the pieces cut to size.

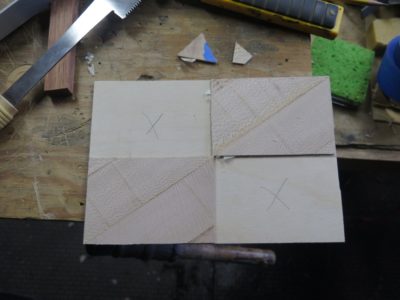
From there I began laying out the veneer patterns using some left over scraps from other projects. Unfortunately my first effort was a catastrophe as I failed to tape the elements in place before gluing them down under free weights. I tell myself that I was trying to keep too many Christmas gift projects in the air at once, but the simple fact is I just forgot to do what I should. Thus, the veneers shifted during gluing and were in the wrong place. Since I was using PVA the effort to remove and re-start would have been odious so I just tossed that piece and started that panel over.

I made sure to get it right the second time as I was almost out of the sawn rosewood veneer.


The second panel was done with sycamore, its bold fleck providing some real dynamism to the composition.
I made sure to tape the veneer compositions in place this time, and they turned out as they should.
Next time – assembling and finishing.
In recent years Mrs. Barn had been traveling to the West Coast several times a year to attend to her dad in his failing health. Normally she would not even carry any luggage beyond a small carry-on bag, so she left her laptop at home and just took her small Kindle. After making my prototype Kindle case last year I decided she needed a nice case to protect her smaller Kindle during her travels, so it was on my agenda for Christmas. I got it done just in time, but then we had to postpone our family Christmas for three months due to a variety of circumstances, not the least were my mother’s funeral, my father-in-law’s death and funeral, my son-in-law’s inadvertent exposure to someone with the ‘Rona, my daughter’s need for self-quarantining for work travel…

As with the first case I started by making my own veneer-core plywood using the abundant ash veneer from my stash using West System epoxy as the binder, under the dead weight of a stack of fire bricks. I am becoming even more smitten with this type of sheet good and may try to figure out how to make larger panels to employ in other projects. I have used Baltic birch plywood as my “go to” for years, and still rely on it a fair bit. But the veneer-core plywood is just something special. I guess I’m gong to have to make a large veneer press to make it happen.

Much of the goings-on in the shop are Christmas-gift related and therefore must wait a while before recounting them on this page. But one recent veneering exercise revealed the foibles implicit in being distracted by other activities, and what happens when you (by that I mean me) lose your concentration.

I was creating a fairly simple pattern from some rosewood veneer and everything went well and I managed to assemble the pattern with one little scrap I had to use.
When I glued down the veneer to the substrate I simply forgot to anchor the composition into the correct place on the panel, and lined it up free then placed the caul and clamps. Of course the whole thing shifted under the weigh pressure and I saw the next day that everything was out of whack.

I tried to lift the veneer by soaking it with acetone, but it was too set for that to work. All I accomplished was tearing everything up. It was off and that was that. Now it’s off to the trash can.
Now my only question is, was this simple rookie mistake or a geezer mistake?.
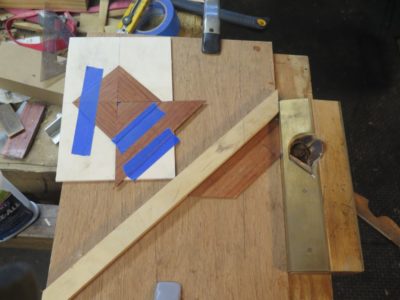
In many instances, cutting dovetailed open mortises through a Roubo bench top for example, a 30-60-90 layout gauge only has to be “close enough,” however you define that term. All one layout line has to do is match another layout line, and as long the two lines are struck with the same tool off the same reference plane all is well.
During last year’s workshop we all made one or two of these triangles, and like I said above, they work just fine. Laying out the hypotenuse with dividers was all that really needed to accomplish (the hypotenuse of a 30-60-90 triangle is exactly twice the length of the short leg), using my Chris Vesper sublime refence square for the 90-degree corner.
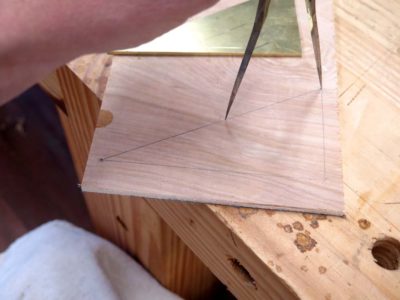
But what happens when you have to create a series of lines coming from different places, and they establish the perimeters of pieces that must match each other precisely? That is exactly the case of laying out a basic “starburst” or “dice” pattern parquetry composition. I used to be content with simply laying out a sawing jig using a small plastic triangle from a middle school geometry class set, but since I have moved to shooting the edges of all the lozenges to minimize the joints even more, I needed to make myself a truly precise triangle square to set the fence for the shooting board.
Starting with one of the brass triangles left over from the workshop two summer ago I determined to make a 30-60-90 square that fit the bill. Once I had the angles perfect I could then solder on the shoe to the short leg of the triangle.
Tomorrow I will show how I did just that with a bench top geometry version of a Covid/PCR test, using a piece of paper and two popsicle sticks.


With the two halves of the Kindle case ready, I glued on band of leather to bring the two of them together. The gluing was only to the faces of the case with the back edges unglued so that the case could be folded open with the two halves face-to-face.

Once the two halves were put together I took some scrap felt from my rag bin and glued that into the cavity holding the Kindle. That was a nice effect, except for where I slipped with the razor blade while trimming the felt and cut off some of the cypress veneer. I hate when that happens, and will repair it when I get a chance.

With everything together and complete I spent a little time padding on some more shellac. I will probably repeat this periodically to build it up a bit more, but I wanted the case to get to work. I stuck on some velcro dots at the two corners to hold it together when not in use and called it “finished.”

A few days ago blog reader (and the Lou Gehrig of the woodworking blogosphere) RalphB asked about my use of the pumice block to smooth the surface of my parquetry Kindle case. The use of pumice blocks is well documented in historical accounts, although explicit or specific details are often missing.
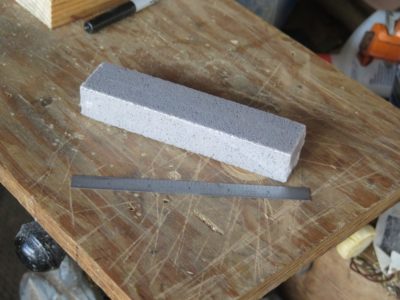
I use a pumice block from the plumbing section of the hardware store (I order them by the case). Normally they are used for deep cleaning of porcelain and enameled fixtures to remove mineral deposits and stains. They work equally well for evening out irregular wood surfaces such as those found when assembling parquetry or marquetry from sawn veneers, where regardless of the care in the initial veneer sawing a fair bit of irregularity is manifest.
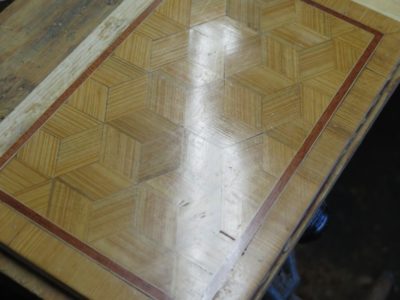
I generally use a pumice block as the step following the toothing plane/Shinto rasp, moving the block in a circular fashion on the substrate, yielding a fairly smooth and even surface about what you might expect with 60 or 80 grit sandpaper. Following the pumice block with a card scraper and polissoir, the result is quite pleasing.
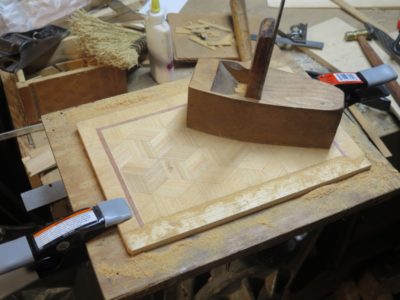

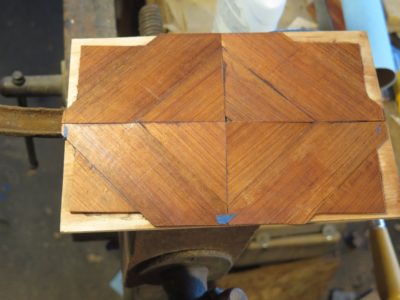
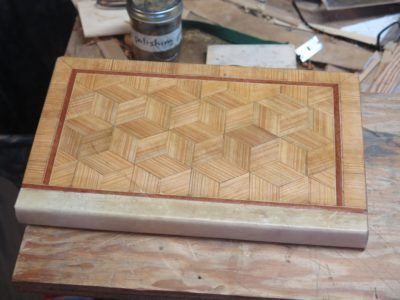
Once all the veneerwork was finished and the banding in place it was time to flatten all these irregular surfaces. Using a variety of tools, including a toothing plane and a Shinto rasp, I soon had things even enough to use a pumice block to smooth everything out.
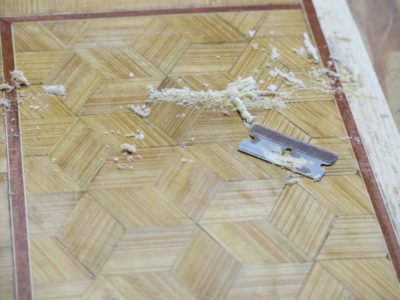
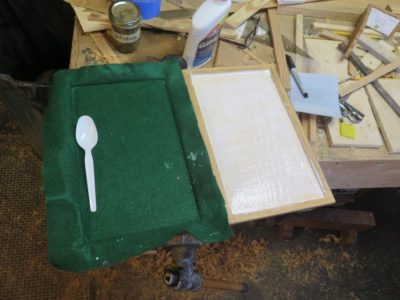
With my tacking iron I impregnated all the show surface with a generous application of molten Blend 31 wax to serve as a grain filler and foundation for a little bit of padded shellac yet to come. Using a fresh single edge razor I gently scraped off the excess wax to get down to the smooth surface, which was evident when I buffed the scraped surface with a piece of linen. Little places of voids were filled in with more molten wax after the buffing revealed them.

The two halves of the Kindle box are different because I was mostly trying to use leftovers from other projects.

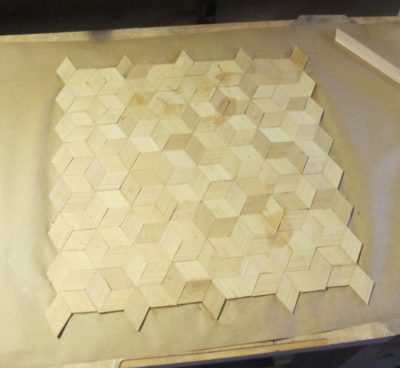
In laying out the first of the parquetry patterns I was finding peace and solitude while listening to an audio book rather than news or similar podcasts. As always I laid out the patterns on kraft paper, gluing the pieces in place with a dab of stick adhesive. Once I had built the pattern beyond the boundaries of the field I flipped it over and glued it “face down,” this time with PVA since I needed an adverse-environment-resistant construction. Using a foam sheet between the paper and the plywood caul assured the pieces would conform intimately with the substrate. Their irregularities on the surface are irrelevant as the surface will be smoothed to a finished foundation.
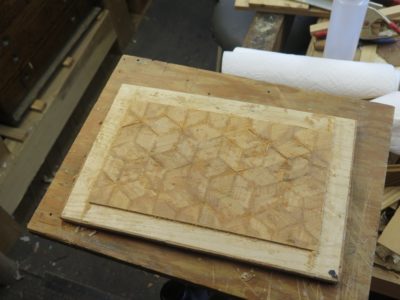

Using a straight edge and my Japanese mortise saw I trimmed the field to the designed size. I noted with interest the amount of curve that was introduced to the homemade epoxy/veneer plywood through the use of the water-based PVA emulsion to lay down the parquetry. Fortunately that cupping diminished in about 72 hours.
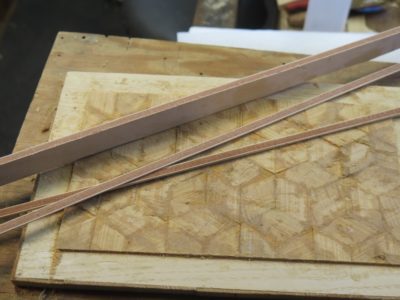
It was then time to saw the simple banding strips from a block I made long ago, fitting the corners with a 45-degree shooting board, then glued them in place along the perimeter of the field.
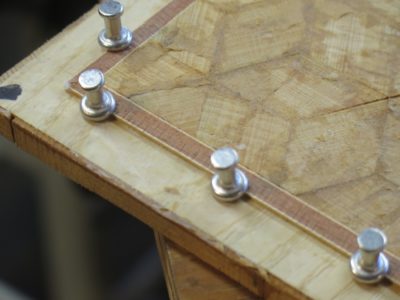
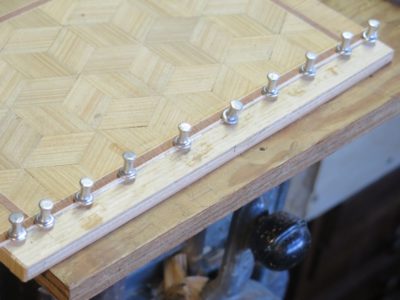
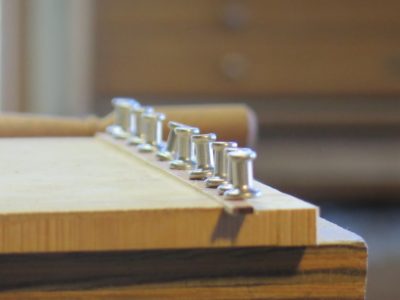
I have found the best method for holding the banding in place during the gluing is essentially the same as described by Roubo — wide head pins.

The next day I laid the edge decoration, which was just thin, cross-grained pieces of the sawn veneer. Once those were done I began the process of removing all the thickness variations and creating the perfect foundation for the finished surface.

Recent Comments